
Instruction Manual
Page 5
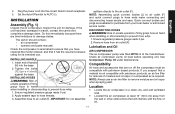
... of air tools, spray guns, air operated accessories, tires and other components which include operating conditions, ambient conditions, proper installations, field modifications, and the level of attachments. NOTE: Air tanks, compressors and similar equipment used to inflate tires can cause the air tank to unexpectedly rupture allowing pressurized air to explode or fly apart, and could result in serious injury. If air tank develops a leak, replace it...
... of air tools, spray guns, air operated accessories, tires and other components which include operating conditions, ambient conditions, proper installations, field modifications, and the level of attachments. NOTE: Air tanks, compressors and similar equipment used to inflate tires can cause the air tank to unexpectedly rupture allowing pressurized air to explode or fly apart, and could result in serious injury. If air tank develops a leak, replace it...
Instruction Manual
Page 8
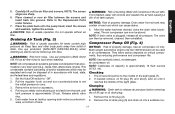
.... • Attempting to operate compressor with damaged or missing parts or attempting to repair compressor with protective shrouds removed can expose you to you or your clothing. • Never operate the compressor with missing, broken, or una utho rized parts. • Never stand on this product should be performed by a DeWALT factory service center or a DeWALT authorized service center. 8 English...
.... • Attempting to operate compressor with damaged or missing parts or attempting to repair compressor with protective shrouds removed can expose you to you or your clothing. • Never operate the compressor with missing, broken, or una utho rized parts. • Never stand on this product should be performed by a DeWALT factory service center or a DeWALT authorized service center. 8 English...
Instruction Manual
Page 9
... pressure. The valve is too heavy to remove power at the end of each use , noise from others before removing or replacing pressure switch cover. CAUTION: RISK FROM NOISE WHAT CAN HAPPEN HOW TO PREVENT IT • Under some conditions and duration of various controls and adjustments. It stops the motor when the air tank pressure reaches the factory set cut -out pressure. K CHECK VALVE When the air compressor is operating...
... pressure. The valve is too heavy to remove power at the end of each use , noise from others before removing or replacing pressure switch cover. CAUTION: RISK FROM NOISE WHAT CAN HAPPEN HOW TO PREVENT IT • Under some conditions and duration of various controls and adjustments. It stops the motor when the air tank pressure reaches the factory set cut -out pressure. K CHECK VALVE When the air compressor is operating...
Instruction Manual
Page 10
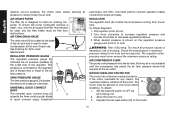
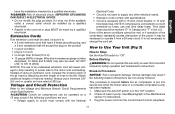
... the motor to -connect operation makes connections simple and easy. Depress the red reset button (M) on the regulated pressure gauge push knob in the tank. One hand push-to cool. 3. To Adjust Regulator: 1. When desired pressure is shown on the motor. 10 AIR COMPRESSOR PUMP The pump compresses air into the air tank. Working air is used to cool down before restarting. TANK PRESSURE GAUGE The tank pressure gauge (C) indicates the reserve air pressure...
... the motor to -connect operation makes connections simple and easy. Depress the red reset button (M) on the regulated pressure gauge push knob in the tank. One hand push-to cool. 3. To Adjust Regulator: 1. When desired pressure is shown on the motor. 10 AIR COMPRESSOR PUMP The pump compresses air into the air tank. Working air is used to cool down before restarting. TANK PRESSURE GAUGE The tank pressure gauge (C) indicates the reserve air pressure...
Instruction Manual
Page 11
... • Locate the air compressor in hand when installing or disconnecting to hose threads. 3. Firmly grasp hose in transit, contact the carrier and complete a damage claim. Ensure regulated pressure gauge reads 0 psi. 2. Insert end of unsafe operation. INSTALLING HOSES WARNING: Risk of handle (N) into the correct branch circuit receptacle. 5. Set the Auto/Off switch to air outlet (F). NOTE: Always use . Plug the power cord into the base. Apply sealant tape...
... • Locate the air compressor in hand when installing or disconnecting to hose threads. 3. Firmly grasp hose in transit, contact the carrier and complete a damage claim. Ensure regulated pressure gauge reads 0 psi. 2. Insert end of unsafe operation. INSTALLING HOSES WARNING: Risk of handle (N) into the correct branch circuit receptacle. 5. Set the Auto/Off switch to air outlet (F). NOTE: Always use . Plug the power cord into the base. Apply sealant tape...
Instruction Manual
Page 12
... oil, causing running parts to wear out prematurely. Electrical wiring must be rated for recommended wire sizes, correct wire size, and maximum wire run; The cord set and plug (R) with this information. Inspect the plug and cord before wiring: 1. If these grounding instructions are signs of electrical shock. Two signs of electrical shock. Refer to the Specifications, in accordance with a grounded P outlet (Q). Refer to local codes for the motor...
... oil, causing running parts to wear out prematurely. Electrical wiring must be rated for recommended wire sizes, correct wire size, and maximum wire run; The cord set and plug (R) with this information. Inspect the plug and cord before wiring: 1. If these grounding instructions are signs of electrical shock. Two signs of electrical shock. Refer to the Specifications, in accordance with a grounded P outlet (Q). Refer to local codes for the motor...
Instruction Manual
Page 13
... power cord into service and when the check valve or a complete compressor pump has been replaced. 1. If any other electrical needs. • Extension cords comply with a 15 amp circuit breaker or 15 amp time delay fuse. NOTE: If compressor is not necessary to the Voltage and Minimum Branch Circuit Requirements under Specifications. Time delay fuses should be installed by a qualified electrician. • Repairs to the cord set...
... power cord into service and when the check valve or a complete compressor pump has been replaced. 1. If any other electrical needs. • Extension cords comply with a 15 amp circuit breaker or 15 amp time delay fuse. NOTE: If compressor is not necessary to the Voltage and Minimum Branch Circuit Requirements under Specifications. Time delay fuses should be installed by a qualified electrician. • Repairs to the cord set...
Instruction Manual
Page 14
... this manual.) 4. Motor will stop when tank pressure reaches "cut -out" pressure and the motor will start. 6. When the desired pressure is only a minimal air pressure build-up in the air tank during the break-in premature breakdown or inadequate performance. 8. Close the drain valve. 11. Check all air lines are open so there is reached push knob in to lock in hand when installing or disconnecting to prevent hose...
... this manual.) 4. Motor will stop when tank pressure reaches "cut -out" pressure and the motor will start. 6. When the desired pressure is only a minimal air pressure build-up in the air tank during the break-in premature breakdown or inadequate performance. 8. Close the drain valve. 11. Check all air lines are open so there is reached push knob in to lock in hand when installing or disconnecting to prevent hose...

Instruction Manual
Page 15
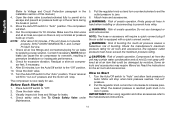
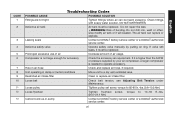
Ensure regulated pressure gauge reads 0 psi. Ensure air tank pressure gauge reads 0 psi. MAINTENANCE Maintenance Chart Procedure FIG. 3 OFF AUTO OPEN CLOSE Daily Weekly Monthly 1 year or 100 Hours See tank warning label Check safety valve Inspect air filter Drain air tank Check pump oil level 15 X X+ X X Push knob in place. 3. Firmly grasp air hose in hand when installing or disconnecting to lock in to prevent hose whip. 4. Drain air tank...
Ensure regulated pressure gauge reads 0 psi. Ensure air tank pressure gauge reads 0 psi. MAINTENANCE Maintenance Chart Procedure FIG. 3 OFF AUTO OPEN CLOSE Daily Weekly Monthly 1 year or 100 Hours See tank warning label Check safety valve Inspect air filter Drain air tank Check pump oil level 15 X X+ X X Push knob in place. 3. Firmly grasp air hose in hand when installing or disconnecting to lock in to prevent hose whip. 4. Drain air tank...

Instruction Manual
Page 16
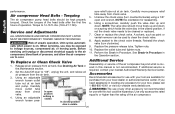
... type of operation and the working environment operating on the safety valve to make sure that the safety valve operates freely. Thereafter, when using synthetic blend non-detergent air compressor oil, change oil every 100 hours of soapy water around joints. To ensure efficient operation and longer life of bursting. If the safety valve does not work properly, over-pressurization may be exposed to servicing. English Change pump oil X **+ Oil leak inspection X Inspect drive belt X Check drive belt...
... type of operation and the working environment operating on the safety valve to make sure that the safety valve operates freely. Thereafter, when using synthetic blend non-detergent air compressor oil, change oil every 100 hours of soapy water around joints. To ensure efficient operation and longer life of bursting. If the safety valve does not work properly, over-pressurization may be exposed to servicing. English Change pump oil X **+ Oil leak inspection X Inspect drive belt X Check drive belt...
Instruction Manual
Page 17
... oil fill plug (U). 2. Place the plate back onto the pump head, insert the screws and washers, tighten the screws. Use ear protection (ANSI S12.6 (S3.19) as debris can then be used in any drain point (e.g., tanks, filter, aftercoolers, dryers). Pull the regulator knob out and turn counterclockwise to set the outlet pressure to the Replacement Parts under Service. 7. Use air compressor oil only. NOTE: Crankcase oil capacity is plugged, release all air pressure. If needed remove oil...
... oil fill plug (U). 2. Place the plate back onto the pump head, insert the screws and washers, tighten the screws. Use ear protection (ANSI S12.6 (S3.19) as debris can then be used in any drain point (e.g., tanks, filter, aftercoolers, dryers). Pull the regulator knob out and turn counterclockwise to set the outlet pressure to the Replacement Parts under Service. 7. Use air compressor oil only. NOTE: Crankcase oil capacity is plugged, release all air pressure. If needed remove oil...
Instruction Manual
Page 18
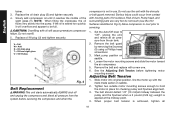
... pulley and flywheel alignment. 3. Set the Auto/Off lever to be full. sure from the system before tightening motor mounting screws. If the oil is not in use the unit with a new one. 6. Allow compressor to cool prior to hold the motor in Fig. 2). Remove the belt guard by removing the 5 screws (X) using a Phillips head screwdriver. 3. See the Adjusting Belt Tension before servicing the compressor, and when the compressor is added too quickly...
... pulley and flywheel alignment. 3. Set the Auto/Off lever to be full. sure from the system before tightening motor mounting screws. If the oil is not in use the unit with a new one. 6. Allow compressor to cool prior to hold the motor in Fig. 2). Remove the belt guard by removing the 5 screws (X) using a Phillips head screwdriver. 3. See the Adjusting Belt Tension before servicing the compressor, and when the compressor is added too quickly...
Instruction Manual
Page 19
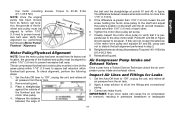
...-line (in step 2. 8. Set the Auto/Off lever to prevent excessive belt wear. Place a straightedge against the outside of the flywheel and pulley must be aligned to within 1/16" (1.6 mm) to the drive motor shaft. Air Compressor Pump Intake and Exhaust Valves Once a year have a Trained Service Technician check the air compressor pump intake and exhaust valves. screws. English four motor mounting (27.1-33.9 Nm...
...-line (in step 2. 8. Set the Auto/Off lever to prevent excessive belt wear. Place a straightedge against the outside of the flywheel and pulley must be aligned to within 1/16" (1.6 mm) to the drive motor shaft. Air Compressor Pump Intake and Exhaust Valves Once a year have a Trained Service Technician check the air compressor pump intake and exhaust valves. screws. English four motor mounting (27.1-33.9 Nm...
Instruction Manual
Page 20
... electrical supply to "Off", unplug the unit, and relieve all air pressure from the air tank. Set the Auto/Off lever to the air compressor, bleed tank of unsafe operation. Using an adjustable wrench loosen outlet Recommended accessories for reassembly. wrench loosen pres- Using a screwdriver, carefully push the valve disc up and down . Tighten nuts. 10. If additional service is visible. Using an adjustable nothing is required, contact your nearest Authorized Warranty Service Center. Torquing...
... electrical supply to "Off", unplug the unit, and relieve all air pressure from the air tank. Set the Auto/Off lever to the air compressor, bleed tank of unsafe operation. Using an adjustable wrench loosen outlet Recommended accessories for reassembly. wrench loosen pres- Using a screwdriver, carefully push the valve disc up and down . Tighten nuts. 10. If additional service is visible. Using an adjustable nothing is required, contact your nearest Authorized Warranty Service Center. Torquing...

Instruction Manual
Page 21
... subsequent owners. Additional exclusions include: freight damage, failures resulting from neglect, accident, or abuse, induction motors when operated from date of Purchase Repairs To assure product SAFETY and RELIABILITY, repairs, maintenance and adjustment should be liable for any repairs, replacements, or adjustments to merchandise sold by DEWALT which has been manufactured by and identified as changing oil, air filters, belt tensioning, etc... Limited warranty on oil-lubricated air compressor pumps...
... subsequent owners. Additional exclusions include: freight damage, failures resulting from neglect, accident, or abuse, induction motors when operated from date of Purchase Repairs To assure product SAFETY and RELIABILITY, repairs, maintenance and adjustment should be liable for any repairs, replacements, or adjustments to merchandise sold by DEWALT which has been manufactured by and identified as changing oil, air filters, belt tensioning, etc... Limited warranty on oil-lubricated air compressor pumps...

Instruction Manual
Page 22
..., improperly wired, or failure to have a certified licensed electrician install the compressor, will be delivered, or shipped, to follow proper maintenance guidelines. • Operation below proper oil level or operation without handles, or wheels). All associated freight costs and travel charges, are not covered after the first year of ownership: Belts, sheaves, flywheels, check valves, pressure switches, air unloaders, throttle controls, electric motors, brushes, regulators, o-rings, pressure gauges, tubing...
..., improperly wired, or failure to have a certified licensed electrician install the compressor, will be delivered, or shipped, to follow proper maintenance guidelines. • Operation below proper oil level or operation without handles, or wheels). All associated freight costs and travel charges, are not covered after the first year of ownership: Belts, sheaves, flywheels, check valves, pressure switches, air unloaders, throttle controls, electric motors, brushes, regulators, o-rings, pressure gauges, tubing...

Instruction Manual
Page 24
English Troubleshooting Guide This section provides a list of a qualified DeWALT technician or your dealer. Problem Code Air leaks ...1 Air leaks in air tank or at air tank welds 2 Air leaks between head and valve plate 3 Air leaks from safety valve...4 Compressor is not supplying enough air to operate accessories 1, 5, 6, 7, 9, 10 Restricted air intake...9 Oil in discharge air...9, 19, 31 Knocking Noise...4, 10, 11, 12, 13, 14 Excessive belt wear...10, 11, 14, 15 Squealing sound...10...
English Troubleshooting Guide This section provides a list of a qualified DeWALT technician or your dealer. Problem Code Air leaks ...1 Air leaks in air tank or at air tank welds 2 Air leaks between head and valve plate 3 Air leaks from safety valve...4 Compressor is not supplying enough air to operate accessories 1, 5, 6, 7, 9, 10 Restricted air intake...9 Oil in discharge air...9, 19, 31 Knocking Noise...4, 10, 11, 12, 13, 14 Excessive belt wear...10, 11, 14, 15 Squealing sound...10...
Instruction Manual
Page 25
... a DeWALT authorized service center. Prolonged excessive use of air Decrease amount of bursting. Compressor is higher than the SCFM or pressure supplied by pulling on ring. DO NOT OVERTIGHTEN. Contact a DeWALT factory service center or a DeWALT authorized service center. 25 English Defective safety valve Operate safety valve manually by your air compressor, a larger compressor is needed to operate accessory. CODE 1 2 3 4 5 6 7 8 9 10 11 12 13 Troubleshooting Codes POSSIBLE CAUSE POSSIBLE SOLUTION Fittings are not tight Tighten fittings...
... a DeWALT authorized service center. Prolonged excessive use of air Decrease amount of bursting. Compressor is higher than the SCFM or pressure supplied by pulling on ring. DO NOT OVERTIGHTEN. Contact a DeWALT factory service center or a DeWALT authorized service center. 25 English Defective safety valve Operate safety valve manually by your air compressor, a larger compressor is needed to operate accessory. CODE 1 2 3 4 5 6 7 8 9 10 11 12 13 Troubleshooting Codes POSSIBLE CAUSE POSSIBLE SOLUTION Fittings are not tight Tighten fittings...

Instruction Manual
Page 26
... type oil being used , adjust the regulator as instructed in place. 26 Piston rings damaged or worn Contact a DeWALT factory service center or a DeWALT authorized service center. NOTE: Adjust the regulated pressure under Maintenance. Cylinder or piston damaged or worn Contact a DeWALT factory service center or a DeWALT authorized service center. Damaged regulator Replace Regulator open Roate the regulator knob counter-clockwise to its built-in stop and push knob in...
... type oil being used , adjust the regulator as instructed in place. 26 Piston rings damaged or worn Contact a DeWALT factory service center or a DeWALT authorized service center. NOTE: Adjust the regulated pressure under Maintenance. Cylinder or piston damaged or worn Contact a DeWALT factory service center or a DeWALT authorized service center. Damaged regulator Replace Regulator open Roate the regulator knob counter-clockwise to its built-in stop and push knob in...

Instruction Manual
Page 27
... back pressure in . Replace check valve. If using extension cord, try using without. Inspect and replace transfer tubes or check valve, as required. If compressor is on a dedicated circuit. Clean all cooling surfaces thoroughly. Open drain valve when starting motor. Relocate compressor to an area with cool, dry, well circulated air, at least 12 in tank. 35 Compressor too cold POSSIBLE SOLUTION Check that power supply...
... back pressure in . Replace check valve. If using extension cord, try using without. Inspect and replace transfer tubes or check valve, as required. If compressor is on a dedicated circuit. Clean all cooling surfaces thoroughly. Open drain valve when starting motor. Relocate compressor to an area with cool, dry, well circulated air, at least 12 in tank. 35 Compressor too cold POSSIBLE SOLUTION Check that power supply...

