
Revision 3 (6/2003)
Page 5
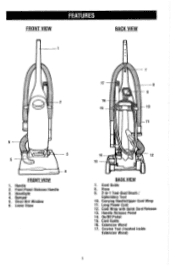
Cord Guide 16. Carrying HandleIUpper Cord Wrap 11. Long Power Cord 12. Cord Wrap with Quick Cord Release 13. Handle Release Pedal 14. Crevice Tool (located inside Extension Wand) OnIOff Pedal 15. Extension Wand 17. Cord Guide 8. Hose 9. 2-in-1 Tool-Dust Brush I Upholstery Tool 10. FRONT VlEW n BACK VlEW 1 FRONT VlEW Handle Front Panel Release Handle Headlight Bumper Clear Dirt Window Lower Hose BACK VlEW 7.
Cord Guide 16. Carrying HandleIUpper Cord Wrap 11. Long Power Cord 12. Cord Wrap with Quick Cord Release 13. Handle Release Pedal 14. Crevice Tool (located inside Extension Wand) OnIOff Pedal 15. Extension Wand 17. Cord Guide 8. Hose 9. 2-in-1 Tool-Dust Brush I Upholstery Tool 10. FRONT VlEW n BACK VlEW 1 FRONT VlEW Handle Front Panel Release Handle Headlight Bumper Clear Dirt Window Lower Hose BACK VlEW 7.
Revision 3 (6/2003)
Page 7
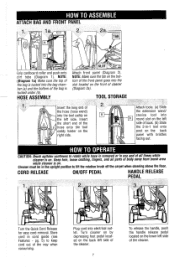
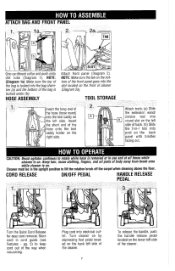
... guide (see Features - CORD RELEASE ONIOFF PEDAL HANDLE RELEASE PEDAL Turn the Quick Cord Release for easy cord removal. (;rip cardboard collar and push onto dirt tube (Diagram 1). NOTE: Make sure the tab on the bottom of the front panel goes into round slot on the left side of the bag...
... guide (see Features - CORD RELEASE ONIOFF PEDAL HANDLE RELEASE PEDAL Turn the Quick Cord Release for easy cord removal. (;rip cardboard collar and push onto dirt tube (Diagram 1). NOTE: Make sure the tab on the bottom of the front panel goes into round slot on the left side of the bag...

Revision 3 (6/2003)
Page 9
... cardboard collar of paper bag with both hands and pull away from hole before changing paper bag. IMPORTANT: Expand bag away from dirt tube. Grip cardboard collar and push onto dirt tube. NOTE: Unplug cleaner before installing. Cleaner must have paper bag in opening to clear paper away from hole. REMOVE OLD...
... cardboard collar of paper bag with both hands and pull away from hole before changing paper bag. IMPORTANT: Expand bag away from dirt tube. Grip cardboard collar and push onto dirt tube. NOTE: Unplug cleaner before installing. Cleaner must have paper bag in opening to clear paper away from hole. REMOVE OLD...

Revision 3 (6/2003)
Page 11
.... Secure the headlight lens by replacing the two (2) screws. WARNING: TO REDUCE THE RISK OF INJURY FROM MOVING PARTS - Check paper bag to remove. Check dirt tube to replace. Turn cleaner over and remove nozzle guard (Diagram 2). Remove hose from blue filter in or around the brushroll area. 4. If full, replace...
.... Secure the headlight lens by replacing the two (2) screws. WARNING: TO REDUCE THE RISK OF INJURY FROM MOVING PARTS - Check paper bag to remove. Check dirt tube to replace. Turn cleaner over and remove nozzle guard (Diagram 2). Remove hose from blue filter in or around the brushroll area. 4. If full, replace...

Revision 3 (6/2003)
Page 12
Power cord not firmly plugged into outlet. 2. Needs service. 4. Replace fuseheset breaker. 3. Cleaner won't pick-up -- Pg. 7. 2. Replace belt - Change bag - Review dirt bag removal and correctly. Pg. 9. 1. Cleaner is an obstruction. --4. ily available from cleaner 1. - WARNING: REDUCE RISK OF PERSONAL INJURY UNPLUG CLEANER BEFORE SERVICING PROBLEM Cleaner ...
Power cord not firmly plugged into outlet. 2. Needs service. 4. Replace fuseheset breaker. 3. Cleaner won't pick-up -- Pg. 7. 2. Replace belt - Change bag - Review dirt bag removal and correctly. Pg. 9. 1. Cleaner is an obstruction. --4. ily available from cleaner 1. - WARNING: REDUCE RISK OF PERSONAL INJURY UNPLUG CLEANER BEFORE SERVICING PROBLEM Cleaner ...

Revision 4 (1/2004)
Page 4
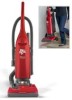
...Page 10 Page 11 Page 11 Page 12 LIMITED WARRANTY To the consumer, Royal Appliance Mfg. CONGRATULATIONS You are now the proud owner of Dirt Devil° products. Co. We trust your original sales receipt to validate start of the original purchase. We are very proud of satisfaction.... USA & Canada: 1-800-321-1134. Our company designed and developed this vacuum cleaner to be delivered prepaid to your support of a Dirt Devil®. Use only genuine Royal® replacement parts. warrants this product with their quality and performance. If the vacuum cleaner should become defective...
...Page 10 Page 11 Page 11 Page 12 LIMITED WARRANTY To the consumer, Royal Appliance Mfg. CONGRATULATIONS You are now the proud owner of Dirt Devil° products. Co. We trust your original sales receipt to validate start of the original purchase. We are very proud of satisfaction.... USA & Canada: 1-800-321-1134. Our company designed and developed this vacuum cleaner to be delivered prepaid to your support of a Dirt Devil®. Use only genuine Royal® replacement parts. warrants this product with their quality and performance. If the vacuum cleaner should become defective...
Revision 4 (1/2004)
Page 5
Headlight 4. Clear Dirt Window 6. Hose 9. 2-in-1 Tool-Dust Brush / Upholstery Tool 10. Handle Release Pedal 14. On/Off Pedal 15. Long Power Cord 12. Cord Guide 16. Crevice Tool (located inside Extension Wand) 5 Lower Hose 14 13 9 12 BACK VIEW 7. Bumper 5. Handle 2. Cord Guide 8. Cord Wrap with Quick Cord Release 13. Extension Wand 17. FRONT VIEW FEATURES BACK VIEW 17 16 15 10 11 4 FRONT VIEW 1. Front Panel Release Handle 3. Carrying Handle/Upper Cord Wrap 11.
Headlight 4. Clear Dirt Window 6. Hose 9. 2-in-1 Tool-Dust Brush / Upholstery Tool 10. Handle Release Pedal 14. On/Off Pedal 15. Long Power Cord 12. Cord Guide 16. Crevice Tool (located inside Extension Wand) 5 Lower Hose 14 13 9 12 BACK VIEW 7. Bumper 5. Handle 2. Cord Guide 8. Cord Wrap with Quick Cord Release 13. Extension Wand 17. FRONT VIEW FEATURES BACK VIEW 17 16 15 10 11 4 FRONT VIEW 1. Front Panel Release Handle 3. Carrying Handle/Upper Cord Wrap 11.
Revision 4 (1/2004)
Page 7
... bag chamber (a) and the bottom of the cleaner. Insert the long end of the way when vacuuming. TAB 0 a b SLOT O Grip cardboard collar and push onto dirt tube (Diagram 1). la. 2. Keep hair, loose clothing, fingers, and all times while cleaner is tucked under (b). pg. 5) to lift the rotation brush off the carpet...
... bag chamber (a) and the bottom of the cleaner. Insert the long end of the way when vacuuming. TAB 0 a b SLOT O Grip cardboard collar and push onto dirt tube (Diagram 1). la. 2. Keep hair, loose clothing, fingers, and all times while cleaner is tucked under (b). pg. 5) to lift the rotation brush off the carpet...
Revision 4 (1/2004)
Page 9
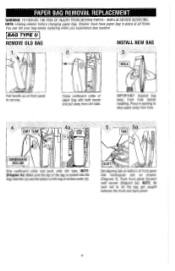
...into rectangular slot on front panel to remove. Push front panel forward until secure (Diagram 5a). NOTE: Be sure not to clear paper away from dirt tube. UNPLUG BEFORE SERVICING. Press in place at all times. BAG TYPE U REMOVE OLD BAG INSTALL NEW BAG 3. HOLE Pull handle up on...panel into the bag chamber (a) and the bottom of the bag is tucked under (b). TAB CARDBOARD COLLAR b Grip cardboard collar and push onto dirt tube. NOTE: Unplug cleaner before nstalling. Cleaner must have paper bag in opening to let the bag get caught between the front and back...
...into rectangular slot on front panel to remove. Push front panel forward until secure (Diagram 5a). NOTE: Be sure not to clear paper away from dirt tube. UNPLUG BEFORE SERVICING. Press in place at all times. BAG TYPE U REMOVE OLD BAG INSTALL NEW BAG 3. HOLE Pull handle up on...panel into the bag chamber (a) and the bottom of the bag is tucked under (b). TAB CARDBOARD COLLAR b Grip cardboard collar and push onto dirt tube. NOTE: Unplug cleaner before nstalling. Cleaner must have paper bag in opening to let the bag get caught between the front and back...

Revision 4 (1/2004)
Page 11
... compartment. GENERAL MAINTENANCE WARNING: TO REDUCE THE RISK OF INJURY FROM MOVING PARTS - Remove hose from blue filter in or around the brushroll area. 4. Check dirt tube to see if it is an obstruction (Diagram 1). This cleaner uses a common automotive lamp #906, 13.0 volts. NOTE: Regularly clean debris from hose inlet...
... compartment. GENERAL MAINTENANCE WARNING: TO REDUCE THE RISK OF INJURY FROM MOVING PARTS - Remove hose from blue filter in or around the brushroll area. 4. Check dirt tube to see if it is an obstruction (Diagram 1). This cleaner uses a common automotive lamp #906, 13.0 volts. NOTE: Regularly clean debris from hose inlet...

Revision 4 (1/2004)
Page 12
... Pg. 11. to service center or call 1-800-321-1134. 4. The service parts used in home. POSSIBLE SOLUTION 1. Paper bag full. 3. Nozzle/dirt passage hose clogged. 1. Paper bag not installed correctly. 3. Review hose installation - Pg. 10. Thermal Protector activated. Plug unit in firmly. 2. Take to...; Dealer or retailer. Replace paper bag - Pg. 10. 4. Remove lower hose; There is an obstruction. 1. Review dirt bag removal and replacement - Remove hose and tools; Replace bulb- Always identify your Yellow Pages for nearest authorized Royal® Dealer.
... Pg. 11. to service center or call 1-800-321-1134. 4. The service parts used in home. POSSIBLE SOLUTION 1. Paper bag full. 3. Nozzle/dirt passage hose clogged. 1. Paper bag not installed correctly. 3. Review hose installation - Pg. 10. Thermal Protector activated. Plug unit in firmly. 2. Take to...; Dealer or retailer. Replace paper bag - Pg. 10. 4. Remove lower hose; There is an obstruction. 1. Review dirt bag removal and replacement - Remove hose and tools; Replace bulb- Always identify your Yellow Pages for nearest authorized Royal® Dealer.


