User Guide 1
Page 2
All rights reserved. Trademarks DYMO, DYMO Label, and LabelManager are the property of Newell Rubbermaid, LLC. Copyright © 2012 Newell Rubbermaid, LLC. No part of this document or the software may be reproduced or transmitted in the US and other trademarks are registered marks in any form or by any means or translated into another language without the prior written consent of their respective holders. All other countries.
All rights reserved. Trademarks DYMO, DYMO Label, and LabelManager are the property of Newell Rubbermaid, LLC. Copyright © 2012 Newell Rubbermaid, LLC. No part of this document or the software may be reproduced or transmitted in the US and other trademarks are registered marks in any form or by any means or translated into another language without the prior written consent of their respective holders. All other countries.

User Guide 1
Page 3
... 5 Removing the Battery 5 Inserting the Label Cassette 6 Using the Label Maker for the First Time 6 Getting to Know the Label Maker 6 Power 6 LCD Display 7 Navigation Keys 7 Cancel 7 Backspace 7 Caps Mode 7 New Label/Clear 7 Text Size 7 Format Keys 7 Vertical Text 7 Menu 7 Formatting Your Label 7 Changing the Font Type 7 Changing the Text Size 8 Changing the Text Style 8 Adding Borders 8 Using Mirror Text 8 Creating Vertical Labels 8 Creating Fixed-Length Labels 9 Aligning the Text 9 Creating Two-Line Labels 9 Using Clip Art, Symbols, and Special Characters 9 Adding...
... 5 Removing the Battery 5 Inserting the Label Cassette 6 Using the Label Maker for the First Time 6 Getting to Know the Label Maker 6 Power 6 LCD Display 7 Navigation Keys 7 Cancel 7 Backspace 7 Caps Mode 7 New Label/Clear 7 Text Size 7 Format Keys 7 Vertical Text 7 Menu 7 Formatting Your Label 7 Changing the Font Type 7 Changing the Text Size 8 Changing the Text Style 8 Adding Borders 8 Using Mirror Text 8 Creating Vertical Labels 8 Creating Fixed-Length Labels 9 Aligning the Text 9 Creating Two-Line Labels 9 Using Clip Art, Symbols, and Special Characters 9 Adding...
User Guide 1
Page 4
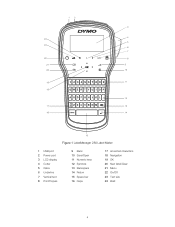
12 3 4 24 5 23 6 7 22 8 21 9 20 10 19 11 18 12 17 13 16 14 15 Figure 1 LabelManager 280 Label Maker 1 USB port 2 Power port 3 LCD display 4 Cutter 5 Italics 6 Underline 7 Vertical text 8 Print/Copies 9 Back 10 Save/Open 11 Numeric keys 12 Symbols 13 Backspace 14 Return 15 Space bar 16 Caps 17 Accented characters 18 Navigation 19 OK 20 New label/Clear 21 Menu 22 On/Off 23 Text size 24 Bold 4
12 3 4 24 5 23 6 7 22 8 21 9 20 10 19 11 18 12 17 13 16 14 15 Figure 1 LabelManager 280 Label Maker 1 USB port 2 Power port 3 LCD display 4 Cutter 5 Italics 6 Underline 7 Vertical text 8 Print/Copies 9 Back 10 Save/Open 11 Numeric keys 12 Symbols 13 Backspace 14 Return 15 Space bar 16 Caps 17 Accented characters 18 Navigation 19 OK 20 New label/Clear 21 Menu 22 On/Off 23 Text size 24 Bold 4

User Guide 1
Page 5
... Your New Label Maker With the DYMO® LabelManager® 280 electronic label maker, you will take approximately three hours; Make sure the charging adapter is located inside the back cover of time. Charging the battery pack will need the serial number, which is disconnected before handling the Li-ion battery pack. however, after two minutes of software upgrades by a rechargeable, lithium-ion (Li-ion) battery pack. Removing the Battery Remove the battery pack...
... Your New Label Maker With the DYMO® LabelManager® 280 electronic label maker, you will take approximately three hours; Make sure the charging adapter is located inside the back cover of time. Charging the battery pack will need the serial number, which is disconnected before handling the Li-ion battery pack. however, after two minutes of software upgrades by a rechargeable, lithium-ion (Li-ion) battery pack. Removing the Battery Remove the battery pack...
User Guide 1
Page 6
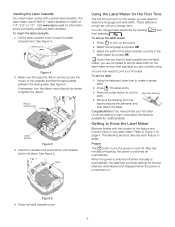
...! You can change them. To print a label 1 Using the keyboard, enter text to open the label compartment. The label prints. 3 Press the cutter button to cut the Split label backing label. 4 Remove the backing from the label to tighten the ribbon. See Figure 5. See Figure 6. Using the Label Maker for creating labels. To set the label width so the label maker knows what size label you are taut across the mouth of 1/4", 3/8", or 1/2" . Power The button turns the power on and...
...! You can change them. To print a label 1 Using the keyboard, enter text to open the label compartment. The label prints. 3 Press the cutter button to cut the Split label backing label. 4 Remove the backing from the label to tighten the ribbon. See Figure 5. See Figure 6. Using the Label Maker for creating labels. To set the label width so the label maker knows what size label you are taut across the mouth of 1/4", 3/8", or 1/2" . Power The button turns the power on and...
User Guide 1
Page 7
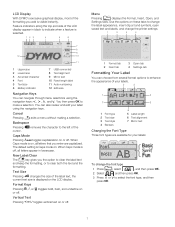
... change the printer settings. 1 2 3 4 A 1 Format tab 2 Insert tab 3 Open tab 4 Settings tab Formatting Your Label You can choose from several format options to indicate when a feature is visible instantly. New Label/Clear The key gives you add is selected. 123 4 5 6 A 7 8 9 12 10 11 1 Uppercase 2 Lowercase 3 Accented character 4 Font 5 Text size 6 Battery indicator 7 USB connected 8 Text alignment 9 Mirror text 10 Fixed-length label 11 Auto-numbering 12 Edit area Navigation Keys You can also review and edit your labels. 2 3 1 4 7 5 1 Font type 2 Text size...
... change the printer settings. 1 2 3 4 A 1 Format tab 2 Insert tab 3 Open tab 4 Settings tab Formatting Your Label You can choose from several format options to indicate when a feature is visible instantly. New Label/Clear The key gives you add is selected. 123 4 5 6 A 7 8 9 12 10 11 1 Uppercase 2 Lowercase 3 Accented character 4 Font 5 Text size 6 Battery indicator 7 USB connected 8 Text alignment 9 Mirror text 10 Fixed-length label 11 Auto-numbering 12 Edit area Navigation Keys You can also review and edit your labels. 2 3 1 4 7 5 1 Font type 2 Text size...
User Guide 1
Page 8
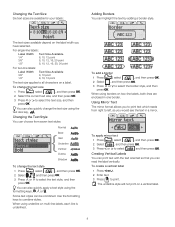
... For two-line labels: Label Width 3/8" 1/2" Text Size Available 8, 10 point 8, 10, 12 point The text size applies to select the text size, and then press . To change the text size using the formatting keys, , , or . You can choose from right to left, as you to print text which reads from seven text styles: Normal Bold { Italic Underline Vertical Outline Shadow To change the text style 1 Press , select , and then press . 2 Select , and...
... For two-line labels: Label Width 3/8" 1/2" Text Size Available 8, 10 point 8, 10, 12 point The text size applies to select the text size, and then press . To change the text size using the formatting keys, , , or . You can choose from right to left, as you to print text which reads from seven text styles: Normal Bold { Italic Underline Vertical Outline Shadow To change the text style 1 Press , select , and then press . 2 Select , and...

User Guide 1
Page 9
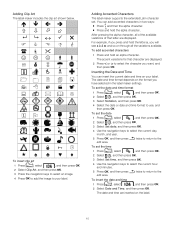
... set shown below. ? ! _ - : ' " , . ; ' ¡ ¿ / \ & @ # % ‰ | ( ) { } [ ] ° • * + - or > to print. To create a two-line label 1 Type the text for the first line and press . 2 Type the text for fixed-length labels. You can quickly add a symbol by the length of the text. Aligning the Text You can be added to fit within the fixed label length, a message is displayed and you choose a fixed label length, the size of the label text is centered. Variable-length labels are prompted to print left...
... set shown below. ? ! _ - : ' " , . ; ' ¡ ¿ / \ & @ # % ‰ | ( ) { } [ ] ° • * + - or > to print. To create a two-line label 1 Type the text for the first line and press . 2 Type the text for fixed-length labels. You can quickly add a symbol by the length of the text. Aligning the Text You can be added to fit within the fixed label length, a message is displayed and you choose a fixed label length, the size of the label text is centered. Variable-length labels are prompted to print left...
User Guide 1
Page 10
... on the label. 10 Adding Accented Characters The label maker supports the extended Latin character set the date 1 Press , select , and then press . 2 Select , and then press . 3 Select Set date, and then press . 4 Use the navigation keys to the To insert the date and time 1 Press , select , and then press . 2 Select Date and Time, and then press . The accent variations for that letter are displayed. To set . The...
... on the label. 10 Adding Accented Characters The label maker supports the extended Latin character set the date 1 Press , select , and then press . 2 Select , and then press . 3 Select Set date, and then press . 4 Use the navigation keys to the To insert the date and time 1 Press , select , and then press . 2 Select Date and Time, and then press . The accent variations for that letter are displayed. To set . The...
User Guide 1
Page 11
... actually inserted in any time, regardless of the auto-numbering text on the LCD display. Previewing Your Label Layout You can store a new label in the label maker. When printing is added to nine frequently used labels. To delete auto-numbering 1 Place the cursor at any of up to ten copies of a label. > > To print multiple labels 1 Press and hold for a few seconds. • Press and then select . Changing the Settings Several...
... actually inserted in any time, regardless of the auto-numbering text on the LCD display. Previewing Your Label Layout You can store a new label in the label maker. When printing is added to nine frequently used labels. To delete auto-numbering 1 Place the cursor at any of up to ten copies of a label. > > To print multiple labels 1 Press and hold for a few seconds. • Press and then select . Changing the Settings Several...

User Guide 1
Page 12
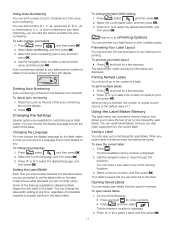
... or to select Saved text, and then press . Clean your label maker from inside the label compartment cover. Use caution when cleaning. Print head Cleaning tool Figure 8 12 Caring for Your Label Maker Your label maker is inserted, not the formatting. Clean the cutter blade each time you long and trouble-free service, while requiring very little maintenance. Only the saved text is designed to give you replace the label cassette. To clean the print head 1 Remove the label cassette. 2 Remove the cleaning tool...
... or to select Saved text, and then press . Clean your label maker from inside the label compartment cover. Use caution when cleaning. Print head Cleaning tool Figure 8 12 Caring for Your Label Maker Your label maker is inserted, not the formatting. Clean the cutter blade each time you long and trouble-free service, while requiring very little maintenance. Only the saved text is designed to give you replace the label cassette. To clean the print head 1 Remove the label cassette. 2 Remove the cleaning tool...
User Guide 1
Page 13
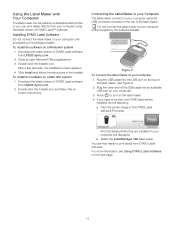
... version of DYMO Label software from LM280.dymo.com. 2 Double-click the Installer icon and follow the instructions in the DYMO Label software Print area. To install the software on a Windows® system 1 Download the latest version of DYMO Label™ software. Do not connect the label maker to your computer using the USB connection located on the top of the label maker. You are displayed. Figure 9 To connect the label maker to print labels from DYMO Label software. For more than one DYMO label printer installed, do...
... version of DYMO Label software from LM280.dymo.com. 2 Double-click the Installer icon and follow the instructions in the DYMO Label software Print area. To install the software on a Windows® system 1 Download the latest version of DYMO Label™ software. Do not connect the label maker to your computer using the USB connection located on the top of the label maker. You are displayed. Figure 9 To connect the label maker to print labels from DYMO Label software. For more than one DYMO label printer installed, do...
User Guide 1
Page 14
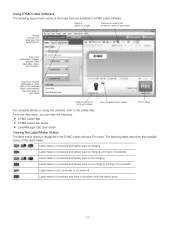
... is turned off Label maker is connected and there is not charging; Select a printer to the online Help. Apply a layout to insert on your favorite addresses or other data in DYMO Label software. Insert text, addresses, images, shapes, lines, barcodes, dates, and counters. Store your label. automatically insert the data on your label type and apply layouts. printing is not possible Label maker is connected and battery pack is not charging Label maker is connected and battery pack is a problem with the battery...
... is turned off Label maker is connected and there is not charging; Select a printer to the online Help. Apply a layout to insert on your favorite addresses or other data in DYMO Label software. Insert text, addresses, images, shapes, lines, barcodes, dates, and counters. Store your label. automatically insert the data on your label type and apply layouts. printing is not possible Label maker is connected and battery pack is not charging Label maker is connected and battery pack is a problem with the battery...

User Guide 1
Page 15
...; Remove jammed label, clearing the jam. Clean the cutter blade. Problem/Error Message No display Solution Ensure the label maker is stalled due to recharge the battery pack. See Inserting the Battery Pack. See Recharging the Battery Pack. Clean the print head. Auto-numbering already inserted Auto-numbering already appears on the label and cannot be added more than once to fit on the label width. Insert a wider label cassette. Change to recharge before unplugging the label maker. Label length exceeds fixed length...
...; Remove jammed label, clearing the jam. Clean the cutter blade. Problem/Error Message No display Solution Ensure the label maker is stalled due to recharge the battery pack. See Inserting the Battery Pack. See Recharging the Battery Pack. Clean the print head. Auto-numbering already inserted Auto-numbering already appears on the label and cannot be added more than once to fit on the label width. Insert a wider label cassette. Change to recharge before unplugging the label maker. Label length exceeds fixed length...
User Guide 1
Page 16
...email messages to: documentation@dymo.com Please keep in mind that are constantly working to produce the highest quality documentation for more information on the collection, reuse, and recycling of natural resources for documentation feedback. Send us your suggestions about our user guides. ...; Product name, model number, and User Guide page number Brief description of instructions that you to use the appropriate take-back systems. These systems will reuse or recycle most of the materials of your device indicates you should use of this email address is needed, and...
...email messages to: documentation@dymo.com Please keep in mind that are constantly working to produce the highest quality documentation for more information on the collection, reuse, and recycling of natural resources for documentation feedback. Send us your suggestions about our user guides. ...; Product name, model number, and User Guide page number Brief description of instructions that you to use the appropriate take-back systems. These systems will reuse or recycle most of the materials of your device indicates you should use of this email address is needed, and...

User Guide 1
Page 17
...Replace only with fire and explosion, which if not avoided, may cause leakage, heat, smoke, an explosion, or fire. WARNING To reduce the risks associated with the same or equivalent type recommended by DYMO. When charging the battery, use dedicated chargers and follow the instructions below. While Discharging the Battery...battery close to fire or at extremely high temperatures over 60°C (for example, a vehicle, strong direct sunlight). Do not short-circuit the batteries under any way appears abnormal during charging. This could damage equipment or injure users...
...Replace only with fire and explosion, which if not avoided, may cause leakage, heat, smoke, an explosion, or fire. WARNING To reduce the risks associated with the same or equivalent type recommended by DYMO. When charging the battery, use dedicated chargers and follow the instructions below. While Discharging the Battery...battery close to fire or at extremely high temperatures over 60°C (for example, a vehicle, strong direct sunlight). Do not short-circuit the batteries under any way appears abnormal during charging. This could damage equipment or injure users...


