
User Guide 1
Page 2
... font. Trademarks DYMO, DYMO Label, and LabelManager are registered marks in the DejaVu fonts imported from Arev fonts are based on Vera fonts copyright © by Bitstream, Inc. The DejaVu fonts are copyright © by any means or translated into another language ...without the prior written consent of this document or the software may be reproduced or transmitted in any form or by Tavmjong Bah. No part...
... font. Trademarks DYMO, DYMO Label, and LabelManager are registered marks in the DejaVu fonts imported from Arev fonts are based on Vera fonts copyright © by Bitstream, Inc. The DejaVu fonts are copyright © by any means or translated into another language ...without the prior written consent of this document or the software may be reproduced or transmitted in any form or by Tavmjong Bah. No part...

User Guide 1
Page 3
...the Power 6 Inserting the Battery Pack 6 Removing the Battery Pack 6 Charging the Battery Pack 6 Inserting the Label Cassette 6 Using the Label Maker for the First Time 7 Getting to Know the Label Maker 7 Power 7 Home 7 Touch Screen Display 7 Navigation Keys 7 Caps Lock 7 Shift 7 Backspace 8 Delete 8 Using the Touch Screen 8 Making a Selection 8 Selecting Text 8 Scrolling a List 8 Editing Your Label 8 Selecting the Font 8 Changing the Font Type 9 Changing the Font Size 9 Changing the Font Style 9 Inserting Special Characters, Auto-Text, and Barcodes 9 Inserting Symbols...
...the Power 6 Inserting the Battery Pack 6 Removing the Battery Pack 6 Charging the Battery Pack 6 Inserting the Label Cassette 6 Using the Label Maker for the First Time 7 Getting to Know the Label Maker 7 Power 7 Home 7 Touch Screen Display 7 Navigation Keys 7 Caps Lock 7 Shift 7 Backspace 8 Delete 8 Using the Touch Screen 8 Making a Selection 8 Selecting Text 8 Scrolling a List 8 Editing Your Label 8 Selecting the Font 8 Changing the Font Type 9 Changing the Font Size 9 Changing the Font Style 9 Inserting Special Characters, Auto-Text, and Barcodes 9 Inserting Symbols...

User Guide 1
Page 4
Changing the Default Font 14 Changing the Screen Settings 14 Working with User Accounts 14 Creating User Accounts 14 Changing User Settings 15 Deleting User Accounts 15 Maintaining Your Label Maker 15 Cleaning Your Label Maker 15 Calibrating the Touch Screen 15 Using the Label Maker with Your Computer 16 Installing DYMO Label Software 16 Connecting the Label Maker to Your Computer 16 Using DYMO Label Software 17 Viewing the Label Maker Status 17 Troubleshooting 18 Documentation Feedback 18 Safety Precautions for Lithium Polymer Rechargeable Battery Pack 19 Environmental...
Changing the Default Font 14 Changing the Screen Settings 14 Working with User Accounts 14 Creating User Accounts 14 Changing User Settings 15 Deleting User Accounts 15 Maintaining Your Label Maker 15 Cleaning Your Label Maker 15 Calibrating the Touch Screen 15 Using the Label Maker with Your Computer 16 Installing DYMO Label Software 16 Connecting the Label Maker to Your Computer 16 Using DYMO Label Software 17 Viewing the Label Maker Status 17 Troubleshooting 18 Documentation Feedback 18 Safety Precautions for Lithium Polymer Rechargeable Battery Pack 19 Environmental...
User Guide 1
Page 5
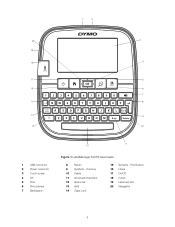
Currency 10 Delete 11 Accented characters 12 Space bar 13 Shift 14 Caps Lock 15 Symbols - Punctuation 16 Home 17 On/Off 18 Cutter 19 Label exit slot 20 Navigation 5 1 2 20 3 19 18 4 17 5 16 6 7 15 8 14 9 13 10 1 USB connector 2 Power connector 3 Touch screen 4 OK 5 Print 6 Print preview 7 Backspace 11 12 Figure 1 LabelManager 500TS label maker 8 Return 9 Symbols -
Currency 10 Delete 11 Accented characters 12 Space bar 13 Shift 14 Caps Lock 15 Symbols - Punctuation 16 Home 17 On/Off 18 Cutter 19 Label exit slot 20 Navigation 5 1 2 20 3 19 18 4 17 5 16 6 7 15 8 14 9 13 10 1 USB connector 2 Power connector 3 Touch screen 4 OK 5 Print 6 Print preview 7 Backspace 11 12 Figure 1 LabelManager 500TS label maker 8 Return 9 Symbols -

User Guide 1
Page 6
... label maker uses DYMO D1 label cassettes in a wide range of colors. Removing the Battery Pack Remove the battery pack when the label maker will take approximately three hours. During the registration process, you can choose to print your label maker comes partially charged. About Your New Label Maker With the DYMO LabelManager 500TS label maker, you will need the serial number, which is located inside the back cover of the label maker. Make sure the charging adapter...
... label maker uses DYMO D1 label cassettes in a wide range of colors. Removing the Battery Pack Remove the battery pack when the label maker will take approximately three hours. During the registration process, you can choose to print your label maker comes partially charged. About Your New Label Maker With the DYMO LabelManager 500TS label maker, you will need the serial number, which is located inside the back cover of the label maker. Make sure the charging adapter...

User Guide 1
Page 7
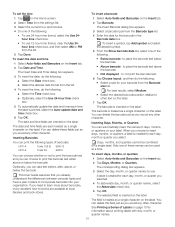
... your first label. Select a user, create new users, and manage user settings. Caps Lock The key toggles capitalization on and off . These selections remain set up the label maker 1 Press to Know the Label Maker Become familiar with the location of the label cassette currently in the display while the label maker is Caps Lock off manually or when the battery pack is removed and the power adapter is illuminated and all the letters entered are...
... your first label. Select a user, create new users, and manage user settings. Caps Lock The key toggles capitalization on and off . These selections remain set up the label maker 1 Press to Know the Label Maker Become familiar with the location of the label cassette currently in the display while the label maker is Caps Lock off manually or when the battery pack is removed and the power adapter is illuminated and all the letters entered are...

User Guide 1
Page 8
... objects or characters are selected, the character to edit or delete. Scrolling a List Dragging a scroll bar moves you quickly through a list. Selecting Text You can change the font type, size, and style. Do not press on the touch screen by using your label. Making a Selection You can change the formatting for all text on the label. 12 3 456 8 7 1 Font type 2 Bold 3 Italic 4 Underline 5 Font size 6 Strikethrough 7 Outline 8 Auto-fit text To format your label text 1 If necessary...
... objects or characters are selected, the character to edit or delete. Scrolling a List Dragging a scroll bar moves you quickly through a list. Selecting Text You can change the font type, size, and style. Do not press on the touch screen by using your label. Making a Selection You can change the formatting for all text on the label. 12 3 456 8 7 1 Font type 2 Bold 3 Italic 4 Underline 5 Font size 6 Strikethrough 7 Outline 8 Auto-fit text To format your label text 1 If necessary...

User Guide 1
Page 9
... new text only, you would any existing text. 2 Tap the button for the auto-numbering. 5 Select the amount to your label. Inserting Special Characters, Auto-Text, and Barcodes From the Insert tab, you can quickly add symbols, clip art, barcodes, several types of useful symbols that you can quickly add to increment each desired style. Inserting Symbols The label maker supports a variety of auto-text, and international characters. To insert a symbol 1 Select Symbols on the Insert tab. 2 Select the symbol to use auto-numbering 1 Select Auto...
... new text only, you would any existing text. 2 Tap the button for the auto-numbering. 5 Select the amount to your label. Inserting Special Characters, Auto-Text, and Barcodes From the Insert tab, you can quickly add symbols, clip art, barcodes, several types of useful symbols that you can quickly add to increment each desired style. Inserting Symbols The label maker supports a variety of auto-text, and international characters. To insert a symbol 1 Select Symbols on the Insert tab. 2 Select the symbol to use auto-numbering 1 Select Auto...
User Guide 1
Page 10
... Printing a Series of Labels on the label. b Optionally, select the Use 24-hour time check box. 5 To automatically update the date and time each time the label is inserted on page 13 for each treated as a single character on the label. Inserting Barcodes You can print the following : • Select a size for your label. to not print the barcode text. 6 Tap Choose layout, and then do the following types of barcodes: UPC-A UPC-E Code...
... Printing a Series of Labels on the label. b Optionally, select the Use 24-hour time check box. 5 To automatically update the date and time each time the label is inserted on page 13 for each treated as a single character on the label. Inserting Barcodes You can print the following : • Select a size for your label. to not print the barcode text. 6 Tap Choose layout, and then do the following types of barcodes: UPC-A UPC-E Code...

User Guide 1
Page 11
... create fixed-length labels. Using Word Suggestions The label maker remembers words longer than five characters that letter. To add a border 1 Select Border on the Layout tab. 2 Select a border to insert that you have previously used are displayed. 2 Use the left , centered, or right justified. Using Mirror Text The mirror format allows you use the suggested words 1 Enter text on the Layout tab. 2 Tap . The mirror format is visible in a mirror. Inserting International Characters The label maker supports...
... create fixed-length labels. Using Word Suggestions The label maker remembers words longer than five characters that letter. To add a border 1 Select Border on the Layout tab. 2 Select a border to insert that you have previously used are displayed. 2 Use the left , centered, or right justified. Using Mirror Text The mirror format allows you use the suggested words 1 Enter text on the Layout tab. 2 Tap . The mirror format is visible in a mirror. Inserting International Characters The label maker supports...

User Guide 1
Page 12
... printed. However, you can choose to 40" long. You can choose a fixed length label up to set a fixed length 1 Select Length and width on the Home screen. 2 Select Manage Files from a database file and download the labels to delete. 2 Tap Delete. Using Saved Labels You can use vertical text 1 Select Direction on your label, do the following : • Saved labels - To create a new folder 1 Tap New folder. The selected labels and folders are saved. To set the length of the label for your label maker...
... printed. However, you can choose to 40" long. You can choose a fixed length label up to set a fixed length 1 Select Length and width on the Home screen. 2 Select Manage Files from a database file and download the labels to delete. 2 Tap Delete. Using Saved Labels You can use vertical text 1 Select Direction on your label, do the following : • Saved labels - To create a new folder 1 Tap New folder. The selected labels and folders are saved. To set the length of the label for your label maker...

User Guide 1
Page 13
... recently printed labels from the Settings list. 3 Tap Downloaded Clip Art. For more information about using autonumbering or by inserting day, month, or quarter names on the Home screen. 2 Select Manage Files from the label maker memory. You cannot print multiple copies of a series of labels by using these features, see Using Auto-Numbering and Inserting Days, Months, or Quarters on the Home screen. 2 Select Manage Files from the Settings list. 3 Tap Clear recently printed. The Print preview screen...
... recently printed labels from the Settings list. 3 Tap Downloaded Clip Art. For more information about using autonumbering or by inserting day, month, or quarter names on the Home screen. 2 Select Manage Files from the label maker memory. You cannot print multiple copies of a series of labels by using these features, see Using Auto-Numbering and Inserting Days, Months, or Quarters on the Home screen. 2 Select Manage Files from the Settings list. 3 Tap Clear recently printed. The Print preview screen...

User Guide 1
Page 14
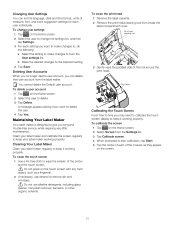
... standby mode and the charging adapter is automatically cut 1 Tap on page 15 for individual labels from the Settings list. 3 Clear the Show clock while charging check box, and then tap Done. To print cut mark between labels check box. To change the font for information about selecting user settings. 5 Tap Save. 14 You can turn off auto-cut after printing. The label in the label maker. To turn off auto-cut is actually inserted in the Label Edit screen changes...
... standby mode and the charging adapter is automatically cut 1 Tap on page 15 for individual labels from the Settings list. 3 Clear the Show clock while charging check box, and then tap Done. To print cut mark between labels check box. To change the font for information about selecting user settings. 5 Tap Save. 14 You can turn off auto-cut after printing. The label in the label maker. To turn off auto-cut is actually inserted in the Label Edit screen changes...
User Guide 1
Page 15
... working properly. To clean the print head 1 Remove the label cassette. 2 Remove the print head cleaning tool from the Settings list. 3 Tap Calibrate screen. 4 When prompted to remove dirt and smudges. To change the settings for each user individually. To clean the touch screen 1 Use a lint-free cloth to the selected setting. 4 Tap Save. Deleting User Accounts When you long and trouble-free service, while requiring very little maintenance. Changing User Settings You can delete that user account from the label maker. b Make the desired changes...
... working properly. To clean the print head 1 Remove the label cassette. 2 Remove the print head cleaning tool from the Settings list. 3 Tap Calibrate screen. 4 When prompted to remove dirt and smudges. To change the settings for each user individually. To clean the touch screen 1 Use a lint-free cloth to the selected setting. 4 Tap Save. Deleting User Accounts When you long and trouble-free service, while requiring very little maintenance. Changing User Settings You can delete that user account from the label maker. b Make the desired changes...

User Guide 1
Page 16
... label maker. 4 If you can print labels directly from your computer using the USB connector located on the top of the label maker. All of the label printers that are installed on your computer until prompted by the installer. Do not connect the label maker to your computer using DYMO Label™ software (requires DYMO Label v.8.4 or later). b Select the LabelManager 500TS label maker. 16 To install the software on a Windows® system 1 Download the latest version of DYMO Label software from the Support...
... label maker. 4 If you can print labels directly from your computer using the USB connector located on the top of the label maker. All of the label printers that are installed on your computer until prompted by the installer. Do not connect the label maker to your computer using DYMO Label™ software (requires DYMO Label v.8.4 or later). b Select the LabelManager 500TS label maker. 16 To install the software on a Windows® system 1 Download the latest version of DYMO Label software from the Support...

User Guide 1
Page 17
...; Insert text, addresses, images, shapes, lines, barcodes, dates, and counters. automatically insert the data on your label. Label maker is connected and battery pack is charging Label maker is connected and battery pack is not charging; Select a label maker to insert on using the software, refer to a label. Print a label. Import and download labels, download clip art, and manage files on your label maker. printing is not possible Label maker is not connected or is turned off Label maker is connected and there is displayed in the DYMO Label software Print area...
...; Insert text, addresses, images, shapes, lines, barcodes, dates, and counters. automatically insert the data on your label. Label maker is connected and battery pack is charging Label maker is connected and battery pack is not charging; Select a label maker to insert on using the software, refer to a label. Print a label. Import and download labels, download clip art, and manage files on your label maker. printing is not possible Label maker is not connected or is turned off Label maker is connected and there is displayed in the DYMO Label software Print area...

User Guide 1
Page 18
...; Clean cutter blade. Send us your suggestions about our user guides. Send email messages to: documentation@dymo.com Please keep in the documentation. See Charging the Battery Pack. Clean the print head. See Inserting the Battery Pack. Replace the battery pack. Remove jammed label; replace label cassette. Clean cutter blade. Remove jammed label; Please include the following possible solutions if you encounter a problem while using your feedback. DYMO labels have a technical question, please contact Customer Support. 18...
...; Clean cutter blade. Send us your suggestions about our user guides. Send email messages to: documentation@dymo.com Please keep in the documentation. See Charging the Battery Pack. Clean the print head. See Inserting the Battery Pack. Replace the battery pack. Remove jammed label; replace label cassette. Clean cutter blade. Remove jammed label; Please include the following possible solutions if you encounter a problem while using your feedback. DYMO labels have a technical question, please contact Customer Support. 18...
User Guide 1
Page 19
...directly to an electric outlet or cigarette lighter charger. Do not use or store battery pack close to fire or inside the car where temperature may contain substances that generates static electricity. Battery pack can also contact DYMO for more information on the collection, reuse, and recycling of this User Guide... equipment in an environmentally sound way. While Charging the Battery Pack Danger When charging the battery pack, use dedicated chargers and follow the instructions below. It may be used within -20°C~60°C (-4°F~140°F)...
...directly to an electric outlet or cigarette lighter charger. Do not use or store battery pack close to fire or inside the car where temperature may contain substances that generates static electricity. Battery pack can also contact DYMO for more information on the collection, reuse, and recycling of this User Guide... equipment in an environmentally sound way. While Charging the Battery Pack Danger When charging the battery pack, use dedicated chargers and follow the instructions below. It may be used within -20°C~60°C (-4°F~140°F)...


