User Guide
Page 2
Contents About Your New Label Maker 5 Product Registration 5 Getting Started 5 Connecting the Power 5 Inserting the Batteries 5 Connecting the Optional Power Adapter 6 Inserting the Tape Cassette 6 Using the Label Maker for the First Time 7 Getting to Know the Label Maker 7 Power ...7 LCD Display ...8 Format ...8 Insert ...8 Settings ...8 CAPS Mode ...8 Num Lock ...9 ...
Contents About Your New Label Maker 5 Product Registration 5 Getting Started 5 Connecting the Power 5 Inserting the Batteries 5 Connecting the Optional Power Adapter 6 Inserting the Tape Cassette 6 Using the Label Maker for the First Time 7 Getting to Know the Label Maker 7 Power ...7 LCD Display ...8 Format ...8 Insert ...8 Settings ...8 CAPS Mode ...8 Num Lock ...9 ...

User Guide
Page 4
17 18 19 20 21 22 23 1 16 2 15 3 14 4 5 6 7 c 13 8 12 11 10 9 Figure 1 DYMO® LabelManager® 210D Electronic Label Maker 1 Tape cutter 2 Print 3 Save 4 OK 5 Number lock 6 Backspace 7 Currency 8 Return 9 Accented character 10 Punctuation 11 Space bar 12 Insert 13 Caps 14 Format 15 Settings 16 On/Off 17 AC power connector 18 Clear 19 Open 20 Navigation 21 LCD display 22 Cancel 23 Preview 4
17 18 19 20 21 22 23 1 16 2 15 3 14 4 5 6 7 c 13 8 12 11 10 9 Figure 1 DYMO® LabelManager® 210D Electronic Label Maker 1 Tape cutter 2 Print 3 Save 4 OK 5 Number lock 6 Backspace 7 Currency 8 Return 9 Accented character 10 Punctuation 11 Space bar 12 Insert 13 Caps 14 Format 15 Settings 16 On/Off 17 AC power connector 18 Clear 19 Open 20 Navigation 21 LCD display 22 Cancel 23 Preview 4
User Guide
Page 5
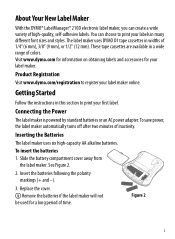
... (+ and -). 3. Getting Started Follow the instructions in many different font sizes and styles. See Figure 2. 2. The label maker uses DYMO D1 tape cassettes in a wide range of colors. Connecting the Power The label maker is powered by standard batteries or an AC power adapter. Product...label maker. Inserting the Batteries The label maker uses six high-capacity AA alkaline batteries. About Your New Label Maker With the DYMO® LabelManager® 210D electronic label maker, you can choose to register your first label. You can create a wide variety of time. To insert the...
... (+ and -). 3. Getting Started Follow the instructions in many different font sizes and styles. See Figure 2. 2. The label maker uses DYMO D1 tape cassettes in a wide range of colors. Connecting the Power The label maker is powered by standard batteries or an AC power adapter. Product...label maker. Inserting the Batteries The label maker uses six high-capacity AA alkaline batteries. About Your New Label Maker With the DYMO® LabelManager® 210D electronic label maker, you can choose to register your first label. You can create a wide variety of time. To insert the...

User Guide
Page 6
...maker disconnects the batteries as a power source. Remove cardboard insert Figure 4 To insert the tape cassette 1. Lift the tape cassette cover to open the tape compartment. Visit www.dymo.com for the first time, remove the protective cardboard insert from the main power source. ...Click! Ç Before using the label maker for information about purchasing additional tape cassettes. Press firmly until cassette clicks into...
...maker disconnects the batteries as a power source. Remove cardboard insert Figure 4 To insert the tape cassette 1. Lift the tape cassette cover to open the tape compartment. Visit www.dymo.com for the first time, remove the protective cardboard insert from the main power source. ...Click! Ç Before using the label maker for information about purchasing additional tape cassettes. Press firmly until cassette clicks into...
User Guide
Page 7
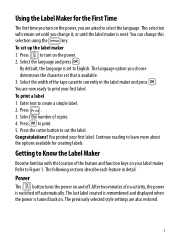
... asked to turn on the power. 2. The last label created is remembered and displayed when the power is switched off . Select the number of the tape cassette currently in detail. You printed your label maker. You are also restored. 7 The following sections describe each feature in the label maker and press...
... asked to turn on the power. 2. The last label created is remembered and displayed when the power is switched off . Select the number of the tape cassette currently in detail. You printed your label maker. You are also restored. 7 The following sections describe each feature in the label maker and press...

User Guide
Page 16
... cutter blade. Clean the cutter blade each time you want to give you long and trouble-free service, while requiring very little maintenance. Remove the tape cassette. 2. Gently wipe the padded side of the blade. Caring for Your Label Maker Your label maker is designed to insert. 4. See Figure 6. 16 Remove.... 2. See Figure 6. 3. Position the cursor at the location in the current label. The first memory location is inserted in the label where you replace the tape cassette. Press }. The text is displayed. 3. Remove the...
... cutter blade. Clean the cutter blade each time you want to give you long and trouble-free service, while requiring very little maintenance. Remove the tape cassette. 2. Gently wipe the padded side of the blade. Caring for Your Label Maker Your label maker is designed to insert. 4. See Figure 6. 16 Remove.... 2. See Figure 6. 3. Position the cursor at the location in the current label. The first memory location is inserted in the label where you replace the tape cassette. Press }. The text is displayed. 3. Remove the...
User Guide
Page 17
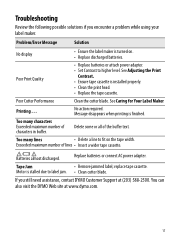
... installed properly. • Clean the print head. • Replace the tape cassette. Too many characters Exceeded maximum number of characters in buffer. Batteries almost discharged. Replace batteries or connect AC power adapter. No action required. You can also visit the DYMO Web site at (203) 588-2500. Poor Cutter Performance Clean the...
... installed properly. • Clean the print head. • Replace the tape cassette. Too many characters Exceeded maximum number of characters in buffer. Batteries almost discharged. Replace batteries or connect AC power adapter. No action required. You can also visit the DYMO Web site at (203) 588-2500. Poor Cutter Performance Clean the...


