
Warranty (English)
Page 1
... obtain in-home warranty service for a period of 90 days from the date you notify Dynex during the Warranty Period. 90 Day Limited Warranty Dynex Products ("Dynex") warrants to you, the original purchaser of this new product, that the product shall be free of defects in the original manufacture of the material or workmanship for a television with a screen 25 inches or larger...
... obtain in-home warranty service for a period of 90 days from the date you notify Dynex during the Warranty Period. 90 Day Limited Warranty Dynex Products ("Dynex") warrants to you, the original purchaser of this new product, that the product shall be free of defects in the original manufacture of the material or workmanship for a television with a screen 25 inches or larger...
User Manual (English)
Page 2
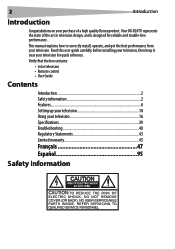
... and trouble-free performance. Your DX-R24TV represents the state of a high quality Dynex product. REFER SERVICING TO QUALIFIED SERVICE PERSONNEL. Verify that the box contains: • Color television • Remote control • User Guide Contents Introduction 2 Safety information 2 Features 6 Setting up your television 10 Using your purchase of the art in television design, and is designed for quick reference. NO USER-SERVICEABLE PARTS INSIDE. 2 Introduction Introduction Congratulations on your television 16 Specifications 39 Troubleshooting...
... and trouble-free performance. Your DX-R24TV represents the state of a high quality Dynex product. REFER SERVICING TO QUALIFIED SERVICE PERSONNEL. Verify that the box contains: • Color television • Remote control • User Guide Contents Introduction 2 Safety information 2 Features 6 Setting up your television 10 Using your purchase of the art in television design, and is designed for quick reference. NO USER-SERVICEABLE PARTS INSIDE. 2 Introduction Introduction Congratulations on your television 16 Specifications 39 Troubleshooting...

User Manual (English)
Page 3
... of important operating and maintenance (servicing) instructions in the literature accompanying the appliance. Use a dry cloth for ventilation, to ensure reliable operation of electric shock. Do not use liquid cleaners or aerosol cleaners. • To avoid hazards, use only attachments recommended by placing the television on an unstable cart, stand, Portable Cart Warning or table. If the plug should never...
... of important operating and maintenance (servicing) instructions in the literature accompanying the appliance. Use a dry cloth for ventilation, to ensure reliable operation of electric shock. Do not use liquid cleaners or aerosol cleaners. • To avoid hazards, use only attachments recommended by placing the television on an unstable cart, stand, Portable Cart Warning or table. If the plug should never...
User Manual (English)
Page 4
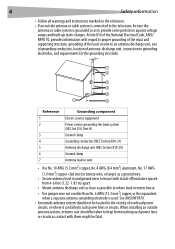
... information • Follow all warnings and instructions marked on the television. • If an outside antenna or cable system is connected to the television, be located in the vicinity of antenna-discharge unit, connection to grounding electrodes, and requirements for the grounding electrode. 7 6 5 4 3 1 2 Reference Grounding component 1 Electric service equipment 2 Power service grounding electrode system (NEC Art 250, Part H) 3 Ground clamp 4 Grounding conductors (NEC...
... information • Follow all warnings and instructions marked on the television. • If an outside antenna or cable system is connected to the television, be located in the vicinity of antenna-discharge unit, connection to grounding electrodes, and requirements for the grounding electrode. 7 6 5 4 3 1 2 Reference Grounding component 1 Electric service equipment 2 Power service grounding electrode system (NEC Art 250, Part H) 3 Ground clamp 4 Grounding conductors (NEC...
User Manual (English)
Page 5
... in particular, specifies that the cable ground shall be sure the service technician has used replacement parts specified by the operating instructions, because incorrect adjustment of time, unplug it from the power outlet and disconnect it is left unattended and unused for proper grounding and, in fire, electric shock, or other hazards. Note to cable television system installer This reminder is safe to...
... in particular, specifies that the cable ground shall be sure the service technician has used replacement parts specified by the operating instructions, because incorrect adjustment of time, unplug it from the power outlet and disconnect it is left unattended and unused for proper grounding and, in fire, electric shock, or other hazards. Note to cable television system installer This reminder is safe to...
User Manual (English)
Page 8
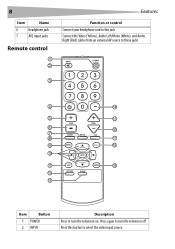
Press again to turn the television on. Press this jack Connect the Video (Yellow), Audio Left/Mono (White), and Audio Right (Red) cables from an external AV source to these jacks 3 4 14 5 15 6 16 7 CCD 8 17 9 DISPLAY 18 10 ENTER 11 19 12 13 Item Button 1 POWER 2 INPUT Description Press to turn the television off. 8 Item Name 6 headphone jack 7 AV2 input jacks Remote control 1 2 Features Function or control Connect your headphone cord to this button to select the video input source.
Press again to turn the television on. Press this jack Connect the Video (Yellow), Audio Left/Mono (White), and Audio Right (Red) cables from an external AV source to these jacks 3 4 14 5 15 6 16 7 CCD 8 17 9 DISPLAY 18 10 ENTER 11 19 12 13 Item Button 1 POWER 2 INPUT Description Press to turn the television off. 8 Item Name 6 headphone jack 7 AV2 input jacks Remote control 1 2 Features Function or control Connect your headphone cord to this button to select the video input source.
User Manual (English)
Page 9
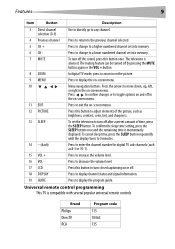
... channel number for digital TV sub-channels (such as brightness, contrast, color, tint, and sharpness. 13 SLEEP To set into memory. 6 CH 7 MUTE Press to change to a higher numbered channel set into memory. Features 9 Item Button Description 3 Direct channel selection (0-9) 4 Previous channel Use to directly go to decrease the volume level. The television is momentarily displayed. Press to confirm changes or to display the program guide. Universal remote control programming This TV is compatible with several popular universal remote controls. To turn closed captioning...
... channel number for digital TV sub-channels (such as brightness, contrast, color, tint, and sharpness. 13 SLEEP To set into memory. 6 CH 7 MUTE Press to change to a higher numbered channel set into memory. Features 9 Item Button Description 3 Direct channel selection (0-9) 4 Previous channel Use to directly go to decrease the volume level. The television is momentarily displayed. Press to confirm changes or to display the program guide. Universal remote control programming This TV is compatible with several popular universal remote controls. To turn closed captioning...
User Manual (English)
Page 10
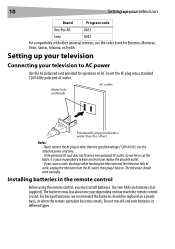
... the batteries should work , unplug the television from the AC outlet, then plug it back in the remote control Before using the remote control, you cause a static discharge when touching the television and the television fails to other than the other universal remotes, use the codes listed for operation on AC. If you must install batteries. Installing batteries in . Use the attached power cord only. - Use two AAA size batteries (not supplied). The batteries...
... the batteries should work , unplug the television from the AC outlet, then plug it back in the remote control Before using the remote control, you cause a static discharge when touching the television and the television fails to other than the other universal remotes, use the codes listed for operation on AC. If you must install batteries. Installing batteries in . Use the attached power cord only. - Use two AAA size batteries (not supplied). The batteries...

User Manual (English)
Page 13
... use to interconnect various video and audio components to accommodate your television, such as a VCR or DVD player. You may need to modify them to the television is dependent on -screen display. Selecting the video input source Press INPUT on the remote to view a signal from another 75 ohm coaxial cable, connect the output jack of the converter/descrambler box to the RF IN jack on the television. -Set the television to the output channel of the converter/descrambler box (usually channel...
... use to interconnect various video and audio components to accommodate your television, such as a VCR or DVD player. You may need to modify them to the television is dependent on -screen display. Selecting the video input source Press INPUT on the remote to view a signal from another 75 ohm coaxial cable, connect the output jack of the converter/descrambler box to the RF IN jack on the television. -Set the television to the output channel of the converter/descrambler box (usually channel...
User Manual (English)
Page 14
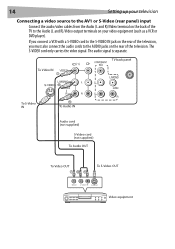
14 Setting up your television Connecting a video source to the AV1 or S-Video (rear panel) input Connect the audio/video cables from the Audio (L and R)/Video terminal on the back of the television. If you connect a VCR with a S-VIDEO cord to the S-VIDEO IN jack on the rear of the television, you must also connect the audio cords to the Audio (L and R)/Video output terminals on the rear of the TV to the AUDIO jacks on your video equipment (such as a VCR or DVD player). The audio signal is...
14 Setting up your television Connecting a video source to the AV1 or S-Video (rear panel) input Connect the audio/video cables from the Audio (L and R)/Video terminal on the back of the television. If you connect a VCR with a S-VIDEO cord to the S-VIDEO IN jack on the rear of the television, you must also connect the audio cords to the Audio (L and R)/Video output terminals on the rear of the TV to the AUDIO jacks on your video equipment (such as a VCR or DVD player). The audio signal is...
User Manual (English)
Page 15
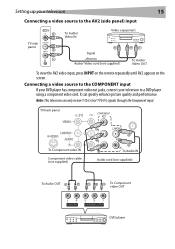
...Signal Audio/ Video cord (not supplied) W Y To Audio/ Video OUT To view the AV2 video input, press INPUT on the remote repeatedly until AV2 appears on the screen. TV back panel (1) To Component video IN Component video cable (not supplied) G w B R R To Audio IN Audio cord (not supplied) To Audio OUT W R R B G To Component video OUT L R AUDIO OUTPUT Cr Cb Y COMPONENT OUTPUT DVD player Connecting a video source to the COMPONENT input If your DVD player has component video out jacks, connect your television 15 Connecting a video source to a DVD player using a component...
...Signal Audio/ Video cord (not supplied) W Y To Audio/ Video OUT To view the AV2 video input, press INPUT on the remote repeatedly until AV2 appears on the screen. TV back panel (1) To Component video IN Component video cable (not supplied) G w B R R To Audio IN Audio cord (not supplied) To Audio OUT W R R B G To Component video OUT L R AUDIO OUTPUT Cr Cb Y COMPONENT OUTPUT DVD player Connecting a video source to the COMPONENT input If your DVD player has component video out jacks, connect your television 15 Connecting a video source to a DVD player using a component...
User Manual (English)
Page 16
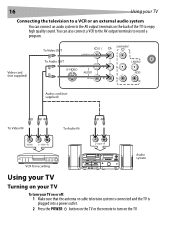
... the antenna or cable television system is connected and the TV is plugged into a power outlet. 2 Press the POWER button on the TV or the remote to turn your TV Connecting the television to a VCR or an external audio system You can also connect a VCR to the AV output terminals to enjoy high quality sound. Video cord (not supplied) To Video OUT To Audio OUT (1) L/MONO Audio cord (not supplied) To Video IN To Audio IN VCR for recording Audio system Using...
... the antenna or cable television system is connected and the TV is plugged into a power outlet. 2 Press the POWER button on the TV or the remote to turn your TV Connecting the television to a VCR or an external audio system You can also connect a VCR to the AV output terminals to enjoy high quality sound. Video cord (not supplied) To Video OUT To Audio OUT (1) L/MONO Audio cord (not supplied) To Video IN To Audio IN VCR for recording Audio system Using...
User Manual (English)
Page 17
... use this plug with this TV is no input signal for example, if you turn off automatically by pressing the VOL+ button). Adjusting the volume To adjust the volume: • Press the VOL+ to mute the sound. After you can be fully inserted. 3 Press the POWER button on the TV or the remote again to turn it on screen. Viewing the program guide (digital TV only) To view the program guide: • Press GUIDE...
... use this plug with this TV is no input signal for example, if you turn off automatically by pressing the VOL+ button). Adjusting the volume To adjust the volume: • Press the VOL+ to mute the sound. After you can be fully inserted. 3 Press the POWER button on the TV or the remote again to turn it on screen. Viewing the program guide (digital TV only) To view the program guide: • Press GUIDE...
User Manual (English)
Page 21
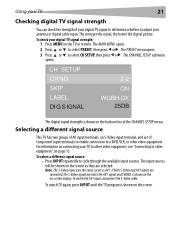
...-DX 25DB The digital signal strength is shown on the on the bottom line of the CHANNEL SETUP menu. Selecting a different signal source This TV has two groups of AV input terminals, an S-Video input terminal, and set of Component input terminals to enable connection to a DVD, VCR, or other equipment" on the screen as AV1. Note: The S-Video input uses the same circuit as they are connected, the S-Video signal overrides the AV1 signal...
...-DX 25DB The digital signal strength is shown on the on the bottom line of the CHANNEL SETUP menu. Selecting a different signal source This TV has two groups of AV input terminals, an S-Video input terminal, and set of Component input terminals to enable connection to a DVD, VCR, or other equipment" on the screen as AV1. Note: The S-Video input uses the same circuit as they are connected, the S-Video signal overrides the AV1 signal...

User Manual (English)
Page 22
... or remote. The MAIN MENU opens. MAIN MENU PIC TURE P. Main menu overview MAIN MENU PICTURE P.LOCK CLOCK PRESET EXTRA PICTURE CONTRAST BRIGHTNESS COLOR TINT SHARPNESS P.LOCK PARENTAL LOCK CHANGE PASSWORD PARENTAL LOCK LOCK RATINGS LOCKS AUTO PROGRAM ANTENNA STRAT RATINGS LOCKS MPAA RATING TV RATING CANADA ENGLISH CANADA FRENCH CC SETTING CC TYPE CC MODE* CC CUSTOMER* CLOCK ON TIMER CLOCK DST AUTO CLOCK ZONE PRESET AUTO PROGRAM CH SETUP CH SETUP CH NO SKIP LABEL* DIG SIGNAL* CLOSED CAPTION CC DISPLAY CC SETTING EXTRA CLOSED CAPTION MENU LANGUAGE AUDIO...
... or remote. The MAIN MENU opens. MAIN MENU PIC TURE P. Main menu overview MAIN MENU PICTURE P.LOCK CLOCK PRESET EXTRA PICTURE CONTRAST BRIGHTNESS COLOR TINT SHARPNESS P.LOCK PARENTAL LOCK CHANGE PASSWORD PARENTAL LOCK LOCK RATINGS LOCKS AUTO PROGRAM ANTENNA STRAT RATINGS LOCKS MPAA RATING TV RATING CANADA ENGLISH CANADA FRENCH CC SETTING CC TYPE CC MODE* CC CUSTOMER* CLOCK ON TIMER CLOCK DST AUTO CLOCK ZONE PRESET AUTO PROGRAM CH SETUP CH SETUP CH NO SKIP LABEL* DIG SIGNAL* CLOSED CAPTION CC DISPLAY CC SETTING EXTRA CLOSED CAPTION MENU LANGUAGE AUDIO...
User Manual (English)
Page 23
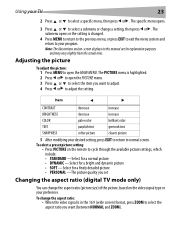
... to normal screen. The specific menu opens. 3 Press or to select a submenu or change the aspect ratio: • When the video signal is in this manual are for a finely detailed picture • PERSONAL -The picture quality you set Changing the aspect ratio (digital TV mode only) You can change the aspect ratio (picture size) of the picture, based on -screen displays in the 16:9 (wide screen) format, press ZOOM to select the aspect ratio you want to adjust. 4 Press or to select the item...
... to normal screen. The specific menu opens. 3 Press or to select a submenu or change the aspect ratio: • When the video signal is in this manual are for a finely detailed picture • PERSONAL -The picture quality you set Changing the aspect ratio (digital TV mode only) You can change the aspect ratio (picture size) of the picture, based on -screen displays in the 16:9 (wide screen) format, press ZOOM to select the aspect ratio you want to adjust. 4 Press or to select the item...

User Manual (English)
Page 25
... screen. The EXTRA menu opens. If using an indoor antenna or if television reception is not closed captions: 1 Press MENU. EXTTRRAA CLOSED CCAAPPTTIOIONN MMEENNUU LLAANNGGUUAAGGEE EENNGGLLIISSHH AAUUDDIIOO LLAANNGGUUAAGGEE EENNGGLLIISSHH Setting up closed -captioned, no caption signal is not available in the caption mode. - If the program or video you select is very poor, the closed captions, the captioning delays about ten seconds. - In this happens, set up closed captioning To set the closed captioned signal. - This is because during closed captioning...
... screen. The EXTRA menu opens. If using an indoor antenna or if television reception is not closed captions: 1 Press MENU. EXTTRRAA CLOSED CCAAPPTTIOIONN MMEENNUU LLAANNGGUUAAGGEE EENNGGLLIISSHH AAUUDDIIOO LLAANNGGUUAAGGEE EENNGGLLIISSHH Setting up closed -captioned, no caption signal is not available in the caption mode. - If the program or video you select is very poor, the closed captions, the captioning delays about ten seconds. - In this happens, set up closed captioning To set the closed captioned signal. - This is because during closed captioning...
User Manual (English)
Page 38
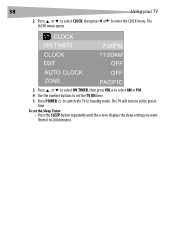
To set the TV ON time. 5 Press POWER to switch the TV to Standby mode. The TV will turn on at the preset time. CLOCK ON TIMER 7:00PM CLOCK 11:00AM DST OFF AUTO CLOCK ZONE OFF PACIFIC 3 Press or to select ON TIMER, then press VOL+ to select AM or PM. 4 Use the number buttons to set the Sleep Timer: • Press the SLEEP button repeatedly until the screen displays the sleep setting you want (from 0 to enter the CLOCK menu. The CLOCK menu opens. 38 Using your TV 2 Press or to select CLOCK, then press or to 240 minutes).
To set the TV ON time. 5 Press POWER to switch the TV to Standby mode. The TV will turn on at the preset time. CLOCK ON TIMER 7:00PM CLOCK 11:00AM DST OFF AUTO CLOCK ZONE OFF PACIFIC 3 Press or to select ON TIMER, then press VOL+ to select AM or PM. 4 Use the number buttons to set the Sleep Timer: • Press the SLEEP button repeatedly until the screen displays the sleep setting you want (from 0 to enter the CLOCK menu. The CLOCK menu opens. 38 Using your TV 2 Press or to select CLOCK, then press or to 240 minutes).
User Manual (English)
Page 40
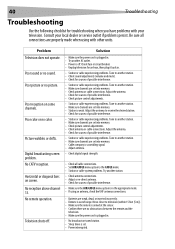
... channels are set into memory. • Check antenna or cable connections. Picture wobbles or drifts. Poor reception on screen. Digital broadcasting screen problem. Poor color or no picture. No CATV reception. Poor sound or no obstructions between the remote and the television. • Make sure the power cord is plugged in the appropriate mode. • If using with your local dealer or service outlet if problems persist. 40 Troubleshooting Troubleshooting Use the following checklist for troubleshooting...
... channels are set into memory. • Check antenna or cable connections. Picture wobbles or drifts. Poor reception on screen. Digital broadcasting screen problem. Poor color or no picture. No CATV reception. Poor sound or no obstructions between the remote and the television. • Make sure the power cord is plugged in the appropriate mode. • If using with your local dealer or service outlet if problems persist. 40 Troubleshooting Troubleshooting Use the following checklist for troubleshooting...
User Manual (English)
Page 45
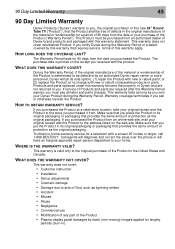
... • Negligence • Commercial use • Modification of any part of the Product • Plasma display panel damaged by this warranty that requires service, terms of this warranty apply. This warranty does not cover: • Customer instruction • Installation • Set up adjustments • Cosmetic damage • ...be free of defects in the original manufacture of the material or workmanship for a television with a screen 25 inches or larger, call 1-888-BESTBUY. or (2) replace the Product at its sole option): (1) repair the Product with new or rebuilt parts; If...
... • Negligence • Commercial use • Modification of any part of the Product • Plasma display panel damaged by this warranty that requires service, terms of this warranty apply. This warranty does not cover: • Customer instruction • Installation • Set up adjustments • Cosmetic damage • ...be free of defects in the original manufacture of the material or workmanship for a television with a screen 25 inches or larger, call 1-888-BESTBUY. or (2) replace the Product at its sole option): (1) repair the Product with new or rebuilt parts; If...


