User Manual (English)
Page 2
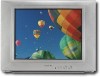
Verify that the box contains: • Color television • Remote control • User Guide Contents Introduction 2 Safety information 2 Features 6 Setting up your television 10 Using your television. This manual explains how to ... PERSONNEL. 2 Introduction Introduction Congratulations on your television for reliable and trouble-free performance. NO USER-SERVICEABLE PARTS INSIDE. Your DX-R24TV represents the state of a high quality Dynex product. Read this user guide carefully before installing your television, then keep it near your purchase of the art in television...
Verify that the box contains: • Color television • Remote control • User Guide Contents Introduction 2 Safety information 2 Features 6 Setting up your television 10 Using your television. This manual explains how to ... PERSONNEL. 2 Introduction Introduction Congratulations on your television for reliable and trouble-free performance. NO USER-SERVICEABLE PARTS INSIDE. Your DX-R24TV represents the state of a high quality Dynex product. Read this user guide carefully before installing your television, then keep it near your purchase of the art in television...
User Manual (English)
Page 6
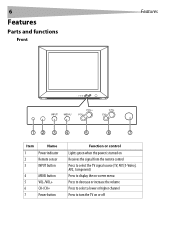
6 Features Parts and functions Front Features INPUT MENU VOL+ VOL CH+ CH 12 3 4 5 6 7 Item Name 1 Power indicator 2 Remote sensor 3 INPUT button 4 MENU button 5 VOL-/VOL+ 6 CH-/CH+ 7 Power button Function or control Lights green when the power is turned on Receives the signal from the remote control Press to select the TV signal source (TV, AV1[S-Video], AV2, Component) Press to display the on-screen menu Press to decrease or increase the volume Press to select a lower or higher channel Press to turn the TV on or off
6 Features Parts and functions Front Features INPUT MENU VOL+ VOL CH+ CH 12 3 4 5 6 7 Item Name 1 Power indicator 2 Remote sensor 3 INPUT button 4 MENU button 5 VOL-/VOL+ 6 CH-/CH+ 7 Power button Function or control Lights green when the power is turned on Receives the signal from the remote control Press to select the TV signal source (TV, AV1[S-Video], AV2, Component) Press to display the on-screen menu Press to decrease or increase the volume Press to select a lower or higher channel Press to turn the TV on or off
User Manual (English)
Page 8
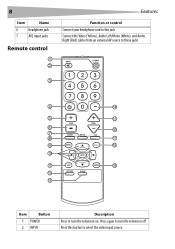
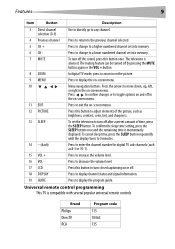
8 Item Name 6 headphone jack 7 AV2 input jacks Remote control 1 2 Features Function or control Connect your headphone cord to this button to select the video input source. Press this jack Connect the Video (Yellow), Audio Left/Mono (White), and Audio Right (Red) cables from an external AV source to these jacks 3 4 14 5 15 6 16 7 CCD 8 17 9 DISPLAY 18 10 ENTER 11 19 12 13 Item Button 1 POWER 2 INPUT Description Press to turn the television on. Press again to turn the television off.
8 Item Name 6 headphone jack 7 AV2 input jacks Remote control 1 2 Features Function or control Connect your headphone cord to this button to select the video input source. Press this jack Connect the Video (Yellow), Audio Left/Mono (White), and Audio Right (Red) cables from an external AV source to these jacks 3 4 14 5 15 6 16 7 CCD 8 17 9 DISPLAY 18 10 ENTER 11 19 12 13 Item Button 1 POWER 2 INPUT Description Press to turn the television on. Press again to turn the television off.
User Manual (English)
Page 9
... on -screen menus. To confirm the sleep time setting, press the SLEEP button once and the remaining time is compatible with several popular universal remote controls. Universal remote control programming This TV is momentarily displayed. Press to return to the previous channel selected 5 CH + Press to change to exit the on and...
... on -screen menus. To confirm the sleep time setting, press the SLEEP button once and the remaining time is compatible with several popular universal remote controls. Universal remote control programming This TV is momentarily displayed. Press to return to the previous channel selected 5 CH + Press to change to exit the on and...
User Manual (English)
Page 10
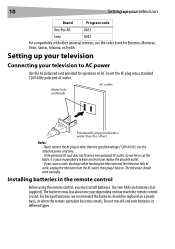
...outlet. Installing batteries in . Wider hole and blade AC outlet Polarized AC plug (one year depending on a yearly basis, or when the remote operation becomes erratic. Do not mix old and new batteries or different types. 10 Setting up your television Connecting your responsibility to AC power ... codes listed for operation on AC. Never connect the AC plug to work normally. The television should be replaced on how much the remote control is your television to have an electrician replace the obsolete outlet. - Use the attached power cord only. - The batteries may last...
...outlet. Installing batteries in . Wider hole and blade AC outlet Polarized AC plug (one year depending on a yearly basis, or when the remote operation becomes erratic. Do not mix old and new batteries or different types. 10 Setting up your television Connecting your responsibility to AC power ... codes listed for operation on AC. Never connect the AC plug to work normally. The television should be replaced on how much the remote control is your television to have an electrician replace the obsolete outlet. - Use the attached power cord only. - The batteries may last...
User Manual (English)
Page 11
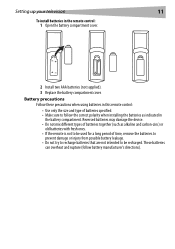
... only the size and type of batteries specified. • Make sure to be used for a long period of batteries together (such as indicated in the remote control: 1 Open the battery compartment cover. 2 Install two AAA batteries (not supplied). 3 Replace the battery compartment cover. Reversed batteries may damage the device. • Do... overheat and rupture (follow the correct polarity when installing the batteries as alkaline and carbon-zinc) or old batteries with fresh ones. • If the remote is not to be recharged.
... only the size and type of batteries specified. • Make sure to be used for a long period of batteries together (such as indicated in the remote control: 1 Open the battery compartment cover. 2 Install two AAA batteries (not supplied). 3 Replace the battery compartment cover. Reversed batteries may damage the device. • Do... overheat and rupture (follow the correct polarity when installing the batteries as alkaline and carbon-zinc) or old batteries with fresh ones. • If the remote is not to be recharged.
User Manual (English)
Page 12
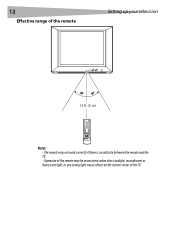
12 Effective range of the TV. Operation of the remote may not work correctly if there is an obstacle between the remote and the TV. - The remote may be inconsistent when direct sunlight, incandescent or fluorescent light, or any strong light source shines on the remote sensor of the remote Setting up your television 15 ft. (5 m) Notes: -
12 Effective range of the TV. Operation of the remote may not work correctly if there is an obstacle between the remote and the TV. - The remote may be inconsistent when direct sunlight, incandescent or fluorescent light, or any strong light source shines on the remote sensor of the remote Setting up your television 15 ft. (5 m) Notes: -

User Manual (English)
Page 13
... cords. - Connect the 75 ohm cable from the combination VHF/UHF antenna, cable wall outlet, or descrambler box to the Antenna Input jack on the remote to view a signal from antenna, cable wall outlet, or descrambler box - You may need to modify them to a cable television service which input jacks you...
... cords. - Connect the 75 ohm cable from the combination VHF/UHF antenna, cable wall outlet, or descrambler box to the Antenna Input jack on the remote to view a signal from antenna, cable wall outlet, or descrambler box - You may need to modify them to a cable television service which input jacks you...
User Manual (English)
Page 15
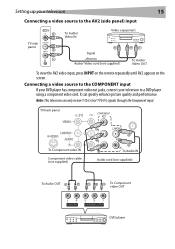
... Audio/ Video IN Video equipment R Signal Audio/ Video cord (not supplied) W Y To Audio/ Video OUT To view the AV2 video input, press INPUT on the remote repeatedly until AV2 appears on the screen.
... Audio/ Video IN Video equipment R Signal Audio/ Video cord (not supplied) W Y To Audio/ Video OUT To view the AV2 video input, press INPUT on the remote repeatedly until AV2 appears on the screen.
User Manual (English)
Page 16
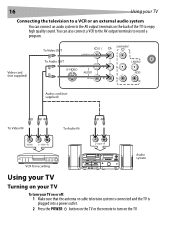
... the antenna or cable television system is connected and the TV is plugged into a power outlet. 2 Press the POWER button on the TV or the remote to record a program.
... the antenna or cable television system is connected and the TV is plugged into a power outlet. 2 Press the POWER button on the TV or the remote to record a program.
User Manual (English)
Page 17
..., if there is no input signal for example, if you want channel 83, press 8, then press 3). After you turn it on the TV or the remote again to increase the volume, or the VOL- Adjusting the volume To adjust the volume: • Press the VOL+ to turn off the TV. Do... not use this plug with this TV is polarized to restore the sound (you can set the TV to show the program guide on the remote to turn off automatically by pressing the VOL+ button). Note: You can also restore the sound by setting the SLEEP timer. To select a channel: •...
..., if there is no input signal for example, if you want channel 83, press 8, then press 3). After you turn it on the TV or the remote again to increase the volume, or the VOL- Adjusting the volume To adjust the volume: • Press the VOL+ to turn off the TV. Do... not use this plug with this TV is polarized to restore the sound (you can set the TV to show the program guide on the remote to turn off automatically by pressing the VOL+ button). Note: You can also restore the sound by setting the SLEEP timer. To select a channel: •...
User Manual (English)
Page 18
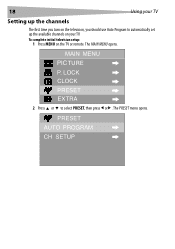
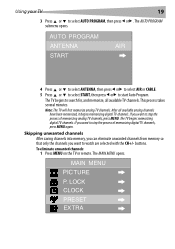
18 Using your TV Setting up the available channels on your TV. The MAIN MENU opens. LOCK CLOCK PRESET EX TRA 2 Press or to automatically set up the channels The first time you turn on the TV or remote. The PRESET menu opens. To complete initial television setup: 1 Press MENU on the television, you should use Auto Program to select PRESET, then press or . MAIN MENU PIC TURE P. PRESET AUTO PROGRAM CH SETUP
18 Using your TV Setting up the available channels on your TV. The MAIN MENU opens. LOCK CLOCK PRESET EX TRA 2 Press or to automatically set up the channels The first time you turn on the TV or remote. The PRESET menu opens. To complete initial television setup: 1 Press MENU on the television, you should use Auto Program to select PRESET, then press or . MAIN MENU PIC TURE P. PRESET AUTO PROGRAM CH SETUP
User Manual (English)
Page 19
..., and memorize, all available analog channels have been memorized, it begins memorizing digital TV channels. To eliminate unwanted channels: 1 Press MENU on the TV or remote. The TV begins to watch are selected with the CH+/- After all available TV channels. If you want to start Auto Program. The AUTO PROGRAM...
..., and memorize, all available analog channels have been memorized, it begins memorizing digital TV channels. To eliminate unwanted channels: 1 Press MENU on the TV or remote. The TV begins to watch are selected with the CH+/- After all available TV channels. If you want to start Auto Program. The AUTO PROGRAM...
User Manual (English)
Page 21
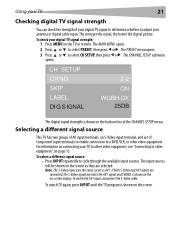
... AV1 input, disconnect the S-Video cable. The stronger the signal, the better the digital picture. CH SETUP CH NO SKIP LABEL DI G S IGNAL 2-2 ON WGBH-DX 25DB The digital signal strength is shown on the on-screen display. The input sources will be shown on the screen as AV1. To check... can check the strength of your digital TV signal to determine whether to adjust your digital TV signal strength: 1 Press MENU on the TV or remote.
... AV1 input, disconnect the S-Video cable. The stronger the signal, the better the digital picture. CH SETUP CH NO SKIP LABEL DI G S IGNAL 2-2 ON WGBH-DX 25DB The digital signal strength is shown on the on-screen display. The input sources will be shown on the screen as AV1. To check... can check the strength of your digital TV signal to determine whether to adjust your digital TV signal strength: 1 Press MENU on the TV or remote.

User Manual (English)
Page 22
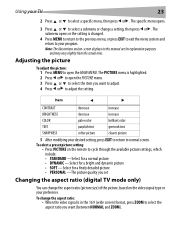
22 Using your TV Using the menus This TV has a simple and easy menu system that appears on the TV or remote. Unavailable items are grayed out and are not selectable. Main menu overview MAIN MENU PICTURE P.LOCK CLOCK PRESET EXTRA PICTURE CONTRAST BRIGHTNESS COLOR TINT SHARPNESS P....
22 Using your TV Using the menus This TV has a simple and easy menu system that appears on the TV or remote. Unavailable items are grayed out and are not selectable. Main menu overview MAIN MENU PICTURE P.LOCK CLOCK PRESET EXTRA PICTURE CONTRAST BRIGHTNESS COLOR TINT SHARPNESS P....
User Manual (English)
Page 23
... or your desired setting, press EXIT to return to select a specific menu, then press or . To select a preset picture setting: • Press PICTURE on the remote to cycle through the available picture settings, which include: • STANDARD -Select for a normal picture • DYNAMIC -Select for a bright and dynamic picture • SOFT...
... or your desired setting, press EXIT to return to select a specific menu, then press or . To select a preset picture setting: • Press PICTURE on the remote to cycle through the available picture settings, which include: • STANDARD -Select for a normal picture • DYNAMIC -Select for a bright and dynamic picture • SOFT...
User Manual (English)
Page 40
.... • Make sure channels are set . • Power interrupted. Move closer to television (within 15 feet [5 m]). • Make sure the remote is in . • Station or cable experiencing problems. Tune to another station. • Check sound adjustments (volume and mute). • Check for...• Power is plugged in . • Try another station. • Make sure channels are weak, dead, or inserted incorrectly. • Remote is out of possible interference. • Check picture control adjustments. • Station or cable experiencing problems. Tune to the CABLE mode. • ...
.... • Make sure channels are set . • Power interrupted. Move closer to television (within 15 feet [5 m]). • Make sure the remote is in . • Station or cable experiencing problems. Tune to another station. • Check sound adjustments (volume and mute). • Check for...• Power is plugged in . • Try another station. • Make sure channels are weak, dead, or inserted incorrectly. • Remote is out of possible interference. • Check picture control adjustments. • Station or cable experiencing problems. Tune to the CABLE mode. • ...


