User Manual (English)
Page 2
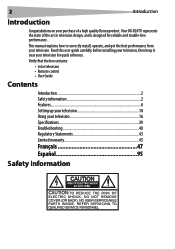
Your DX-R24TV represents the state of a high quality Dynex product. This manual explains how to correctly install, operate, and get the best performance from your television for reliable and trouble-free performance....before installing your television, then keep it near your television. NO USER-SERVICEABLE PARTS INSIDE. Verify that the box contains: • Color television • Remote control • User Guide Contents Introduction 2 Safety information 2 Features 6 Setting up your television 10 Using your television 16 Specifications 39 Troubleshooting 40 Regulatory Statements...
Your DX-R24TV represents the state of a high quality Dynex product. This manual explains how to correctly install, operate, and get the best performance from your television for reliable and trouble-free performance....before installing your television, then keep it near your television. NO USER-SERVICEABLE PARTS INSIDE. Verify that the box contains: • Color television • Remote control • User Guide Contents Introduction 2 Safety information 2 Features 6 Setting up your television 10 Using your television 16 Specifications 39 Troubleshooting 40 Regulatory Statements...
User Manual (English)
Page 6
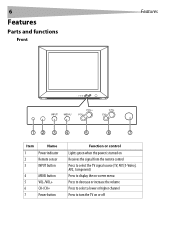
6 Features Parts and functions Front Features INPUT MENU VOL+ VOL CH+ CH 12 3 4 5 6 7 Item Name 1 Power indicator 2 Remote sensor 3 INPUT button 4 MENU button 5 VOL-/VOL+ 6 CH-/CH+ 7 Power button Function or control Lights green when the power is turned on Receives the signal from the remote control Press to select the TV signal source (TV, AV1[S-Video], AV2, Component) Press to display the on-screen menu Press to decrease or increase the volume Press to select a lower or higher channel Press to turn the TV on or off
6 Features Parts and functions Front Features INPUT MENU VOL+ VOL CH+ CH 12 3 4 5 6 7 Item Name 1 Power indicator 2 Remote sensor 3 INPUT button 4 MENU button 5 VOL-/VOL+ 6 CH-/CH+ 7 Power button Function or control Lights green when the power is turned on Receives the signal from the remote control Press to select the TV signal source (TV, AV1[S-Video], AV2, Component) Press to display the on-screen menu Press to decrease or increase the volume Press to select a lower or higher channel Press to turn the TV on or off
User Manual (English)
Page 8
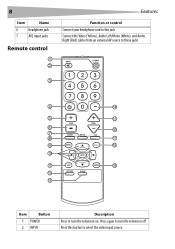
8 Item Name 6 headphone jack 7 AV2 input jacks Remote control 1 2 Features Function or control Connect your headphone cord to this button to turn the television off. Press this jack Connect the Video (Yellow), Audio Left/Mono (White), and Audio Right (Red) cables from an external AV source to these jacks 3 4 14 5 15 6 16 7 CCD 8 17 9 DISPLAY 18 10 ENTER 11 19 12 13 Item Button 1 POWER 2 INPUT Description Press to select the video input source. Press again to turn the television on.
8 Item Name 6 headphone jack 7 AV2 input jacks Remote control 1 2 Features Function or control Connect your headphone cord to this button to turn the television off. Press this jack Connect the Video (Yellow), Audio Left/Mono (White), and Audio Right (Red) cables from an external AV source to these jacks 3 4 14 5 15 6 16 7 CCD 8 17 9 DISPLAY 18 10 ENTER 11 19 12 13 Item Button 1 POWER 2 INPUT Description Press to select the video input source. Press again to turn the television on.
User Manual (English)
Page 9
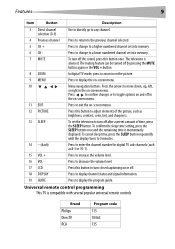
... menus. To confirm the sleep time setting, press the SLEEP button once and the remaining time is compatible with several popular universal remote controls. To cancel sleep time, press the SLEEP button repeatedly until the display turns to 0 minutes. 14 - (dash) Press...-channels (such as brightness, contrast, color, tint, and sharpness. 13 SLEEP To set the television to decrease the volume level. Universal remote control programming This TV is momentarily displayed. Press to any channel. Features 9 Item Button Description 3 Direct channel selection (0-9) 4 Previous channel...
... menus. To confirm the sleep time setting, press the SLEEP button once and the remaining time is compatible with several popular universal remote controls. To cancel sleep time, press the SLEEP button repeatedly until the display turns to 0 minutes. 14 - (dash) Press...-channels (such as brightness, contrast, color, tint, and sharpness. 13 SLEEP To set the television to decrease the volume level. Universal remote control programming This TV is momentarily displayed. Press to any channel. Features 9 Item Button Description 3 Direct channel selection (0-9) 4 Previous channel...
User Manual (English)
Page 10
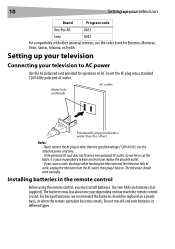
...attached power cord only. - It is your television Brand Program code One-For-All 0463 Sony 8042 For compatibility with other universal remotes, use the codes listed for operation on AC. 10 Setting up your television Connecting your television to AC power Use the AC polarized...best performance, we recommend the batteries should work , unplug the television from the AC outlet, then plug it back in the remote control Before using the remote control, you cause a static discharge when touching the television and the television fails to work normally. If you must install ...
...attached power cord only. - It is your television Brand Program code One-For-All 0463 Sony 8042 For compatibility with other universal remotes, use the codes listed for operation on AC. 10 Setting up your television Connecting your television to AC power Use the AC polarized...best performance, we recommend the batteries should work , unplug the television from the AC outlet, then plug it back in the remote control Before using the remote control, you cause a static discharge when touching the television and the television fails to work normally. If you must install ...
User Manual (English)
Page 11
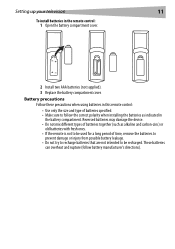
...not mix different types of batteries together (such as indicated in the battery compartment. Battery precautions Follow these precautions when using batteries in the remote control: 1 Open the battery compartment cover. 2 Install two AAA batteries (not supplied). 3 Replace the battery compartment cover. These batteries can...follow the correct polarity when installing the batteries as alkaline and carbon-zinc) or old batteries with fresh ones. • If the remote is not to be used for a long period of batteries specified. • Make sure to be recharged. Setting up your television...
...not mix different types of batteries together (such as indicated in the battery compartment. Battery precautions Follow these precautions when using batteries in the remote control: 1 Open the battery compartment cover. 2 Install two AAA batteries (not supplied). 3 Replace the battery compartment cover. These batteries can...follow the correct polarity when installing the batteries as alkaline and carbon-zinc) or old batteries with fresh ones. • If the remote is not to be used for a long period of batteries specified. • Make sure to be recharged. Setting up your television...
User Manual (English)
Page 12
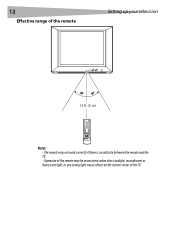
Operation of the remote may not work correctly if there is an obstacle between the remote and the TV. - 12 Effective range of the TV. The remote may be inconsistent when direct sunlight, incandescent or fluorescent light, or any strong light source shines on the remote sensor of the remote Setting up your television 15 ft. (5 m) Notes: -
Operation of the remote may not work correctly if there is an obstacle between the remote and the TV. - 12 Effective range of the TV. The remote may be inconsistent when direct sunlight, incandescent or fluorescent light, or any strong light source shines on the remote sensor of the remote Setting up your television 15 ft. (5 m) Notes: -

User Manual (English)
Page 13
... input source Press INPUT on -screen display. Check the owner's manual provided with electrical power cords. - If the antenna is shown on the on the remote to view a signal from the combination VHF/UHF antenna, cable wall outlet, or descrambler box to accommodate your particular components. Antenna input jack 300-75...
... input source Press INPUT on -screen display. Check the owner's manual provided with electrical power cords. - If the antenna is shown on the on the remote to view a signal from the combination VHF/UHF antenna, cable wall outlet, or descrambler box to accommodate your particular components. Antenna input jack 300-75...
User Manual (English)
Page 15
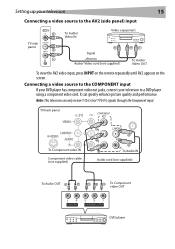
... Audio/ Video IN Video equipment R Signal Audio/ Video cord (not supplied) W Y To Audio/ Video OUT To view the AV2 video input, press INPUT on the remote repeatedly until AV2 appears on the screen. Connecting a video source to the COMPONENT input If your DVD player has component video out jacks, connect your...
... Audio/ Video IN Video equipment R Signal Audio/ Video cord (not supplied) W Y To Audio/ Video OUT To view the AV2 video input, press INPUT on the remote repeatedly until AV2 appears on the screen. Connecting a video source to the COMPONENT input If your DVD player has component video out jacks, connect your...
User Manual (English)
Page 16
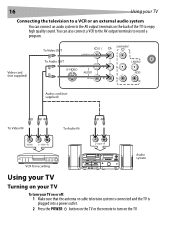
... the antenna or cable television system is connected and the TV is plugged into a power outlet. 2 Press the POWER button on the TV or the remote to turn your TV Connecting the television to a VCR or an external audio system You can also connect a VCR to the AV output terminals to...
... the antenna or cable television system is connected and the TV is plugged into a power outlet. 2 Press the POWER button on the TV or the remote to turn your TV Connecting the television to a VCR or an external audio system You can also connect a VCR to the AV output terminals to...
User Manual (English)
Page 17
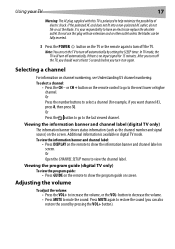
... or cut the blade. After you turn off the TV, you should wait at least 5 seconds before you turn it on the TV or the remote again to turn off the TV. To select a channel: • Press the CH - Or Press the number buttons to select a channel (for 15 minutes. Using... fully inserted. 3 Press the POWER button on again. Viewing the program guide (digital TV only) To view the program guide: • Press GUIDE on the remote to help minimize the possibility of electric shock. Press MUTE again to restore the sound (you want channel 83, press 8, then press 3). To view the...
... or cut the blade. After you turn off the TV, you should wait at least 5 seconds before you turn it on the TV or the remote again to turn off the TV. To select a channel: • Press the CH - Or Press the number buttons to select a channel (for 15 minutes. Using... fully inserted. 3 Press the POWER button on again. Viewing the program guide (digital TV only) To view the program guide: • Press GUIDE on the remote to help minimize the possibility of electric shock. Press MUTE again to restore the sound (you want channel 83, press 8, then press 3). To view the...
User Manual (English)
Page 18
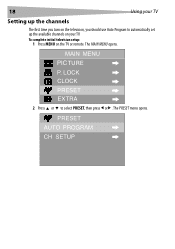
PRESET AUTO PROGRAM CH SETUP The PRESET menu opens. MAIN MENU PIC TURE P. The MAIN MENU opens. LOCK CLOCK PRESET EX TRA 2 Press or to automatically set up the available channels on the TV or remote. To complete initial television setup: 1 Press MENU on your TV Setting up the channels The first time you turn on the television, you should use Auto Program to select PRESET, then press or . 18 Using your TV.
PRESET AUTO PROGRAM CH SETUP The PRESET menu opens. MAIN MENU PIC TURE P. The MAIN MENU opens. LOCK CLOCK PRESET EX TRA 2 Press or to automatically set up the available channels on the TV or remote. To complete initial television setup: 1 Press MENU on your TV Setting up the channels The first time you turn on the television, you should use Auto Program to select PRESET, then press or . 18 Using your TV.
User Manual (English)
Page 19
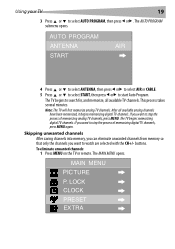
... channels. Note: The TV will first memorize analog TV channels. LOCK CLOCK PRESET EX TRA To eliminate unwanted channels: 1 Press MENU on the TV or remote. AUTO PROGRAM ANTENNA AIR START 4 Press or to select ANTENNA, then press or to select AIR or CABLE. 5 Press or to select START, then press...
... channels. Note: The TV will first memorize analog TV channels. LOCK CLOCK PRESET EX TRA To eliminate unwanted channels: 1 Press MENU on the TV or remote. AUTO PROGRAM ANTENNA AIR START 4 Press or to select ANTENNA, then press or to select AIR or CABLE. 5 Press or to select START, then press...
User Manual (English)
Page 21
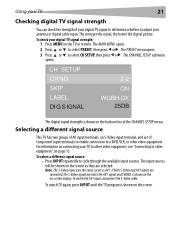
The MAIN MENU opens. 2 Press or to cycle through the available input sources. CH SETUP CH NO SKIP LABEL DI G S IGNAL 2-2 ON WGBH-DX 25DB The digital signal strength is shown on page 13. For information on connecting your TV to other video equipment, see "Connecting to other video .... To select a different signal source: • Press INPUT repeatedly to select PRESET, then press or . The input sources will be shown on the TV or remote. To watch TV again, press INPUT until the TV program is shown on the on the screen. The stronger the signal, the better the digital...
The MAIN MENU opens. 2 Press or to cycle through the available input sources. CH SETUP CH NO SKIP LABEL DI G S IGNAL 2-2 ON WGBH-DX 25DB The digital signal strength is shown on page 13. For information on connecting your TV to other video equipment, see "Connecting to other video .... To select a different signal source: • Press INPUT repeatedly to select PRESET, then press or . The input sources will be shown on the TV or remote. To watch TV again, press INPUT until the TV program is shown on the on the screen. The stronger the signal, the better the digital...

User Manual (English)
Page 22
22 Using your TV Using the menus This TV has a simple and easy menu system that appears on the TV or remote. The MAIN MENU opens. MAIN MENU PIC TURE P. To access and navigate the Menu system: 1 Press MENU on the screen when you press MENU. LOCK ...
22 Using your TV Using the menus This TV has a simple and easy menu system that appears on the TV or remote. The MAIN MENU opens. MAIN MENU PIC TURE P. To access and navigate the Menu system: 1 Press MENU on the screen when you press MENU. LOCK ...
User Manual (English)
Page 23
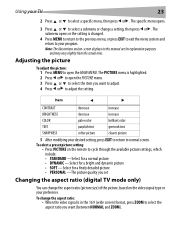
... picture: 1 Press MENU to open the PICTURE menu. 3 Press or to open the MAIN MENU. To select a preset picture setting: • Press PICTURE on the remote to cycle through the available picture settings, which include: • STANDARD -Select for a normal picture • DYNAMIC -Select for a bright and dynamic picture • SOFT...
... picture: 1 Press MENU to open the PICTURE menu. 3 Press or to open the MAIN MENU. To select a preset picture setting: • Press PICTURE on the remote to cycle through the available picture settings, which include: • STANDARD -Select for a normal picture • DYNAMIC -Select for a bright and dynamic picture • SOFT...
User Manual (English)
Page 40
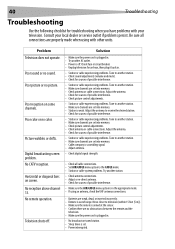
...using an antenna, check the UHF antenna connections. • Batteries are set . • Power interrupted. Poor reception on screen. No remote operation. Adjust the antenna. • Check for sources of range. Consult your television. Poor sound or no color. Poor color or ... Check picture control adjustments. • Station or cable experiencing problems. Tune to television (within 15 feet [5 m]). • Make sure the remote is aimed at the sensor. • Confirm there are set into memory. • Check antenna or cable connections. Problem Television does not operate...
...using an antenna, check the UHF antenna connections. • Batteries are set . • Power interrupted. Poor reception on screen. No remote operation. Adjust the antenna. • Check for sources of range. Consult your television. Poor sound or no color. Poor color or ... Check picture control adjustments. • Station or cable experiencing problems. Tune to television (within 15 feet [5 m]). • Make sure the remote is aimed at the sensor. • Confirm there are set into memory. • Check antenna or cable connections. Problem Television does not operate...


