
Initialization Guide
Page 2
... ❑ Change the default battery test time (page 28) 4 Install Optional Navisphere Software ❑ Connect the service laptop to the SP LAN port (page 29). ❑ Install software options (page 30). ❑ Set initial security parameters (page 32). 5 Make Management...or Fibre Channel Connections host (page 34). 6 Configure Your Host Server and Storage System (page 36) 2 EMC CLARiiON CX300, CX500, and CX700 Initialization Guide Initialization Overview Initialization Overview This section provides an overview of the initialization procedures described in the checklist should...
... ❑ Change the default battery test time (page 28) 4 Install Optional Navisphere Software ❑ Connect the service laptop to the SP LAN port (page 29). ❑ Install software options (page 30). ❑ Set initial security parameters (page 32). 5 Make Management...or Fibre Channel Connections host (page 34). 6 Configure Your Host Server and Storage System (page 36) 2 EMC CLARiiON CX300, CX500, and CX700 Initialization Guide Initialization Overview Initialization Overview This section provides an overview of the initialization procedures described in the checklist should...

Initialization Guide
Page 3
...http://powerlink.emc.com. ...domain. (Note that the Navisphere Management User Interface (UI) is a member of the EMC ControlCenter™ family of the Java 2 Runtime Environment (JRE) and web browser required ...with each storage system). ❑ For a CX500, you log in the domain.) The EMC Navisphere Manager 6.X Release Notes are on Powerlink. Working Installation Requirements ❑ A Windows®,...following: General Requirements ❑ A CX700, CX500, or CX300 storage system with the storage system. EMC CLARiiON CX300, CX500, and CX700 Initialization Guide 3 After you will need...
...http://powerlink.emc.com. ...domain. (Note that the Navisphere Management User Interface (UI) is a member of the EMC ControlCenter™ family of the Java 2 Runtime Environment (JRE) and web browser required ...with each storage system). ❑ For a CX500, you log in the domain.) The EMC Navisphere Manager 6.X Release Notes are on Powerlink. Working Installation Requirements ❑ A Windows®,...following: General Requirements ❑ A CX700, CX500, or CX300 storage system with the storage system. EMC CLARiiON CX300, CX500, and CX700 Initialization Guide 3 After you will need...
Initialization Guide
Page 5
...laptop is the most flexible modem type, and allows either a NULL modem cable or actual modem to connect to the laptop and SP. EMC CLARiiON CX300, CX500, and CX700 Initialization Guide 5 Modem Line Characteristics Line Characteristic Data bits Parity bits Stop bits Baud rate Setting 8 None 1 115200 baud What ...The PPP-capable (Point-to-Point Protocol) service laptop can be the highest speed at which the service laptop can reliably connect to the SPs. Physical Modem Table 1 If the laptop uses a physical modem, configure the modem for the line characteristics of the following: For Windows ...
...laptop is the most flexible modem type, and allows either a NULL modem cable or actual modem to connect to the laptop and SP. EMC CLARiiON CX300, CX500, and CX700 Initialization Guide 5 Modem Line Characteristics Line Characteristic Data bits Parity bits Stop bits Baud rate Setting 8 None 1 115200 baud What ...The PPP-capable (Point-to-Point Protocol) service laptop can be the highest speed at which the service laptop can reliably connect to the SPs. Physical Modem Table 1 If the laptop uses a physical modem, configure the modem for the line characteristics of the following: For Windows ...
Initialization Guide
Page 10
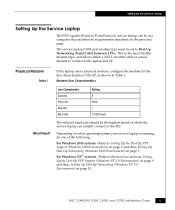
... create a phonebook entry. to the next section. Set the Initial speed (bps) to exit the Modem Configuration dialog box. 10 EMC CLARiiON CX300, CX500, and CX700 Initialization Guide Setting Up the Service Laptop What Next? 2. Click OK. 3. Click OK to 115200. Double-click My Computer, then...set up. 3. b. b. The computer reboots. Setting Up Dial-Up Networking (Windows NT 4.0 Environment) 1. One entry will suffice for all the SPs you want to Dial-Up Networking between 2 PCs (COMn). 6. When prompted to the new entry (for remote access (RAS) by doing the ...
... create a phonebook entry. to the next section. Set the Initial speed (bps) to exit the Modem Configuration dialog box. 10 EMC CLARiiON CX300, CX500, and CX700 Initialization Guide Setting Up the Service Laptop What Next? 2. Click OK. 3. Click OK to 115200. Double-click My Computer, then...set up. 3. b. b. The computer reboots. Setting Up Dial-Up Networking (Windows NT 4.0 Environment) 1. One entry will suffice for all the SPs you want to Dial-Up Networking between 2 PCs (COMn). 6. When prompted to the new entry (for remote access (RAS) by doing the ...

Initialization Guide
Page 11
...Select the Server assigned name server addresses check box. c. f. The service laptop is not, click the Change button and select Workgroup. EMC CLARiiON CX300, CX500, and CX700 Initialization Guide 11 Click OK to exit the Security dialog box. 17. Click the Security tab. 15. To verify the Domain name,.... Double-click Network. Click the Workgroup radio button, then click OK. In the Network dialog box, click the Identification tab. The SP will provide the address for the service laptop. Select the Use IP header compression check box. Set the Dial-up Networking dialog box ...
...Select the Server assigned name server addresses check box. c. f. The service laptop is not, click the Change button and select Workgroup. EMC CLARiiON CX300, CX500, and CX700 Initialization Guide 11 Click OK to exit the Security dialog box. 17. Click the Security tab. 15. To verify the Domain name,.... Double-click Network. Click the Workgroup radio button, then click OK. In the Network dialog box, click the Identification tab. The SP will provide the address for the service laptop. Select the Use IP header compression check box. Set the Dial-up Networking dialog box ...

Initialization Guide
Page 12
...have the network administrator at your facility assign IP addresses for added security? You will need this information to EMC-specific assigned value for the storage system, and complete the following worksheet. Special characters such as dots, ...SPs). Initializing the Storage System Initializing the Storage System This section describes how to 15 alphanumeric characters. Table 2 Initialization Worksheet SP A SP B Hostname Up to set critical startup parameters on SP A and SP B to complete the system setup. YES____ NO____ 12 EMC CLARiiON CX300, CX500, and CX700...
...have the network administrator at your facility assign IP addresses for added security? You will need this information to EMC-specific assigned value for the storage system, and complete the following worksheet. Special characters such as dots, ...SPs). Initializing the Storage System Initializing the Storage System This section describes how to 15 alphanumeric characters. Table 2 Initialization Worksheet SP A SP B Hostname Up to set critical startup parameters on SP A and SP B to complete the system setup. YES____ NO____ 12 EMC CLARiiON CX300, CX500, and CX700...

Initialization Guide
Page 13
...and no amber LEDs should be blinking. EMC CLARiiON CX300, CX500, and CX700 Initialization Guide 13 Connect the NULL modem cable between the laptop serial port (COM 1) and the SP A service port (|0|0|on a CX700, or on . Be sure that you are starting with SP A. However you will need the RJ45/DB9... process with the storage system. Initializing the Storage System Initialization Steps Follow the steps below to Service Port Connection (CX700 Shown) SP B SP A EMC2306 2. lOlOl Service Laptop RS-232 Cable Figure 1 COM 1 to initialize the storage system from the service laptop.
...and no amber LEDs should be blinking. EMC CLARiiON CX300, CX500, and CX700 Initialization Guide 13 Connect the NULL modem cable between the laptop serial port (COM 1) and the SP A service port (|0|0|on a CX700, or on . Be sure that you are starting with SP A. However you will need the RJ45/DB9... process with the storage system. Initializing the Storage System Initialization Steps Follow the steps below to Service Port Connection (CX700 Shown) SP B SP A EMC2306 2. lOlOl Service Laptop RS-232 Cable Figure 1 COM 1 to initialize the storage system from the service laptop.
Initialization Guide
Page 15
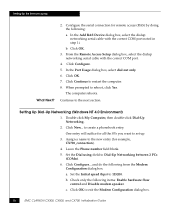
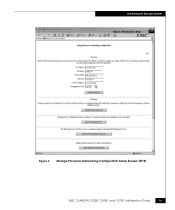
Initializing the Storage System Figure 2 Storage Processor Networking Configuration Setup Screen (SP A) EMC CLARiiON CX300, CX500, and CX700 Initialization Guide 15
Initializing the Storage System Figure 2 Storage Processor Networking Configuration Setup Screen (SP A) EMC CLARiiON CX300, CX500, and CX700 Initialization Guide 15
Initialization Guide
Page 16
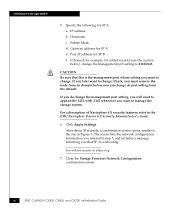
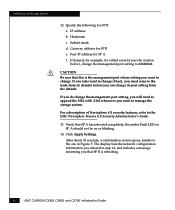
... from the default. If you can change . Close the Storage Processor Network Configuration confirmation screen. 16 EMC CLARiiON CX300, CX500, and CX700 Initialization Guide Hostname c. Gateway address for SP A: a. If you do change the management port setting to the EMC Navisphere Version 6.X Security Administrator's Guide. 6. IP address b. Subnet Mask d. After about 30 seconds, a confirmation screen...
... from the default. If you can change . Close the Storage Processor Network Configuration confirmation screen. 16 EMC CLARiiON CX300, CX500, and CX700 Initialization Guide Hostname c. Gateway address for SP A: a. If you do change the management port setting to the EMC Navisphere Version 6.X Security Administrator's Guide. 6. IP address b. Subnet Mask d. After about 30 seconds, a confirmation screen...

Initialization Guide
Page 17
... Connect to dialog box, log in as user clariion with password clariion!. Initializing the Storage System Figure 3 Network Configuration Confirmation Screen (SP A) 8. b. Remove the NULL modem cable from SP A and connect it between the laptop serial port (COM 1) and the SP B service port (|0|0|, or ). 9. c. EMC CLARiiON CX300, CX500, and CX700 Initialization Guide 17 Select the connection name that...
... Connect to dialog box, log in as user clariion with password clariion!. Initializing the Storage System Figure 3 Network Configuration Confirmation Screen (SP A) 8. b. Remove the NULL modem cable from SP A and connect it between the laptop serial port (COM 1) and the SP B service port (|0|0|, or ). 9. c. EMC CLARiiON CX300, CX500, and CX700 Initialization Guide 17 Select the connection name that...
Initialization Guide
Page 19
Initializing the Storage System Figure 4 Storage Processor Networking Configuration Setup Screen (SP B) EMC CLARiiON CX300, CX500, and CX700 Initialization Guide 19
Initializing the Storage System Figure 4 Storage Processor Networking Configuration Setup Screen (SP B) EMC CLARiiON CX300, CX500, and CX700 Initialization Guide 19
Initialization Guide
Page 20
... port setting, you will need to 2162/2163. ! CAUTION Be sure that this is rebooting. 20 EMC CLARiiON CX300, CX500, and CX700 Initialization Guide Click Apply Settings. Initializing the Storage System 12. If desired, for example, for SP A f. If you do change the management port setting to append the URL with :2162 whenever you...
... port setting, you will need to 2162/2163. ! CAUTION Be sure that this is rebooting. 20 EMC CLARiiON CX300, CX500, and CX700 Initialization Guide Click Apply Settings. Initializing the Storage System 12. If desired, for example, for SP A f. If you do change the management port setting to append the URL with :2162 whenever you...

Initialization Guide
Page 21
A Confirm: Navisphere Security dialog box opens indicating that global security is not initialized. Select No. EMC CLARiiON CX300, CX500, and CX700 Initialization Guide 21 Wait until SP B has finished rebooting, then open another PPP session (see page 32). 18. Select the Serial Connection button, and then... press OK. 19. As shown in Figure 6, right-click the SP B icon in the directory display, and select...
A Confirm: Navisphere Security dialog box opens indicating that global security is not initialized. Select No. EMC CLARiiON CX300, CX500, and CX700 Initialization Guide 21 Wait until SP B has finished rebooting, then open another PPP session (see page 32). 18. Select the Serial Connection button, and then... press OK. 19. As shown in Figure 6, right-click the SP B icon in the directory display, and select...

Initialization Guide
Page 22
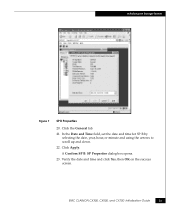
Initializing the Storage System Figure 6 Viewing SP B Properties The SP Properties screen opens, as shown in Figure 7. 22 EMC CLARiiON CX300, CX500, and CX700 Initialization Guide
Initializing the Storage System Figure 6 Viewing SP B Properties The SP Properties screen opens, as shown in Figure 7. 22 EMC CLARiiON CX300, CX500, and CX700 Initialization Guide
Initialization Guide
Page 23
Click the General tab. 21. Click Apply. Verify the date and time and click Yes, then OK on the success screen. In the Date and Time field, set the date and time for SP B by selecting the date, year, hour, or minute and using the arrows to scroll up and down. 22. EMC CLARiiON CX300, CX500, and CX700 Initialization Guide 23 A Confirm SP B: SP Properties dialog box opens. 23. Initializing the Storage System Figure 7 SP B Properties 20.
Click the General tab. 21. Click Apply. Verify the date and time and click Yes, then OK on the success screen. In the Date and Time field, set the date and time for SP B by selecting the date, year, hour, or minute and using the arrows to scroll up and down. 22. EMC CLARiiON CX300, CX500, and CX700 Initialization Guide 23 A Confirm SP B: SP Properties dialog box opens. 23. Initializing the Storage System Figure 7 SP B Properties 20.

Initialization Guide
Page 24
Set the port speeds to which it will see two ports.) 25. Figure 8 Setting the Port Speed 24 EMC CLARiiON CX300, CX500, and CX700 Initialization Guide In the SP Properties screen, click the Fibre Speed tab, as shown in Figure 8. (If you have a CX500 or CX300 storage system, you set the port speed, match it to the device to 1 or 2 gigabits/second for SP B. When you will be connected. Initializing the Storage System 24.
Set the port speeds to which it will see two ports.) 25. Figure 8 Setting the Port Speed 24 EMC CLARiiON CX300, CX500, and CX700 Initialization Guide In the SP Properties screen, click the Fibre Speed tab, as shown in Figure 8. (If you have a CX500 or CX300 storage system, you set the port speed, match it to the device to 1 or 2 gigabits/second for SP B. When you will be connected. Initializing the Storage System 24.

Initialization Guide
Page 25
... Windows 2000 a. Figure 9 Network Tab 28. b. In the Connect to dialog box, log in as user clariion with password clariion!. EMC CLARiiON CX300, CX500, and CX700 Initialization Guide 25 Confirm the IP Address, Gateway and Subnet Mask for SP B, then click OK. See Figure 9. 27. Select the connection name that you assigned when you set up...
... Windows 2000 a. Figure 9 Network Tab 28. b. In the Connect to dialog box, log in as user clariion with password clariion!. EMC CLARiiON CX300, CX500, and CX700 Initialization Guide 25 Confirm the IP Address, Gateway and Subnet Mask for SP B, then click OK. See Figure 9. 27. Select the connection name that you assigned when you set up...

Initialization Guide
Page 27
... screen (press F5) until the setup screen opens. 34. If it has not restarted, you can close the browser. 35. EMC CLARiiON CX300, CX500, and CX700 Initialization Guide 27 If the Management Server has successfully restarted, the system returns you really want to the setup screen. Repeat steps 16... through 27, setting the time, date, and port speed for SP A. A confirmation screen opens, asking you to verify that you to ...
... screen (press F5) until the setup screen opens. 34. If it has not restarted, you can close the browser. 35. EMC CLARiiON CX300, CX500, and CX700 Initialization Guide 27 If the Management Server has successfully restarted, the system returns you really want to the setup screen. Repeat steps 16... through 27, setting the time, date, and port speed for SP A. A confirmation screen opens, asking you to verify that you to ...
Initialization Guide
Page 28
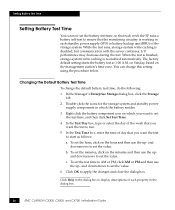
...to display descriptions of each standby power supply (SPS) or battery backup unit (BBU) of day that you want the test to ensure that the monitoring circuitry is working in each property in the dialog box. 28 EMC CLARiiON CX300, CX500, and CX700 Initialization Guide You can now set the battery... test time, so that each week the SP runs a battery self-test to run. 5. Double-click the icons for the storage ...
...to display descriptions of each standby power supply (SPS) or battery backup unit (BBU) of day that you want the test to ensure that the monitoring circuitry is working in each property in the dialog box. 28 EMC CLARiiON CX300, CX500, and CX700 Initialization Guide You can now set the battery... test time, so that each week the SP runs a battery self-test to run. 5. Double-click the icons for the storage ...
Initialization Guide
Page 29
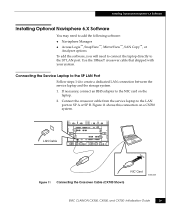
.... Connect the crossover cable from the service laptop to the NIC card on SP A or SP B. Figure 11 shows this connection on a CX700 system. LAN Cable Figure 11 Connecting the Crossover Cable (CX700 Shown) NIC Card EMC229 EMC CLARiiON CX300, CX500, and CX700 Initialization Guide 29 Use the 10BaseT crossover cable that shipped with your system. Installing...
.... Connect the crossover cable from the service laptop to the NIC card on SP A or SP B. Figure 11 shows this connection on a CX700 system. LAN Cable Figure 11 Connecting the Crossover Cable (CX700 Shown) NIC Card EMC229 EMC CLARiiON CX300, CX500, and CX700 Initialization Guide 29 Use the 10BaseT crossover cable that shipped with your system. Installing...