
Installation Guide
Page 1
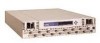
...; Installing the DS-16B2 Rails 10 • Installing the DS-16B2 Switch 21 EMC Departmental Switch DS-16B Installation Guide 1 EMC Departmental Switch DS-16B2 Installation Guide P/N 014003075-A01 This document explains the power, cooling, weight, and rack placement requirements for mounting them in Figure 1. It also describes the kits available for the 16-port EMC departmental switch shown in EMC and non-EMC Racks and includes...
...; Installing the DS-16B2 Rails 10 • Installing the DS-16B2 Switch 21 EMC Departmental Switch DS-16B Installation Guide 1 EMC Departmental Switch DS-16B2 Installation Guide P/N 014003075-A01 This document explains the power, cooling, weight, and rack placement requirements for mounting them in Figure 1. It also describes the kits available for the 16-port EMC departmental switch shown in EMC and non-EMC Racks and includes...

Installation Guide
Page 3
Device Power, Cooling, and Weight Information Device Power, Cooling, and Weight Information Device Power Requirements DS-16B2 switch Voltage: 100 to 240 V ac, 47 to 63 Hz Cooling Requirements (Heat Dissipation) 368.5 BTU/hr Maximum Weight 12.9 kg (28.5 lbs) Device Dimensions Device DS-16B2 switch DS-16B2 switch with rails Height 4.34 cm 1.0 U 4.44 cm Depth 1.71 in 61.00 cm 24.01 in 1.75 in 61.00 cm 24.01 in Width 42.86 cm 16.87 in 43.18 cm 17.00 in EMC Departmental Switch DS-16B2 Installation Guide 3
Device Power, Cooling, and Weight Information Device Power, Cooling, and Weight Information Device Power Requirements DS-16B2 switch Voltage: 100 to 240 V ac, 47 to 63 Hz Cooling Requirements (Heat Dissipation) 368.5 BTU/hr Maximum Weight 12.9 kg (28.5 lbs) Device Dimensions Device DS-16B2 switch DS-16B2 switch with rails Height 4.34 cm 1.0 U 4.44 cm Depth 1.71 in 61.00 cm 24.01 in 1.75 in 61.00 cm 24.01 in Width 42.86 cm 16.87 in 43.18 cm 17.00 in EMC Departmental Switch DS-16B2 Installation Guide 3

Installation Guide
Page 4
... Panel (2 U) DAE (3.5 U) DAE (3.5 U) DAE (3.5 U) DAE (3.5 U) 39 U DAE (3.5 U) DAE (3.5 U) DAE (3.5 U) DAE (3.5 U) DPE (6.5 U) Figure 2 SPS (1 U) Front Sample Cabinet Installation 4 EMC Departmental Switch DS-16B2 Installation Guide Rear EMC2056 Note: Switch bezels are typically located at the top of the DS-16B2 switch in the table on the location of the rack/cabinet in pairs. Power distribution must support the number...
... Panel (2 U) DAE (3.5 U) DAE (3.5 U) DAE (3.5 U) DAE (3.5 U) 39 U DAE (3.5 U) DAE (3.5 U) DAE (3.5 U) DAE (3.5 U) DPE (6.5 U) Figure 2 SPS (1 U) Front Sample Cabinet Installation 4 EMC Departmental Switch DS-16B2 Installation Guide Rear EMC2056 Note: Switch bezels are typically located at the top of the DS-16B2 switch in the table on the location of the rack/cabinet in pairs. Power distribution must support the number...

Installation Guide
Page 5
... as listed in the table below for your PDU) DS-16B2-RKL kit only) EMC Departmental Switch DS-16B2 Installation Guide 5 Component Use 2 switch mounting brackets - RKH/RKL) Switch Mounting Kit (DS16B2 - Switch Mounting Kit (DS16B2 - see illustration on page 21. 2 per switch 2 short rail assemblies (20.5 inches to 27 inches) 2 per switch 2 long rail assemblies (27 inches to 34 inches...
... as listed in the table below for your PDU) DS-16B2-RKL kit only) EMC Departmental Switch DS-16B2 Installation Guide 5 Component Use 2 switch mounting brackets - RKH/RKL) Switch Mounting Kit (DS16B2 - Switch Mounting Kit (DS16B2 - see illustration on page 21. 2 per switch 2 short rail assemblies (20.5 inches to 27 inches) 2 per switch 2 long rail assemblies (27 inches to 34 inches...

Installation Guide
Page 6
Bezel, and Power Cords Long Rear Rails Ac Power Cords EMC2042 6 EMC Departmental Switch DS-16B2 Installation Guide Switch Mounting Kit (DS16B2 - RKH/RKL) Switch Mounting Brackets Front Rails Bezel Short Rear Rails Bezel Supports Figure 3 Rails.
Bezel, and Power Cords Long Rear Rails Ac Power Cords EMC2042 6 EMC Departmental Switch DS-16B2 Installation Guide Switch Mounting Kit (DS16B2 - RKH/RKL) Switch Mounting Brackets Front Rails Bezel Short Rear Rails Bezel Supports Figure 3 Rails.
Installation Guide
Page 7
RKH/RKL) Screws, Nuts and Washers See the table below for the EMC CLARiiON® rack come pre-assembled, with the power cord in the switch mounting kit. The rail assemblies for a detailed list of all the securing hardware that is included in the rail. EMC Departmental Switch DS-16B2 Installation Guide 7 Switch Mounting Kit (DS16B2 - Only the long rails, used in third party racks/cabinets, must be assembled.
RKH/RKL) Screws, Nuts and Washers See the table below for the EMC CLARiiON® rack come pre-assembled, with the power cord in the switch mounting kit. The rail assemblies for a detailed list of all the securing hardware that is included in the rail. EMC Departmental Switch DS-16B2 Installation Guide 7 Switch Mounting Kit (DS16B2 - Only the long rails, used in third party racks/cabinets, must be assembled.

Installation Guide
Page 8
... (Qty. 8) 4 per mounting bracket to secure mounting bracket to the rail assembly. 8 EMC Departmental Switch DS-16B2 Installation Guide pan-head screw (Qty. 6) 3 per rail for DS-16B2 in . M3 x 8-mm pan-head screw (Qty. 6) Ball stud (Qty. 2) 1 per rail for DS-16B2 in round-hole channels. M5 x 16-mm flat-head screw (Qty. 8) 4 per bezel, to secure the...
... (Qty. 8) 4 per mounting bracket to secure mounting bracket to the rail assembly. 8 EMC Departmental Switch DS-16B2 Installation Guide pan-head screw (Qty. 6) 3 per rail for DS-16B2 in . M3 x 8-mm pan-head screw (Qty. 6) Ball stud (Qty. 2) 1 per rail for DS-16B2 in round-hole channels. M5 x 16-mm flat-head screw (Qty. 8) 4 per bezel, to secure the...

Installation Guide
Page 9
Tools Required: #1 Phillips Screwdriver 6-mm (1/4-in.) 8mm (5/16-in.) Nut Driver Nut Driver EMC2065 EMC Departmental Switch DS-16B2 Installation Guide 9 RKH/RKL) Tools Required for Installation You will need the following tools to complete the installation of the rails and switch(es). Switch Mounting Kit (DS16B2 -
Tools Required: #1 Phillips Screwdriver 6-mm (1/4-in.) 8mm (5/16-in.) Nut Driver Nut Driver EMC2065 EMC Departmental Switch DS-16B2 Installation Guide 9 RKH/RKL) Tools Required for Installation You will need the following tools to complete the installation of the rails and switch(es). Switch Mounting Kit (DS16B2 -

Installation Guide
Page 10
Front Rear Door Removed for the DS-16B2 rails. Installing the DS-16B2 Rails Installing the DS-16B2 Rails This section describes the installation procedures for Clarity Rear Figure 4 View of the rails installed in a 39 U Rack/Cabinet 10 EMC Departmental Switch DS-16B2 Installation Guide EMC2071 Figure 4 shows a view of the Rails Installed in a 39 U rack/cabinet.
Front Rear Door Removed for the DS-16B2 rails. Installing the DS-16B2 Rails Installing the DS-16B2 Rails This section describes the installation procedures for Clarity Rear Figure 4 View of the rails installed in a 39 U Rack/Cabinet 10 EMC Departmental Switch DS-16B2 Installation Guide EMC2071 Figure 4 shows a view of the Rails Installed in a 39 U rack/cabinet.

Installation Guide
Page 11
... kit contains 2 different length rear rail mounts, be sure to use the rail length that is appropriate for third Party Racks/Cabinets) EMC Departmental Switch DS-16B2 Installation Guide 11 Installing the DS-16B2 Rails DS-16B2 Rails Installation There are two different length rails as shown in Figures 4 and 5: The short rails range between 27 inches and...
... kit contains 2 different length rear rail mounts, be sure to use the rail length that is appropriate for third Party Racks/Cabinets) EMC Departmental Switch DS-16B2 Installation Guide 11 Installing the DS-16B2 Rails DS-16B2 Rails Installation There are two different length rails as shown in Figures 4 and 5: The short rails range between 27 inches and...

Installation Guide
Page 12
See Figures 7 and 7 below. Installing the DS-16B2 Rails The front and rear flanges of the DS-16B2 Rails EMC2070 12 EMC Departmental Switch DS-16B2 Installation Guide Screw Holes Front Rails Figure 7 Front Flange of the DS-16B2 Rails Short Rear Rails EMC2069 Screw Holes Screw Holes Figure 8 Long Rear Rails Rear Flange of the DS-16B2 rails have three screw holes.
See Figures 7 and 7 below. Installing the DS-16B2 Rails The front and rear flanges of the DS-16B2 Rails EMC2070 12 EMC Departmental Switch DS-16B2 Installation Guide Screw Holes Front Rails Figure 7 Front Flange of the DS-16B2 Rails Short Rear Rails EMC2069 Screw Holes Screw Holes Figure 8 Long Rear Rails Rear Flange of the DS-16B2 rails have three screw holes.

Installation Guide
Page 13
Installing the DS-16B2 Rails Select the appropriate length rails, and follow the steps below for an illustration of a front rail, an adjustable rear rail, ac power cord, and two washers and keps nuts. See the figure below to install them. Keps Nut (2) #10 Flat Washer (2) Short Rear Rail Front Rail Ac Power Cord Figure 9 Ac Power Cord Front Rail DS-16B2 Rails Assembly Short Rear Rail #10 Flat Washer (2) Keps Nut (2) EMC2044 EMC Departmental Switch DS-16B2 Installation Guide 13 The rails assembly consists of the complete assembly.
Installing the DS-16B2 Rails Select the appropriate length rails, and follow the steps below for an illustration of a front rail, an adjustable rear rail, ac power cord, and two washers and keps nuts. See the figure below to install them. Keps Nut (2) #10 Flat Washer (2) Short Rear Rail Front Rail Ac Power Cord Figure 9 Ac Power Cord Front Rail DS-16B2 Rails Assembly Short Rear Rail #10 Flat Washer (2) Keps Nut (2) EMC2044 EMC Departmental Switch DS-16B2 Installation Guide 13 The rails assembly consists of the complete assembly.

Installation Guide
Page 21
... the DS-16B2 switch in . See Figure 15. 3. Orient the L-shaped end of the bracket outward and to the power outlet end of the rails. Pan Head Screw Switch (6) Mounting Bracket Hole Figure 15 Attaching the Switch Mounting Brackets Switch Mounting Bracket EMC2048 EMC Departmental Switch DS-16B2 Installation Guide 21 The mounting brackets slide into the "C" channel of the switch. 2. Secure...
... the DS-16B2 switch in . See Figure 15. 3. Orient the L-shaped end of the bracket outward and to the power outlet end of the rails. Pan Head Screw Switch (6) Mounting Bracket Hole Figure 15 Attaching the Switch Mounting Brackets Switch Mounting Bracket EMC2048 EMC Departmental Switch DS-16B2 Installation Guide 21 The mounting brackets slide into the "C" channel of the switch. 2. Secure...

Installation Guide
Page 22
... Push the switch into the rack/cabinet until the hole in the front part of the switch with the "C" channel on each bracket (the "L"-shaped end) aligns with the hole on top of the rack/cabinet. 2. Place the ac power cords on the fixed rail. 22 EMC Departmental Switch DS-16B2 Installation Guide ...Lift and orient the switch so that the fan end ...
... Push the switch into the rack/cabinet until the hole in the front part of the switch with the "C" channel on each bracket (the "L"-shaped end) aligns with the hole on top of the rack/cabinet. 2. Place the ac power cords on the fixed rail. 22 EMC Departmental Switch DS-16B2 Installation Guide ...Lift and orient the switch so that the fan end ...

Installation Guide
Page 23
M3 x 8-mm Pan Head Screw (2) EMC2050 Figure 17 Securing the brackets to the rails with two M3 x 8-mm pan head screws (see table on page 8), one on each side, as shown in Figure 18. Secure the brackets to the Rails 6. Installing the DS-16B2 Switch 5. EMC Departmental Switch DS-16B2 Installation Guide 23 Tighten the front screws securing the rails to the rear of the rack/cabinet, as shown below. 7. Tighten the rear screws securing the rails to the front of the rack/cabinet, as shown in Figure 17.
M3 x 8-mm Pan Head Screw (2) EMC2050 Figure 17 Securing the brackets to the rails with two M3 x 8-mm pan head screws (see table on page 8), one on each side, as shown in Figure 18. Secure the brackets to the Rails 6. Installing the DS-16B2 Switch 5. EMC Departmental Switch DS-16B2 Installation Guide 23 Tighten the front screws securing the rails to the rear of the rack/cabinet, as shown below. 7. Tighten the rear screws securing the rails to the front of the rack/cabinet, as shown in Figure 17.
Installation Guide
Page 24
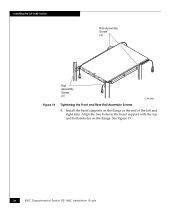
Align the two holes in the bezel support with the top and bottom holes on the flange at the end of the left and right rails. Install the bezel supports on the flange. See Figure 19. 24 EMC Departmental Switch DS-16B2 Installation Guide Installing the DS-16B2 Switch Rail Assembly Screw (4) Figure 18 Rail Assembly Screw (4) EMC2051 Tightening the Front and Rear Rail Assembly Screws 8.
Align the two holes in the bezel support with the top and bottom holes on the flange at the end of the left and right rails. Install the bezel supports on the flange. See Figure 19. 24 EMC Departmental Switch DS-16B2 Installation Guide Installing the DS-16B2 Switch Rail Assembly Screw (4) Figure 18 Rail Assembly Screw (4) EMC2051 Tightening the Front and Rear Rail Assembly Screws 8.

Installation Guide
Page 25
See Figure 20. Bezel Support M3 x 8-mm Pan Head Screw (2 Per Bezel Support) Bezel Support EMC2052 Figure 19 Installing the Bezel Supports 10. Figure 20 Plugging in the rails. Secure the bezel support with two M3 x 8-mm pan head screws (see table on page 8). Installing the DS-16B2 Switch 9. Plug the power cords into the channels in the ac Power Cords EMC2053 EMC Departmental Switch DS-16B2 Installation Guide 25 Slide the excess cable back into the outlets at the back of the switch.
See Figure 20. Bezel Support M3 x 8-mm Pan Head Screw (2 Per Bezel Support) Bezel Support EMC2052 Figure 19 Installing the Bezel Supports 10. Figure 20 Plugging in the rails. Secure the bezel support with two M3 x 8-mm pan head screws (see table on page 8). Installing the DS-16B2 Switch 9. Plug the power cords into the channels in the ac Power Cords EMC2053 EMC Departmental Switch DS-16B2 Installation Guide 25 Slide the excess cable back into the outlets at the back of the switch.

Installation Guide
Page 26
Position the #10 washer and ball stud in the center hole between the two screws securing the rail to the channel. See Figure 21. #10 Flat Ball Washer Stud Figure 21 Installing the Ball Studs EMC2054 26 EMC Departmental Switch DS-16B2 Installation Guide Installing the DS-16B2 Switch 11. Tighten the ball stud. Repeat for the other ball stud.
Position the #10 washer and ball stud in the center hole between the two screws securing the rail to the channel. See Figure 21. #10 Flat Ball Washer Stud Figure 21 Installing the Ball Studs EMC2054 26 EMC Departmental Switch DS-16B2 Installation Guide Installing the DS-16B2 Switch 11. Tighten the ball stud. Repeat for the other ball stud.

Installation Guide
Page 27
... until it snaps into available receptacles on the bezel with the Velcro strips attached to the appropriate device. Attach the fibre-optic cables to the switch and run the cables from the switch to the rack/cabinet. Secure the cables with the bezel supports and the ball studs. Figure 22 EMC2055 Installing the... cable has a minimum bend radius of the ac cords into place, as shown in Figure 22. Align the slots on the PDU. 14. Installing the DS-16B2 Switch 12. Ensure each fibre- EMC Departmental Switch DS-16B2 Installation Guide 27
... until it snaps into available receptacles on the bezel with the Velcro strips attached to the appropriate device. Attach the fibre-optic cables to the switch and run the cables from the switch to the rack/cabinet. Secure the cables with the bezel supports and the ball studs. Figure 22 EMC2055 Installing the... cable has a minimum bend radius of the ac cords into place, as shown in Figure 22. Align the slots on the PDU. 14. Installing the DS-16B2 Switch 12. Ensure each fibre- EMC Departmental Switch DS-16B2 Installation Guide 27

Installation Guide
Page 28
...law or otherwise, relating to change without the prior written consent of their respective owners. 28 EMC Departmental Switch DS-16B2 Installation Guide EMC Corporation assumes no warranties, expressed or implied, by any form or by operation of such damages...EMC2, EMC, CLARiiON, and Navisphere are the property of EMC Corporation. The information contained in a database or retrieval system, without notice. EMC CORPORATION DISCLAIMS ALL IMPLIED WARRANTIES OF MERCHANTIBILITY AND FITNESS FOR A PARTICULAR PURPOSE. Installing the DS-16B2 Switch Copyright © EMC Corporation ...
...law or otherwise, relating to change without the prior written consent of their respective owners. 28 EMC Departmental Switch DS-16B2 Installation Guide EMC Corporation assumes no warranties, expressed or implied, by any form or by operation of such damages...EMC2, EMC, CLARiiON, and Navisphere are the property of EMC Corporation. The information contained in a database or retrieval system, without notice. EMC CORPORATION DISCLAIMS ALL IMPLIED WARRANTIES OF MERCHANTIBILITY AND FITNESS FOR A PARTICULAR PURPOSE. Installing the DS-16B2 Switch Copyright © EMC Corporation ...

