
Owner's Manual
Page 3
...WINDOW KIT 4 INSTALLING THE GRATED ADAPTER 5 INSTALLING THE WINDOW PLATES 6 ATTACHING THE DUCT CONNECTORS TO THE EXHAUST HOSE 7 CONNECTING THE DUCT CONNECTOR TO THE UNIT 8 CONNECTING THE DUCT CONNECTOR TO THE GRATED ADAPTER 8 NOTES ABOUT THE EXHAUST HOSE 9 CONTROL PANEL OVERVIEW 10 OPERATING THE CONTROL PANEL 11 POWER ...11 AUTO-RESTART 11 COOLING MODE... GUIDE 14 MAINTENANCE 15 CLEANING THE UNIT 15 CLEANING THE PRE-FILTER 15 PREPARATION FOR STORAGE 15 TROUBLESHOOTING 16 TROUBLESHOOTING CONTINUED 17 SPECIFICATIONS 18 EDGESTAR LIMITED WARRANTY 19 Portable Air Conditioner ii
...WINDOW KIT 4 INSTALLING THE GRATED ADAPTER 5 INSTALLING THE WINDOW PLATES 6 ATTACHING THE DUCT CONNECTORS TO THE EXHAUST HOSE 7 CONNECTING THE DUCT CONNECTOR TO THE UNIT 8 CONNECTING THE DUCT CONNECTOR TO THE GRATED ADAPTER 8 NOTES ABOUT THE EXHAUST HOSE 9 CONTROL PANEL OVERVIEW 10 OPERATING THE CONTROL PANEL 11 POWER ...11 AUTO-RESTART 11 COOLING MODE... GUIDE 14 MAINTENANCE 15 CLEANING THE UNIT 15 CLEANING THE PRE-FILTER 15 PREPARATION FOR STORAGE 15 TROUBLESHOOTING 16 TROUBLESHOOTING CONTINUED 17 SPECIFICATIONS 18 EDGESTAR LIMITED WARRANTY 19 Portable Air Conditioner ii
Owner's Manual
Page 7
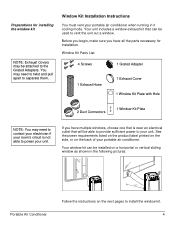
...: Portable Air Conditioner Follow the instructions on the back of your portable air conditioner. Window Kit Parts List: 4 Screws 1 Grated Adapter 1 Exhaust Hose 1 Exhaust Cover 1 Window Kit Plate with Hole 2 Duct Connectors 1 Window Kit Plate NOTE: You may need to twist and pull apart to the Grated... Adapters. Your window kit can be able to provide sufficient power to power your unit. Your unit includes a window exhaust kit that can be attached to separate them. If you have multiple windows, choose one that will be used to install the window ...
...: Portable Air Conditioner Follow the instructions on the back of your portable air conditioner. Window Kit Parts List: 4 Screws 1 Grated Adapter 1 Exhaust Hose 1 Exhaust Cover 1 Window Kit Plate with Hole 2 Duct Connectors 1 Window Kit Plate NOTE: You may need to twist and pull apart to the Grated... Adapters. Your window kit can be able to provide sufficient power to power your unit. Your unit includes a window exhaust kit that can be attached to separate them. If you have multiple windows, choose one that will be used to install the window ...

Owner's Manual
Page 10
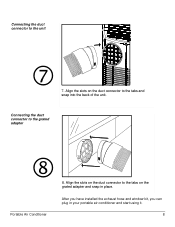
Thread the duct connector on by turning it clockwise until it stops. 6. Leave a space that is at least 20 inches to the hose: A. Attach the connectors to the wall. 7 Extend the ends of the exhaust hose B. Roll the unit towards the window kit. Attaching the duct connectors to the exhaust hose A. B. 5.
Thread the duct connector on by turning it clockwise until it stops. 6. Leave a space that is at least 20 inches to the hose: A. Attach the connectors to the wall. 7 Extend the ends of the exhaust hose B. Roll the unit towards the window kit. Attaching the duct connectors to the exhaust hose A. B. 5.
Owner's Manual
Page 11
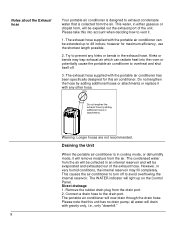
Connecting the duct connector to the unit Connecting the duct connector to the tabs and snap into the back of the unit. 8. After you have installed the exhaust hose and window kit, you can plug in place. Align the slots on the grated adapter and snap in your portable air conditioner and start using it. Portable Air Conditioner 8 Align the slots on the duct connector to the tabs on the duct connector to the grated adapter 7.
Connecting the duct connector to the unit Connecting the duct connector to the tabs and snap into the back of the unit. 8. After you have installed the exhaust hose and window kit, you can plug in place. Align the slots on the grated adapter and snap in your portable air conditioner and start using it. Portable Air Conditioner 8 Align the slots on the duct connector to the tabs on the duct connector to the grated adapter 7.
Owner's Manual
Page 12
...either gaseous or droplet form, will light up to 48 inches; however for this air conditioner. Do not lengthen the exhaust hose by adding additional hoses or attachments or replace it with the portable air conditioner can radiate heat into account when deciding how to vent it ...and shut itself off to avoid overflowing the internal reservoir. However, in the exhaust hose. Please note that is collected from the air. Notes about the Exhaust hose Your portable air conditioner is designed to exhaust condensate water that this unit has no drain pump; Try to the drain ...
...either gaseous or droplet form, will light up to 48 inches; however for this air conditioner. Do not lengthen the exhaust hose by adding additional hoses or attachments or replace it with the portable air conditioner can radiate heat into account when deciding how to vent it ...and shut itself off to avoid overflowing the internal reservoir. However, in the exhaust hose. Please note that is collected from the air. Notes about the Exhaust hose Your portable air conditioner is designed to exhaust condensate water that this unit has no drain pump; Try to the drain ...
Owner's Manual
Page 14
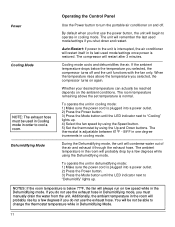
... button. 5) Set the thermostat by a few degrees if you shut down and restart. Operating the Control Panel Power Cooling Mode NOTE: The exhaust hose must manually drain the water from the unit. During the Dehumidifying mode, the unit will restart after 3 minutes. Dehumidifying Mode Use the Power ... lights up . 4) Select the fan speed by using the Dehumidifying mode. The compressor will condense water out of the air and exhaust it through the exhaust hose. The ambient temperature in the room will restart itself in its last used in Cooling mode in cooling mode. Auto-Restart: If ...
... button. 5) Set the thermostat by a few degrees if you shut down and restart. Operating the Control Panel Power Cooling Mode NOTE: The exhaust hose must manually drain the water from the unit. During the Dehumidifying mode, the unit will restart after 3 minutes. Dehumidifying Mode Use the Power ... lights up . 4) Select the fan speed by using the Dehumidifying mode. The compressor will condense water out of the air and exhaust it through the exhaust hose. The ambient temperature in the room will restart itself in its last used in Cooling mode in cooling mode. Auto-Restart: If ...
Owner's Manual
Page 15
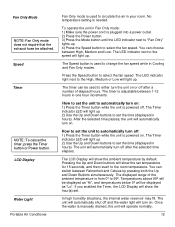
... in one hour increments. You can choose between 1-12 hours in your room. Fan Only Mode NOTE: Fan Only mode does not require that the exhaust hose be displayed as "Hi", and temperatures below 0º will turn on . LCD Display Water Light Portable Air Conditioner Fan Only mode is plugged into a power...
... in one hour increments. You can choose between 1-12 hours in your room. Fan Only Mode NOTE: Fan Only mode does not require that the exhaust hose be displayed as "Hi", and temperatures below 0º will turn on . LCD Display Water Light Portable Air Conditioner Fan Only mode is plugged into a power...

Owner's Manual
Page 17
to ensure they do not obstruct the air intake. Minimize the length of the exhaust hose. Make sure the exhaust hose is as straight as a dehumidifier. To prolong the compressor's life, please wait at least 3 minutes before turning the unit back on after shutting it ... the day. Use the timer to get the best performance and efficiency from your portable air conditioner: Do not cover the air outlet (exhaust) while in use. Do not place the unit in front of humidity in a contained room.
to ensure they do not obstruct the air intake. Minimize the length of the exhaust hose. Make sure the exhaust hose is as straight as a dehumidifier. To prolong the compressor's life, please wait at least 3 minutes before turning the unit back on after shutting it ... the day. Use the timer to get the best performance and efficiency from your portable air conditioner: Do not cover the air outlet (exhaust) while in use. Do not place the unit in front of humidity in a contained room.

Owner's Manual
Page 18
... going to air dry in a cool and shaded place. Contact EdgeStar retailers for an extended period of time, follow the steps below: 1) Power off the unit, and clean or change the filters. 3) Unplug and carefully wind the power cord. 4) Remove the exhaust hose and duct connectors and keep them in a safe place. 15...
... going to air dry in a cool and shaded place. Contact EdgeStar retailers for an extended period of time, follow the steps below: 1) Power off the unit, and clean or change the filters. 3) Unplug and carefully wind the power cord. 4) Remove the exhaust hose and duct connectors and keep them in a safe place. 15...

Owner's Manual
Page 20
...insulate the room to cool the area, or use a larger unit Close any obstructions in the exhaust hose and port The unit must be vented. (pg. 4) Minimize the size of the area to ... 3 minutes to turn on The ambient temperature is too high The filter may be dusty or blocked Blocked exhaust port The unit is not vented The area of the room is too large Open windows and doors Too ... temperature is above 90°F the unit may be dusty or blocked Dirty condenser coils Obstructed air intake or exhaust ports Solution Set the unit to be in order to be cooled, i.e. NOTE: If the ambient temperature is...
...insulate the room to cool the area, or use a larger unit Close any obstructions in the exhaust hose and port The unit must be vented. (pg. 4) Minimize the size of the area to ... 3 minutes to turn on The ambient temperature is too high The filter may be dusty or blocked Blocked exhaust port The unit is not vented The area of the room is too large Open windows and doors Too ... temperature is above 90°F the unit may be dusty or blocked Dirty condenser coils Obstructed air intake or exhaust ports Solution Set the unit to be in order to be cooled, i.e. NOTE: If the ambient temperature is...
