
Owners Manual
Page 2
... and RESET buttons as an ON/OFF switch. Press the TEST button on the unit, please contact EdgeStar support. This device provides protection to reduce the risk of the unit. Route the power cord carefully to recycle electronic waste. Plug the power cord to the air conditioner. This should not be replaced by an authorized technician. Electrical products should trip the plug and cut the power to a grounded outlet. 2. EdgeStar Portable Air Conditioner ii...
... and RESET buttons as an ON/OFF switch. Press the TEST button on the unit, please contact EdgeStar support. This device provides protection to reduce the risk of the unit. Route the power cord carefully to recycle electronic waste. Plug the power cord to the air conditioner. This should not be replaced by an authorized technician. Electrical products should trip the plug and cut the power to a grounded outlet. 2. EdgeStar Portable Air Conditioner ii...
Owners Manual
Page 3
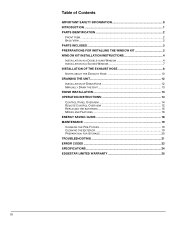
... 4 INSTALLATION IN A DOUBLE-HUNG WINDOW 4 INSTALLATION IN A SLIDING WINDOW 7 INSTALLATION OF THE EXHAUST HOSE 8 NOTES ABOUT THE EXHAUST HOSE 10 DRAINING THE UNIT 12 INSTALLATION OF DRAIN HOSE 12 MANUALLY DRAIN THE UNIT 13 FINISH INSTALLATION 13 OPERATING INSTRUCTIONS 14 CONTROL PANEL OVERVIEW 14 REMOTE CONTROL OVERVIEW 15 REPLACING THE BATTERIES 15 MODES AND FEATURES 16 ENERGY SAVING GUIDE 18 MAINTENANCE 19 CLEANING THE PRE-FILTERS 19 CLEANING THE EXTERIOR 19 PREPARATION FOR STORAGE 20 TROUBLESHOOTING 21 ERROR CODES 23 SPECIFICATIONS 24 EDGESTAR LIMITED WARRANTY 25...
... 4 INSTALLATION IN A DOUBLE-HUNG WINDOW 4 INSTALLATION IN A SLIDING WINDOW 7 INSTALLATION OF THE EXHAUST HOSE 8 NOTES ABOUT THE EXHAUST HOSE 10 DRAINING THE UNIT 12 INSTALLATION OF DRAIN HOSE 12 MANUALLY DRAIN THE UNIT 13 FINISH INSTALLATION 13 OPERATING INSTRUCTIONS 14 CONTROL PANEL OVERVIEW 14 REMOTE CONTROL OVERVIEW 15 REPLACING THE BATTERIES 15 MODES AND FEATURES 16 ENERGY SAVING GUIDE 18 MAINTENANCE 19 CLEANING THE PRE-FILTERS 19 CLEANING THE EXTERIOR 19 PREPARATION FOR STORAGE 20 TROUBLESHOOTING 21 ERROR CODES 23 SPECIFICATIONS 24 EDGESTAR LIMITED WARRANTY 25...
Owners Manual
Page 5
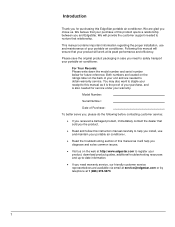
... follow this instruction manual carefully to -date information. If you need warranty service, our friendly customer service representatives are located on the ratings label on the web at http://www.edgestar.com to register your product, download product guides, additional troubleshooting resources and up-to help you diagnose and solve common issues. Visit us . Model Number: Serial Number: Date of your unit and are glad you need to obtain warranty service. Introduction...
... follow this instruction manual carefully to -date information. If you need warranty service, our friendly customer service representatives are located on the ratings label on the web at http://www.edgestar.com to register your product, download product guides, additional troubleshooting resources and up-to help you diagnose and solve common issues. Visit us . Model Number: Serial Number: Date of your unit and are glad you need to obtain warranty service. Introduction...

Owners Manual
Page 7
... installation instructions carefully to your unit. Suggested Tools- Your unit includes a window exhaust kit that can be used to power your room's circuit is near an electrical outlet that your window panel needs to be able to provide sufficient power to avoid personal injury or damage. 3 See the power requirements listed on the product label printed on the side, or on the back of your portable air conditioner when running it in size...
... installation instructions carefully to your unit. Suggested Tools- Your unit includes a window exhaust kit that can be used to power your room's circuit is near an electrical outlet that your window panel needs to be able to provide sufficient power to avoid personal injury or damage. 3 See the power requirements listed on the product label printed on the side, or on the back of your portable air conditioner when running it in size...

Owners Manual
Page 8
...: o Remove the adjustment panel from the window panel, and cut the window panel to the same width as the window opening. Push the grille firmly to ensure that pertain to your specific window type. NOTE: The window panel cannot be installed in either a double-hung sash window or in a sliding sash window. o Slide the adjustment panel to fit the window frame width. EdgeStar Portable Air Conditioner 4 Window Kit Installation Instructions The window kit can be installed in a Double-hung Window 1 Attach Grille Attach...
...: o Remove the adjustment panel from the window panel, and cut the window panel to the same width as the window opening. Push the grille firmly to ensure that pertain to your specific window type. NOTE: The window panel cannot be installed in either a double-hung sash window or in a sliding sash window. o Slide the adjustment panel to fit the window frame width. EdgeStar Portable Air Conditioner 4 Window Kit Installation Instructions The window kit can be installed in a Double-hung Window 1 Attach Grille Attach...
Owners Manual
Page 14
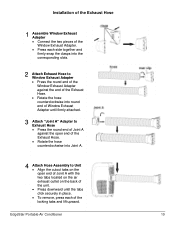
... the hose counterclockwise into Joint A. 4 Attach Hose Assembly to Unit Align the cutout tabs on the open end of Joint A with the two tabs located on the air exhaust outlet on the back of the unit. Press downward until the tabs click securely in place. To remove, press each of the locking tabs and lift upward. EdgeStar Portable Air Conditioner...
... the hose counterclockwise into Joint A. 4 Attach Hose Assembly to Unit Align the cutout tabs on the open end of Joint A with the two tabs located on the air exhaust outlet on the back of the unit. Press downward until the tabs click securely in place. To remove, press each of the locking tabs and lift upward. EdgeStar Portable Air Conditioner...

Owners Manual
Page 16
... drain hose, secure with the pipe hoop provided. 4 Insert the rubber plug into a drain pain or other end of Drain Hose 1 Remove the drain cap from the drainage port. EdgeStar Portable Air Conditioner 12 When this occurs, the tank must be evaporated and exhausted out of the exhaust hose. Draining the Unit Moisture that is collected during the Cool and Dry (dehumidify) modes will condense in an internal tank and will then be drained manually...
... drain hose, secure with the pipe hoop provided. 4 Insert the rubber plug into a drain pain or other end of Drain Hose 1 Remove the drain cap from the drainage port. EdgeStar Portable Air Conditioner 12 When this occurs, the tank must be evaporated and exhausted out of the exhaust hose. Draining the Unit Moisture that is collected during the Cool and Dry (dehumidify) modes will condense in an internal tank and will then be drained manually...

Owners Manual
Page 17
... LED window will display error code "H8". Install the Power Cord Hooks by sliding each hook into place. To drain the tank manually: 1. Finish Installation 1. When this unit has no drain pump; Reinstall rubber stopper and pipe hoop. 6. NOTE: Although not recommended, you may choose to connect a permanent drain hose (not included) to the drain port provided that this occurs, the tank must be drained manually into pipe clip. all water...
... LED window will display error code "H8". Install the Power Cord Hooks by sliding each hook into place. To drain the tank manually: 1. Finish Installation 1. When this unit has no drain pump; Reinstall rubber stopper and pipe hoop. 6. NOTE: Although not recommended, you may choose to connect a permanent drain hose (not included) to the drain port provided that this occurs, the tank must be drained manually into pipe clip. all water...

Owners Manual
Page 18
Operating Instructions: Control Panel Overview Dry Fan Heat On/Off Mode Select Buttons Fan Speed Timer Mode Sleep Mode Press the button once to manually turn the unit off. Press the MODE button to enter timer mode. There are 4 fan settings, LOW Æ MED Æ TURBO Æ AUTO. The display will be blank. When the Sleep Mode is active, the LCD will slowly raise the Temp Control by 1° degree Fahrenheit. Display will remain in increments of 1 hour up to 10 hours...
Operating Instructions: Control Panel Overview Dry Fan Heat On/Off Mode Select Buttons Fan Speed Timer Mode Sleep Mode Press the button once to manually turn the unit off. Press the MODE button to enter timer mode. There are 4 fan settings, LOW Æ MED Æ TURBO Æ AUTO. The display will be blank. When the Sleep Mode is active, the LCD will slowly raise the Temp Control by 1° degree Fahrenheit. Display will remain in increments of 1 hour up to 10 hours...

Owners Manual
Page 19
... off MODE Changes between modes: COOL DRY FAN (HEAT) Decreases the temperature and timer setting Increases the temperature and timer setting FAN Adjusts fan speed X-FAN Used to enable X-Fan mode TEMP Used to display the temperature setting or current temperature TIMER ON / TIMER OFF Turn the Timer Mode on/off TURBO Turn the Turbo mode on / off SLEEP Used to enable Sleep mode LIGHT Turn the light on/off To replace the batteries: Slide to remove the battery cover plate on the rear of the remote control. Remove and...
... off MODE Changes between modes: COOL DRY FAN (HEAT) Decreases the temperature and timer setting Increases the temperature and timer setting FAN Adjusts fan speed X-FAN Used to enable X-Fan mode TEMP Used to display the temperature setting or current temperature TIMER ON / TIMER OFF Turn the Timer Mode on/off TURBO Turn the Turbo mode on / off SLEEP Used to enable Sleep mode LIGHT Turn the light on/off To replace the batteries: Slide to remove the battery cover plate on the rear of the remote control. Remove and...

Owners Manual
Page 20
... unit unitizes a heat pump to the ambient room temperature. You can press the "+" or "-" to increase or decrease the set temperature is not adjustable in Fan Only mode: 1) Make sure the power cord is plugged into a power outlet. 2) Press the ON/OFF button on the remote. 3) Press the Mode button until the Fan Indicator light on the control panel lights up . 4) Select the fan speed by using the Fan button. 5) Set the thermostat by using the "+" and "-" buttons on the remote. The room temperature...
... unit unitizes a heat pump to the ambient room temperature. You can press the "+" or "-" to increase or decrease the set temperature is not adjustable in Fan Only mode: 1) Make sure the power cord is plugged into a power outlet. 2) Press the ON/OFF button on the remote. 3) Press the Mode button until the Fan Indicator light on the control panel lights up . 4) Select the fan speed by using the Fan button. 5) Set the thermostat by using the "+" and "-" buttons on the remote. The room temperature...
Owners Manual
Page 21
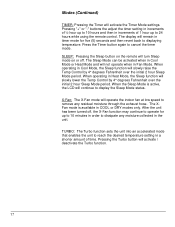
... Cool Mode or Heat Mode and will remain in Fan Mode. When the Sleep Mode is available in order to 24 hours while using the remote control. The display will not operate when in timer mode for up to dissipate any residual moisture through the exhaust hose. Press the Timer button again to displaying temperature. TURBO: The Turbo function sets the unit into an accelerated mode that enables the unit to reach the desired temperature setting in Cool Mode...
... Cool Mode or Heat Mode and will remain in Fan Mode. When the Sleep Mode is available in order to 24 hours while using the remote control. The display will not operate when in timer mode for up to dissipate any residual moisture through the exhaust hose. Press the Timer button again to displaying temperature. TURBO: The Turbo function sets the unit into an accelerated mode that enables the unit to reach the desired temperature setting in Cool Mode...

Owners Manual
Page 22
...; Keep curtains, blinds, or drapes closed during the sunniest part of humidity in a contained room. EdgeStar Portable Air Conditioner 18 Energy Saving Guide Read and follow the guide below to get the best performance and efficiency from your portable air conditioner: Do not cover the air outlet (exhaust) while in use. Do not place the unit in front of curtains or drapes to ensure they...
...; Keep curtains, blinds, or drapes closed during the sunniest part of humidity in a contained room. EdgeStar Portable Air Conditioner 18 Energy Saving Guide Read and follow the guide below to get the best performance and efficiency from your portable air conditioner: Do not cover the air outlet (exhaust) while in use. Do not place the unit in front of curtains or drapes to ensure they...
Owners Manual
Page 23
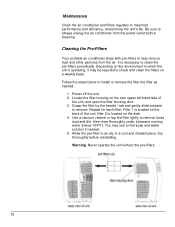
... outward to help remove dust and other particles from the power outlet before reinstalling. Filter 1 is located on the back of the unit, and open the filter housing door. 3. Warning: Never operate the unit without the pre-filters. 19 Maintenance Clean the air conditioner and filters regularly to air dry in which the unit it operating, it may use a mild soap and water solution if needed : 1. Dry thoroughly before cleaning. Allow the pre-filter to maximize...
... outward to help remove dust and other particles from the power outlet before reinstalling. Filter 1 is located on the back of the unit, and open the filter housing door. 3. Warning: Never operate the unit without the pre-filters. 19 Maintenance Clean the air conditioner and filters regularly to air dry in which the unit it operating, it may use a mild soap and water solution if needed : 1. Dry thoroughly before cleaning. Allow the pre-filter to maximize...

Owners Manual
Page 24
... cabinet exterior. Never spray water directly on the coils inside the unit. 2) Power off the unit, and clean or change the filters. 3) Unplug and carefully wind the power cord. 4) Remove the exhaust hose and duct connectors and keep them in a safe place. Use a soft bristle brush to wipe the body of time, follow the instructions below before storing your unit: 1) Drain all the water from the unit's reservoir. Preparation for Storage...
... cabinet exterior. Never spray water directly on the coils inside the unit. 2) Power off the unit, and clean or change the filters. 3) Unplug and carefully wind the power cord. 4) Remove the exhaust hose and duct connectors and keep them in a safe place. Use a soft bristle brush to wipe the body of time, follow the instructions below before storing your unit: 1) Drain all the water from the unit's reservoir. Preparation for Storage...

Owners Manual
Page 25
.... power. My air conditioner is The unit is remove Attach the drain plug leaking. My air conditioner is Drain plug is not level. Contact customer service. Check your circuit breaker. (Refer to the rating label on Batteries installed Reinstall the batteries remote does not turn on . turn incorrectly. on , contact customer service. the unit sit on a level metallic knocking or surface for a little while and may have a faulty Contact customer lights blink randomly. control panel. My air conditioner is Unit may be plugged...
.... power. My air conditioner is The unit is remove Attach the drain plug leaking. My air conditioner is Drain plug is not level. Contact customer service. Check your circuit breaker. (Refer to the rating label on Batteries installed Reinstall the batteries remote does not turn on . turn incorrectly. on , contact customer service. the unit sit on a level metallic knocking or surface for a little while and may have a faulty Contact customer lights blink randomly. control panel. My air conditioner is Unit may be plugged...

Owners Manual
Page 26
... be cooled, i.e. Close curtains or pull down blinds, and minimize the direct sunlight into the room. My air conditioner is above 50F. EdgeStar Portable Air Conditioner 22 Solution Set the unit to be inadequately insulated. Use heat function when temperatures rises above 90°F. The room/garage may not work properly if ambient temperature is too large. Remove any open doors and windows. Use more than one unit to turn on . Minimize the size...
... be cooled, i.e. Close curtains or pull down blinds, and minimize the direct sunlight into the room. My air conditioner is above 50F. EdgeStar Portable Air Conditioner 22 Solution Set the unit to be inadequately insulated. Use heat function when temperatures rises above 90°F. The room/garage may not work properly if ambient temperature is too large. Remove any open doors and windows. Use more than one unit to turn on . Minimize the size...

Owners Manual
Page 27
... contact customer service evaporator temperature sensor F0 Refrigerant is leaking or system is blocked Please contact customer service H3 Overload protection for If the unit is not operating correctly. E8 Overload malfunction Also check the evaporator and condenser to ensure they are the list of outdoor Please contact customer service temperature sensor 23 compressor temperature and high-humidity environment, power off the unit and start it is working in a high- Error Codes The air conditioner may display an error code...
... contact customer service evaporator temperature sensor F0 Refrigerant is leaking or system is blocked Please contact customer service H3 Overload protection for If the unit is not operating correctly. E8 Overload malfunction Also check the evaporator and condenser to ensure they are the list of outdoor Please contact customer service temperature sensor 23 compressor temperature and high-humidity environment, power off the unit and start it is working in a high- Error Codes The air conditioner may display an error code...

Owners Manual
Page 29
... a mail-in exchange for installation, setup or training to use of this product within the United States of parts designed to be replaced, e.g. This warranty does not cover: Labor charges for the replacement part. Please have been modified to the coverage of purchase available. EdgeStar Limited Warranty One (1) Year Parts & Ninety (90) Days Labor This product is warranted by EdgeStar to be free from defective workmanship and...
... a mail-in exchange for installation, setup or training to use of this product within the United States of parts designed to be replaced, e.g. This warranty does not cover: Labor charges for the replacement part. Please have been modified to the coverage of purchase available. EdgeStar Limited Warranty One (1) Year Parts & Ninety (90) Days Labor This product is warranted by EdgeStar to be free from defective workmanship and...

Owners Manual
Page 32
EdgeStar Products 500 N. Capital of TX Hwy, Bldg 5 Austin, TX 78746 Toll Free: 1-866-319-5473 Web: http://www.edgestar.com E-mail: service@edgestar.com Register your product, download owner's manuals, access additional troubleshooting resources, and obtain more information on other great EdgeStar products on the web at: http://www.edgestar.com Product contents and specifications may change without notice. Copyright © 2016 Living Direct, Inc. Edgestar Portable Air Conditioner 66129921947 26 All rights reserved.
EdgeStar Products 500 N. Capital of TX Hwy, Bldg 5 Austin, TX 78746 Toll Free: 1-866-319-5473 Web: http://www.edgestar.com E-mail: service@edgestar.com Register your product, download owner's manuals, access additional troubleshooting resources, and obtain more information on other great EdgeStar products on the web at: http://www.edgestar.com Product contents and specifications may change without notice. Copyright © 2016 Living Direct, Inc. Edgestar Portable Air Conditioner 66129921947 26 All rights reserved.


