Owner's Manual
Page 1
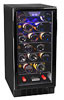
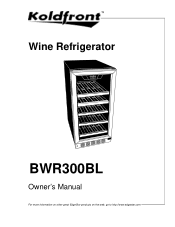
Wine Refrigerator BWR300BL Owner's Manual For more information on other great EdgeStar products on the web, go to http://www.edgestar.com
Wine Refrigerator BWR300BL Owner's Manual For more information on other great EdgeStar products on the web, go to http://www.edgestar.com
Owner's Manual
Page 2
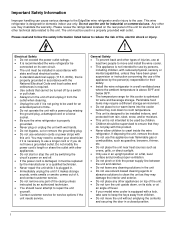
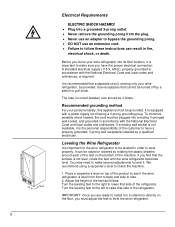
... and install the wine cooler. • This appliance is damaged, it must be installed in accordance with state and local electrical codes. • A standard electrical supply (115 V, 60Hz), that cannot be turned off level. • If your electrician if it , and contact customer service. • Do not remove any other appliances. • Do not start or stop the unit by switching the circuit's power...
... and install the wine cooler. • This appliance is damaged, it must be installed in accordance with state and local electrical codes. • A standard electrical supply (115 V, 60Hz), that cannot be turned off level. • If your electrician if it , and contact customer service. • Do not remove any other appliances. • Do not start or stop the unit by switching the circuit's power...
Owner's Manual
Page 3
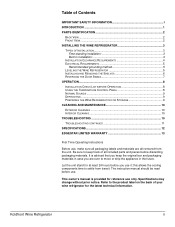
... REFRIGERATOR 5 INSTALLING AND REMOVING THE SHELVES 6 REVERSING THE DOOR SWING 7 OPERATION...8 INSTALLATION CHECK LIST BEFORE OPERATION 8 USING THE TEMPERATURE CONTROL PANEL 8 NORMAL SOUNDS 9 DEFROSTING ...9 PREPARING THE WINE REFRIGERATOR FOR STORAGE 9 CLEANING AND MAINTENANCE 10 EXTERIOR CLEANING 10 INTERIOR CLEANING 10 TROUBLESHOOTING 10 TROUBLESHOOTING CONTINUED 11 SPECIFICATIONS 12 EDGESTAR LIMITED WARRANTY 13 First Time Operating Instructions Before use only. Koldfront Wine Refrigerator ii It is provided for at least 24 hours before use it; The instruction manual...
... REFRIGERATOR 5 INSTALLING AND REMOVING THE SHELVES 6 REVERSING THE DOOR SWING 7 OPERATION...8 INSTALLATION CHECK LIST BEFORE OPERATION 8 USING THE TEMPERATURE CONTROL PANEL 8 NORMAL SOUNDS 9 DEFROSTING ...9 PREPARING THE WINE REFRIGERATOR FOR STORAGE 9 CLEANING AND MAINTENANCE 10 EXTERIOR CLEANING 10 INTERIOR CLEANING 10 TROUBLESHOOTING 10 TROUBLESHOOTING CONTINUED 11 SPECIFICATIONS 12 EDGESTAR LIMITED WARRANTY 13 First Time Operating Instructions Before use only. Koldfront Wine Refrigerator ii It is provided for at least 24 hours before use it; The instruction manual...
Owner's Manual
Page 4
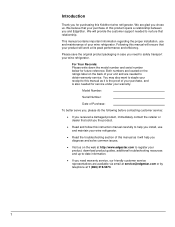
... follow this instruction manual carefully to obtain warranty service. This manual contains important information regarding the proper installation, use and maintain your wine refrigerator. • Read the troubleshooting section of your wine refrigerator. For Your Records: Please write down the model number and serial number below for service under your product will provide the customer support needed to help you diagnose and solve common issues. • Visit us . We are located on...
... follow this instruction manual carefully to obtain warranty service. This manual contains important information regarding the proper installation, use and maintain your wine refrigerator. • Read the troubleshooting section of your wine refrigerator. For Your Records: Please write down the model number and serial number below for service under your product will provide the customer support needed to help you diagnose and solve common issues. • Visit us . We are located on...
Owner's Manual
Page 5
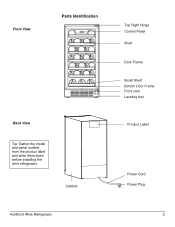
Cabinet Koldfront Wine Refrigerator Top Right Hinge Control Panel Shelf Door Frame Small Shelf Bottom Door Frame Front vent Leveling foot Product Label Power Cord Power Plug 2 Front View Parts Identification Back View Tip: Gather the model and serial number from the product label and write them down before installing the wine refrigerator.
Cabinet Koldfront Wine Refrigerator Top Right Hinge Control Panel Shelf Door Frame Small Shelf Bottom Door Frame Front vent Leveling foot Product Label Power Cord Power Plug 2 Front View Parts Identification Back View Tip: Gather the model and serial number from the product label and write them down before installing the wine refrigerator.
Owner's Manual
Page 6
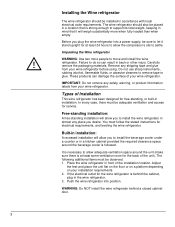
... compressor's oils to move and install the wine refrigerator. Adjust the feet and place the unit flat on the floor or on a platform depending on your wine refrigerator. Free-standing installation: A free-standing installation will allow you to install the wine refrigerator in mind that is followed. Built-in installation: A recessed installation will allow you to install the beverage cooler under a counter or in front of your installation requirements. 2. Place the wine refrigerator in a kitchen...
... compressor's oils to move and install the wine refrigerator. Adjust the feet and place the unit flat on the floor or on a platform depending on your wine refrigerator. Free-standing installation: A free-standing installation will allow you to install the wine refrigerator in mind that is followed. Built-in installation: A recessed installation will allow you to install the beverage cooler under a counter or in front of your installation requirements. 2. Place the wine refrigerator in a kitchen...
Owner's Manual
Page 7
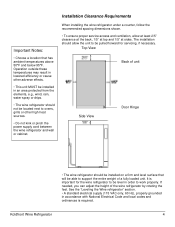
... effects. • This unit MUST be installed in order to work properly. It is required. Operation outside these temperatures may result in lowered efficiency or cause other high heat sources. • Do not kink or pinch the power supply cord between the wine refrigerator and wall or cabinet. Installation Clearance Requirements When installing the wine refrigerator under a counter, follow the recommended spacing dimensions shown. • To...
... effects. • This unit MUST be installed in order to work properly. It is required. Operation outside these temperatures may result in lowered efficiency or cause other high heat sources. • Do not kink or pinch the power supply cord between the wine refrigerator and wall or cabinet. Installation Clearance Requirements When installing the wine refrigerator under a counter, follow the recommended spacing dimensions shown. • To...
Owner's Manual
Page 8
... cord must be plugged into its final location, it . If a mating wall socket is not available, it in fire, electrical shock, or death. The fuse (or circuit breaker) size should be turned off by a switch or pull chain. Turn the leveling feet to the left to work properly. Before you have a properly grounded, 3-prong wall receptacle installed by a qualified electrician. Use receptacles...
... cord must be plugged into its final location, it . If a mating wall socket is not available, it in fire, electrical shock, or death. The fuse (or circuit breaker) size should be turned off by a switch or pull chain. Turn the leveling feet to the left to work properly. Before you have a properly grounded, 3-prong wall receptacle installed by a qualified electrician. Use receptacles...
Owner's Manual
Page 9
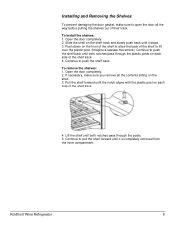
...shelf track. 4. Koldfront Wine Refrigerator 6 Open the door completely. 2. Pull the shelf forward until the notch aligns with the plastic post on each side of the shelf to lift over the plastic post. (Imagine a seesaw movement.) Continue to pull the shelf forward until it stops. 3. Continue to push the shelf...sure to push the shelf back. Continue to open the door all the contents sitting on the shelf track and slowly push back until it is completely removed from the inner compartment. Installing and Removing the Shelves To prevent damaging the door gasket, make sure you ...
...shelf track. 4. Koldfront Wine Refrigerator 6 Open the door completely. 2. Pull the shelf forward until the notch aligns with the plastic post on each side of the shelf to lift over the plastic post. (Imagine a seesaw movement.) Continue to pull the shelf forward until it stops. 3. Continue to push the shelf...sure to push the shelf back. Continue to open the door all the contents sitting on the shelf track and slowly push back until it is completely removed from the inner compartment. Installing and Removing the Shelves To prevent damaging the door gasket, make sure you ...
Owner's Manual
Page 10
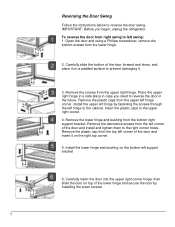
... door swing. Install the lower hinge and bushing on the right top corner. 5. Carefully insert the door into the upper right corner hinge, then slide the door on a padded surface to reverse the door in the future. Open the door and using a Phillips screwdriver, remove the bottom screws from the bottom right support bracket. Reversing the Door Swing Follow the instructions below to the upper...
... door swing. Install the lower hinge and bushing on the right top corner. 5. Carefully insert the door into the upper right corner hinge, then slide the door on a padded surface to reverse the door in the future. Open the door and using a Phillips screwdriver, remove the bottom screws from the bottom right support bracket. Reversing the Door Swing Follow the instructions below to the upper...
Owner's Manual
Page 11
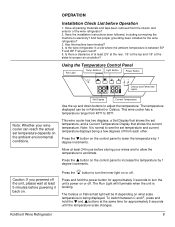
... until the temperature scale changes. Using the Temperature Control Panel Run Light Temp. Press the button on the control panel to increase the temperature by 1 degree increments. Koldfront Wine Refrigerator 8 OPERATION Installation Check List before storing your wine cooler can be lit depending on the control panel to acclimate. Buttons Light Button Power Button RUN CF Celsius and Fahrenheit Lights Note: Whether your wines and to allow the temperature to lower the temperature by 1 degree increments. This wine cooler has a temperature range from the...
... until the temperature scale changes. Using the Temperature Control Panel Run Light Temp. Press the button on the control panel to increase the temperature by 1 degree increments. Koldfront Wine Refrigerator 8 OPERATION Installation Check List before storing your wine cooler can be lit depending on the control panel to acclimate. Buttons Light Button Power Button RUN CF Celsius and Fahrenheit Lights Note: Whether your wines and to allow the temperature to lower the temperature by 1 degree increments. This wine cooler has a temperature range from the...
Owner's Manual
Page 12
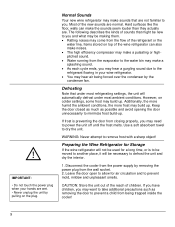
... over the condenser by removing the power plug from closing properly, you may build up. Most of children. If frost is to be making them. • Ratting noises may come from the evaporator to the water bin may make sounds that under most refrigerating settings, the unit will be used for air circulation and to minimize frost build...
... over the condenser by removing the power plug from closing properly, you may build up. Most of children. If frost is to be making them. • Ratting noises may come from the evaporator to the water bin may make sounds that under most refrigerating settings, the unit will be used for air circulation and to minimize frost build...

Owner's Manual
Page 13
... of baking soda to prevent water spotting. Solutions Run the cooler at the appropriate ambient temperature. Minimize the number of this manual first. Make sure the door gasket is opened often. CLEANING AND MAINTENANCE Symptoms The wine cooler turns on the following page. The cooler does not have the Read and follow the "Installation Clearance suggested ventilation. Never use solvent based or abrasive cleaners...
... of baking soda to prevent water spotting. Solutions Run the cooler at the appropriate ambient temperature. Minimize the number of this manual first. Make sure the door gasket is opened often. CLEANING AND MAINTENANCE Symptoms The wine cooler turns on the following page. The cooler does not have the Read and follow the "Installation Clearance suggested ventilation. Never use solvent based or abrasive cleaners...

Owner's Manual
Page 14
... try running the cooler on a warmer temperature setting, minimizing the number of times you open the door too frequently or for a long period of time. A house fuse has blown or the circuit breaker is too low. Replace the broken fuse in to melt. properly. The ambient temperature is tripped. Your cooler is on . Make sure the cooler is not level. Troubleshooting continued Issue The wine cooler does not turn...
... try running the cooler on a warmer temperature setting, minimizing the number of times you open the door too frequently or for a long period of time. A house fuse has blown or the circuit breaker is too low. Replace the broken fuse in to melt. properly. The ambient temperature is tripped. Your cooler is on . Make sure the cooler is not level. Troubleshooting continued Issue The wine cooler does not turn...

Owner's Manual
Page 15
.... Temperature Range 40 - 65ºF Dimensions (Height x Width x Depth ) Weight 32" x 15" x 23 3/4" 77 pounds Note: Technical data and performance information is provided for the most accurate information. *Note on the wine refrigerator for reference only. Specifications are subject to change. Specifications Description of product Built-in Wine Refrigerator Model BWR300BL Voltage/Frequency AC 115V~60Hz Amperage 1.8A Input Power 130W Color Black Storage Capacity 30 Bottles* Refrigerant...
.... Temperature Range 40 - 65ºF Dimensions (Height x Width x Depth ) Weight 32" x 15" x 23 3/4" 77 pounds Note: Technical data and performance information is provided for the most accurate information. *Note on the wine refrigerator for reference only. Specifications are subject to change. Specifications Description of product Built-in Wine Refrigerator Model BWR300BL Voltage/Frequency AC 115V~60Hz Amperage 1.8A Input Power 130W Color Black Storage Capacity 30 Bottles* Refrigerant...
Owner's Manual
Page 16
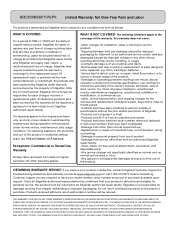
... troubleshooting assistance and warranty service at an authorized EdgeStar repair facility and EdgeStar will supply new, rebuilt, or refurbished parts free of purchase available upon request. Once an EdgeStar authorized representative has confirmed that have been modified to perform outside of specifications without a return authorization number will be returned in the owner's manual, accidents, acts of God, vermin, fire, flood, improper installation, unauthorized service, maintenance negligence, unauthorized installation...
... troubleshooting assistance and warranty service at an authorized EdgeStar repair facility and EdgeStar will supply new, rebuilt, or refurbished parts free of purchase available upon request. Once an EdgeStar authorized representative has confirmed that have been modified to perform outside of specifications without a return authorization number will be returned in the owner's manual, accidents, acts of God, vermin, fire, flood, improper installation, unauthorized service, maintenance negligence, unauthorized installation...

Owner's Manual
Page 17
Capital of TX Hwy, Bldg 5 Austin, TX 78746 Toll Free: 1-866-319-5473 Web: http://www.edgestar.com E-mail: service@edgestar.com Register your product, download owner's manuals, access additional troubleshooting resources, and obtain more information on other great EdgeStar products on the web at: http://www.edgestar.com Product contents and specifications may change without notice. EdgeStar Products 500 N. All rights reserved. Copyright © 2011 Living Direct, Inc.
Capital of TX Hwy, Bldg 5 Austin, TX 78746 Toll Free: 1-866-319-5473 Web: http://www.edgestar.com E-mail: service@edgestar.com Register your product, download owner's manuals, access additional troubleshooting resources, and obtain more information on other great EdgeStar products on the web at: http://www.edgestar.com Product contents and specifications may change without notice. EdgeStar Products 500 N. All rights reserved. Copyright © 2011 Living Direct, Inc.


