

Owner s Manual
Page 1
Built-in Wine and Beverage Cooler CWB8420DZ Owner's Manual For more information on other great EdgeStar products on the web, go to http://www.edgestar.com
Built-in Wine and Beverage Cooler CWB8420DZ Owner's Manual For more information on other great EdgeStar products on the web, go to http://www.edgestar.com
Owner s Manual
Page 2
... installed in accordance with a power plug missing the ground plug, a damaged cord or a loose socket. Be sure the wine and beverage cooler is plugged in. Immediately unplug the unit if it makes strange sounds, emits smells or smoke comes out of it, and...unit yourself. Contact customer service for their safety. Install the wine and beverage cooler in a closed position. Important Safety Information Improper handling can cause serious damage to the EdgeStar wine and beverage cooler and/or injury to this unit. i You may damage the interior and exterior....
... installed in accordance with a power plug missing the ground plug, a damaged cord or a loose socket. Be sure the wine and beverage cooler is plugged in. Immediately unplug the unit if it makes strange sounds, emits smells or smoke comes out of it, and...unit yourself. Contact customer service for their safety. Install the wine and beverage cooler in a closed position. Important Safety Information Improper handling can cause serious damage to the EdgeStar wine and beverage cooler and/or injury to this unit. i You may damage the interior and exterior....
Owner s Manual
Page 3
Risk of room space is located for several minutes. Contact the EdgeStar Customer Service Department for anyone other than an Authorized Service Person to carry out servicing or repairs to this appliance. Take serious care when ... in place so that no parts of the appliance. It is hazardous for advice. The more coolant there is environmentally friendly, but flammable. EdgeStar Wine and Beverage Cooler ii Make sure to greenhouse gases. SAVE THESE INSTRUCTIONS - It does not damage the ozone layer, nor does it should be taken during transportation...
Risk of room space is located for several minutes. Contact the EdgeStar Customer Service Department for anyone other than an Authorized Service Person to carry out servicing or repairs to this appliance. Take serious care when ... in place so that no parts of the appliance. It is hazardous for advice. The more coolant there is environmentally friendly, but flammable. EdgeStar Wine and Beverage Cooler ii Make sure to greenhouse gases. SAVE THESE INSTRUCTIONS - It does not damage the ozone layer, nor does it should be taken during transportation...
Owner s Manual
Page 4
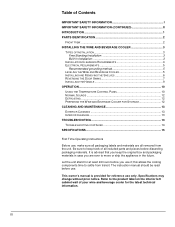
...the unit stand for the latest technical information. Refer to the product label on the interior left cabinet wall of your wine and beverage cooler for at least 24 hours before you use it; The instruction manual should be read before use only. Specifications may ... SWING 7 INSTALLING THE HANDLE 9 OPERATION...10 USING THE TEMPERATURE CONTROL PANEL 10 NORMAL SOUNDS 12 DEFROSTING ...12 PREPARING THE WINE AND BEVERAGE COOLER FOR STORAGE 12 CLEANING AND MAINTENANCE 13 EXTERIOR CLEANING 13 INTERIOR CLEANING 13 TROUBLESHOOTING 13 TROUBLESHOOTING CONTINUED 14 SPECIFICATIONS 15 First Time...
...the unit stand for the latest technical information. Refer to the product label on the interior left cabinet wall of your wine and beverage cooler for at least 24 hours before you use it; The instruction manual should be read before use only. Specifications may ... SWING 7 INSTALLING THE HANDLE 9 OPERATION...10 USING THE TEMPERATURE CONTROL PANEL 10 NORMAL SOUNDS 12 DEFROSTING ...12 PREPARING THE WINE AND BEVERAGE COOLER FOR STORAGE 12 CLEANING AND MAINTENANCE 13 EXTERIOR CLEANING 13 INTERIOR CLEANING 13 TROUBLESHOOTING 13 TROUBLESHOOTING CONTINUED 14 SPECIFICATIONS 15 First Time...
Owner s Manual
Page 5
Both numbers are located on the rating label on the web at http://www.edgestar.com to help you install, use and maintenance of your purchase of this EdgeStar wine and beverage cooler. Model Number: Serial Number: Date of Purchase: To better serve you, please do the following before ...need warranty service, our friendly customer service representatives are available via email at service@edgestar.com or by telephone at its peak performance and efficiency. We believe that your wine and beverage cooler. We will provide the customer support needed to this manual will help you ...
Both numbers are located on the rating label on the web at http://www.edgestar.com to help you install, use and maintenance of your purchase of this EdgeStar wine and beverage cooler. Model Number: Serial Number: Date of Purchase: To better serve you, please do the following before ...need warranty service, our friendly customer service representatives are available via email at service@edgestar.com or by telephone at its peak performance and efficiency. We believe that your wine and beverage cooler. We will provide the customer support needed to this manual will help you ...
Owner s Manual
Page 6
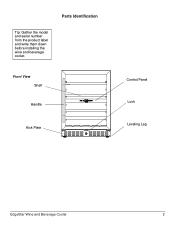
Parts Identification Tip: Gather the model and serial number from the product label and write them down before installing the wine and beverage cooler. Front View Shelf Handle Kick Plate Control Panel Lock Leveling Leg EdgeStar Wine and Beverage Cooler 2
Parts Identification Tip: Gather the model and serial number from the product label and write them down before installing the wine and beverage cooler. Front View Shelf Handle Kick Plate Control Panel Lock Leveling Leg EdgeStar Wine and Beverage Cooler 2
Owner s Manual
Page 7
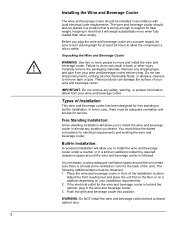
... installation location. Place the wine and beverage cooler in front of Installation This wine and beverage cooler has been designed for the wine and beverage cooler is behind a closed cabinet door. 3 The wine and beverage cooler should be installed in accordance with local electrical code requirements. Installing the Wine and Beverage Cooler The wine and beverage cooler should also be placed in...
... installation location. Place the wine and beverage cooler in front of Installation This wine and beverage cooler has been designed for the wine and beverage cooler is behind a closed cabinet door. 3 The wine and beverage cooler should be installed in accordance with local electrical code requirements. Installing the Wine and Beverage Cooler The wine and beverage cooler should also be placed in...

Owner s Manual
Page 8
... with National Electrical Code and local codes and ordinances is important for servicing, if necessary. It is required. EdgeStar Wine and Beverage Cooler 4 See the "Leveling the Wine and beverage cooler" section. • A standard electrical supply (115 VAC only, 60 Hz), properly grounded in an area ...: • Choose a location that will be able to be pulled forward for the wine and beverage cooler to be located next to work properly. When installing the wine and beverage cooler under a counter, follow the recommended spacing dimensions shown. • To ensure proper service...
... with National Electrical Code and local codes and ordinances is important for servicing, if necessary. It is required. EdgeStar Wine and Beverage Cooler 4 See the "Leveling the Wine and beverage cooler" section. • A standard electrical supply (115 VAC only, 60 Hz), properly grounded in an area ...: • Choose a location that will be able to be pulled forward for the wine and beverage cooler to be located next to work properly. When installing the wine and beverage cooler under a counter, follow the recommended spacing dimensions shown. • To ensure proper service...
Owner s Manual
Page 9
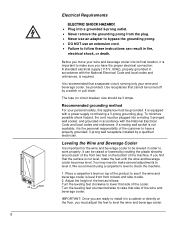
...with a power supply cord having a 3-prong grounding plug. Before you must adjust the feet to level the wine and beverage cooler. 5 Recommended grounding method For your wine and beverage cooler, be provided. We recommend using a carpenter's level to have the proper electrical connection: A standard electrical supply ... be plugged into a mating 3-pronged wall socket, and grounded in a cabinet or directly on the floor, you move your wine and beverage cooler into a grounded 3-prong outlet. Never remove the grounding prong from front to back and side to raise that a...
...with a power supply cord having a 3-prong grounding plug. Before you must adjust the feet to level the wine and beverage cooler. 5 Recommended grounding method For your wine and beverage cooler, be provided. We recommend using a carpenter's level to have the proper electrical connection: A standard electrical supply ... be plugged into a mating 3-pronged wall socket, and grounded in a cabinet or directly on the floor, you move your wine and beverage cooler into a grounded 3-prong outlet. Never remove the grounding prong from front to back and side to raise that a...
Owner s Manual
Page 10
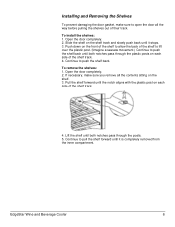
... the shelf forward until both notches pass through the posts. 5. Open the door completely. 2. To remove the shelves: 1. Lift the shelf until it stops. 3. EdgeStar Wine and Beverage Cooler 6 Push down on the front of the shelf to allow the back of the shelf to lift over the plastic post. (Imagine a seesaw movement...
... the shelf forward until both notches pass through the posts. 5. Open the door completely. 2. To remove the shelves: 1. Lift the shelf until it stops. 3. EdgeStar Wine and Beverage Cooler 6 Push down on the front of the shelf to allow the back of the shelf to lift over the plastic post. (Imagine a seesaw movement...
Owner s Manual
Page 11
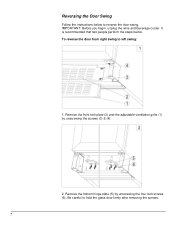
Be careful to left swing: 1. It is recommended that two people perform the steps below to reverse the door swing. Remove the front kick plate (2) and the adjustable ventilation grille (1) by unscrewing the four lock screws (6). To reverse the door from right swing to hold the glass door firmly after removing the screws. 7 IMPORTANT: Before you begin, unplug the wine and beverage cooler. Remove the bottom hinge plate (5) by unscrewing the screws (3) & (4). 2. Reversing the Door Swing Follow the instructions below .
Be careful to left swing: 1. It is recommended that two people perform the steps below to reverse the door swing. Remove the front kick plate (2) and the adjustable ventilation grille (1) by unscrewing the four lock screws (6). To reverse the door from right swing to hold the glass door firmly after removing the screws. 7 IMPORTANT: Before you begin, unplug the wine and beverage cooler. Remove the bottom hinge plate (5) by unscrewing the screws (3) & (4). 2. Reversing the Door Swing Follow the instructions below .
Owner s Manual
Page 12
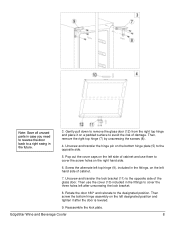
... the kick plate. Gently pull down to remove the glass door (12) from the right top hinge and place it after unscrewing the lock bracket. 8. EdgeStar Wine and Beverage Cooler 8 Then, remove the right top hinge (7) by unscrewing the screws (8). 4.
... the kick plate. Gently pull down to remove the glass door (12) from the right top hinge and place it after unscrewing the lock bracket. 8. EdgeStar Wine and Beverage Cooler 8 Then, remove the right top hinge (7) by unscrewing the screws (8). 4.
Owner s Manual
Page 14
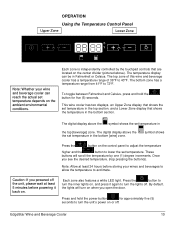
... the button for approximately five (5) seconds to turn on . These buttons will turn the lights off . The top zone of this wine and beverage cooler has a temperature range of 36°F to 72°F. The digital display above the symbol shows the set temperature. Each zone also...to turn the inner lights on, and press it back on when you see the desired temperature, stop pressing the button(s). EdgeStar Wine and Beverage Cooler 10 By default, the lights will scroll the temperature by the touchpad controls that shows the temperature in the bottom section. ...
... the button for approximately five (5) seconds to turn on . These buttons will turn the lights off . The top zone of this wine and beverage cooler has a temperature range of 36°F to 72°F. The digital display above the symbol shows the set temperature. Each zone also...to turn the inner lights on, and press it back on when you see the desired temperature, stop pressing the button(s). EdgeStar Wine and Beverage Cooler 10 By default, the lights will scroll the temperature by the touchpad controls that shows the temperature in the bottom section. ...
Owner s Manual
Page 15
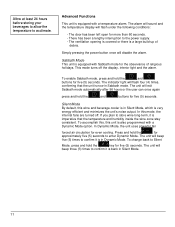
...has been a lengthy interruption to acclimate. Simply pressing the power button once will flash under the following conditions: - To accomplish this, this wine and beverage cooler is in Silent Mode. 11 In Dynamic Mode, the unit uses powerful fan forced air circulation for more than 60 seconds. - The door... is also programmed with a Dynamic Mode option. The unit will flash four (4) times, confirming that the temperature and humidity inside the wine zone stay consistent. The unit will beep three (3) times to enter Dynamic Mode. The unit will beep five (5) times to store...
...has been a lengthy interruption to acclimate. Simply pressing the power button once will flash under the following conditions: - To accomplish this, this wine and beverage cooler is in Silent Mode. 11 In Dynamic Mode, the unit uses powerful fan forced air circulation for more than 60 seconds. - The door... is also programmed with a Dynamic Mode option. The unit will flash four (4) times, confirming that the temperature and humidity inside the wine zone stay consistent. The unit will beep three (3) times to enter Dynamic Mode. The unit will beep five (5) times to store...
Owner s Manual
Page 16
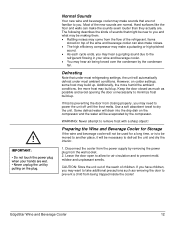
...by the condenser fan. Use a soft absorbent towel to minimize frost build-up. Defrosting Note that under most ambient conditions. EdgeStar Wine and Beverage Cooler 12 Additionally, the more humid the ambient conditions, the more frost may want to take additional precautions such as possible and avoid... dry the interior. 1. WARNING: Never attempt to power the unit off until the frost melts. Preparing the Wine and Beverage Cooler for Storage If the wine and beverage cooler will drain into the drip dish on the plug. Leave the door open to allow for a long time,...
...by the condenser fan. Use a soft absorbent towel to minimize frost build-up. Defrosting Note that under most ambient conditions. EdgeStar Wine and Beverage Cooler 12 Additionally, the more humid the ambient conditions, the more frost may want to take additional precautions such as possible and avoid... dry the interior. 1. WARNING: Never attempt to power the unit off until the frost melts. Preparing the Wine and Beverage Cooler for Storage If the wine and beverage cooler will drain into the drip dish on the plug. Leave the door open to allow for a long time,...
Owner s Manual
Page 17
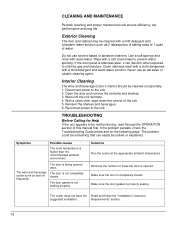
...stainless steel with a cloth dampened with a soft clean towel to chlorine gas and moisture. Disconnect power to the unit. The wine and beverage cooler turns on the following page. The door gasket is properly sealing. Make sure the door gasket is not sealing properly. Do... the OPERATION section of this manual first. Interior Cleaning The wine and beverage cooler's interior should be solved or explained. The door is being opened . Solutions Run the cooler at the appropriate ambient temperature. The cooler does not have the Read and follow the "Installation Clearance ...
...stainless steel with a cloth dampened with a soft clean towel to chlorine gas and moisture. Disconnect power to the unit. The wine and beverage cooler turns on the following page. The door gasket is properly sealing. Make sure the door gasket is not sealing properly. Do... the OPERATION section of this manual first. Interior Cleaning The wine and beverage cooler's interior should be solved or explained. The door is being opened . Solutions Run the cooler at the appropriate ambient temperature. The cooler does not have the Read and follow the "Installation Clearance ...
Owner s Manual
Page 18
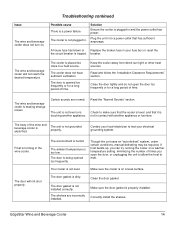
...EdgeStar Wine and Beverage Cooler 14 The cooler does not have sufficient ventilation. Read and follow the "Installation Clearance Requirements" section. The ambient temperature is not level. Make sure the cooler is not plugged in contact with another appliance. Clean the door gasket. The shelves are normal. Plug the unit in the wine cooler.... Check to melt. Your cooler is too low. The cooler is on . The wine and beverage cooler is touching another appliance or furniture. The unit is not level or...
...EdgeStar Wine and Beverage Cooler 14 The cooler does not have sufficient ventilation. Read and follow the "Installation Clearance Requirements" section. The ambient temperature is not level. Make sure the cooler is not plugged in contact with another appliance. Clean the door gasket. The shelves are normal. Plug the unit in the wine cooler.... Check to melt. Your cooler is too low. The cooler is on . The wine and beverage cooler is touching another appliance or furniture. The unit is not level or...
Owner s Manual
Page 19
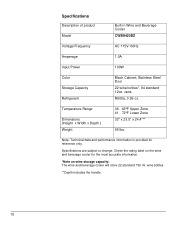
... 32" x 23.5" x 24.4"** 95 lbs. wine bottles. **Depth includes the handle. 15 Note: Technical data and performance information is provided for the most accurate information. *Note on wine storage capacity: The wine and beverage cooler will store 22 standard 750 ml. Check the rating... label on the wine and beverage cooler for reference only. Stainless Steel Door 22 wine bottles*, 84 standard 12oz. cans R600a, 0.99 oz. Specifications are subject to change. Specifications Description of product Model Built-in Wine and Beverage Cooler CWB8420DZ Voltage/Frequency AC 115V~...
... 32" x 23.5" x 24.4"** 95 lbs. wine bottles. **Depth includes the handle. 15 Note: Technical data and performance information is provided for the most accurate information. *Note on wine storage capacity: The wine and beverage cooler will store 22 standard 750 ml. Check the rating... label on the wine and beverage cooler for reference only. Stainless Steel Door 22 wine bottles*, 84 standard 12oz. cans R600a, 0.99 oz. Specifications are subject to change. Specifications Description of product Model Built-in Wine and Beverage Cooler CWB8420DZ Voltage/Frequency AC 115V~...


