Owner's Manual
Page 1
Combo Washer/Dryer CWD1510S Owner's Manual For more information on other great EdgeStar products on the web, go to http://www.edgestar.com
Combo Washer/Dryer CWD1510S Owner's Manual For more information on other great EdgeStar products on the web, go to http://www.edgestar.com
Owner's Manual
Page 2
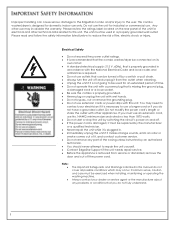
... contact customer service. Do not remove any problems or conditions that you do not cover all possible conditions which may invalidate the warranty. Always contact your electrician if it is not going to the user. Electrical Safety Do not exceed the power outlet ratings. It is recommended that the combo washer/dryer be connected on...
... contact customer service. Do not remove any problems or conditions that you do not cover all possible conditions which may invalidate the warranty. Always contact your electrician if it is not going to the user. Electrical Safety Do not exceed the power outlet ratings. It is recommended that the combo washer/dryer be connected on...
Owner's Manual
Page 3
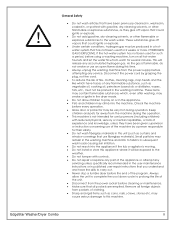
... could ignite or explode. Do not add gasoline, dry-cleaning solvents, or other flammable or explosive substances to this appliance where it will release any service. If the hot-water system has not been used for 2 weeks or more. HYDROGEN GAS IS EXPLOSIVE. As the gas is moving. Do not install or store this machine. EdgeStar Washer/Dryer Combo ii
... could ignite or explode. Do not add gasoline, dry-cleaning solvents, or other flammable or explosive substances to this appliance where it will release any service. If the hot-water system has not been used for 2 weeks or more. HYDROGEN GAS IS EXPLOSIVE. As the gas is moving. Do not install or store this machine. EdgeStar Washer/Dryer Combo ii
Owner's Manual
Page 5
EdgeStar Washer/Dryer Combo iv Refer to the product label on the back of Contents IMPORTANT SAFETY INFORMATION I INTRODUCTION 1 PARTS IDENTIFICATION 2 FRONT VIEW ...2 BACK VIEW ...3 DETERGENT DISPENSER 4 PREPARATION FOR INSTALLATION 4 ELECTRICAL REQUIREMENTS 5 LOCATION REQUIREMENTS 5 INSTALLATION CLEARANCES 6 Washer Dimensions 6 TOOLS AND PARTS 7 REMOVE TRANSPORT BOLTS 7 7 CONNECT INLET PIPE 8 INSTALL INLET PIPE 8 DRAIN SYSTEM OPTIONS 9 Standpipe drain system 9 Laundry tub drain system 9 Floor drain system 9 LEVEL THE WASHER 10 OPERATING INSTRUCTIONS 12 CONTROL PANEL ...
EdgeStar Washer/Dryer Combo iv Refer to the product label on the back of Contents IMPORTANT SAFETY INFORMATION I INTRODUCTION 1 PARTS IDENTIFICATION 2 FRONT VIEW ...2 BACK VIEW ...3 DETERGENT DISPENSER 4 PREPARATION FOR INSTALLATION 4 ELECTRICAL REQUIREMENTS 5 LOCATION REQUIREMENTS 5 INSTALLATION CLEARANCES 6 Washer Dimensions 6 TOOLS AND PARTS 7 REMOVE TRANSPORT BOLTS 7 7 CONNECT INLET PIPE 8 INSTALL INLET PIPE 8 DRAIN SYSTEM OPTIONS 9 Standpipe drain system 9 Laundry tub drain system 9 Floor drain system 9 LEVEL THE WASHER 10 OPERATING INSTRUCTIONS 12 CONTROL PANEL ...
Owner's Manual
Page 6
... this instruction manual carefully to safely transport your Combo Washer/Dryer. You may also want to staple your receipt to nurture that relationship. We are glad you need warranty service, our friendly customer service representatives are located on the ratings label on the web at http://www.edgestar.com to register your product, download product manuals, and access additional troubleshooting resources...
... this instruction manual carefully to safely transport your Combo Washer/Dryer. You may also want to staple your receipt to nurture that relationship. We are glad you need warranty service, our friendly customer service representatives are located on the ratings label on the web at http://www.edgestar.com to register your product, download product manuals, and access additional troubleshooting resources...
Owner's Manual
Page 7
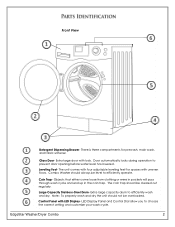
... properly wash and dry the unit should always be level to choose the correct setting and customize your wash cycle. EdgeStar Washer/Dryer Combo 2 Front View Detergent Dispensing Drawer- The unit comes with four adjustable leveling feet for prewash, main wash, and fabric softener. Control Panel with uneven floors. Leveling Feet- Extra-large capacity drum to prevent door opening before water level...
... properly wash and dry the unit should always be level to choose the correct setting and customize your wash cycle. EdgeStar Washer/Dryer Combo 2 Front View Detergent Dispensing Drawer- The unit comes with four adjustable leveling feet for prewash, main wash, and fabric softener. Control Panel with uneven floors. Leveling Feet- Extra-large capacity drum to prevent door opening before water level...
Owner's Manual
Page 9
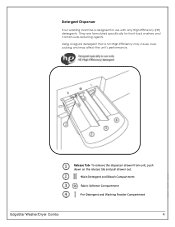
Using a regular detergent that is designed for front-load washers and contain suds-reducing agents. To remove the dispenser drawer from unit, push down on the release tab and pull drawer out. -Main Detergent and Bleach Compartment -Fabric Softener Compartment -Pre-Detergent and Washing Powder Compartment EdgeStar Washer/Dryer Combo 4 They are formulated specifically for use with only High-Efficiency (HE) detergents. Detergent Dispenser Your washing machine is not High-Efficiency may cause oversudsing and may affect the unit's performance. Release Tab-
Using a regular detergent that is designed for front-load washers and contain suds-reducing agents. To remove the dispenser drawer from unit, push down on the release tab and pull drawer out. -Main Detergent and Bleach Compartment -Fabric Softener Compartment -Pre-Detergent and Washing Powder Compartment EdgeStar Washer/Dryer Combo 4 They are formulated specifically for use with only High-Efficiency (HE) detergents. Detergent Dispenser Your washing machine is not High-Efficiency may cause oversudsing and may affect the unit's performance. Release Tab-
Owner's Manual
Page 10
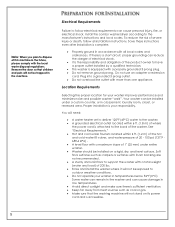
... cause personal injury, fire, or electrical shock. Do not use an adapter or extension cord. Remove the door so that the washing machine will not stand on a rigid, dry, and level surface. If there is accessible. 5 Proper installation is attached to the back of the washer. See "Electrical Requirements." Hot and cold water faucets located within 6 ft. (1.8 m) of where...
... cause personal injury, fire, or electrical shock. Do not use an adapter or extension cord. Remove the door so that the washing machine will not stand on a rigid, dry, and level surface. If there is accessible. 5 Proper installation is attached to the back of the washer. See "Electrical Requirements." Hot and cold water faucets located within 6 ft. (1.8 m) of where...
Owner's Manual
Page 11
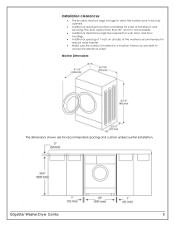
... sides of installation and servicing. EdgeStar Washer/Dryer Combo 6 Installation clearances The location must be large enough to allow the washer door to be fully opened. Additional spacing should be required for ease of the washer is recommended to reduce noise transfer Make sure the combo is installed in a location where you are for recommended spacing and custom undercounter installation. Washer Dimensions: The dimensions shown...
... sides of installation and servicing. EdgeStar Washer/Dryer Combo 6 Installation clearances The location must be large enough to allow the washer door to be fully opened. Additional spacing should be required for ease of the washer is recommended to reduce noise transfer Make sure the combo is installed in a location where you are for recommended spacing and custom undercounter installation. Washer Dimensions: The dimensions shown...
Owner's Manual
Page 12
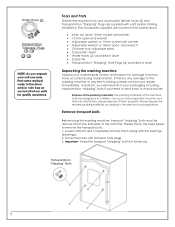
... Water Hoses (2)- provided in the washer drum. 6mm nut driver 10mm socket with ratchet 10 mm open - Dispose of the packing materials: The packing materials of them along with unit) before starting installation. Remove transport bolts Before using this machine. Loosen all of this washing ...some residual water in drum Unpacking the washing machine Unpack your washer/dryer combo and inspect for damage that may have inspected machine and find unit satisfactory, please dispose of this machine may be removed from the backside of our units for future use. -...
... Water Hoses (2)- provided in the washer drum. 6mm nut driver 10mm socket with ratchet 10 mm open - Dispose of the packing materials: The packing materials of them along with unit) before starting installation. Remove transport bolts Before using this machine. Loosen all of this washing ...some residual water in drum Unpacking the washing machine Unpack your washer/dryer combo and inspect for damage that may have inspected machine and find unit satisfactory, please dispose of this machine may be removed from the backside of our units for future use. -...
Owner's Manual
Page 13
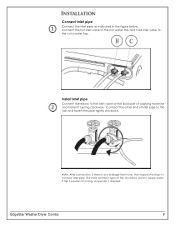
... inlet pipe to the tap and fasten the pipe tightly clockwise. EdgeStar Washer/Dryer Combo 8 The most common type of tap should be used to the cold water tap. Install inlet pipe Connect the elbow to connect inlet pipe. Note: After connection, if there is required. Connect the other end of washing machine and fasten it turning clockwise.
... inlet pipe to the tap and fasten the pipe tightly clockwise. EdgeStar Washer/Dryer Combo 8 The most common type of tap should be used to the cold water tap. Install inlet pipe Connect the elbow to connect inlet pipe. Note: After connection, if there is required. Connect the other end of washing machine and fasten it turning clockwise.
Owner's Manual
Page 15
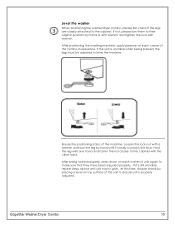
...cabinet. Hold the leg with one hand and fasten the nut closely to their original positions by hand until unit has no give. EdgeStar Washer/Dryer Combo 10 If it is still unstable, repeat steps above until it closely contacts the floor. If not, please turn the leg by...they have been adjusted properly. After positioning the washing machine, apply pressure on top surface of the machine. At this time, double check by placing a level on each corner of the combo in sequence. Level the washer When positioning the washer/dryer combo, please first check if the legs are ...
...cabinet. Hold the leg with one hand and fasten the nut closely to their original positions by hand until unit has no give. EdgeStar Washer/Dryer Combo 10 If it is still unstable, repeat steps above until it closely contacts the floor. If not, please turn the leg by...they have been adjusted properly. After positioning the washing machine, apply pressure on top surface of the machine. At this time, double check by placing a level on each corner of the combo in sequence. Level the washer When positioning the washer/dryer combo, please first check if the legs are ...
Owner's Manual
Page 17
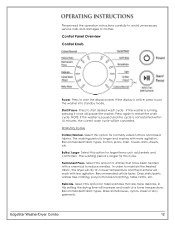
... washer into standby mode. If the display is running, pressing it once will wash with more delicate. If the washer is active, press to reduce wrinkles. Wash/Dry Cycles Cotton/Normal- Select this cycle. Select this option for larger items such as blankets and comforters. Dress shirts/pants, wrinkle free clothing, poly/cotton blend clothing, table cloths, etc. Recommended fabric types- EdgeStar Washer/Dryer Combo...
... washer into standby mode. If the display is running, pressing it once will wash with more delicate. If the washer is active, press to reduce wrinkles. Wash/Dry Cycles Cotton/Normal- Select this cycle. Select this option for larger items such as blankets and comforters. Dress shirts/pants, wrinkle free clothing, poly/cotton blend clothing, table cloths, etc. Recommended fabric types- EdgeStar Washer/Dryer Combo...
Owner's Manual
Page 19
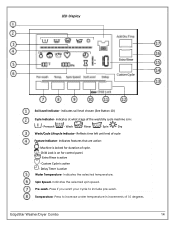
Indicates at what stage of cycle. - Indicates features that are active: - Spin Speed- Pre-wash- EdgeStar Washer/Dryer Combo 14 Prewash - Child Lock is on for duration of the wash/dry cycle machine is in increments of cycle Feature Indicator- Indicates the selected temperature. Machine is active - Indicates the selected spin speed. Press if you want your cycle to increase water temperature in : - Temperature- Reflects...
Indicates at what stage of cycle. - Indicates features that are active: - Spin Speed- Pre-wash- EdgeStar Washer/Dryer Combo 14 Prewash - Child Lock is on for duration of the wash/dry cycle machine is in increments of cycle Feature Indicator- Indicates the selected temperature. Machine is active - Indicates the selected spin speed. Press if you want your cycle to increase water temperature in : - Temperature- Reflects...
Owner's Manual
Page 21
...clothes should be hand washed first. Please consult the water company if you are washed according to the stated washing temperature to avoid color change/distortion. Keep detergents and additives in safe dry places out of the clothes to avoid possible damage or unnecessary service call. EdgeStar Washer/Dryer Combo 16 Tips before Washing Check for colorfastness is suggested to use...in . Before washing any loose items to be washed, remove any new garment you know the item is loaded it should be harmful and damage clothes, so it set in the same wash cycle. Simply wet ...
...clothes should be hand washed first. Please consult the water company if you are washed according to the stated washing temperature to avoid color change/distortion. Keep detergents and additives in safe dry places out of the clothes to avoid possible damage or unnecessary service call. EdgeStar Washer/Dryer Combo 16 Tips before Washing Check for colorfastness is suggested to use...in . Before washing any loose items to be washed, remove any new garment you know the item is loaded it should be harmful and damage clothes, so it set in the same wash cycle. Simply wet ...
Owner's Manual
Page 23
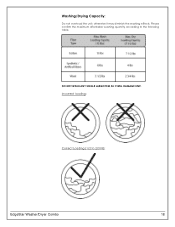
Incorrect loading: Correct Loading (1/2 to the following table. Please confirm the maximum affordable washing quantity according to 2/3 Fill): EdgeStar Washer/Dryer Combo 18 DO NOT WASH ANY SINGLE LARGE ITEM AS IT WILL DAMAGE UNIT. otherwise it may diminish the washing effects. Washing/Drying Capacity: Do not overload the unit;
Incorrect loading: Correct Loading (1/2 to the following table. Please confirm the maximum affordable washing quantity according to 2/3 Fill): EdgeStar Washer/Dryer Combo 18 DO NOT WASH ANY SINGLE LARGE ITEM AS IT WILL DAMAGE UNIT. otherwise it may diminish the washing effects. Washing/Drying Capacity: Do not overload the unit;
Owner's Manual
Page 26
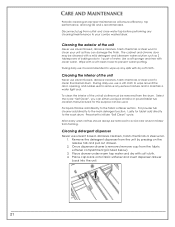
..., harsh chemicals or steel wool to prevent water spotting. Wipe with a mild detergent and lukewarm water solution such as they can be cleaned with a soft clean towel to clean your combo washer/dryer. Use a soft sponge and rinse with clean water. Periodic cleaning and proper maintenance will ensure efficiency, top performance, and long life and is removed remove cap from the fabric softener compartment...
..., harsh chemicals or steel wool to prevent water spotting. Wipe with a mild detergent and lukewarm water solution such as they can be cleaned with a soft clean towel to clean your combo washer/dryer. Use a soft sponge and rinse with clean water. Periodic cleaning and proper maintenance will ensure efficiency, top performance, and long life and is removed remove cap from the fabric softener compartment...
Owner's Manual
Page 27
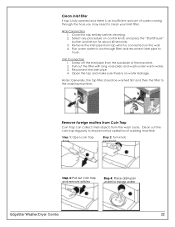
... need to run for excess water EdgeStar Washer/Dryer Combo 22 Clean out the coin trap regularly to the washing machine. Clean inlet filter If tap is fully opened and there is an insufficient amount of water coming through filter and reconnect inlet pipe to hose. Notes: Generally, the tap filter should be washed first and then the filter to ensure normal operation of...
... need to run for excess water EdgeStar Washer/Dryer Combo 22 Clean out the coin trap regularly to the washing machine. Clean inlet filter If tap is fully opened and there is an insufficient amount of water coming through filter and reconnect inlet pipe to hose. Notes: Generally, the tap filter should be washed first and then the filter to ensure normal operation of...
Owner's Manual
Page 30
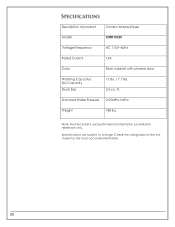
ft. Check the rating label on the ice maker for reference only. Specifications are subject to change. Description of product Combo Washer/Dryer Model CWD1510S Voltage/Frequency AC 115V~60Hz Rated Current 12A Color Silver cabinet with chrome door Washing Capacity/ Dry Capacity Drum Size 15 lbs. / 7.7 lbs. 2.0 cu. Standard Water Pressure 0.05MPa-1MPa Weight 188 lbs. Note: Technical data and performance information provided for the most accurate information. 25
ft. Check the rating label on the ice maker for reference only. Specifications are subject to change. Description of product Combo Washer/Dryer Model CWD1510S Voltage/Frequency AC 115V~60Hz Rated Current 12A Color Silver cabinet with chrome door Washing Capacity/ Dry Capacity Drum Size 15 lbs. / 7.7 lbs. 2.0 cu. Standard Water Pressure 0.05MPa-1MPa Weight 188 lbs. Note: Technical data and performance information provided for the most accurate information. 25
Owner's Manual
Page 31
... removal and replacement of defective parts, beyond the initial 12 month period. -Products that your product is defective, contact EdgeStar Customer Support for troubleshooting assistance and warranty service at an authorized EdgeStar repair facility and EdgeStar will supply new, rebuilt, or refurbished parts free of this warranty. Do not return a defective product to the place of charge including labor that have your model number...
... removal and replacement of defective parts, beyond the initial 12 month period. -Products that your product is defective, contact EdgeStar Customer Support for troubleshooting assistance and warranty service at an authorized EdgeStar repair facility and EdgeStar will supply new, rebuilt, or refurbished parts free of this warranty. Do not return a defective product to the place of charge including labor that have your model number...

