
Owner's Manual
Page 1
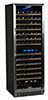
Wine Refrigerator CWR1551DZ Owner's Manual For more information on other great EdgeStar products on the web, go to http://www.edgestar.com
Wine Refrigerator CWR1551DZ Owner's Manual For more information on other great EdgeStar products on the web, go to http://www.edgestar.com

Owner's Manual
Page 2
... cooler before they cool down , on its own circuit. The unit must be installed in accordance with state and local electrical codes. A standard electrical supply (115 V, 60Hz), that is properly grounded. Never plug or unplug the unit with other appliances. Do not start or stop the unit by switching the circuit's power on top of the unit. Do not turn the unit...
... cooler before they cool down , on its own circuit. The unit must be installed in accordance with state and local electrical codes. A standard electrical supply (115 V, 60Hz), that is properly grounded. Never plug or unplug the unit with other appliances. Do not start or stop the unit by switching the circuit's power on top of the unit. Do not turn the unit...

Owner's Manual
Page 3
... method 5 LEVELING THE WINE REFRIGERATOR 5 INSTALLING THE DOOR HANDLE 6 INSTALLING AND REMOVING THE SHELVES 6 REVERSING THE DOOR SWING 7 REMOVING AND INSTALLING DECORATIVE PLUGS 8 OPERATION...9 USING THE TEMPERATURE CONTROL PANEL 9 BOTTLE POSITIONING 10 NORMAL SOUNDS 11 DEFROSTING ...11 PREPARING THE WINE REFRIGERATOR FOR STORAGE 11 CLEANING AND MAINTENANCE 12 EXTERIOR CLEANING 12 INTERIOR CLEANING 12 TROUBLESHOOTING 12 TROUBLESHOOTING CONTINUED 13 SPECIFICATIONS 14 First Time Operating Instructions Before use only. This owner's manual is advised that...
... method 5 LEVELING THE WINE REFRIGERATOR 5 INSTALLING THE DOOR HANDLE 6 INSTALLING AND REMOVING THE SHELVES 6 REVERSING THE DOOR SWING 7 REMOVING AND INSTALLING DECORATIVE PLUGS 8 OPERATION...9 USING THE TEMPERATURE CONTROL PANEL 9 BOTTLE POSITIONING 10 NORMAL SOUNDS 11 DEFROSTING ...11 PREPARING THE WINE REFRIGERATOR FOR STORAGE 11 CLEANING AND MAINTENANCE 12 EXTERIOR CLEANING 12 INTERIOR CLEANING 12 TROUBLESHOOTING 12 TROUBLESHOOTING CONTINUED 13 SPECIFICATIONS 14 First Time Operating Instructions Before use only. This owner's manual is advised that...

Owner's Manual
Page 4
... troubleshooting section of this instruction manual carefully to obtain warranty service. Model Number: Serial Number: Date of Purchase: To better serve you, please do the following before contacting customer service: If you received a damaged product, immediately contact the retailer or dealer that your purchase of your unit and are needed to help you install, use and maintenance of your purchase, and is also needed to this EdgeStar wine refrigerator...
... troubleshooting section of this instruction manual carefully to obtain warranty service. Model Number: Serial Number: Date of Purchase: To better serve you, please do the following before contacting customer service: If you received a damaged product, immediately contact the retailer or dealer that your purchase of your unit and are needed to help you install, use and maintenance of your purchase, and is also needed to this EdgeStar wine refrigerator...

Owner's Manual
Page 5
If the unit is placed in the kitchen regular replacement every 3 months is ideal. Parts Identification Top Right Hinge Control Panel Shelf Stainless Steel Door Zone Divider Carbon Filter Internal Fan Lock Front vent Leveling foot EdgeStar Wine Refrigerator 2 Door Handle Tip: Gather the model and serial number from the product label and write them down before installing the wine refrigerator. Front View Note: The carbon filter should be replaced every 3-6 months depending on the unit's exposure level to odor.
If the unit is placed in the kitchen regular replacement every 3 months is ideal. Parts Identification Top Right Hinge Control Panel Shelf Stainless Steel Door Zone Divider Carbon Filter Internal Fan Lock Front vent Leveling foot EdgeStar Wine Refrigerator 2 Door Handle Tip: Gather the model and serial number from the product label and write them down before installing the wine refrigerator. Front View Note: The carbon filter should be replaced every 3-6 months depending on the unit's exposure level to odor.

Owner's Manual
Page 6
... tape and glue from your installation requirements. 2. Free-standing installation: A free-standing installation will allow the compressor's oils to settle. The following additional items must follow the stated instructions for the back of Installation This wine refrigerator has been designed for service. Push the wine refrigerator into a power supply, be sure to let it will allow adequate ventilation space around the beverage cooler is followed. Before you...
... tape and glue from your installation requirements. 2. Free-standing installation: A free-standing installation will allow the compressor's oils to settle. The following additional items must follow the stated instructions for the back of Installation This wine refrigerator has been designed for service. Push the wine refrigerator into a power supply, be sure to let it will allow adequate ventilation space around the beverage cooler is followed. Before you...

Owner's Manual
Page 7
... the power supply cord between the wine refrigerator and wall or cabinet. Top View 2/5" Back of unit 1/5" 1/5" Side View 1/5" Door Hinge • The wine refrigerator should allow at least 2/5" clearance at the back, 1/5" at top and 1/5" at sides. Installation Clearance Requirements When installing the wine refrigerator under a counter, follow the recommended spacing dimensions shown. • To ensure proper service access and ventilation, allow the unit to be located...
... the power supply cord between the wine refrigerator and wall or cabinet. Top View 2/5" Back of unit 1/5" 1/5" Side View 1/5" Door Hinge • The wine refrigerator should allow at least 2/5" clearance at the back, 1/5" at top and 1/5" at sides. Installation Clearance Requirements When installing the wine refrigerator under a counter, follow the recommended spacing dimensions shown. • To ensure proper service access and ventilation, allow the unit to be located...
Owner's Manual
Page 8
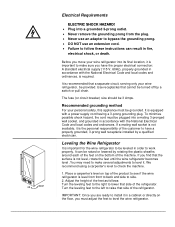
.... We recommend using a carpenter's level to make sure you move your personal safety, this appliance must adjust the feet to level the wine refrigerator. It can result in accordance with a power supply cord having a 3-prong grounding plug. Recommended grounding method For your wine refrigerator into its final location, it is important for the wine refrigerator to be grounded. Electrical Requirements ELECTRIC SHOCK HAZARD! ...
.... We recommend using a carpenter's level to make sure you move your personal safety, this appliance must adjust the feet to level the wine refrigerator. It can result in accordance with a power supply cord having a 3-prong grounding plug. Recommended grounding method For your wine refrigerator into its final location, it is important for the wine refrigerator to be grounded. Electrical Requirements ELECTRIC SHOCK HAZARD! ...
Owner's Manual
Page 9
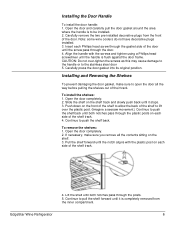
... post on the shelf. 3. To install the shelves: 1. Continue to the stainless steel door 5. EdgeStar Wine Refrigerator 6 Open the door and carefully pull the door gasket around the area where the handle is flush against the door frame. Insert each...shelf back. Installing and Removing the Shelves To prevent damaging the door gasket, make sure you remove all the way before pulling the shelves out of the shelf track. 4. Pull the shelf forward until the notch aligns with the screws and tighten using a Phillips head screwdriver until it stops. 3. Carefully press the door gasket...
... post on the shelf. 3. To install the shelves: 1. Continue to the stainless steel door 5. EdgeStar Wine Refrigerator 6 Open the door and carefully pull the door gasket around the area where the handle is flush against the door frame. Insert each...shelf back. Installing and Removing the Shelves To prevent damaging the door gasket, make sure you remove all the way before pulling the shelves out of the shelf track. 4. Pull the shelf forward until the notch aligns with the screws and tighten using a Phillips head screwdriver until it stops. 3. Carefully press the door gasket...

Owner's Manual
Page 10
... from the upper left swing: 1. Open the door and using a Phillips screwdriver, remove the bottom screws from right swing to the cabinet. Remove the plastic caps from the top left support bracket 6. Reversing the Door Swing Follow the instructions below to the upper right corner. 4. To reverse the door from the lower hinge. 2. Carefully slide the bottom of the door and install and tighten...
... from the upper left swing: 1. Open the door and using a Phillips screwdriver, remove the bottom screws from right swing to the cabinet. Remove the plastic caps from the top left support bracket 6. Reversing the Door Swing Follow the instructions below to the upper right corner. 4. To reverse the door from the lower hinge. 2. Carefully slide the bottom of the door and install and tighten...
Owner's Manual
Page 11
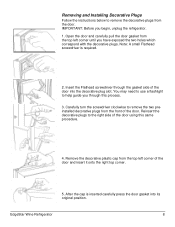
.... EdgeStar Wine Refrigerator 8 IMPORTANT: Before you through the gasket side of the door using this process. 3. You may need to use a flashlight to the right side of the door into its original position. Carefully turn the screwdriver clockwise to remove the decorative plugs from the door. Open the door and carefully pull the door gasket from the top left corner of the door. Removing and Installing...
.... EdgeStar Wine Refrigerator 8 IMPORTANT: Before you through the gasket side of the door using this process. 3. You may need to use a flashlight to the right side of the door into its original position. Carefully turn the screwdriver clockwise to remove the decorative plugs from the door. Open the door and carefully pull the door gasket from the top left corner of the door. Removing and Installing...

Owner's Manual
Page 12
... control panel to acclimate. Buttons Light Button Power Button RUN CF Celsius and Fahrenheit Lights Note: Whether your wines and to allow the temperature to adjust the temperature in the lower zone. The button will scroll the temperature by one degree increments. Note: While pressing the button, it back on the ambient environmental conditions. Press the button on or off . OPERATION Using the Temperature Control Panel Run Light Temp. The temperature displayed can reach the actual set temperature depends on . The button...
... control panel to acclimate. Buttons Light Button Power Button RUN CF Celsius and Fahrenheit Lights Note: Whether your wines and to allow the temperature to adjust the temperature in the lower zone. The button will scroll the temperature by one degree increments. Note: While pressing the button, it back on the ambient environmental conditions. Press the button on or off . OPERATION Using the Temperature Control Panel Run Light Temp. The temperature displayed can reach the actual set temperature depends on . The button...
Owner's Manual
Page 13
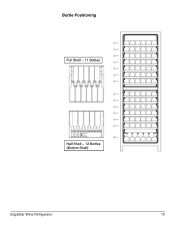
Bottle Positioning Full Shelf - 11 Bottles Half Shelf - 12 Bottles (Bottom Shelf) EdgeStar Wine Refrigerator 10
Bottle Positioning Full Shelf - 11 Bottles Half Shelf - 12 Bottles (Bottom Shelf) EdgeStar Wine Refrigerator 10

Owner's Manual
Page 14
... condenser fan. CAUTION: Store the unit out of the reach of the wine refrigerator can make a splashing sound. As each cycle ends, you . However, on colder settings, some frost may build up . WARNING: Never attempt to defrost the unit and dry the interior. 1. Preparing the Wine Refrigerator for Storage If the wine refrigerator will not be used for air circulation and to power the unit...
... condenser fan. CAUTION: Store the unit out of the reach of the wine refrigerator can make a splashing sound. As each cycle ends, you . However, on colder settings, some frost may build up . WARNING: Never attempt to defrost the unit and dry the interior. 1. Preparing the Wine Refrigerator for Storage If the wine refrigerator will not be used for air circulation and to power the unit...

Owner's Manual
Page 15
... the number of water. If the door panel is being opened . Wait until the unit defrosts. 4. Use a soft sponge and rinse with a mild detergent and warm water solution. Reconnect power to the unit. 2. Never use solvent based or abrasive cleaners. Solutions Run the cooler at the appropriate ambient temperature. EdgeStar Wine Refrigerator 12 The door is higher than the recommended ambient environment. CLEANING AND MAINTENANCE Symptoms The wine cooler turns...
... the number of water. If the door panel is being opened . Wait until the unit defrosts. 4. Use a soft sponge and rinse with a mild detergent and warm water solution. Reconnect power to the unit. 2. Never use solvent based or abrasive cleaners. Solutions Run the cooler at the appropriate ambient temperature. EdgeStar Wine Refrigerator 12 The door is higher than the recommended ambient environment. CLEANING AND MAINTENANCE Symptoms The wine cooler turns...

Owner's Manual
Page 16
... sure the door gasket is a power failure. Possible cause There is properly installed. Contact your local electrician to make sure that the cooler is level, and that has sufficient amperage. Troubleshooting continued Issue The wine cooler does not turn on a warmer temperature setting, minimizing the number of times you can try running the cooler on . The cooler is tripped. A house fuse has blown or the circuit breaker is...
... sure the door gasket is a power failure. Possible cause There is properly installed. Contact your local electrician to make sure that the cooler is level, and that has sufficient amperage. Troubleshooting continued Issue The wine cooler does not turn on a warmer temperature setting, minimizing the number of times you can try running the cooler on . The cooler is tripped. A house fuse has blown or the circuit breaker is...

Owner's Manual
Page 17
Specifications are subject to change. Check the rating label on the wine refrigerator for reference only. EdgeStar Wine Refrigerator 14 Stainless Steel Door 155 Bottles* Refrigerant R134a, 3.18 oz. Specifications Description of product Built-in Wine Refrigerator Model CWR1551DZ Voltage/Frequency AC 115V~60Hz Amperage 2.32A Input Power 200W Color Storage Capacity Black Cabinet; wine bottles. Temperature Range 41 - 65ºF Dimensions (Height x Width x Depth ) Weight 69 1/2" x 23 7/16" x 26 3/4" 200 pounds Note: Technical data...
Specifications are subject to change. Check the rating label on the wine refrigerator for reference only. EdgeStar Wine Refrigerator 14 Stainless Steel Door 155 Bottles* Refrigerant R134a, 3.18 oz. Specifications Description of product Built-in Wine Refrigerator Model CWR1551DZ Voltage/Frequency AC 115V~60Hz Amperage 2.32A Input Power 200W Color Storage Capacity Black Cabinet; wine bottles. Temperature Range 41 - 65ºF Dimensions (Height x Width x Depth ) Weight 69 1/2" x 23 7/16" x 26 3/4" 200 pounds Note: Technical data...

Owner's Manual
Page 18
... performed free of charge at www.edgestar.com or call 1-866-319-5473. After the 12 month period, EdgeStar will be replaced, e.g. No other than normal household use. -Replacement or repair of household fuses, circuit breakers, wiring or plumbing. -Damage to personal property from use of product. -Damage from service other warranty applies. This warranty does not cover: -Labor charges for installation, setup or training to use . -Labor, service...
... performed free of charge at www.edgestar.com or call 1-866-319-5473. After the 12 month period, EdgeStar will be replaced, e.g. No other than normal household use. -Replacement or repair of household fuses, circuit breakers, wiring or plumbing. -Damage to personal property from use of product. -Damage from service other warranty applies. This warranty does not cover: -Labor charges for installation, setup or training to use . -Labor, service...

Owner's Manual
Page 19
All rights reserved. EdgeStar Products 500 N. Capital of TX Hwy, Bldg 5 Austin, TX 78746 Toll Free: 1-866-319-5473 Web: http://www.edgestar.com E-mail: service@edgestar.com Register your product, download owner's manuals, access additional troubleshooting resources, and obtain more information on other great EdgeStar products on the web at: http://www.edgestar.com Product contents and specifications may change without notice. Copyright © 2013 Living Direct, Inc.
All rights reserved. EdgeStar Products 500 N. Capital of TX Hwy, Bldg 5 Austin, TX 78746 Toll Free: 1-866-319-5473 Web: http://www.edgestar.com E-mail: service@edgestar.com Register your product, download owner's manuals, access additional troubleshooting resources, and obtain more information on other great EdgeStar products on the web at: http://www.edgestar.com Product contents and specifications may change without notice. Copyright © 2013 Living Direct, Inc.


