Owner's Manual
Page 1
Wine Refrigerator CWR262DZ Owner's Manual For more information on other great EdgeStar products on the web, go to http://www.edgestar.com
Wine Refrigerator CWR262DZ Owner's Manual For more information on other great EdgeStar products on the web, go to http://www.edgestar.com
Owner's Manual
Page 2
... agents or abrasive solutions to repair the unit yourself. Contact customer service for wine and beverage storage. Please review the ratings label located on its own circuit. The unit must be supervised to be used in a properly grounded wall outlet. Please read and follow the safety information listed below 95°F. The temperature range for this unit. Perishable food items may require...
... agents or abrasive solutions to repair the unit yourself. Contact customer service for wine and beverage storage. Please review the ratings label located on its own circuit. The unit must be supervised to be used in a properly grounded wall outlet. Please read and follow the safety information listed below 95°F. The temperature range for this unit. Perishable food items may require...

Owner's Manual
Page 3
... DOOR SWING 7 REMOVING AND INSTALLING DECORATIVE PLUGS 8 OPERATION...9 USING THE TEMPERATURE CONTROL PANEL 9 NORMAL SOUNDS 10 DEFROSTING ...10 PREPARING THE WINE REFRIGERATOR FOR STORAGE 10 CLEANING AND MAINTENANCE 11 EXTERIOR CLEANING 11 INTERIOR CLEANING 11 TROUBLESHOOTING 11 TROUBLESHOOTING CONTINUED 12 SPECIFICATIONS 13 First Time Operating Instructions Before use it; this allows the cooling components time to the product label on the back of your wine refrigerator for reference use . EdgeStar Wine Refrigerator ii This owner's manual...
... DOOR SWING 7 REMOVING AND INSTALLING DECORATIVE PLUGS 8 OPERATION...9 USING THE TEMPERATURE CONTROL PANEL 9 NORMAL SOUNDS 10 DEFROSTING ...10 PREPARING THE WINE REFRIGERATOR FOR STORAGE 10 CLEANING AND MAINTENANCE 11 EXTERIOR CLEANING 11 INTERIOR CLEANING 11 TROUBLESHOOTING 11 TROUBLESHOOTING CONTINUED 12 SPECIFICATIONS 13 First Time Operating Instructions Before use it; this allows the cooling components time to the product label on the back of your wine refrigerator for reference use . EdgeStar Wine Refrigerator ii This owner's manual...
Owner's Manual
Page 4
... in case you and EdgeStar. Both numbers are glad you for purchasing this product opens a relationship between you need warranty service, our friendly customer service representatives are needed to help you diagnose and solve common issues. Visit us . This manual contains important information regarding the proper installation, use and maintain your wine refrigerator. Read the troubleshooting section of your purchase, and is also needed...
... in case you and EdgeStar. Both numbers are glad you for purchasing this product opens a relationship between you need warranty service, our friendly customer service representatives are needed to help you diagnose and solve common issues. Visit us . This manual contains important information regarding the proper installation, use and maintain your wine refrigerator. Read the troubleshooting section of your purchase, and is also needed...
Owner's Manual
Page 5
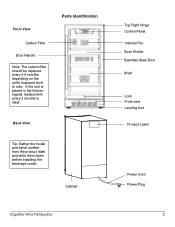
Parts Identification Back View Tip: Gather the model and serial number from the product label and write them down before installing the beverage cooler. Cabinet EdgeStar Wine Refrigerator Top Right Hinge Control Panel Internal Fan Zone Divider Stainless Steel Door Shelf Lock Front vent Leveling foot Product Label Power Cord Power Plug 2 If the unit is placed in the kitchen regular replacement every 3 months is ideal. Front View Carbon Filter Door Handle Note: The carbon filter should be replaced every 3-6 months depending on the unit's exposure level to odor.
Parts Identification Back View Tip: Gather the model and serial number from the product label and write them down before installing the beverage cooler. Cabinet EdgeStar Wine Refrigerator Top Right Hinge Control Panel Internal Fan Zone Divider Stainless Steel Door Shelf Lock Front vent Leveling foot Product Label Power Cord Power Plug 2 If the unit is placed in the kitchen regular replacement every 3 months is ideal. Front View Carbon Filter Door Handle Note: The carbon filter should be replaced every 3-6 months depending on the unit's exposure level to odor.

Owner's Manual
Page 6
... or on a platform depending on your wine refrigerator. Free-standing installation: A free-standing installation will allow adequate ventilation space around the beverage cooler is at least 24 hours to settle. Place the wine refrigerator in installation: A recessed installation will allow the compressor's oils to allow you desire. Types of your wine refrigerator before using. Built-in front of the unit). These products can result in almost any shipping tape...
... or on a platform depending on your wine refrigerator. Free-standing installation: A free-standing installation will allow adequate ventilation space around the beverage cooler is at least 24 hours to settle. Place the wine refrigerator in installation: A recessed installation will allow the compressor's oils to allow you desire. Types of your wine refrigerator before using. Built-in front of the unit). These products can result in almost any shipping tape...
Owner's Manual
Page 7
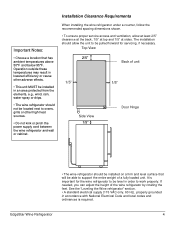
... sides. EdgeStar Wine Refrigerator 4 See the "Leveling the Wine refrigerator" section. • A standard electrical supply (115 VAC only, 60 Hz), properly grounded in accordance with National Electrical Code and local codes and ordinances is important for servicing, if necessary. Installation Clearance Requirements When installing the wine refrigerator under a counter, follow the recommended spacing dimensions shown. • To ensure proper service access and ventilation, allow the unit to work properly...
... sides. EdgeStar Wine Refrigerator 4 See the "Leveling the Wine refrigerator" section. • A standard electrical supply (115 VAC only, 60 Hz), properly grounded in accordance with National Electrical Code and local codes and ordinances is important for servicing, if necessary. Installation Clearance Requirements When installing the wine refrigerator under a counter, follow the recommended spacing dimensions shown. • To ensure proper service access and ventilation, allow the unit to work properly...

Owner's Manual
Page 8
... a mating 3-pronged wall socket, and grounded in fire, electrical shock, or death. Recommended grounding method For your wine refrigerator into its final location, it in order to work properly. It can result in accordance with the National Electrical Code and local codes and ordinances. Adjust the height of the feet as follows: Turn the leveling feet to the right to...
... a mating 3-pronged wall socket, and grounded in fire, electrical shock, or death. Recommended grounding method For your wine refrigerator into its final location, it in order to work properly. It can result in accordance with the National Electrical Code and local codes and ordinances. Adjust the height of the feet as follows: Turn the leveling feet to the right to...

Owner's Manual
Page 9
... to allow the back of their track. To install the shelves: 1. Continue to be installed. 2. EdgeStar Wine Refrigerator 6 Insert each Phillips head screw through the plastic posts on the shelf. 3. Open the door completely. 2. To remove the shelves: 1. Lift the shelf until both notches pass through the gasket side of the door. Align the handle with the plastic post on...
... to allow the back of their track. To install the shelves: 1. Continue to be installed. 2. EdgeStar Wine Refrigerator 6 Insert each Phillips head screw through the plastic posts on the shelf. 3. Open the door completely. 2. To remove the shelves: 1. Lift the shelf until both notches pass through the gasket side of the door. Align the handle with the plastic post on...
Owner's Manual
Page 10
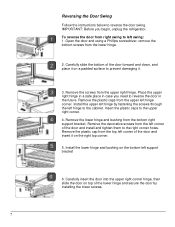
... the plastic cap from the lower hinge. 2. Reversing the Door Swing Follow the instructions below to the upper right corner. 4. To reverse the door from the left hinge by installing the lower screws. 7 Remove the decorative screws from right swing to prevent damaging it on the right top corner. 5. Install the lower hinge and bushing on a padded surface to left support bracket 6. IMPORTANT: Before you...
... the plastic cap from the lower hinge. 2. Reversing the Door Swing Follow the instructions below to the upper right corner. 4. To reverse the door from the left hinge by installing the lower screws. 7 Remove the decorative screws from right swing to prevent damaging it on the right top corner. 5. Install the lower hinge and bushing on a padded surface to left support bracket 6. IMPORTANT: Before you...

Owner's Manual
Page 11
Carefully turn the screwdriver clockwise to the right side of the door. Reinsert the decorative plugs to remove the two preinstalled decorative plugs from the door. Removing and Installing Decorative Plugs Follow the instructions below to help guide you have exposed the two holes ... the door using this process. 3. Open the door and carefully pull the door gasket from the top left corner until you through the gasket side of the door and insert it onto the right top corner. 5. Insert the Flathead screwdriver through this same procedure. 4. EdgeStar Wine Refrigerator 8...
Carefully turn the screwdriver clockwise to the right side of the door. Reinsert the decorative plugs to remove the two preinstalled decorative plugs from the door. Removing and Installing Decorative Plugs Follow the instructions below to help guide you have exposed the two holes ... the door using this process. 3. Open the door and carefully pull the door gasket from the top left corner until you through the gasket side of the door and insert it onto the right top corner. 5. Insert the Flathead screwdriver through this same procedure. 4. EdgeStar Wine Refrigerator 8...

Owner's Manual
Page 12
OPERATION Using the Temperature Control Panel Run Light Temp. The temperature displayed can reach the actual set temperature depends on the control panel to adjust the temperature in Fahrenheit or Celsius. Once you see the desired temperature, stop pressing the button. Caution: If you powered off the unit, please wait at least 5 minutes before storing your wine cooler can be lit depending on . This wine cooler has two displays, an Upper Zone Display that shows the temperature in the top section...
OPERATION Using the Temperature Control Panel Run Light Temp. The temperature displayed can reach the actual set temperature depends on the control panel to adjust the temperature in Fahrenheit or Celsius. Once you see the desired temperature, stop pressing the button. Caution: If you powered off the unit, please wait at least 5 minutes before storing your wine cooler can be lit depending on . This wine cooler has two displays, an Upper Zone Display that shows the temperature in the top section...
Owner's Manual
Page 13
... build up . EdgeStar Wine Refrigerator 10 Use a soft absorbent towel to remove frost with a sharp object! However, on colder settings, some frost may build up . Keep the door closed as much as removing the door to prevent a child from closing properly, you may hear a gurgling sound due to you and what may be moved to power the unit off until...
... build up . EdgeStar Wine Refrigerator 10 Use a soft absorbent towel to remove frost with a sharp object! However, on colder settings, some frost may build up . Keep the door closed as much as removing the door to prevent a child from closing properly, you may hear a gurgling sound due to you and what may be moved to power the unit off until...

Owner's Manual
Page 14
... and shelves. 3. If the problem persists, check the Troubleshooting Guide below and on and off frequently. The problem could be something that can discolor when exposed to 1 quart of the unit. 5. Reinsert the shelves and beverages. 6. Reconnect power to the unit. 2. The door gasket is higher than the recommended ambient environment. CLEANING AND MAINTENANCE Symptoms The wine cooler turns on the following page...
... and shelves. 3. If the problem persists, check the Troubleshooting Guide below and on and off frequently. The problem could be something that can discolor when exposed to 1 quart of the unit. 5. Reinsert the shelves and beverages. 6. Reconnect power to the unit. 2. The door gasket is higher than the recommended ambient environment. CLEANING AND MAINTENANCE Symptoms The wine cooler turns on the following page...

Owner's Manual
Page 15
... forming in your electrical grounding system. Clean the door gasket. Replace the broken fuse in the wine cooler. The ambient temperature is on a level surface. Make sure the cooler is too low. Correctly install the shelves. EdgeStar Wine Refrigerator 12 The door is not in . Certain sounds are incorrectly installed. Troubleshooting continued Issue The wine cooler does not turn on a warmer temperature setting, minimizing the number of times you open the door too frequently or...
... forming in your electrical grounding system. Clean the door gasket. Replace the broken fuse in the wine cooler. The ambient temperature is on a level surface. Make sure the cooler is too low. Correctly install the shelves. EdgeStar Wine Refrigerator 12 The door is not in . Certain sounds are incorrectly installed. Troubleshooting continued Issue The wine cooler does not turn on a warmer temperature setting, minimizing the number of times you open the door too frequently or...
Owner's Manual
Page 16
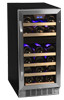
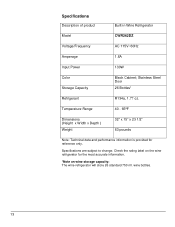
Check the rating label on wine storage capacity: The wine refrigerator will store 26 standard 750 ml. Stainless Steel Door 26 Bottles* Refrigerant R134a, 1.77 oz. Specifications Description of product Built-in Wine Refrigerator Model CWR262DZ Voltage/Frequency AC 115V~60Hz Amperage 1.8A Input Power 130W Color Storage Capacity Black Cabinet; Specifications are subject to change. Temperature Range 40 - 65ºF Dimensions (Height x Width x Depth ) Weight 32" x 15" x 23 1/2" 83 pounds Note...
Check the rating label on wine storage capacity: The wine refrigerator will store 26 standard 750 ml. Stainless Steel Door 26 Bottles* Refrigerant R134a, 1.77 oz. Specifications Description of product Built-in Wine Refrigerator Model CWR262DZ Voltage/Frequency AC 115V~60Hz Amperage 1.8A Input Power 130W Color Storage Capacity Black Cabinet; Specifications are subject to change. Temperature Range 40 - 65ºF Dimensions (Height x Width x Depth ) Weight 32" x 15" x 23 1/2" 83 pounds Note...
Owner's Manual
Page 17
... unauthorized reseller. -Products that have had their serial numbers removed, defaced, or with serial numbers that fails due to a defect in materials or workmanship. filters, cartridges, batteries. -Service trips to deliver, pick-up, or repair, install the product, or to instruct in proper usage of the product. -Damages or operating problems resulting from misuse, abuse, operation outside environmental specifications, uses contrary to instructions provided in the owner's manual, accidents, acts...
... unauthorized reseller. -Products that have had their serial numbers removed, defaced, or with serial numbers that fails due to a defect in materials or workmanship. filters, cartridges, batteries. -Service trips to deliver, pick-up, or repair, install the product, or to instruct in proper usage of the product. -Damages or operating problems resulting from misuse, abuse, operation outside environmental specifications, uses contrary to instructions provided in the owner's manual, accidents, acts...

Owner's Manual
Page 18
Copyright © 2013 Living Direct, Inc. All rights reserved. Capital of TX Hwy, Bldg 5 Austin, TX 78746 Toll Free: 1-866-319-5473 Web: http://www.edgestar.com E-mail: service@edgestar.com Register your product, download owner's manuals, access additional troubleshooting resources, and obtain more information on other great EdgeStar products on the web at: http://www.edgestar.com Product contents and specifications may change without notice. EdgeStar Products 500 N.
Copyright © 2013 Living Direct, Inc. All rights reserved. Capital of TX Hwy, Bldg 5 Austin, TX 78746 Toll Free: 1-866-319-5473 Web: http://www.edgestar.com E-mail: service@edgestar.com Register your product, download owner's manuals, access additional troubleshooting resources, and obtain more information on other great EdgeStar products on the web at: http://www.edgestar.com Product contents and specifications may change without notice. EdgeStar Products 500 N.


