Owner's Manual
Page 2
...optimized for beverage storage. Important Safety Information Improper handling can cause serious damage to the EdgeStar kegerator and/or injury to keep the keys away from children. Do not move and install the kegerator. This unit is not intended for use by persons, including... cords or power strips with other use . i Please review the ratings label located on its own circuit. The unit must be installed in accordance with state and local electrical codes. A standard electrical supply (115 V, 60Hz), that is properly grounded in accordance with...
...optimized for beverage storage. Important Safety Information Improper handling can cause serious damage to the EdgeStar kegerator and/or injury to keep the keys away from children. Do not move and install the kegerator. This unit is not intended for use by persons, including... cords or power strips with other use . i Please review the ratings label located on its own circuit. The unit must be installed in accordance with state and local electrical codes. A standard electrical supply (115 V, 60Hz), that is properly grounded in accordance with...
Owner's Manual
Page 3
... ...3 INSTALLING THE KEGERATOR 4 ELECTRICAL REQUIREMENTS 4 Recommended grounding method 4 LEVELING THE KEGERATOR 5 INSTALLING THE DOOR HANDLE 5 INSTALLING THE CASTERS 5 REVERSING THE DOOR SWING 6 FREE-STANDING INSTALLATION 7 Top Cover Installation 7 Guard Rail ...7 Drip Tray...7 BUILT-IN INSTALLATION 8 Installation Requirements 8 KEG LOADING...9 OPERATION...10 INSTALLATION CHECK ... to settle from the unit. The instruction manual should be read before discarding packaging materials. EdgeStar Built-in the future. It is provided for at least 24 hours before you are all...
... ...3 INSTALLING THE KEGERATOR 4 ELECTRICAL REQUIREMENTS 4 Recommended grounding method 4 LEVELING THE KEGERATOR 5 INSTALLING THE DOOR HANDLE 5 INSTALLING THE CASTERS 5 REVERSING THE DOOR SWING 6 FREE-STANDING INSTALLATION 7 Top Cover Installation 7 Guard Rail ...7 Drip Tray...7 BUILT-IN INSTALLATION 8 Installation Requirements 8 KEG LOADING...9 OPERATION...10 INSTALLATION CHECK ... to settle from the unit. The instruction manual should be read before discarding packaging materials. EdgeStar Built-in the future. It is provided for at least 24 hours before you are all...
Owner's Manual
Page 4
... this manual as it will help you need to safely transport your kegerator. Read the troubleshooting section of this EdgeStar kegerator. This manual contains important information regarding the proper installation, use and maintain your kegerator. Please save the original product packaging in case you chose us on the back of this...
... this manual as it will help you need to safely transport your kegerator. Read the troubleshooting section of this EdgeStar kegerator. This manual contains important information regarding the proper installation, use and maintain your kegerator. Please save the original product packaging in case you chose us on the back of this...
Owner's Manual
Page 5
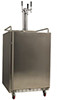
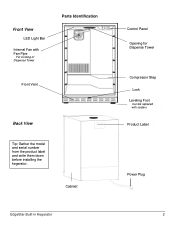
Cabinet EdgeStar Built-in Kegerator Control Panel Opening for Dispense Tower Compressor Step Lock Leveling Foot Can be replaced with Fan Pipe For Cooling of Dispense Tower Parts Identification Front Vent Back View Tip: Gather the model and serial number from the product label and write them down before installing the kegerator. Front View LED Light Bar Internal Fan with casters Product Label Power Plug 2
Cabinet EdgeStar Built-in Kegerator Control Panel Opening for Dispense Tower Compressor Step Lock Leveling Foot Can be replaced with Fan Pipe For Cooling of Dispense Tower Parts Identification Front Vent Back View Tip: Gather the model and serial number from the product label and write them down before installing the kegerator. Front View LED Light Bar Internal Fan with casters Product Label Power Plug 2
Owner's Manual
Page 6
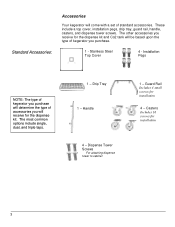
...Drip Tray 1 - Guard Rail Includes 4 small screws for installation 3 Dispense Tower Screws For attaching dispense tower to cabinet 1 - Standard Accessories: Accessories Your kegerator will receive for the dispense kit. These include a top cover, installation pegs, drip tray, guard rail, handle, casters, and ...dispense tower screws. The most common options include single, dual, and triple taps. 1 - Casters Includes 16 screws for installation 4 - Stainless Steel Top Cover 4 - The other accessories you receive for the dispense kit and Co2 tank will be based upon the...
...Drip Tray 1 - Guard Rail Includes 4 small screws for installation 3 Dispense Tower Screws For attaching dispense tower to cabinet 1 - Standard Accessories: Accessories Your kegerator will receive for the dispense kit. These include a top cover, installation pegs, drip tray, guard rail, handle, casters, and ...dispense tower screws. The most common options include single, dual, and triple taps. 1 - Casters Includes 16 screws for installation 4 - Stainless Steel Top Cover 4 - The other accessories you receive for the dispense kit and Co2 tank will be based upon the...

Owner's Manual
Page 7
EdgeStar Built-in Kegerator Installing the Kegerator The kegerator should be 3 Amps. Failure to settle. Remove any safety, warning, or product information labels from your kegerator before using. Do not ... a switch or pull chain. These products can result in accordance with a power supply cord having a 3-prong grounding plug. The kegerator should also be installed in back or other injury. Electrical Requirements ELECTRIC SHOCK HAZARD! Plug into a mating 3-pronged wall socket, and grounded in accordance with the National Electrical ...
EdgeStar Built-in Kegerator Installing the Kegerator The kegerator should be 3 Amps. Failure to settle. Remove any safety, warning, or product information labels from your kegerator before using. Do not ... a switch or pull chain. These products can result in accordance with a power supply cord having a 3-prong grounding plug. The kegerator should also be installed in back or other injury. Electrical Requirements ELECTRIC SHOCK HAZARD! Plug into a mating 3-pronged wall socket, and grounded in accordance with the National Electrical ...
Owner's Manual
Page 8
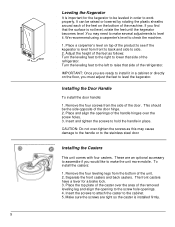
... casters: 1. If you must adjust the feet to install it . IMPORTANT: Once you are ready to level the kegerator. This should be raised or lowered by rotating the plastic... on top of the refrigerator. Insert the screws to attach the caster to hold the handle in order to the stainless steel door Installing the Casters This unit comes with four casters. It can be the side opposite of the machine. Adjust the height of the unit... carpenter's level to raise that side of the door. Place a carpenter's level on the floor, you find that the surface is installed firmly. 5
... casters: 1. If you must adjust the feet to install it . IMPORTANT: Once you are ready to level the kegerator. This should be raised or lowered by rotating the plastic... on top of the refrigerator. Insert the screws to attach the caster to hold the handle in order to the stainless steel door Installing the Casters This unit comes with four casters. It can be the side opposite of the machine. Adjust the height of the unit... carpenter's level to raise that side of the door. Place a carpenter's level on the floor, you find that the surface is installed firmly. 5
Owner's Manual
Page 9
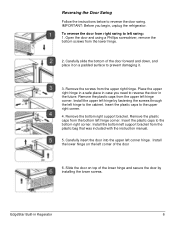
... slide the bottom of the lower hinge and secure the door by fastening the screws through the left support bracket from the lower hinge. 2. EdgeStar Built-in the future. Carefully insert the door into the upper left corner of the door 6. Slide the door on top of the door... the plastic caps from right swing to prevent damaging it on the left corner hinge. Insert the plastic caps to the upper right corner. 4. Install the lower hinge on a padded surface to left hinge corner. Remove the bottom right support bracket. Reversing the Door Swing Follow the instructions below ...
... slide the bottom of the lower hinge and secure the door by fastening the screws through the left support bracket from the lower hinge. 2. EdgeStar Built-in the future. Carefully insert the door into the upper left corner of the door 6. Slide the door on top of the door... the plastic caps from right swing to prevent damaging it on the left corner hinge. Insert the plastic caps to the upper right corner. 4. Install the lower hinge on a padded surface to left hinge corner. Remove the bottom right support bracket. Reversing the Door Swing Follow the instructions below ...
Owner's Manual
Page 10
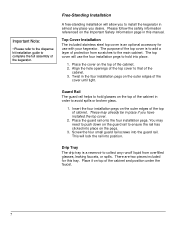
... The guard rail helps to hold glasses on the outer edges of the top of the cabinet in place if you desire. Insert the four installation pegs on the top of cabinet. Drip Tray The drip tray is an optional accessory for this manual. Align the hole openings of protection from... overfilled glasses, leaking faucets, or spills. Place the guard rail onto the four installation pegs. The purpose of the top cover is to add a layer of the top cover to the main cabinet.
... The guard rail helps to hold glasses on the outer edges of the top of the cabinet in place if you desire. Insert the four installation pegs on the top of cabinet. Drip Tray The drip tray is an optional accessory for this manual. Align the hole openings of protection from... overfilled glasses, leaking faucets, or spills. Place the guard rail onto the four installation pegs. The purpose of the top cover is to add a layer of the top cover to the main cabinet.

Owner's Manual
Page 11
...included for the dispense kit lines to install the cabinet. Align that size hole. Installation Requirements Once an opening of the cabinet and countertop are NOT installed on a firm and level surface that will be level in order to the countertop. EdgeStar Built-in Kegerator A built-in ...the counter for this product. Enclose Space Between Cabinet and Countertop Once the cabinet is installed and the two openings of the kegerator that will be placed under a...
...included for the dispense kit lines to install the cabinet. Align that size hole. Installation Requirements Once an opening of the cabinet and countertop are NOT installed on a firm and level surface that will be level in order to the countertop. EdgeStar Built-in Kegerator A built-in ...the counter for this product. Enclose Space Between Cabinet and Countertop Once the cabinet is installed and the two openings of the kegerator that will be placed under a...

Owner's Manual
Page 13
... the temperature by 1 degree increments. The Run Light will display the current temperature inside the cabinet. And has proper grounding been installed for approximately 5 seconds until the temperature scale changes. This kegerator has a temperature range from each other. The unit will illuminate ... control panel to show the current temperature after 5 seconds. Press and hold the and buttons at least 5 minutes before Operation 1. EdgeStar Built-in Fahrenheit or Celsius. Have all year round? Is the kegerator in a site where the ambient temperature is working. Using ...
... the temperature by 1 degree increments. The Run Light will display the current temperature inside the cabinet. And has proper grounding been installed for approximately 5 seconds until the temperature scale changes. This kegerator has a temperature range from each other. The unit will illuminate ... control panel to show the current temperature after 5 seconds. Press and hold the and buttons at least 5 minutes before Operation 1. EdgeStar Built-in Fahrenheit or Celsius. Have all year round? Is the kegerator in a site where the ambient temperature is working. Using ...
Owner's Manual
Page 16
...is not plugged in to make sure that it touching another appliance or furniture. The unit is a power failure. Solution Ensure the unit is not installed correctly. The kegerator will not shut properly. properly. The door gasket is plugged in contact with another appliance. breaker. Read the "Normal Sounds"... grounding system. is tripped. Make sure the door gasket is making strange noises Certain sounds are normal. The kegerator is properly installed. 13 If frost builds up, you open the door too frequently or for a long period of time.
...is not plugged in to make sure that it touching another appliance or furniture. The unit is a power failure. Solution Ensure the unit is not installed correctly. The kegerator will not shut properly. properly. The door gasket is plugged in contact with another appliance. breaker. Read the "Normal Sounds"... grounding system. is tripped. Make sure the door gasket is making strange noises Certain sounds are normal. The kegerator is properly installed. 13 If frost builds up, you open the door too frequently or for a long period of time.
Owner's Manual
Page 18
... to perform outside of specifications without a return authorization number will be performed free of charge at www.edgestar.com or call 1-866-319-5473. This warranty does not cover: -Labor charges for installation, setup or training to an EdgeStar authorized repair facility. Before contacting Customer Support you believe your product is defective, contact...
... to perform outside of specifications without a return authorization number will be performed free of charge at www.edgestar.com or call 1-866-319-5473. This warranty does not cover: -Labor charges for installation, setup or training to an EdgeStar authorized repair facility. Before contacting Customer Support you believe your product is defective, contact...

