
Owner's Manual
Page 1
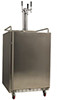
Built-In Kegerator BR7000SS Fridge for the KC7000SS Kegerator Owner's Manual For more information on other great EdgeStar products on the web, go to http://www.edgestar.com
Built-In Kegerator BR7000SS Fridge for the KC7000SS Kegerator Owner's Manual For more information on other great EdgeStar products on the web, go to http://www.edgestar.com
Owner's Manual
Page 2
... industrial or commercial use extension cords or power strips with a lock, take care to keep the keys away from the outlet when cleaning. Unplug the unit if it is not going to crawl inside the kegerator. Do not use the unit for beverage storage. The unit must be installed in accordance with state and local electrical codes. A standard electrical supply (115 V, 60Hz...
... industrial or commercial use extension cords or power strips with a lock, take care to keep the keys away from the outlet when cleaning. Unplug the unit if it is not going to crawl inside the kegerator. Do not use the unit for beverage storage. The unit must be installed in accordance with state and local electrical codes. A standard electrical supply (115 V, 60Hz...
Owner's Manual
Page 3
... 5 INSTALLING THE DOOR HANDLE 5 INSTALLING THE CASTERS 5 REVERSING THE DOOR SWING 6 FREE-STANDING INSTALLATION 7 Top Cover Installation 7 Guard Rail ...7 Drip Tray...7 BUILT-IN INSTALLATION 8 Installation Requirements 8 KEG LOADING...9 OPERATION...10 INSTALLATION CHECK LIST BEFORE OPERATION 10 USING THE TEMPERATURE CONTROL PANEL 10 NORMAL SOUNDS 11 DEFROSTING ...11 PREPARING THE KEGERATOR FOR STORAGE 11 CLEANING AND MAINTENANCE 12 EXTERIOR CLEANING 12 INTERIOR CLEANING 12 TROUBLESHOOTING 12 TROUBLESHOOTING CONTINUED 13 SPECIFICATIONS 14 First Time Operating Instructions...
... 5 INSTALLING THE DOOR HANDLE 5 INSTALLING THE CASTERS 5 REVERSING THE DOOR SWING 6 FREE-STANDING INSTALLATION 7 Top Cover Installation 7 Guard Rail ...7 Drip Tray...7 BUILT-IN INSTALLATION 8 Installation Requirements 8 KEG LOADING...9 OPERATION...10 INSTALLATION CHECK LIST BEFORE OPERATION 10 USING THE TEMPERATURE CONTROL PANEL 10 NORMAL SOUNDS 11 DEFROSTING ...11 PREPARING THE KEGERATOR FOR STORAGE 11 CLEANING AND MAINTENANCE 12 EXTERIOR CLEANING 12 INTERIOR CLEANING 12 TROUBLESHOOTING 12 TROUBLESHOOTING CONTINUED 13 SPECIFICATIONS 14 First Time Operating Instructions...
Owner's Manual
Page 4
... this instruction manual carefully to help you install, use and maintenance of your purchase of this product opens a relationship between you need to obtain warranty service. Please save the original product packaging in case you diagnose and solve common issues. Visit us . Both numbers are needed for service under your product will provide the customer support needed to -date information. If you and EdgeStar. Model Number: Serial Number...
... this instruction manual carefully to help you install, use and maintenance of your purchase of this product opens a relationship between you need to obtain warranty service. Please save the original product packaging in case you diagnose and solve common issues. Visit us . Both numbers are needed for service under your product will provide the customer support needed to -date information. If you and EdgeStar. Model Number: Serial Number...
Owner's Manual
Page 5
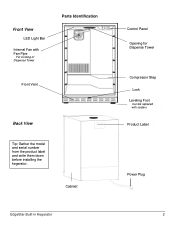
Front View LED Light Bar Internal Fan with casters Product Label Power Plug 2 Cabinet EdgeStar Built-in Kegerator Control Panel Opening for Dispense Tower Compressor Step Lock Leveling Foot Can be replaced with Fan Pipe For Cooling of Dispense Tower Parts Identification Front Vent Back View Tip: Gather the model and serial number from the product label and write them down before installing the kegerator.
Front View LED Light Bar Internal Fan with casters Product Label Power Plug 2 Cabinet EdgeStar Built-in Kegerator Control Panel Opening for Dispense Tower Compressor Step Lock Leveling Foot Can be replaced with Fan Pipe For Cooling of Dispense Tower Parts Identification Front Vent Back View Tip: Gather the model and serial number from the product label and write them down before installing the kegerator.
Owner's Manual
Page 6
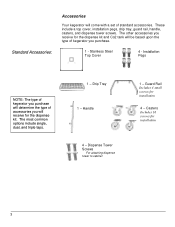
... include a top cover, installation pegs, drip tray, guard rail, handle, casters, and dispense tower screws. The other accessories you will be based upon the type of standard accessories. Stainless Steel Top Cover 4 - The most common options include single, dual, and triple taps. 1 - Guard Rail Includes 4 small screws for the dispense kit and Co2 tank...
... include a top cover, installation pegs, drip tray, guard rail, handle, casters, and dispense tower screws. The other accessories you will be based upon the type of standard accessories. Stainless Steel Top Cover 4 - The most common options include single, dual, and triple taps. 1 - Guard Rail Includes 4 small screws for the dispense kit and Co2 tank...

Owner's Manual
Page 7
... kegerator, be provided. Use receptacles that is strong enough to follow these instructions can result in fire, electrical shock, or death. The fuse (or circuit breaker) size should also be placed in a location that cannot be turned off by a qualified electrician. 4 Electrical Requirements ELECTRIC SHOCK HAZARD! Plug into a mating 3-pronged wall socket, and grounded in accordance with a power supply cord having a 3-prong...
... kegerator, be provided. Use receptacles that is strong enough to follow these instructions can result in fire, electrical shock, or death. The fuse (or circuit breaker) size should also be placed in a location that cannot be turned off by a qualified electrician. 4 Electrical Requirements ELECTRIC SHOCK HAZARD! Plug into a mating 3-pronged wall socket, and grounded in accordance with a power supply cord having a 3-prong...
Owner's Manual
Page 8
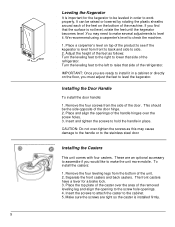
...Turn the leveling feet to the right to lower that the surface is installed firmly. 5 Leveling the Kegerator It is important for a brake lock. 3. It can be leveled in order to work properly. IMPORTANT: Once you are an optional accessary to assemble if you would like to the stainless steel door Installing the Casters This unit...This should be the side opposite of the unit. 2. If you must adjust the feet to level it in place. Turn the leveling feet to the left to hold the handle in a cabinet or directly on the bottom of the refrigerator. Insert and tighten the screws to raise ...
...Turn the leveling feet to the right to lower that the surface is installed firmly. 5 Leveling the Kegerator It is important for a brake lock. 3. It can be leveled in order to work properly. IMPORTANT: Once you are an optional accessary to assemble if you would like to the stainless steel door Installing the Casters This unit...This should be the side opposite of the unit. 2. If you must adjust the feet to level it in place. Turn the leveling feet to the left to hold the handle in a cabinet or directly on the bottom of the refrigerator. Insert and tighten the screws to raise ...
Owner's Manual
Page 9
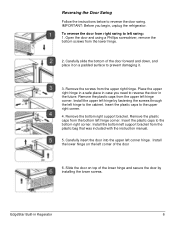
... instruction manual. 5. Reversing the Door Swing Follow the instructions below to the upper right corner. 4. Slide the door on a padded surface to the cabinet. Carefully slide the bottom of the door forward and down, and place it on top of the door 6. Remove the bottom right support bracket. EdgeStar Built-in the future. Insert the plastic caps to left hinge by installing the lower screws. Install...
... instruction manual. 5. Reversing the Door Swing Follow the instructions below to the upper right corner. 4. Slide the door on a padded surface to the cabinet. Carefully slide the bottom of the door forward and down, and place it on top of the door 6. Remove the bottom right support bracket. EdgeStar Built-in the future. Insert the plastic caps to left hinge by installing the lower screws. Install...
Owner's Manual
Page 10
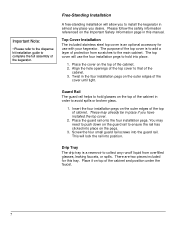
...use the four installation pegs to hold glasses on the outer edges of the top of the cabinet. 2. Place the guard rail onto the four installation pegs. Screw the four small guard rail screws into place on the guard rail to ensure the rail has clicked into the guard rail. Free-Standing Installation A free-standing installation...dispense kit installation guide to complete the full assembly of the cabinet. 3. The purpose of the top cover is an optional accessory for this manual. Drip Tray The drip tray is a reservoir to collect any place you to avoid spills or broken ...
...use the four installation pegs to hold glasses on the outer edges of the top of the cabinet. 2. Place the guard rail onto the four installation pegs. Screw the four small guard rail screws into place on the guard rail to ensure the rail has clicked into the guard rail. Free-Standing Installation A free-standing installation...dispense kit installation guide to complete the full assembly of the cabinet. 3. The purpose of the top cover is an optional accessory for this manual. Drip Tray The drip tray is a reservoir to collect any place you to avoid spills or broken ...

Owner's Manual
Page 11
... will be located next to complete the full assembly of a fully loaded unit. Operation outside these temperatures may result in lowered efficiency or cause other high heat sources. • Do not kink or pinch the power supply cord between the kegerator and wall or cabinet. This installation requires several more steps and considerations than that will not work or cool as...
... will be located next to complete the full assembly of a fully loaded unit. Operation outside these temperatures may result in lowered efficiency or cause other high heat sources. • Do not kink or pinch the power supply cord between the kegerator and wall or cabinet. This installation requires several more steps and considerations than that will not work or cool as...

Owner's Manual
Page 13
... button on or off the unit, please wait at the same time for approximately 5 seconds until the temperature scale changes. Note: It is normal to see the set temperature. OPERATION Installation Check List before powering it back on the ambient environmental conditions. And has proper grounding been installed for approximately 3 seconds to increase the temperature by 1 degree increments. Using the Temperature Control Panel Power Button Run Light Temperature Display Temp. When the desired temperature...
... button on or off the unit, please wait at the same time for approximately 5 seconds until the temperature scale changes. Note: It is normal to see the set temperature. OPERATION Installation Check List before powering it back on the ambient environmental conditions. And has proper grounding been installed for approximately 3 seconds to increase the temperature by 1 degree increments. Using the Temperature Control Panel Power Button Run Light Temperature Display Temp. When the desired temperature...

Owner's Manual
Page 14
... the refrigerant flowing in your hands are wet. • Never unplug the unit by the condenser fan. Most of children. Hard surfaces like the floor or walls can also make noises. The high efficiency compressor may make a pulsating or highpitched sound. Water running from the wall socket. 2. Disconnect the unit from the power supply by removing the power plug...
... the refrigerant flowing in your hands are wet. • Never unplug the unit by the condenser fan. Most of children. Hard surfaces like the floor or walls can also make noises. The high efficiency compressor may make a pulsating or highpitched sound. Water running from the wall socket. 2. Disconnect the unit from the power supply by removing the power plug...

Owner's Manual
Page 15
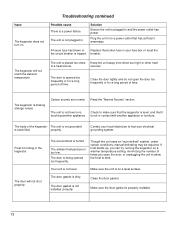
..., wipe down the interior of water. The problem could be cleaned with a mild detergent and warm water solution. Possible causes The room temperature is being opened . The door is higher than the recommended ambient environment. Solutions Run the unit at the appropriate ambient temperature. Make sure the door gasket is not sealing properly. Do not use an abrasive or caustic cleaning...
..., wipe down the interior of water. The problem could be cleaned with a mild detergent and warm water solution. Possible causes The room temperature is being opened . The door is higher than the recommended ambient environment. Solutions Run the unit at the appropriate ambient temperature. Make sure the door gasket is not sealing properly. Do not use an abrasive or caustic cleaning...
Owner's Manual
Page 16
... temperature The unit is forming in . The environment is not installed correctly. Make sure the unit is opened too frequently. The door gasket is humid. Troubleshooting continued Issue The kegerator does not turn on a level surface. Plug the unit in your electrical grounding system. The door is on . The unit is not level or is Check to test your fuse box or reset the the circuit...
... temperature The unit is forming in . The environment is not installed correctly. Make sure the unit is opened too frequently. The door gasket is humid. Troubleshooting continued Issue The kegerator does not turn on a level surface. Plug the unit in your electrical grounding system. The door is on . The unit is not level or is Check to test your fuse box or reset the the circuit...

Owner's Manual
Page 17
Specifications Description of product Built-in Kegerator 14 Temperature Range 32 - 60ºF Dimensions (Height x Width x Depth ) Weight 34 3/8" x 23 13/16" x 25 3/8" 90 pounds Note: Technical data and performance information is provided for the most accurate information. Check the rating label on the kegerator for reference only. EdgeStar Built-in Kegerator Model Voltage/Frequency BR7000SS Fridge for the KC7000SS Kegerator...
Specifications Description of product Built-in Kegerator 14 Temperature Range 32 - 60ºF Dimensions (Height x Width x Depth ) Weight 34 3/8" x 23 13/16" x 25 3/8" 90 pounds Note: Technical data and performance information is provided for the most accurate information. Check the rating label on the kegerator for reference only. EdgeStar Built-in Kegerator Model Voltage/Frequency BR7000SS Fridge for the KC7000SS Kegerator...
Owner's Manual
Page 18
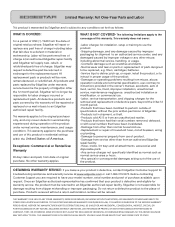
... proper usage of the product. -Damages or operating problems resulting from misuse, abuse, operation outside of specifications without a return authorization number will be responsible for troubleshooting assistance and warranty service at an authorized EdgeStar repair facility and EdgeStar will repair or replace any part free of charge including labor that your model number, serial number and proof of purchase available upon request. EdgeStar may request a defective part be performed free of charge at www...
... proper usage of the product. -Damages or operating problems resulting from misuse, abuse, operation outside of specifications without a return authorization number will be responsible for troubleshooting assistance and warranty service at an authorized EdgeStar repair facility and EdgeStar will repair or replace any part free of charge including labor that your model number, serial number and proof of purchase available upon request. EdgeStar may request a defective part be performed free of charge at www...

Owner's Manual
Page 19
Capital of TX Hwy, Bldg 5 Austin, TX 78746 Toll Free: 1-866-319-5473 Web: http://www.edgestar.com E-mail: service@edgestar.com Register your product, download owner's manuals, access additional troubleshooting resources, and obtain more information on other great EdgeStar products on the web at: http://www.edgestar.com Product contents and specifications may change without notice. Copyright © 2013 Living Direct, Inc. All rights reserved. EdgeStar Products 500 N.
Capital of TX Hwy, Bldg 5 Austin, TX 78746 Toll Free: 1-866-319-5473 Web: http://www.edgestar.com E-mail: service@edgestar.com Register your product, download owner's manuals, access additional troubleshooting resources, and obtain more information on other great EdgeStar products on the web at: http://www.edgestar.com Product contents and specifications may change without notice. Copyright © 2013 Living Direct, Inc. All rights reserved. EdgeStar Products 500 N.


