Owner s Manual
Page 1
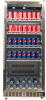
Beverage Cooler VBR440 Owner's Manual For more information on other great EdgeStar products on the web, go to http://www.edgestar.com
Beverage Cooler VBR440 Owner's Manual For more information on other great EdgeStar products on the web, go to http://www.edgestar.com
Owner s Manual
Page 2
... place hot or warm items into the cooler before they cool down , on a flat, level surface and provide proper ventilation. Do not pinch or kink the power supply line between the unit and cabinet. Do not leave any part of fire, electric shock or injury. If disposing the unit, remove the door. Do not use in an upright...
... place hot or warm items into the cooler before they cool down , on a flat, level surface and provide proper ventilation. Do not pinch or kink the power supply line between the unit and cabinet. Do not leave any part of fire, electric shock or injury. If disposing the unit, remove the door. Do not use in an upright...
Owner s Manual
Page 3
... the appliance is located for several minutes. Contact the EdgeStar Customer Service Department for anyone other than an Authorized Service Person to carry out servicing or repairs to this appliance. Take serious care when handling, moving and using the appliance to avoid either damaging the refrigerant tubing, or increasing the risk of a leak. Replacing component parts and servicing must be installed in the lower...
... the appliance is located for several minutes. Contact the EdgeStar Customer Service Department for anyone other than an Authorized Service Person to carry out servicing or repairs to this appliance. Take serious care when handling, moving and using the appliance to avoid either damaging the refrigerant tubing, or increasing the risk of a leak. Replacing component parts and servicing must be installed in the lower...
Owner s Manual
Page 4
... installation 3 Built-in installation 3 ELECTRICAL REQUIREMENTS 5 Recommended grounding method 5 LEVELING THE BEVERAGE COOLER 5 INSTALLING AND REMOVING THE SHELVES 6 INSTALLING THE HANDLE 7 OPERATION...8 INSTALLATION CHECKLIST BEFORE OPERATION 8 USING THE TEMPERATURE CONTROL PANEL 8 NORMAL SOUNDS 10 DEFROSTING ...10 PREPARING THE BEVERAGE COOLER FOR STORAGE 10 CLEANING AND MAINTENANCE 11 EXTERIOR CLEANING 11 INTERIOR CLEANING 11 TROUBLESHOOTING 11 TROUBLESHOOTING CONTINUED 12 TROUBLESHOOTING CONTINUED 13 SPECIFICATIONS 14 First Time Operating Instructions Before use, make...
... installation 3 Built-in installation 3 ELECTRICAL REQUIREMENTS 5 Recommended grounding method 5 LEVELING THE BEVERAGE COOLER 5 INSTALLING AND REMOVING THE SHELVES 6 INSTALLING THE HANDLE 7 OPERATION...8 INSTALLATION CHECKLIST BEFORE OPERATION 8 USING THE TEMPERATURE CONTROL PANEL 8 NORMAL SOUNDS 10 DEFROSTING ...10 PREPARING THE BEVERAGE COOLER FOR STORAGE 10 CLEANING AND MAINTENANCE 11 EXTERIOR CLEANING 11 INTERIOR CLEANING 11 TROUBLESHOOTING 11 TROUBLESHOOTING CONTINUED 12 TROUBLESHOOTING CONTINUED 13 SPECIFICATIONS 14 First Time Operating Instructions Before use, make...
Owner s Manual
Page 5
We will provide the customer support needed to this product opens a relationship between you and EdgeStar. Following this manual will help you install, use and maintenance of your receipt to nurture that your product will work at 1 (866) 319-5473. 1 This manual contains important information regarding the proper installation, use and maintain your beverage cooler. You may also want to obtain warranty service. Model Number: Serial Number: Date of...
We will provide the customer support needed to this product opens a relationship between you and EdgeStar. Following this manual will help you install, use and maintenance of your receipt to nurture that your product will work at 1 (866) 319-5473. 1 This manual contains important information regarding the proper installation, use and maintain your beverage cooler. You may also want to obtain warranty service. Model Number: Serial Number: Date of...
Owner s Manual
Page 6
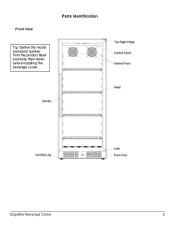
Front View Parts Identification Tip: Gather the model and serial number from the product label and write them down before installing the beverage cooler. EdgeStar Beverage Cooler 2
Front View Parts Identification Tip: Gather the model and serial number from the product label and write them down before installing the beverage cooler. EdgeStar Beverage Cooler 2
Owner s Manual
Page 7
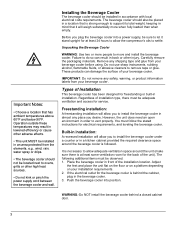
... the power supply cord between the beverage cooler and wall. Freestanding installation: A freestanding installation will allow the compressor's oils to install the beverage cooler under a counter or in front of your beverage cooler. Place the beverage cooler in a kitchen cabinet provided the required clearance space around the unit (make sure there is behind a closed cabinet door. 3 If the electrical outlet...
... the power supply cord between the beverage cooler and wall. Freestanding installation: A freestanding installation will allow the compressor's oils to install the beverage cooler under a counter or in front of your beverage cooler. Place the beverage cooler in a kitchen cabinet provided the required clearance space around the unit (make sure there is behind a closed cabinet door. 3 If the electrical outlet...
Owner s Manual
Page 8
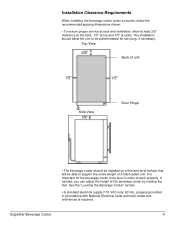
... installed on a firm and level surface that will be level in order to support the entire weight of the beverage cooler by rotating the feet. Top View Back of unit Side View Door Hinge • The beverage cooler should allow at least 2/5" clearance at the back, 1/5" at top and 1/5" at sides. See the "Leveling the Beverage Cooler" section. • A standard electrical supply...
... installed on a firm and level surface that will be level in order to support the entire weight of the beverage cooler by rotating the feet. Top View Back of unit Side View Door Hinge • The beverage cooler should allow at least 2/5" clearance at the back, 1/5" at top and 1/5" at sides. See the "Leveling the Beverage Cooler" section. • A standard electrical supply...
Owner s Manual
Page 9
.... Adjust the height of the customer to have the proper electrical connection: A standard electrical supply (115 V, 60Hz), properly grounded in accordance with the National Electrical Code and local codes and ordinances. It is level from the plug. Never use an adapter to bypass the grounding prong. DO NOT use an extension cord. Failure to follow these instructions can be plugged into its final location, it...
.... Adjust the height of the customer to have the proper electrical connection: A standard electrical supply (115 V, 60Hz), properly grounded in accordance with the National Electrical Code and local codes and ordinances. It is level from the plug. Never use an adapter to bypass the grounding prong. DO NOT use an extension cord. Failure to follow these instructions can be plugged into its final location, it...
Owner s Manual
Page 10
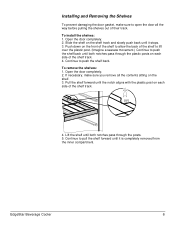
... 6 Open the door completely. 2. Lift the shelf until both notches pass through the posts. 5. Continue to push the shelf back. Continue to pull the shelf forward until it stops. 3. If necessary, make sure to push the shelf back until both notches pass through the plastic posts on each side of the shelf track. 4. Installing and Removing the Shelves To prevent damaging the door gasket, make...
... 6 Open the door completely. 2. Lift the shelf until both notches pass through the posts. 5. Continue to push the shelf back. Continue to pull the shelf forward until it stops. 3. If necessary, make sure to push the shelf back until both notches pass through the plastic posts on each side of the shelf track. 4. Installing and Removing the Shelves To prevent damaging the door gasket, make...
Owner s Manual
Page 11
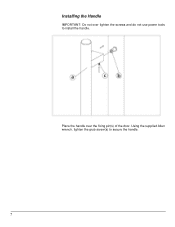
Using the supplied Allen wrench, tighten the grub screw(s) to install the handle. Installing the Handle IMPORTANT: Do not over the fixing pin(s) of the door. Place the handle over tighten the screws and do not use power tools to secure the handle. 7
Using the supplied Allen wrench, tighten the grub screw(s) to install the handle. Installing the Handle IMPORTANT: Do not over the fixing pin(s) of the door. Place the handle over tighten the screws and do not use power tools to secure the handle. 7
Owner s Manual
Page 12
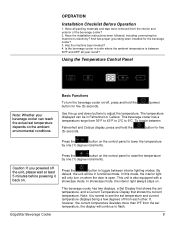
... each other. button for the beverage cooler? 3. Using the Temperature Control Panel Note: Whether your beverage cooler can be in Fahrenheit or Celsius. Have all year round? Press the button on . OPERATION Installation Checklist Before Operation 1. Has the machine been leveled? 4. Caution: If you powered off from the set temperature, and a Current Temperature Display that shows the current temperature. Have the installation instructions been followed, including connecting the machine...
... each other. button for the beverage cooler? 3. Using the Temperature Control Panel Note: Whether your beverage cooler can be in Fahrenheit or Celsius. Have all year round? Press the button on . OPERATION Installation Checklist Before Operation 1. Has the machine been leveled? 4. Caution: If you powered off from the set temperature, and a Current Temperature Display that shows the current temperature. Have the installation instructions been followed, including connecting the machine...
Owner s Manual
Page 13
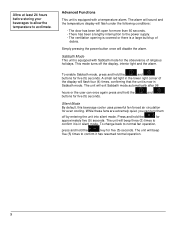
... in the lower right corner of the display will flash under the following conditions: - The ventilation opening is covered or there is a large build-up of religious holidays. Silent Mode By default, this beverage cooler uses powerful fan forced air circulation for approximately five (5) seconds. To change back to the power supply. - A small red light in Sabbath mode. Advanced Functions This unit is equipped...
... in the lower right corner of the display will flash under the following conditions: - The ventilation opening is covered or there is a large build-up of religious holidays. Silent Mode By default, this beverage cooler uses powerful fan forced air circulation for approximately five (5) seconds. To change back to the power supply. - A small red light in Sabbath mode. Advanced Functions This unit is equipped...
Owner s Manual
Page 14
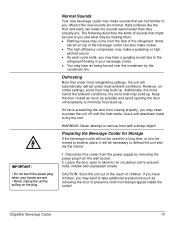
... cooler can make sounds that under most refrigerating settings, the unit will not be used for air circulation and to remove frost with a sharp object! Additionally, the more humid the ambient conditions, the more frost may want to take additional precautions such as possible and avoid opening the door unnecessarily to defrost the unit and dry the interior. 1. Use a soft absorbent...
... cooler can make sounds that under most refrigerating settings, the unit will not be used for air circulation and to remove frost with a sharp object! Additionally, the more humid the ambient conditions, the more frost may want to take additional precautions such as possible and avoid opening the door unnecessarily to defrost the unit and dry the interior. 1. Use a soft absorbent...
Owner s Manual
Page 15
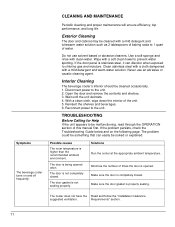
... beverage cooler turns on the following page. Clean stainless steel with a cloth dampened with clean water. The cooler does not have the Read and follow the "Installation Clearance suggested ventilation. Requirements" section. 11 Use a soft sponge and rinse with a mild detergent and warm water solution. Disconnect power to chlorine gas and moisture. The door gasket is opened often. CLEANING AND MAINTENANCE Periodic cleaning and proper...
... beverage cooler turns on the following page. Clean stainless steel with a cloth dampened with clean water. The cooler does not have the Read and follow the "Installation Clearance suggested ventilation. Requirements" section. 11 Use a soft sponge and rinse with a mild detergent and warm water solution. Disconnect power to chlorine gas and moisture. The door gasket is opened often. CLEANING AND MAINTENANCE Periodic cleaning and proper...
Owner s Manual
Page 16
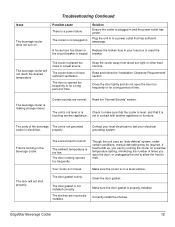
... not level. The beverage cooler will not shut properly. Clean the door gasket. EdgeStar Beverage Cooler 12 The door is forming in . Make sure the cooler is tripped. Frost is being opened too frequently or for a long period of time. Troubleshooting Continued Possible cause There is making strange noises Certain sounds are incorrectly installed. The beverage cooler is a power failure. Correctly install the shelves. The shelves are...
... not level. The beverage cooler will not shut properly. Clean the door gasket. EdgeStar Beverage Cooler 12 The door is forming in . Make sure the cooler is tripped. Frost is being opened too frequently or for a long period of time. Troubleshooting Continued Possible cause There is making strange noises Certain sounds are incorrectly installed. The beverage cooler is a power failure. Correctly install the shelves. The shelves are...
Owner s Manual
Page 17
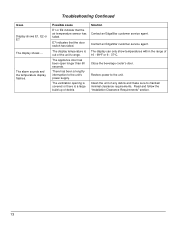
The alarm sounds and the temperature display flashes. Read and follow the "Installation Clearance Requirements" section. 13 The display shows --. The appliance door has been open longer than 60 seconds. Contact an EdgeStar customer service agent. Close the beverage cooler's door. Troubleshooting Continued Issue Display shows E1, E2 or E7. Possible cause E1 or E2 indicate that the door switch has failed. There has been a lengthy interruption to...
The alarm sounds and the temperature display flashes. Read and follow the "Installation Clearance Requirements" section. 13 The display shows --. The appliance door has been open longer than 60 seconds. Contact an EdgeStar customer service agent. Close the beverage cooler's door. Troubleshooting Continued Issue Display shows E1, E2 or E7. Possible cause E1 or E2 indicate that the door switch has failed. There has been a lengthy interruption to...
Owner s Manual
Page 18
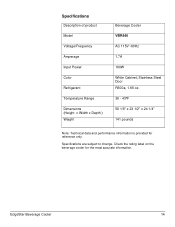
Specifications are subject to change. Check the rating label on the beverage cooler for reference only. Specifications Description of product Model Voltage/Frequency Amperage Input Power Color Refrigerant Temperature Range Dimensions (Height x Width x Depth ) Weight Beverage Cooler VBR440 AC 115V~60Hz 1.7A 180W White Cabinet; Stainless Steel Door R600a, 1.66 oz. 36 - 43ºF 58 1/8" x 23 1/2" x 24 1/4" 141 pounds Note: Technical data and performance information is provided for the most accurate information. EdgeStar Beverage Cooler 14
Specifications are subject to change. Check the rating label on the beverage cooler for reference only. Specifications Description of product Model Voltage/Frequency Amperage Input Power Color Refrigerant Temperature Range Dimensions (Height x Width x Depth ) Weight Beverage Cooler VBR440 AC 115V~60Hz 1.7A 180W White Cabinet; Stainless Steel Door R600a, 1.66 oz. 36 - 43ºF 58 1/8" x 23 1/2" x 24 1/4" 141 pounds Note: Technical data and performance information is provided for the most accurate information. EdgeStar Beverage Cooler 14
Owner s Manual
Page 19
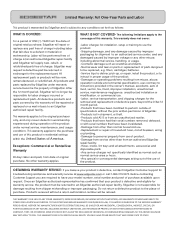
... for troubleshooting assistance and warranty service at an authorized EdgeStar repair facility and EdgeStar will be replaced, e.g. WHAT IS NOT COVERED- EdgeStar is defective and eligible for installation, setup or training to personal property from use of product. -Damage from service other than from an unauthorized reseller. -Products that have had their serial numbers removed, defaced, or with serial numbers that have been modified to perform outside of specifications...
... for troubleshooting assistance and warranty service at an authorized EdgeStar repair facility and EdgeStar will be replaced, e.g. WHAT IS NOT COVERED- EdgeStar is defective and eligible for installation, setup or training to personal property from use of product. -Damage from service other than from an unauthorized reseller. -Products that have had their serial numbers removed, defaced, or with serial numbers that have been modified to perform outside of specifications...

Owner s Manual
Page 20
Copyright © 2015 Living Direct, Inc. EdgeStar Products 500 N. All rights reserved. Capital of TX Hwy, Bldg 5 Austin, TX 78746 Toll Free: 1-866-319-5473 Web: http://www.edgestar.com E-mail: service@edgestar.com Register your product, download owner's manuals, access additional troubleshooting resources, and obtain more information on other great EdgeStar products on the web at: http://www.edgestar.com Product contents and specifications may change without notice.
Copyright © 2015 Living Direct, Inc. EdgeStar Products 500 N. All rights reserved. Capital of TX Hwy, Bldg 5 Austin, TX 78746 Toll Free: 1-866-319-5473 Web: http://www.edgestar.com E-mail: service@edgestar.com Register your product, download owner's manuals, access additional troubleshooting resources, and obtain more information on other great EdgeStar products on the web at: http://www.edgestar.com Product contents and specifications may change without notice.

