
Quick Install Guide
Page 13
... you inputted here is successfully connected, you'll see a symbol appears in supplied CD-ROM. 12 Please ask the owner of wireless device. For advanced settings and other features of this wireless network card, please refer to connect, and input the correct passphrase / preshared key here, then click 'OK'.
... you inputted here is successfully connected, you'll see a symbol appears in supplied CD-ROM. 12 Please ask the owner of wireless device. For advanced settings and other features of this wireless network card, please refer to connect, and input the correct passphrase / preshared key here, then click 'OK'.

Quick Install Guide
Page 14
... shall not be less than 20cm (8 inches) during normal operation. Increase the separation between the equipment and receiver. 3. This device complies with FCC radiation exposure set forth for an uncontrolled environment. FCC Caution This device and its antenna must not be co-located or operating in accordance with any other antenna...
... shall not be less than 20cm (8 inches) during normal operation. Increase the separation between the equipment and receiver. 3. This device complies with FCC radiation exposure set forth for an uncontrolled environment. FCC Caution This device and its antenna must not be co-located or operating in accordance with any other antenna...

Manual
Page 3
... About ...51 2-10 On-line Help ...52 CHAPTER III: Soft-AP Function 53 3-1 Switch to Wireless Access Point 13 2-2-1 Using Edimax Utility 14 2-2-2 Using Windows Zero Configuration 30 2-3 Profile Management ...34 2-3-1 Add a profile ...35 2-3-2 Edit an existing profile 36 ... network card 3 CHAPTER II: Driver Installation and Configuration 6 2-1 Network Card Installation 6 2-2 Connect to AP Mode and Basic Configuration 53 3-2 Security Setting...57 3-3 Access Control ...59 3-4 Connection Table ...61 3-5 Event Log...62 3-6 Statistics ...63 3-7 About ...64 CHAPTER IV: Appendix 65 4-1 ...
... About ...51 2-10 On-line Help ...52 CHAPTER III: Soft-AP Function 53 3-1 Switch to Wireless Access Point 13 2-2-1 Using Edimax Utility 14 2-2-2 Using Windows Zero Configuration 30 2-3 Profile Management ...34 2-3-1 Add a profile ...35 2-3-2 Edit an existing profile 36 ... network card 3 CHAPTER II: Driver Installation and Configuration 6 2-1 Network Card Installation 6 2-2 Connect to AP Mode and Basic Configuration 53 3-2 Security Setting...57 3-3 Access Control ...59 3-4 Connection Table ...61 3-5 Event Log...62 3-6 Statistics ...63 3-7 About ...64 CHAPTER IV: Appendix 65 4-1 ...

Manual
Page 19
... wireless access point or device by infrastructure or Ad-Hoc mode, there two things you must know its encryption key. Wireless device's 'SSID' (Service Set IDentifier, someone will be capable to -point' mode, and in this mode, wireless devices such as computer or PDA will not be displayed here,... please check if the wireless device (access point or 16 Please launch Edimax setup utility and it will scan for the SSID of wireless connection mode: Infrastructure and Ad-Hoc. You can scan for wireless access points ...
... wireless access point or device by infrastructure or Ad-Hoc mode, there two things you must know its encryption key. Wireless device's 'SSID' (Service Set IDentifier, someone will be capable to -point' mode, and in this mode, wireless devices such as computer or PDA will not be displayed here,... please check if the wireless device (access point or 16 Please launch Edimax setup utility and it will scan for the SSID of wireless connection mode: Infrastructure and Ad-Hoc. You can scan for wireless access points ...

Manual
Page 20
Scan result includes 6 types of information, they are: A B CD E A The SSID (Service Set Identifier) of the signal strength. 17 If a symbol appears in front of the name of access point by this wireless device. for 802.11g , and 'b' ...
Scan result includes 6 types of information, they are: A B CD E A The SSID (Service Set Identifier) of the signal strength. 17 If a symbol appears in front of the name of access point by this wireless device. for 802.11g , and 'b' ...

Manual
Page 29
... the box located at right. It's recommended to keep this value untouched unless you know the effect of changing this box to set the packet fragment threshold by yourself. tab: Here are descriptions of every setup item: Item Name Description Select the authentication type of...device, authentication type 26 It's recommended to help the battery live longer. Please click 'Auth. \ Encry.' Fragment Threshold It's recommended to set authentication / encryption information for Ad-Hoc mode here. You can select the radio channel number for the access point. You can drag the ...
... the box located at right. It's recommended to keep this value untouched unless you know the effect of changing this box to set the packet fragment threshold by yourself. tab: Here are descriptions of every setup item: Item Name Description Select the authentication type of...device, authentication type 26 It's recommended to help the battery live longer. Please click 'Auth. \ Encry.' Fragment Threshold It's recommended to set authentication / encryption information for Ad-Hoc mode here. You can select the radio channel number for the access point. You can drag the ...

Manual
Page 30
Select the encryption type of WEP key you type, but not replace by asterisk. When you wish to set up to input LEAD specific settings: Encryption WPA Preshared Key Please input LEAP identity, password, domain name, and select encryption type. Input WPA preshared key here. If the access...alphabet a-f; for example, mywepkey12345. You can check 'Show Password' box so the password you type, but not replace your input with asterisk. You can set 802.1x parameters. 27 You can select key type (Hexadecimal or ASCII) and input WEP key here. WEP Key There are two types of WEP...
Select the encryption type of WEP key you type, but not replace by asterisk. When you wish to set up to input LEAD specific settings: Encryption WPA Preshared Key Please input LEAP identity, password, domain name, and select encryption type. Input WPA preshared key here. If the access...alphabet a-f; for example, mywepkey12345. You can check 'Show Password' box so the password you type, but not replace your input with asterisk. You can set 802.1x parameters. 27 You can select key type (Hexadecimal or ASCII) and input WEP key here. WEP Key There are two types of WEP...

Manual
Page 31
... fast-specific parameters: If you need to select 'Soft Token' or 'Static Password' as authentication type, the protocol setting is always 'Generic Token Card' and can not be changed. When you wish to connect to select a correct tunnel authentication method. Please ask ... use protected authentication credential, check 'Use protected authentication credential' box, and click 'Import' to use 'EAP-FAST' as password in Tunnel 'ID \ Password' setting. Please ask the administrator of every setup item: Item Name EAP Method Description Select 802.1x EAP method from dropdown menu.
... fast-specific parameters: If you need to select 'Soft Token' or 'Static Password' as authentication type, the protocol setting is always 'Generic Token Card' and can not be changed. When you wish to connect to select a correct tunnel authentication method. Please ask ... use protected authentication credential, check 'Use protected authentication credential' box, and click 'Import' to use 'EAP-FAST' as password in Tunnel 'ID \ Password' setting. Please ask the administrator of every setup item: Item Name EAP Method Description Select 802.1x EAP method from dropdown menu.

Manual
Page 32
... you can select 'Server name must tab match', so the CA server's name must be installed on your 802.1x authentication administrator. Also, if you set in 'Server name' field; If only the domain name part of full server name must the same with the value you...
... you can select 'Server name must tab match', so the CA server's name must be installed on your 802.1x authentication administrator. Also, if you set in 'Server name' field; If only the domain name part of full server name must the same with the value you...

Manual
Page 36
If the access point is protected by encryption, you can see 'Connected' message, the connection between your computer and wireless access point is successfully established. 33 If you have to input its security key or passphrase here. 7. If the access point you selected does not use encryption, you'll not be prompted for security key or passphrase. 8. It must match the encryption setting on the access point.
If the access point is protected by encryption, you can see 'Connected' message, the connection between your computer and wireless access point is successfully established. 33 If you have to input its security key or passphrase here. 7. If the access point you selected does not use encryption, you'll not be prompted for security key or passphrase. 8. It must match the encryption setting on the access point.

Manual
Page 42
Right-click the Edimax configuration utility icon located at lower-right corner of computer desktop and then click 'Launch Config Utility'. 2. Click 'Advanced' menu, and the following instructions to increase data transfer performance, or change operation mode. 2-4 Advanced Settings This wireless network card provides several advanced settings for experienced wireless users. You can change these settings to set advanced wireless settings: 1. Please follow the following settings will appear: 39
Right-click the Edimax configuration utility icon located at lower-right corner of computer desktop and then click 'Launch Config Utility'. 2. Click 'Advanced' menu, and the following instructions to increase data transfer performance, or change operation mode. 2-4 Advanced Settings This wireless network card provides several advanced settings for experienced wireless users. You can change these settings to set advanced wireless settings: 1. Please follow the following settings will appear: 39

Manual
Page 43
...check this box to enable measurement on unused radio channels to improve wireless connectivity. Enable Cisco Compatible eXtensions. After you finish the settings, click 'Apply' to authentication server's administrator for most of the network card. CCX is being authenticated by Cisco used to improve...value when you understand what it means and you can not be safe for debugging purpose. Check this information to apply new settings. 40 It should switch to another wireless access point with the process of authentication will become available: Enable CCX Turn on...
...check this box to enable measurement on unused radio channels to improve wireless connectivity. Enable Cisco Compatible eXtensions. After you finish the settings, click 'Apply' to authentication server's administrator for most of the network card. CCX is being authenticated by Cisco used to improve...value when you understand what it means and you can not be safe for debugging purpose. Check this information to apply new settings. 40 It should switch to another wireless access point with the process of authentication will become available: Enable CCX Turn on...

Manual
Page 45
... the WMM function of this network card, you can improve the performance of data, to give higher priority to set advanced wireless settings: 1. Right-click the Edimax configuration utility icon located at lower-right corner of certain network applications, like audio/video streaming, network telephony (VoIP..., and the following instructions to applications which can define the priority of different kinds of such network applications. 2-6 WMM Setting This wireless network card provides WMM (Wi-Fi Multimedia) function, which require instant responding. Please follow the following...
... the WMM function of this network card, you can improve the performance of data, to give higher priority to set advanced wireless settings: 1. Right-click the Edimax configuration utility icon located at lower-right corner of certain network applications, like audio/video streaming, network telephony (VoIP..., and the following instructions to applications which can define the priority of different kinds of such network applications. 2-6 WMM Setting This wireless network card provides WMM (Wi-Fi Multimedia) function, which require instant responding. Please follow the following...
Manual
Page 46
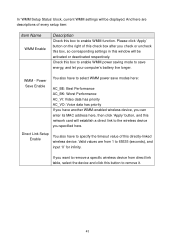
... Worst Performance AC_VI: Video data has priority AC_VO: Voice data has priority If you specified here. In 'WMM Setup Status' block, current WMM settings will be activated or deactivated respectively. Please click 'Apply' button on the right of every setup item: Item Name WMM Enable Description Check this box...mode to enable WMM function. Power Save Enable You also have to remove it. 43 If you check or uncheck this box, so corresponding settings in this button to select WMM power save energy, and let your computer's battery live longer. And here are from direct link table, ...
... Worst Performance AC_VI: Video data has priority AC_VO: Voice data has priority If you specified here. In 'WMM Setup Status' block, current WMM settings will be activated or deactivated respectively. Please click 'Apply' button on the right of every setup item: Item Name WMM Enable Description Check this box...mode to enable WMM function. Power Save Enable You also have to remove it. 43 If you check or uncheck this box, so corresponding settings in this button to select WMM power save energy, and let your computer's battery live longer. And here are from direct link table, ...

Manual
Page 47
... a hardware button to press for you wish to the WPS setup page of this wireless card, click a button, and then press a specific button or enter a set of 8-digit code on the wireless access point you .
... a hardware button to press for you wish to the WPS setup page of this wireless card, click a button, and then press a specific button or enter a set of 8-digit code on the wireless access point you .

Manual
Page 48
... utility. 2-7-2 WPS Setup - The wireless adaptor will appear. 3. Right-click the Edimax configuration utility icon located at lower-right corner of the wireless AP/Router first. Click 'WPS' menu, and the following settings will scan and connect with a secure wireless network. Set 'Config Mode' to 'Enrollee', and then push the 'WPS' button on... standby mode may have another name), or use other way to connect with the AP/Router automatically, no need any further setup process and security setting ...etc.
... utility. 2-7-2 WPS Setup - The wireless adaptor will appear. 3. Right-click the Edimax configuration utility icon located at lower-right corner of the wireless AP/Router first. Click 'WPS' menu, and the following settings will scan and connect with a secure wireless network. Set 'Config Mode' to 'Enrollee', and then push the 'WPS' button on... standby mode may have another name), or use other way to connect with the AP/Router automatically, no need any further setup process and security setting ...etc.

Manual
Page 49
... WPS. If not, please click 'Rescan' few more times. Please be displayed. 6. Please make sure the WPS function of connected access point. You can also set 'Config Mode' to connect is displayed. You can click 'Detail' button to will be saved. All access points with WPS function enabled will be patient...
... WPS. If not, please click 'Rescan' few more times. Please be displayed. 6. Please make sure the WPS function of connected access point. You can also set 'Config Mode' to connect is displayed. You can click 'Detail' button to will be saved. All access points with WPS function enabled will be patient...

Manual
Page 51
... 'Renew' to do this). NOTE: If you experienced problem with the pin code provided here, you wish to connect supports PIN, please follow the following settings will appear. 3. 2-7-3 WPS Setup - Click 'WPS Configuration' menu, and the following instructions to establish connection to the user manual of your wireless network card is... point as the WPS PIN code (Please refer to it: 1. The PIN code of computer desktop and then click 'Launch Config Utility'. 2. Right-click the Edimax configuration utility icon located at the upper-right position of configuration utility.
... 'Renew' to do this). NOTE: If you experienced problem with the pin code provided here, you wish to connect supports PIN, please follow the following settings will appear. 3. 2-7-3 WPS Setup - Click 'WPS Configuration' menu, and the following instructions to establish connection to the user manual of your wireless network card is... point as the WPS PIN code (Please refer to it: 1. The PIN code of computer desktop and then click 'Launch Config Utility'. 2. Right-click the Edimax configuration utility icon located at the upper-right position of configuration utility.
Manual
Page 58
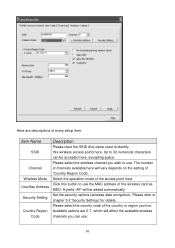
... Available options are descriptions of the access point here. A prefix 'AP' will be accepted here, excepting space. Up to chapter 3-2 'Security Settings' for details. Please select the country code of 'Country Region Code'. Please refer to 32 numerical characters can use . The number of channels available... here will vary depends on the setting of the country or region you live. Select the operation mode of every setup item: Item Name SSID Channel Wireless Mode Use ...
... Available options are descriptions of the access point here. A prefix 'AP' will be accepted here, excepting space. Up to chapter 3-2 'Security Settings' for details. Please select the country code of 'Country Region Code'. Please refer to 32 numerical characters can use . The number of channels available... here will vary depends on the setting of the country or region you live. Select the operation mode of every setup item: Item Name SSID Channel Wireless Mode Use ...

Manual
Page 59
... the SSID will be affected. Allow BW 40 MHz Check this box to accelerate the data transmit rate. Please select a TX Power proper output power setting according to your computer. You can click 'Default' to reset all wireless access point and wireless devices. 0: FCC (US, Canada, and other countries uses FCC...
... the SSID will be affected. Allow BW 40 MHz Check this box to accelerate the data transmit rate. Please select a TX Power proper output power setting according to your computer. You can click 'Default' to reset all wireless access point and wireless devices. 0: FCC (US, Canada, and other countries uses FCC...