User Manual
Page 5
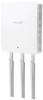
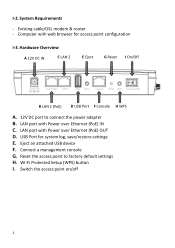
... port with Power over Ethernet (PoE) OUT D. Existing cable/DSL modem & router - Hardware Overview A 12V DC IN C LAN 2 E Eject G Reset I -2. Eject an attached USB device F. Switch the access point on/off 2 Reset the access point to connect the power adapter B. Wi-Fi Protected Setup (WPS) button I -3. USB Port for access point configuration...
... port with Power over Ethernet (PoE) OUT D. Existing cable/DSL modem & router - Hardware Overview A 12V DC IN C LAN 2 E Eject G Reset I -2. Eject an attached USB device F. Switch the access point on/off 2 Reset the access point to connect the power adapter B. Wi-Fi Protected Setup (WPS) button I -3. USB Port for access point configuration...
User Manual
Page 6
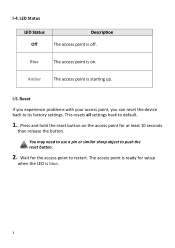
Press and hold the reset button on . The access point is blue. 3 LED Status LED Status Description Off The access point is starting up. I -4. Wait for the access point to ... at least 10 seconds than release the button. Amber The access point is off. This resets all settings back to restart. I -5. Reset If you experience problems with your access point, you can reset the device back to push the reset button. 2. You may need to use a pin or similar sharp object to its factory...
Press and hold the reset button on . The access point is blue. 3 LED Status LED Status Description Off The access point is starting up. I -4. Wait for the access point to ... at least 10 seconds than release the button. Amber The access point is off. This resets all settings back to restart. I -5. Reset If you experience problems with your access point, you can reset the device back to push the reset button. 2. You may need to use a pin or similar sharp object to its factory...

User Manual
Page 17
Wi-Fi Protected Setup (WPS) Wi-Fi Protected Setup is a simple way to establish a connection between WPS compatible devices. Within two minutes, activate WPS on the side of the access point for information regarding its WPS function. 3. Please check the documentation for your WPS-compatible wireless device. The devices will establish a connection. 14 You can use the WPS button to establish connections between the access point and a WPS-compatible wireless device/client. 1. Press and hold the WPS/Reset button on your wireless device for 2 seconds. 2. II-3.
Wi-Fi Protected Setup (WPS) Wi-Fi Protected Setup is a simple way to establish a connection between WPS compatible devices. Within two minutes, activate WPS on the side of the access point for information regarding its WPS function. 3. Please check the documentation for your WPS-compatible wireless device. The devices will establish a connection. 14 You can use the WPS button to establish connections between the access point and a WPS-compatible wireless device/client. 1. Press and hold the WPS/Reset button on your wireless device for 2 seconds. 2. II-3.

User Manual
Page 19
...configuration interface: 1. You will arrive at the "System Information" screen shown below. 16 Enter your access point using an Ethernet cable. 2. Reset 4. Connect a computer to configure the access point's advanced features. The default username is "admin" and the default password is 192.168.2.2. 3....configurations, up to I-5. The access point's default IP address is "1234", though it was recommended that you cannot remember your password, reset the access point back to its factory default settings. Refer to 32 SSIDs and many more. You will be prompted for a username...
...configuration interface: 1. You will arrive at the "System Information" screen shown below. 16 Enter your access point using an Ethernet cable. 2. Reset 4. Connect a computer to configure the access point's advanced features. The default username is "admin" and the default password is 192.168.2.2. 3....configurations, up to I-5. The access point's default IP address is "1234", though it was recommended that you cannot remember your password, reset the access point back to its factory default settings. Refer to 32 SSIDs and many more. You will be prompted for a username...

User Manual
Page 65
... a new field to your preference. Select User Name Password Customize Delete Selected Delete All Check the box to the user registration list. User Name Add Reset Enter the user names here, separated by commas. Click "Add" to add the user to select a user.
... a new field to your preference. Select User Name Password Customize Delete Selected Delete All Check the box to the user registration list. User Name Add Reset Enter the user names here, separated by commas. Click "Add" to add the user to select a user.

User Manual
Page 67
... table. Delete all entries from the list. A new window will be listed in the "MAC Address Filtering Table". Clear all fields. Add MAC Address Add Reset Enter a MAC address of the MAC filtering table. MAC address entries will pop up for you to select a location to the MAC address filtering table...
... table. Delete all entries from the list. A new window will be listed in the "MAC Address Filtering Table". Clear all fields. Add MAC Address Add Reset Enter a MAC address of the MAC filtering table. MAC address entries will pop up for you to select a location to the MAC address filtering table...

User Manual
Page 70
Admin You can change the administrator password, please make a note of the new password. In the event that you change the password used to login to the browser-based configuration interface here. IV-4. Reset for security purposes. If you forget this password and are examples. It is advised to do so for how to the browser based configuration interface, see I-5. IV-4-1. Management Screenshots displayed are unable to login to reset the access point. 67 The information shown on your screen will vary depending on your configuration.
Admin You can change the administrator password, please make a note of the new password. In the event that you change the password used to login to the browser-based configuration interface here. IV-4. Reset for security purposes. If you forget this password and are examples. It is advised to do so for how to the browser based configuration interface, see I-5. IV-4-1. Management Screenshots displayed are unable to login to reset the access point. 67 The information shown on your screen will vary depending on your configuration.

User Manual
Page 83
... access point back to its factory default settings. Factory Default Click "Factory Default" to restore settings to reset and restart. 80 After resetting to factory defaults, please wait for the access point to the factory default. Factory Default If the access point malfunctions or is not responding, then ...it is not convenient to confirm. A pop-up window will appear and ask you reboot the device (see IV-5.5) or reset the device back to its default settings using this feature if the location of the access point is recommended that you to access the...
... access point back to its factory default settings. Factory Default Click "Factory Default" to restore settings to reset and restart. 80 After resetting to factory defaults, please wait for the access point to the factory default. Factory Default If the access point malfunctions or is not responding, then ...it is not convenient to confirm. A pop-up window will appear and ask you reboot the device (see IV-5.5) or reset the device back to its default settings using this feature if the location of the access point is recommended that you to access the...

User Manual
Page 84
Reboot Click "Reboot" to its factory default settings (see IV-5-4). IV-5-5. Reboot If the access point malfunctions or is not responding, then it is recommended that you reboot the device or reset the access point back to reboot the device. A countdown will indicate the progress of the reboot. 81 You can reboot the access point remotely using this feature.
Reboot Click "Reboot" to its factory default settings (see IV-5-4). IV-5-5. Reboot If the access point malfunctions or is not responding, then it is recommended that you reboot the device or reset the access point back to reboot the device. A countdown will indicate the progress of the reboot. 81 You can reboot the access point remotely using this feature.


