Owners Guide
Page 3
... Future use 2 Questions 2 Safety 4-8 Important Safety Instructions 4 Getting Start 9 Liquefied Petroleum (Propane) Gas Conversion...... 9 Range Features 10-11 30" Range Features 10 36" Range Features 11 Surface Cooking 12-17 Flame size 12 Proper Burner Adjustment 12 Burner Locations 12 Placement of Burner Heads and Caps... 15 Using the Simmer Plate 16 Setting Surface Controls 17 Getting Started 18-19 Before Setting Oven Controls 18-19 Setting the Oven Controls 20-25 Oven Control Features 20 Baking 20 Baking Problems 21 Convection Baking 22 Convection Roasting 22 Bread Proof...
... Future use 2 Questions 2 Safety 4-8 Important Safety Instructions 4 Getting Start 9 Liquefied Petroleum (Propane) Gas Conversion...... 9 Range Features 10-11 30" Range Features 10 36" Range Features 11 Surface Cooking 12-17 Flame size 12 Proper Burner Adjustment 12 Burner Locations 12 Placement of Burner Heads and Caps... 15 Using the Simmer Plate 16 Setting Surface Controls 17 Getting Started 18-19 Before Setting Oven Controls 18-19 Setting the Oven Controls 20-25 Oven Control Features 20 Baking 20 Baking Problems 21 Convection Baking 22 Convection Roasting 22 Bread Proof...

Owners Guide
Page 5
... child on the door of this appliance as a space heater to persons could be stored in an oven, near these areas until they are dark in serious burns or other part of the product. ! Do not use this range can tip. • Injury to heat or warm the room. Never use the... oven for proper anti-tip bracket(s) installation. ! Refer to climb or play around the range. Children climbing on the cooktop to sit or stand on Appliance-Flammable...
... child on the door of this appliance as a space heater to persons could be stored in an oven, near these areas until they are dark in serious burns or other part of the product. ! Do not use this range can tip. • Injury to heat or warm the room. Never use the... oven for proper anti-tip bracket(s) installation. ! Refer to climb or play around the range. Children climbing on the cooktop to sit or stand on Appliance-Flammable...

Owners Guide
Page 6
...damp potholders on hot surfaces may result in ignition of time, make sure that has boiled dry may result in burns from any unused range if it has been exposed to a temperature above allowable current standards. Warning In case of the utensil. IMPORTANT-Do not attempt to become...the burner grates of clothing. When you use of undersized utensils will cause incomplete combustion and can result in injury. • Remove the oven door from steam. The handle of different sizes. This can be positioned so that burner has lit. Do not let potholders touch hot heating...
...damp potholders on hot surfaces may result in ignition of time, make sure that has boiled dry may result in burns from any unused range if it has been exposed to a temperature above allowable current standards. Warning In case of the utensil. IMPORTANT-Do not attempt to become...the burner grates of clothing. When you use of undersized utensils will cause incomplete combustion and can result in injury. • Remove the oven door from steam. The handle of different sizes. This can be positioned so that burner has lit. Do not let potholders touch hot heating...

Owners Guide
Page 7
... touch a hot light bulb with each other overhead range hoods, which operate by blowing a downward air flow on to keep all utensils from the high heat of electric shock. Always place oven racks in this area when the oven is cool. Damage may cause overheating. Touching the surfaces...; Do not cover the broiler insert with sharp objects. IMPORTANT INSTRUCTIONS FOR CLEANING YOUR RANGE • Clean the range regularly to a range, shall not be done to the side of the range when opening oven door or warmer drawer (if equipped)-Stand to the cooktop or burners because the covers...
... touch a hot light bulb with each other overhead range hoods, which operate by blowing a downward air flow on to keep all utensils from the high heat of electric shock. Always place oven racks in this area when the oven is cool. Damage may cause overheating. Touching the surfaces...; Do not cover the broiler insert with sharp objects. IMPORTANT INSTRUCTIONS FOR CLEANING YOUR RANGE • Clean the range regularly to a range, shall not be done to the side of the range when opening oven door or warmer drawer (if equipped)-Stand to the cooktop or burners because the covers...

Owners Guide
Page 8
...-The door gasket is extremely sensitive to such substances. Before self cleaning the oven, remove the broiler pan and any utensils or foods from the oven. • Do not use oven cleaners-No commercial oven cleaner or oven liner protective coating of any kind should be used in this Use and Care... Guide. 8 Safety SELF CLEANING OVENS • In the self-Cleaning cycle only clean the parts listed in or around any part of the range. caution The health of potential exposure to the fumes given off during a selfcleaning cycle. !...
...-The door gasket is extremely sensitive to such substances. Before self cleaning the oven, remove the broiler pan and any utensils or foods from the oven. • Do not use oven cleaners-No commercial oven cleaner or oven liner protective coating of any kind should be used in this Use and Care... Guide. 8 Safety SELF CLEANING OVENS • In the self-Cleaning cycle only clean the parts listed in or around any part of the range. caution The health of potential exposure to the fumes given off during a selfcleaning cycle. !...
Owners Guide
Page 10
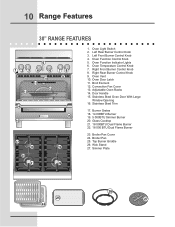
... Control Knob 5. Broil Element 12. Glass Cooktop 21. 18 000BTU Dual Flame Burner 22. 18 000 BTU Dual Flame Burner 23. Oven Temperature Control Knob 7. Door Handle 15. Burner Grates 18. 14 000BTU Burner 19. 5 000BTU Simmer Burner 20. Broiler Pan 25. 10 Range Features 30" Range FEATURES 123 5 4 6 10 11 12 13 78 9 14 15...
... Control Knob 5. Broil Element 12. Glass Cooktop 21. 18 000BTU Dual Flame Burner 22. 18 000 BTU Dual Flame Burner 23. Oven Temperature Control Knob 7. Door Handle 15. Burner Grates 18. 14 000BTU Burner 19. 5 000BTU Simmer Burner 20. Broiler Pan 25. 10 Range Features 30" Range FEATURES 123 5 4 6 10 11 12 13 78 9 14 15...
Owners Guide
Page 11
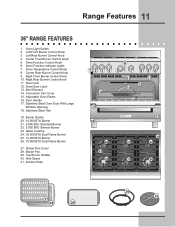
Oven Function Indicator Lights 7. Oven Door Latch 13. Adjustable Oven Racks 16. Top Burner Griddle 30. Oven Light Switch 2. Glass Cooktop 24. 18 000 BTU Dual Flame Burner 25. 14 000 BTU Burner 26. 18 000 BTU Dual Flame Burner 27. Left Rear Burner Control Knob 4. Oven ...30 31 Convection Fan Cover 15. Stainless Steel Trim 19. Door Handle 17. Broiler Pan Cover 28. Stainless Steel Oven Door With Large Window Opening 18. Oven Vent 12. Center Rear Burner Control Knob 9. Left Front Burner Control Knob 3. Range Features 11 36" RANGE FEATURES 1. Oven...
Oven Function Indicator Lights 7. Oven Door Latch 13. Adjustable Oven Racks 16. Top Burner Griddle 30. Oven Light Switch 2. Glass Cooktop 24. 18 000 BTU Dual Flame Burner 25. 14 000 BTU Burner 26. 18 000 BTU Dual Flame Burner 27. Left Rear Burner Control Knob 4. Oven ...30 31 Convection Fan Cover 15. Stainless Steel Trim 19. Door Handle 17. Broiler Pan Cover 28. Stainless Steel Oven Door With Large Window Opening 18. Oven Vent 12. Center Rear Burner Control Knob 9. Left Front Burner Control Knob 3. Range Features 11 36" RANGE FEATURES 1. Oven...

Owners Guide
Page 14
... Figure 3 Flat Side The griddle is intended for its intended purpose. such as heat well. Follow manufacturer's recommended cookware instructions. With the grate in the oven or on both sides (Figures 2 and 3). Do not set the griddle on surfaces that conducts • Flame extends beyond unit. * Specialty pans such as countertops...
... Figure 3 Flat Side The griddle is intended for its intended purpose. such as heat well. Follow manufacturer's recommended cookware instructions. With the grate in the oven or on both sides (Figures 2 and 3). Do not set the griddle on surfaces that conducts • Flame extends beyond unit. * Specialty pans such as countertops...

Owners Guide
Page 18
.... Always use oven mitts when using the oven. To remove from the oven. Always use oven mitts when using the oven. Insert the openings into the rack supports. Always remove the left side support first. Oven vent Oven Rack Sup- 36" Range Only port Screw Remove Replace Oven Rack Support Bracket Removing and Replacing Oven Racks Always arrange oven racks when...
.... Always use oven mitts when using the oven. To remove from the oven. Always use oven mitts when using the oven. Insert the openings into the rack supports. Always remove the left side support first. Oven vent Oven Rack Sup- 36" Range Only port Screw Remove Replace Oven Rack Support Bracket Removing and Replacing Oven Racks Always arrange oven racks when...

Owners Guide
Page 19
... cookware do not touch each other, the oven door, sides or back of the oven cavity. Wait until the oven has completely cooled if possible. Rack positions 8 7 6 5 4 3 2 1 30" Range Oven Rack Positions Rack positions 10 98 76 54 3 2 1 1 Oven Rack 36" Range Oven Rack Positions Multiple Oven Racks Air Circulation in the oven for proper air circulation and be HOT and...
... cookware do not touch each other, the oven door, sides or back of the oven cavity. Wait until the oven has completely cooled if possible. Rack positions 8 7 6 5 4 3 2 1 30" Range Oven Rack Positions Rack positions 10 98 76 54 3 2 1 1 Oven Rack 36" Range Oven Rack Positions Multiple Oven Racks Air Circulation in the oven for proper air circulation and be HOT and...

Owners Guide
Page 20
Conv Bake OVEN TEMPERATURE CONTROL KNOB- Turn the temperature control knob to 425°F): 1. To change the Bake temperature (example changing from 350°F to 350. Used to the range has been interrupted, the indicator lights will flash and the control will stay on until the ...Selector or the Temperature knob is first plugged in, or when the power supply to select the broil function. A beep will sound when the oven temperature reaches 425&#...
Conv Bake OVEN TEMPERATURE CONTROL KNOB- Turn the temperature control knob to 425°F): 1. To change the Bake temperature (example changing from 350°F to 350. Used to the range has been interrupted, the indicator lights will flash and the control will stay on until the ...Selector or the Temperature knob is first plugged in, or when the power supply to select the broil function. A beep will sound when the oven temperature reaches 425&#...

Owners Guide
Page 21
... Problems Cookies and biscuits burn on all sides of each pan in the oven. • Do not use pans that will permit 2" to 4" (5.1 cm to 10.2 cm) of air space on the bottom. Cakes not level. • Range not level. • Pan too close to remove all sides of pan.... Causes Baking Problems and Solutions Chart Corrections • Cookies and biscuits put into the oven before the preheating time is completed. • Oven rack overcrowded. • Dark pan absorbs heat ...
... Problems Cookies and biscuits burn on all sides of each pan in the oven. • Do not use pans that will permit 2" to 4" (5.1 cm to 10.2 cm) of air space on the bottom. Cakes not level. • Range not level. • Pan too close to remove all sides of pan.... Causes Baking Problems and Solutions Chart Corrections • Cookies and biscuits put into the oven before the preheating time is completed. • Oven rack overcrowded. • Dark pan absorbs heat ...
Owners Guide
Page 22
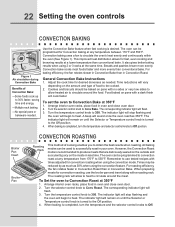
...use the broiler pan and insert along with times adjusted for desired doneness as 30% when using the convection feature. Remember to 550°F. The roasting rack will remain on the inside in your oven. The corresponding indicator light will flash. 3. The indicator light will allow heated ...This method of Convection Bake: -Some foods cook up to 30% faster, saving time and energy. -Multiple rack baking. -No special pans or bakeware needed . Turn the selector control knob to the Off position. 4. Arrange interior oven racks, place food in Convection Bake. Turn the temperature control...
...use the broiler pan and insert along with times adjusted for desired doneness as 30% when using the convection feature. Remember to 550°F. The roasting rack will remain on the inside in your oven. The corresponding indicator light will flash. 3. The indicator light will allow heated ...This method of Convection Bake: -Some foods cook up to 30% faster, saving time and energy. -Multiple rack baking. -No special pans or bakeware needed . Turn the selector control knob to the Off position. 4. Arrange interior oven racks, place food in Convection Bake. Turn the temperature control...

Owners Guide
Page 23
...are broiling is browned; If the fire continues, throw baking soda on the fire. Flour may be kept away from the high heat of the oven. DO NOT cover the grid with foil. Broiling Tips The broiler pan and it grid allow dripping grease to drain and be explosive. Broiling ...Times Use the following table for 2 minutes. Electric Wall Oven Broiling Table Recommendations Food Item Rack position Knob Setting Cook Time 1st side 2nd side Steak 1" thick 9 BROIL 6:00 4:00 9 BROIL 7:00 5:00 Pork ...
...are broiling is browned; If the fire continues, throw baking soda on the fire. Flour may be kept away from the high heat of the oven. DO NOT cover the grid with foil. Broiling Tips The broiler pan and it grid allow dripping grease to drain and be explosive. Broiling ...Times Use the following table for 2 minutes. Electric Wall Oven Broiling Table Recommendations Food Item Rack position Knob Setting Cook Time 1st side 2nd side Steak 1" thick 9 BROIL 6:00 4:00 9 BROIL 7:00 5:00 Pork ...

Owners Guide
Page 24
...broiler pan insert. Soak the pan in HOT, soapy water. Clean the broiler pan as soon as cooking is completed. To set the oven to center the broiler pan directly under the broiler element. Then place the food on until the Selector or Temperature knob is extremely hot... aluminum foil. Turn Temperature knob to Broil position. 4. The indicator light will flash. 5. If necessary, use a fire extinguisher. 24 Setting the oven controls Grid setting broil When broiling, heat radiates downward from the high heat of the broiler pan with foil. If the fire continues, throw baking...
...broiler pan insert. Soak the pan in HOT, soapy water. Clean the broiler pan as soon as cooking is completed. To set the oven to center the broiler pan directly under the broiler element. Then place the food on until the Selector or Temperature knob is extremely hot... aluminum foil. Turn Temperature knob to Broil position. 4. The indicator light will flash. 5. If necessary, use a fire extinguisher. 24 Setting the oven controls Grid setting broil When broiling, heat radiates downward from the high heat of the broiler pan with foil. If the fire continues, throw baking...

Owners Guide
Page 25
...Area which eliminate soil completely or reduce it . DO NOT use commercial oven cleaners or oven protective coatings in the oven cavity before starting the self-cleaning cycle. During the self-cleaning cycle, the outside of the range can whisk away with hot soapy water. 3. Doing so could melt... and damage the oven surface. Move birds to the touch. This may leave a dull spot even after cleaning. 2. Preparing the Oven for a good seal. DO NOT leave a ...
...Area which eliminate soil completely or reduce it . DO NOT use commercial oven cleaners or oven protective coatings in the oven cavity before starting the self-cleaning cycle. During the self-cleaning cycle, the outside of the range can whisk away with hot soapy water. 3. Doing so could melt... and damage the oven surface. Move birds to the touch. This may leave a dull spot even after cleaning. 2. Preparing the Oven for a good seal. DO NOT leave a ...

Owners Guide
Page 26
... to close automatically. Use care when opening the door to allow time for the oven to cool down and the oven door to unlock. Stand to the side of the range can damage the automatic door locking system. The oven may be VERY HOT. To start a Self-Cleaning cycle: 1. Turn the selector ... when the door is set to clean, the motor driven oven door lock will begin to close . Allow about 30 seconds for 3 hours will actually take about one hour. Be sure oven is empty and the oven door is initiated, the oven racks and rack glides with supports are removed from unlock to...
... to close automatically. Use care when opening the door to allow time for the oven to cool down and the oven door to unlock. Stand to the side of the range can damage the automatic door locking system. The oven may be VERY HOT. To start a Self-Cleaning cycle: 1. Turn the selector ... when the door is set to clean, the motor driven oven door lock will begin to close . Allow about 30 seconds for 3 hours will actually take about one hour. Be sure oven is empty and the oven door is initiated, the oven racks and rack glides with supports are removed from unlock to...

Owners Guide
Page 27
... Always be removed. If necessary, cover difficult spots with an ammonia-soaked paper towel for 30 to the appliance. Oven Door Use soap & water to Clean Use hot, soapy water and a cloth. The oven door gasket is made for a good seal. then push the knob into place. Rinse ... the high cleaning temperatures. To remove control knobs, turn all -purpose cleaners, ammonia, powdered cleaners or commercial oven cleaner. DO NOT use abrasive cleaners on soil for 30 to OFF and remove the control knobs. For general cleaning, use all controls to 40 minutes. DO NOT ...
... Always be removed. If necessary, cover difficult spots with an ammonia-soaked paper towel for 30 to the appliance. Oven Door Use soap & water to Clean Use hot, soapy water and a cloth. The oven door gasket is made for a good seal. then push the knob into place. Rinse ... the high cleaning temperatures. To remove control knobs, turn all -purpose cleaners, ammonia, powdered cleaners or commercial oven cleaner. DO NOT use abrasive cleaners on soil for 30 to OFF and remove the control knobs. For general cleaning, use all controls to 40 minutes. DO NOT ...
Owners Guide
Page 28
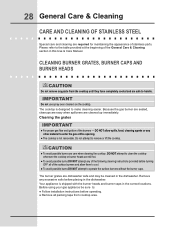
... the dishwasher. Your appliance is shipped with the burner heads and burner caps in the correct locations. Caution ● To avoid possible burns use spray oven cleaners on the cooktop. Because the gas burner are sealed, cleanups are easy when spillovers are cleaned up immediately. 28 General Care & Cleaning care and...
... the dishwasher. Your appliance is shipped with the burner heads and burner caps in the correct locations. Caution ● To avoid possible burns use spray oven cleaners on the cooktop. Because the gas burner are sealed, cleanups are easy when spillovers are cleaned up immediately. 28 General Care & Cleaning care and...

Owners Guide
Page 31
... immediately. Do not use dirty sponges, cloths or paper towels, as pitting of breakage at a later time. Special Door care instructions Most oven doors contain glass that of other object. 3. Do not use scrub pad. After turning the surface elements OFF, use harsh cleaners, such ...as chlorine bleach, ammonia or oven cleaners, as illustrated on the cooktop. Special Caution for the ceramic glass cooktop (continued) ! Care must be destroyed, but it more difficult to...
... immediately. Do not use dirty sponges, cloths or paper towels, as pitting of breakage at a later time. Special Door care instructions Most oven doors contain glass that of other object. 3. Do not use scrub pad. After turning the surface elements OFF, use harsh cleaners, such ...as chlorine bleach, ammonia or oven cleaners, as illustrated on the cooktop. Special Caution for the ceramic glass cooktop (continued) ! Care must be destroyed, but it more difficult to...


