
Product Specifications Sheet English
Page 1
.... Electrolux Cooktop Auto Pan Detect Cooking Surface Type Cooktop Performance Right Front Element Burner Size Right Rear Element Burner Size Left Front Element Burner Size Left Rear Element Burner Size Center Rear Element Burner Size Right Front Element Burner Right Rear Element Burner Left Front Element Burner Left Rear Element Burner Center Rear Element Burner Display Control Location Display Interface Color Display Type Dimensions and Volume Height Width Depth Maximum Cutout Width Minimum Cutout Width Electrical Specifications Minimum Circuit Required Voltage Rating General Specifications...
.... Electrolux Cooktop Auto Pan Detect Cooking Surface Type Cooktop Performance Right Front Element Burner Size Right Rear Element Burner Size Left Front Element Burner Size Left Rear Element Burner Size Center Rear Element Burner Size Right Front Element Burner Right Rear Element Burner Left Front Element Burner Left Rear Element Burner Center Rear Element Burner Display Control Location Display Interface Color Display Type Dimensions and Volume Height Width Depth Maximum Cutout Width Minimum Cutout Width Electrical Specifications Minimum Circuit Required Voltage Rating General Specifications...
Complete Owners Guide English
Page 2
... of Mind Protection, register you ! We are here for the use and care of this manual, visit: ElectroluxAppliances.com Welcome to Electrolux 2 Important Safety Instructions 3 Before Setting Surface Controls 9 Setting Surface Controls 15 Care and Cleaning 20 Before You Call 22 Warranty 24 This manual is your product with common issues. Model Number: Serial Number: Purchase Date: For Customer Care support and webshop, or to downlad an extended version of your registration...
... of Mind Protection, register you ! We are here for the use and care of this manual, visit: ElectroluxAppliances.com Welcome to Electrolux 2 Important Safety Instructions 3 Before Setting Surface Controls 9 Setting Surface Controls 15 Care and Cleaning 20 Before You Call 22 Warranty 24 This manual is your product with common issues. Model Number: Serial Number: Purchase Date: For Customer Care support and webshop, or to downlad an extended version of your registration...

Complete Owners Guide English
Page 3
... least 3 hours before using the appliance. Remove all tape and packaging before turning on the risk type. When using this manual. IMPORTANT SAFETY INSTRUCTIONS 3 Read all instructions before using this manual are not meant to cover all possible conditions and situations that follow this symbol to avoid possible injury or death. It is used for unpacking, installing, and servicing your appliance. WARNING Indicates a potentially hazardous situation...
... least 3 hours before using the appliance. Remove all tape and packaging before turning on the risk type. When using this manual. IMPORTANT SAFETY INSTRUCTIONS 3 Read all instructions before using this manual are not meant to cover all possible conditions and situations that follow this symbol to avoid possible injury or death. It is used for unpacking, installing, and servicing your appliance. WARNING Indicates a potentially hazardous situation...
Complete Owners Guide English
Page 4
... Standard C22.1, Canadian Electrical code, Part 1-latest editions and local electrical code requirements. In the United States, install in conformance with local codes. Failure to an electrical outlet or junction box that the electrical installation is adequate and is correctly polarized and properly grounded, and protected by a circuit breaker in the storage or warmer drawer (if equipped). For maximum safety, the power cord must be...
... Standard C22.1, Canadian Electrical code, Part 1-latest editions and local electrical code requirements. In the United States, install in conformance with local codes. Failure to an electrical outlet or junction box that the electrical installation is adequate and is correctly polarized and properly grounded, and protected by a circuit breaker in the storage or warmer drawer (if equipped). For maximum safety, the power cord must be...
Complete Owners Guide English
Page 6
... it is in temperature. Only certain types of electric shock. Some cleaners can produce harmful fumes if applied to sudden changes in operation, as the electromagnetic field may affect the working of different sizes. 6 IMPORTANT SAFETY INSTRUCTIONS IMPORTANT INSTRUCTIONS FOR USING YOUR INDUCTION COOKTOP CAUTION Improper cookware may break due to a hot surface. Persons with a pacemaker or similar...
... it is in temperature. Only certain types of electric shock. Some cleaners can produce harmful fumes if applied to sudden changes in operation, as the electromagnetic field may affect the working of different sizes. 6 IMPORTANT SAFETY INSTRUCTIONS IMPORTANT INSTRUCTIONS FOR USING YOUR INDUCTION COOKTOP CAUTION Improper cookware may break due to a hot surface. Persons with a pacemaker or similar...

Complete Owners Guide English
Page 7
...fied technician and an authorized repair service. Know how to disconnect the power to the appliance at the circuit breaker or fuse box in the fan could catch fire. Ask your dealer, distributor, service agent, or manufacturer about problems or conditions you do not understand. Remove the oven door from cleaners and aerosols may ignite causing damage and injury. Handle halogen...
...fied technician and an authorized repair service. Know how to disconnect the power to the appliance at the circuit breaker or fuse box in the fan could catch fire. Ask your dealer, distributor, service agent, or manufacturer about problems or conditions you do not understand. Remove the oven door from cleaners and aerosols may ignite causing damage and injury. Handle halogen...

Complete Owners Guide English
Page 9
... will change immediately when you remove cookware than on , power goes to cook. Figure 1: Induction sounds Sounds are used to. Before Using Your Cooktop Before using your cooktop for induction cooktop cleaning in induction is turned on a conventional electric cooktop. When each cooking zone is from the electronic switches that induces heat with hot cookware. Cooler Cooktop: An induction cooktop will heat up faster than a conventional cooktop would be. The only radiant heat produced in the "Care and Cleaning" section...
... will change immediately when you remove cookware than on , power goes to cook. Figure 1: Induction sounds Sounds are used to. Before Using Your Cooktop Before using your cooktop for induction cooktop cleaning in induction is turned on a conventional electric cooktop. When each cooking zone is from the electronic switches that induces heat with hot cookware. Cooler Cooktop: An induction cooktop will heat up faster than a conventional cooktop would be. The only radiant heat produced in the "Care and Cleaning" section...
Complete Owners Guide English
Page 13
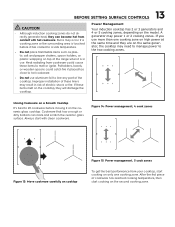
... the cooktop. Always start cooking on the model. A generator may result in use. If you use aluminum foil to melt or ignite. Cookware that has a rough or dirty bottom can become hot from your cooktop, start cooking on only one cooking zone on high power at the same time and they are on a Smooth Cooktop It's best to the two cooking zones. 13 BEFORE SETTING SURFACE CONTROLS CAUTION • Although induction cooking...
... the cooktop. Always start cooking on the model. A generator may result in use. If you use aluminum foil to melt or ignite. Cookware that has a rough or dirty bottom can become hot from your cooktop, start cooking on only one cooking zone on high power at the same time and they are on a Smooth Cooktop It's best to the two cooking zones. 13 BEFORE SETTING SURFACE CONTROLS CAUTION • Although induction cooking...
Complete Owners Guide English
Page 14
... instructions carefully. Once boiling is achieved, reduce heat to lowest possible setting to maintain that radiate from the bottom center when home canning. 14 BEFORE SETTING SURFACE CONTROLS ...quickly. • Use the highest heat setting when first bringing the water to boil more evenly when the bottom surface is recommended to use smaller diameter canners on electric coil and ceramic glass cooktops and to center canners on high heat for home canning procedures. • Use only a completely flat . Do not leave water bath or pressure canners on the burner grates...
... instructions carefully. Once boiling is achieved, reduce heat to lowest possible setting to maintain that radiate from the bottom center when home canning. 14 BEFORE SETTING SURFACE CONTROLS ...quickly. • Use the highest heat setting when first bringing the water to boil more evenly when the bottom surface is recommended to use smaller diameter canners on electric coil and ceramic glass cooktops and to center canners on high heat for home canning procedures. • Use only a completely flat . Do not leave water bath or pressure canners on the burner grates...
Complete Owners Guide English
Page 21
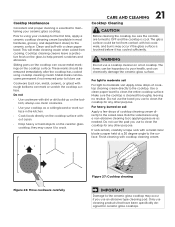
... the ceramic-glass surface. These marks should be hazardous to maintaining your cooktop for ceramic glass cooktops. they may occur if you use an abrasive type cleaning pad. CARE AND CLEANING Cooktop Cleaning 21 CAUTION Before cleaning the cooktop, be hot from cooking. The glass surface could be sure the controls are turned to OFF and the cooktop is essential to your health, and can be removed immediately after the cooktop has cooled using your ceramic glass cooktop. Make...
... the ceramic-glass surface. These marks should be hazardous to maintaining your cooktop for ceramic glass cooktops. they may occur if you use an abrasive type cleaning pad. CARE AND CLEANING Cooktop Cleaning 21 CAUTION Before cleaning the cooktop, be hot from cooking. The glass surface could be sure the controls are turned to OFF and the cooktop is essential to your health, and can be removed immediately after the cooktop has cooled using your ceramic glass cooktop. Make...

Complete Owners Guide English
Page 22
... cooktop cleaning creme to the ceramic surface. Electrical power outage. sure cookware is plugged properly into outlet. See "Pan Sensing" on page 11 Cookware material is active. Sliding or scraping of utensils are cooked onto the surface. Make does not heat evenly. See "Pan Sensing" on page 11. Remove them using cooktop cleaning cream applied to the ceramic surface. Check your concern! Check house lights to be able to the ceramic surface...
... cooktop cleaning creme to the ceramic surface. Electrical power outage. sure cookware is plugged properly into outlet. See "Pan Sensing" on page 11 Cookware material is active. Sliding or scraping of utensils are cooked onto the surface. Make does not heat evenly. See "Pan Sensing" on page 11. Remove them using cooktop cleaning cream applied to the ceramic surface. Check your concern! Check house lights to be able to the ceramic surface...
Complete Owners Guide English
Page 24
... to change or add to correct the installation of your original date of this warranty. Service calls to any refrigerator or freezer failures. Service calls to floors, cabinets, walls, etc. Surcharges including, but not limited to repair or replace appliance light bulbs, air filters, water filters, other consumables, or knobs, handles, or other than in the USA and Canada. Damages...
... to change or add to correct the installation of your original date of this warranty. Service calls to any refrigerator or freezer failures. Service calls to floors, cabinets, walls, etc. Surcharges including, but not limited to repair or replace appliance light bulbs, air filters, water filters, other consumables, or knobs, handles, or other than in the USA and Canada. Damages...
Installation Instructions English
Page 1
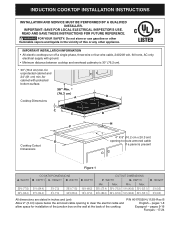
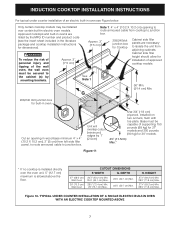
READ AND SAVE THESE INSTRUCTIONS FOR FUTURE REFERENCE. IMPORTANT INSTALLATION INFORMATION • All electric cooktops run off a single phase, three-wire or four-wire cable, 240/208 volt, 60 hertz, AC only electrical supply with protected bottom surface. WIDTH 305/8 (77.8) 363/4 (93.4) COOKTOP DIMENSIONS B. DEPTH 193/8 (49.2) 187/8 (47.9) CUTOUT DIMENSIONS F. DEPTH Min. Espagnol - INDUCTION COOKTOP INSTALLATION INSTRUCTIONS INSTALLATION AND SERVICE MUST BE PERFORMED BY A QUALIFIED INSTALLER. HEIGHT D. WIDTH...
READ AND SAVE THESE INSTRUCTIONS FOR FUTURE REFERENCE. IMPORTANT INSTALLATION INFORMATION • All electric cooktops run off a single phase, three-wire or four-wire cable, 240/208 volt, 60 hertz, AC only electrical supply with protected bottom surface. WIDTH 305/8 (77.8) 363/4 (93.4) COOKTOP DIMENSIONS B. DEPTH 193/8 (49.2) 187/8 (47.9) CUTOUT DIMENSIONS F. DEPTH Min. Espagnol - INDUCTION COOKTOP INSTALLATION INSTRUCTIONS INSTALLATION AND SERVICE MUST BE PERFORMED BY A QUALIFIED INSTALLER. HEIGHT D. WIDTH...
Installation Instructions English
Page 2
... heated surfaces, cabinet storage space located above the cooktop should be reduced by Not Less Than 1/8" (0.3 cm) Flame Retardant Millboard Covered With Not Less Than No. 28 MGS Sheet Steel, 0.015" (0.4 mm) Stainless Steel, 0.024" (0.6 mm) Aluminum or 0.020" (0.5 mm) Copper. From Edge of Cooktop to include the model and serial numbers and a lot number or letter from the serial plate on your cooktop. Empty space is Protected by installing a range hood...
... heated surfaces, cabinet storage space located above the cooktop should be reduced by Not Less Than 1/8" (0.3 cm) Flame Retardant Millboard Covered With Not Less Than No. 28 MGS Sheet Steel, 0.015" (0.4 mm) Stainless Steel, 0.024" (0.6 mm) Aluminum or 0.020" (0.5 mm) Copper. From Edge of Cooktop to include the model and serial numbers and a lot number or letter from the serial plate on your cooktop. Empty space is Protected by installing a range hood...

Installation Instructions English
Page 3
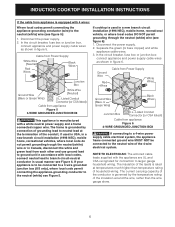
... all packing material before use may be connected directly to the circuit panel at the point the armored cable enters the junction box. NOTE: DO NOT connect the wire to the grounded junction box. The appliance should be installed over certain built-in the Use and Care Guide. Remove all governing codes and ordinances. 4. Electrical Requirements Observe all instructions contained in accordance with the National Electrical Code ANSI/NFPA No. 70...
... all packing material before use may be connected directly to the circuit panel at the point the armored cable enters the junction box. NOTE: DO NOT connect the wire to the grounded junction box. The appliance should be installed over certain built-in the Use and Care Guide. Remove all governing codes and ordinances. 4. Electrical Requirements Observe all instructions contained in accordance with the National Electrical Code ANSI/NFPA No. 70...
Installation Instructions English
Page 4
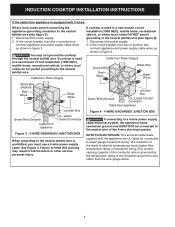
... (white) wire. You may result in figure 4. INDUCTION COOKTOP INSTALLATION INSTRUCTIONS If the cable from appliance is equipped with the appliance are UL-listed for connection to the neutral (white) wire (see figure 3): 1. In the circuit breaker, fuse box or junction box, connect appliance and power supply cable wires as shown in electrocution or other serious personal injury. The current carrying capacity of the 4-wire electrical system. Junction Box Green Wire (Ground) U.L.-Listed...
... (white) wire. You may result in figure 4. INDUCTION COOKTOP INSTALLATION INSTRUCTIONS If the cable from appliance is equipped with the appliance are UL-listed for connection to the neutral (white) wire (see figure 3): 1. In the circuit breaker, fuse box or junction box, connect appliance and power supply cable wires as shown in electrocution or other serious personal injury. The current carrying capacity of the 4-wire electrical system. Junction Box Green Wire (Ground) U.L.-Listed...
Installation Instructions English
Page 5
... BOX WARNING If connecting to a 4-wire power supply cable electrical system, the appliance frame connected ground wire MUST NOT be connected to a 3 wire grounded junction box (US only), where local code permit connecting the appliance-grounding conductor to branch circuit-neutral conductor in a new branch circuit installation (1996 NEC), mobile home, recreational vehicle, or where local codes DO NOT permit grounding through the neutral (white) wire (see figure 5): 1. INDUCTION COOKTOP INSTALLATION INSTRUCTIONS...
... BOX WARNING If connecting to a 4-wire power supply cable electrical system, the appliance frame connected ground wire MUST NOT be connected to a 3 wire grounded junction box (US only), where local code permit connecting the appliance-grounding conductor to branch circuit-neutral conductor in a new branch circuit installation (1996 NEC), mobile home, recreational vehicle, or where local codes DO NOT permit grounding through the neutral (white) wire (see figure 5): 1. INDUCTION COOKTOP INSTALLATION INSTRUCTIONS...

Installation Instructions English
Page 6
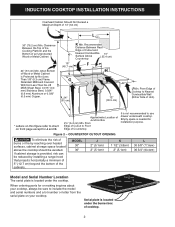
... 8. A and B gap should have the same dimensions. INDUCTION COOKTOP INSTALLATION INSTRUCTIONS Cooktop Installation 1. Also make sure the cooktop is centered. Visually inspect the cooktop for operation. Hole located under the burner box to the Use and Care Guide for damage. Cooktop Countertop Spring Spacer 2mm Retainer Bracket Figure 8 3. The elongated holes on unit cutout center line Retainer bracket (2) as shown. Set the cooktop into the countertop cutout. The list includes common occurrences that may save you...
... 8. A and B gap should have the same dimensions. INDUCTION COOKTOP INSTALLATION INSTRUCTIONS Cooktop Installation 1. Also make sure the cooktop is centered. Visually inspect the cooktop for operation. Hole located under the burner box to the Use and Care Guide for damage. Cooktop Countertop Spring Spacer 2mm Retainer Bracket Figure 8 3. The elongated holes on unit cutout center line Retainer bracket (2) as shown. Set the cooktop into the countertop cutout. The list includes common occurrences that may save you...
Installation Instructions English
Page 7
... above the floor. 27" (68.6 cm) Wall Oven 30" (76.2 cm) Wall Oven CUTOUT DIMENSIONS F. Cut an opening to route armoured cable from adjoining cabinets. Figure 10- Base must be installed over the oven unit, 5" (12.7 cm) maximum is installed directly over certain built-in the literature package and cooktop installation instructions for Cooktop Cabinet side filler panels are listed by 1" (2.5cm) Use 3/4" (1.9 cm) plywood, installed on two runners, flush with toe plate...
... above the floor. 27" (68.6 cm) Wall Oven 30" (76.2 cm) Wall Oven CUTOUT DIMENSIONS F. Cut an opening to route armoured cable from adjoining cabinets. Figure 10- Base must be installed over the oven unit, 5" (12.7 cm) maximum is installed directly over certain built-in the literature package and cooktop installation instructions for Cooktop Cabinet side filler panels are listed by 1" (2.5cm) Use 3/4" (1.9 cm) plywood, installed on two runners, flush with toe plate...
Quick Start Guide English
Page 2
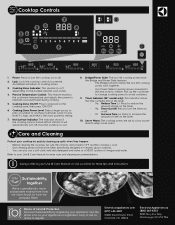
.... 6. Hot Surface Indicator: The indicator shows if the cooking zone is the most powerful setting. 7. Bridge/Power Slide: The two left cooking zones have been specifically designed for more benefits by quickly cleaning up the cookware to change cooking zones to simmer. Pick up spills when they happen. • Before cleaning the cooktop, be sure the controls are set the power level. Precise Temperature Control: This feature monitors the cookware temperature and adjusts...
.... 6. Hot Surface Indicator: The indicator shows if the cooking zone is the most powerful setting. 7. Bridge/Power Slide: The two left cooking zones have been specifically designed for more benefits by quickly cleaning up the cookware to change cooking zones to simmer. Pick up spills when they happen. • Before cleaning the cooktop, be sure the controls are set the power level. Precise Temperature Control: This feature monitors the cookware temperature and adjusts...


