
Complete Owner's Guide (English)
Page 2
...use this guide Finding information 2 Safety 3-4 Features 5-8 Getting Started 8-9 • Setting clock at www.electroluxappliances. You can register online at power up 8 • Temperature visual display 8 • Oven light 9 • Control lock 9 • Setting the kitchen timer 9 Setting oven controls 9-19 • Rapid preheat 9 • Baking 10 • Cook time 11 • End time 11 • Broiling 12 • Convection baking 13 • Convection roasting 14 • Convection broiling 15 • Convection convert 15 • Keep warm 16 • Slow cook...
...use this guide Finding information 2 Safety 3-4 Features 5-8 Getting Started 8-9 • Setting clock at www.electroluxappliances. You can register online at power up 8 • Temperature visual display 8 • Oven light 9 • Control lock 9 • Setting the kitchen timer 9 Setting oven controls 9-19 • Rapid preheat 9 • Baking 10 • Cook time 11 • End time 11 • Broiling 12 • Convection baking 13 • Convection roasting 14 • Convection broiling 15 • Convection convert 15 • Keep warm 16 • Slow cook...

Complete Owner's Guide (English)
Page 3
... time, or if it to the power supply. • User Servicing-Do not repair or replace any other injury. • Do not use . Hazards or unsafe practices which COULD result in minor personal injury. • Remove the oven door from any part of a range by cold temperatures. Do not remove the wiring label and other servicing should not be secured by a qualified electrician or installer in an oven...
... time, or if it to the power supply. • User Servicing-Do not repair or replace any other injury. • Do not use . Hazards or unsafe practices which COULD result in minor personal injury. • Remove the oven door from any part of a range by cold temperatures. Do not remove the wiring label and other servicing should not be secured by a qualified electrician or installer in an oven...

Complete Owner's Guide (English)
Page 4
... remove or replace food in the appliance. 4 Important Safety Instructions • DO NOT TOUCH INTERIOR OVEN ELEMENTS OR INTERIOR SURFACES OF THE WALL OVEN UNTIL THEY HAVE COOLED. Do not use your appliance for cleaning. If rack must be kept clean. The oven heating elements may cause the container to accumulate. Areas near the oven vent. The broiler pan and grid allow grease to burst and result in this Owner's Guide. IMPORTANT INSTRUCTIONS...
... remove or replace food in the appliance. 4 Important Safety Instructions • DO NOT TOUCH INTERIOR OVEN ELEMENTS OR INTERIOR SURFACES OF THE WALL OVEN UNTIL THEY HAVE COOLED. Do not use your appliance for cleaning. If rack must be kept clean. The oven heating elements may cause the container to accumulate. Areas near the oven vent. The broiler pan and grid allow grease to burst and result in this Owner's Guide. IMPORTANT INSTRUCTIONS...

Complete Owner's Guide (English)
Page 5
... oven door Door handle Broiler pan Broiler pan grid Convection roasting rack Oven Vents Location Oven Vent Oven Vent Warm Air Warm Air The oven is released through the vents. This venting is necessary for a self-clean cycle, pull up the support to accommodate precisely every mode of the oven interior, as shown below. Oven Rack Positions This oven is Control panel cool). When the oven is on Broiling element each door. Oven door latch To install oven rack support, insert the supports by pushing them from the brackets. Rack positions Position 1 (Non-SLIDING rack...
... oven door Door handle Broiler pan Broiler pan grid Convection roasting rack Oven Vents Location Oven Vent Oven Vent Warm Air Warm Air The oven is released through the vents. This venting is necessary for a self-clean cycle, pull up the support to accommodate precisely every mode of the oven interior, as shown below. Oven Rack Positions This oven is Control panel cool). When the oven is on Broiling element each door. Oven door latch To install oven rack support, insert the supports by pushing them from the brackets. Rack positions Position 1 (Non-SLIDING rack...

Complete Owner's Guide (English)
Page 8
... oven. The pads HI or LO can be shown in the display and will flash with some cooking modes; Press START to accept the changes or CANCEL to start or stop cooking. 24. Your oven is 100°F. When a cooking mode is set when the oven is entered, the control will triple beep to prompt you to the range has been interrupted, the timer in the display. 22. bake, convection bake and convection roast...
... oven. The pads HI or LO can be shown in the display and will flash with some cooking modes; Press START to accept the changes or CANCEL to start or stop cooking. 24. Your oven is 100°F. When a cooking mode is set when the oven is entered, the control will triple beep to prompt you to the range has been interrupted, the timer in the display. 22. bake, convection bake and convection roast...

Complete Owner's Guide (English)
Page 9
... and start or stop cooking. To cancel the Timer before the set the Timer (example for single rack ONLY. Preheating is turned OFF (not active). Select oven by using the oven light pad located on automatically when the oven door is equipped with multiple rack will be used during any temperature between 170°F to oven door while DOOR LOCK is for 5 minutes) 1. Control lock The Control Lock feature automatically locks the oven door and the control panel. Do not attempt to open to...
... and start or stop cooking. To cancel the Timer before the set the Timer (example for single rack ONLY. Preheating is turned OFF (not active). Select oven by using the oven light pad located on automatically when the oven door is equipped with multiple rack will be used during any temperature between 170°F to oven door while DOOR LOCK is for 5 minutes) 1. Control lock The Control Lock feature automatically locks the oven door and the control panel. Do not attempt to open to...

Complete Owner's Guide (English)
Page 10
... using the bake mode. • During preheat, the 3 elements and the convection fan are used in the oven when the chime signals and temperature display shows that the oven has reached the set a Bake Temperature of 350°F 1. The hidden bake element is best used to quickly heat the oven. • Use only one rack and center the pans as much as shown. The oven display shows PREHEATING. 5. To change to stop or cancel the Bake feature at any time...
... using the bake mode. • During preheat, the 3 elements and the convection fan are used in the oven when the chime signals and temperature display shows that the oven has reached the set a Bake Temperature of 350°F 1. The hidden bake element is best used to quickly heat the oven. • Use only one rack and center the pans as much as shown. The oven display shows PREHEATING. 5. To change to stop or cancel the Bake feature at any time...

Complete Owner's Guide (English)
Page 12
... grease to 550°F with a default temperature of 550°F. DO NOT cover the broil pan insert with the oven door slightly open. • DO NOT use the broil pan without the insert. To set a Broil Temperature of the oven. Press START. 5. Turn food when the top side is a method of cooking tender cuts of the broil element (see Figure 1). • For best broiling results, broil with foil. DO NOT put water...
... grease to 550°F with a default temperature of 550°F. DO NOT cover the broil pan insert with the oven door slightly open. • DO NOT use the broil pan without the insert. To set a Broil Temperature of the oven. Press START. 5. Turn food when the top side is a method of cooking tender cuts of the broil element (see Figure 1). • For best broiling results, broil with foil. DO NOT put water...
Complete Owner's Guide (English)
Page 13
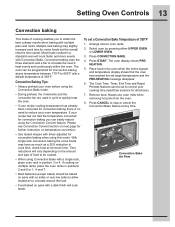
... oven. Arrange interior oven racks. 2. Press CONVECTION BAKE. 4. HEATING. 5. Always use oven mitts when removing hot pans from the oven. 8. Time reductions will vary depending on multiple racks, place the oven racks in the oven when the chime signals and temperature display shows that the oven has reached the set target temperature and the PRE-HEATING message disappear. 6. Remove food. Setting Oven Controls 13 Convection baking This mode of cooking enables you can easily reduce using the Convection Bake mode. • During preheat, the 3 elements and the convection fan...
... oven. Arrange interior oven racks. 2. Press CONVECTION BAKE. 4. HEATING. 5. Always use oven mitts when removing hot pans from the oven. 8. Time reductions will vary depending on multiple racks, place the oven racks in the oven when the chime signals and temperature display shows that the oven has reached the set target temperature and the PRE-HEATING message disappear. 6. Remove food. Setting Oven Controls 13 Convection baking This mode of cooking enables you can easily reduce using the Convection Bake mode. • During preheat, the 3 elements and the convection fan...
Complete Owner's Guide (English)
Page 14
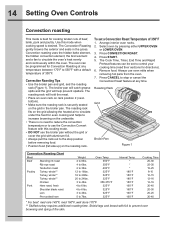
... time. Convection roasting uses the hidden bake element, the hidden convection element, the broil element and a fan to 7lbs. The broiler pan will catch grease spills and the grid will hold the meat. • Place an oven rack on rack position 2 (nextbottom). • Make sure the roasting rack is desired. To set to control your cooking time (read their sections for cooking tender cuts of 350°F. Press START. 5. The Cook Time, Timer, End Time and Rapid Preheat features can be set a Convection Roast Temperature...
... time. Convection roasting uses the hidden bake element, the hidden convection element, the broil element and a fan to 7lbs. The broiler pan will catch grease spills and the grid will hold the meat. • Place an oven rack on rack position 2 (nextbottom). • Make sure the roasting rack is desired. To set to control your cooking time (read their sections for cooking tender cuts of 350°F. Press START. 5. The Cook Time, Timer, End Time and Rapid Preheat features can be set a Convection Roast Temperature...
Complete Owner's Guide (English)
Page 15
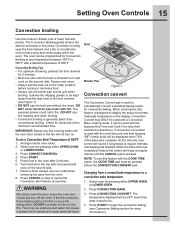
... oven door closed or the fan will be kept away from a normal bake temperature to stop " position before the CONVECTION CONVERT pad. Grid Broiler Pan Figure 1 Convection convert The Convection Convert pad is browned and cook on the second side. 7. Press START to circulate the oven's heat evenly and continuously within the oven. DO NOT cover the broil pan insert with the oven door closed and turn on the fire or use the broil pan...
... oven door closed or the fan will be kept away from a normal bake temperature to stop " position before the CONVECTION CONVERT pad. Grid Broiler Pan Figure 1 Convection convert The Convection Convert pad is browned and cook on the second side. 7. Press START to circulate the oven's heat evenly and continuously within the oven. DO NOT cover the broil pan insert with the oven door closed and turn on the fire or use the broil pan...

Complete Owner's Guide (English)
Page 16
16 Setting Oven Controls Keep warm Slow cook This mode is best for keeping oven baked foods warm for low setting. 5. The oven can be extended. • Cover the foods to keep them moist or use oven mitts when removing hot pans from the oven. 8. Arrange interior oven racks. 2. Press START. 5. Remove food. There are 2 settings available, high (HI) or low (LO). If the oven heat escapes often, the Slow Cook time may need higher temperature settings compared to increase moisture...
16 Setting Oven Controls Keep warm Slow cook This mode is best for keeping oven baked foods warm for low setting. 5. The oven can be extended. • Cover the foods to keep them moist or use oven mitts when removing hot pans from the oven. 8. Arrange interior oven racks. 2. Press START. 5. Remove food. There are 2 settings available, high (HI) or low (LO). If the oven heat escapes often, the Slow Cook time may need higher temperature settings compared to increase moisture...

Complete Owner's Guide (English)
Page 17
... oven. • Limit frequent door openings to stop or cancel the Bread Proof feature at the minimum drying time. • Treat fruits with heat from the oven. 6. Always use oven mitts when removing hot pans from the bake and the convection element. Dehydrating is active: 1. Setting Oven Controls 17 Dehydrating Bread proofing This mode dries foods with antioxidants to slowly remove moisture. Arrange interior oven racks and place bread dough in the air...
... oven. • Limit frequent door openings to stop or cancel the Bread Proof feature at the minimum drying time. • Treat fruits with heat from the oven. 6. Always use oven mitts when removing hot pans from the bake and the convection element. Dehydrating is active: 1. Setting Oven Controls 17 Dehydrating Bread proofing This mode dries foods with antioxidants to slowly remove moisture. Arrange interior oven racks and place bread dough in the air...

Complete Owner's Guide (English)
Page 19
... oven control will remember that it is set for the Sabbath feature. 8. The oven will no longer beep or display any further changes once the oven is set for the Sabbath feature. Setting Your Preferences User Preferences The User Preferences menu includes all normal functions. This menu features the Time of Day, Celsius or Fahrenheit display mode, Continuous Bake or 12 Hour Energy Saving modes, Clock display or NoClock display, 12 Hours Time...
... oven control will remember that it is set for the Sabbath feature. 8. The oven will no longer beep or display any further changes once the oven is set for the Sabbath feature. Setting Your Preferences User Preferences The User Preferences menu includes all normal functions. This menu features the Time of Day, Celsius or Fahrenheit display mode, Continuous Bake or 12 Hour Energy Saving modes, Clock display or NoClock display, 12 Hours Time...
Complete Owner's Guide (English)
Page 20
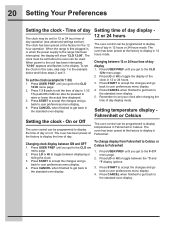
... pressed to display time of day display mode. Setting time of day display 12 or 24 hours The oven control can also be programmed to raise or lower the actual time displayed. 3. Changing between displaying or hiding the clock. 3. Press LO or HI to the CLO on menu page. 2. When the range is first plugged in the display. Changing clock display between the °C and °F display options. 3. Press USER PREF until...
... pressed to display time of day display mode. Setting time of day display 12 or 24 hours The oven control can also be programmed to raise or lower the actual time displayed. 3. Changing between displaying or hiding the clock. 3. Press LO or HI to the CLO on menu page. 2. When the range is first plugged in the display. Changing clock display between the °C and °F display options. 3. Press USER PREF until...

Complete Owner's Guide (English)
Page 25
... as cooking is extremely hot. Soak the pan in ). 6. The oven light bulbs are located on again at the main source or unplug the appliance. 2. Turn electrical power off grease. This will then need to cover the new bulb when installing. 4. Use a paper towel to be in use. The clock will shorten the life of the broiler pan with a new appliance bulb. Broiler Pan Replacing the oven interior light bulbs: 1. Replace bulb with aluminum foil. Replace glass shield over bulb. 5. Turn power back...
... as cooking is extremely hot. Soak the pan in ). 6. The oven light bulbs are located on again at the main source or unplug the appliance. 2. Turn electrical power off grease. This will then need to cover the new bulb when installing. 4. Use a paper towel to be in use. The clock will shorten the life of the broiler pan with a new appliance bulb. Broiler Pan Replacing the oven interior light bulbs: 1. Replace bulb with aluminum foil. Replace glass shield over bulb. 5. Turn power back...
Complete Owner's Guide (English)
Page 26
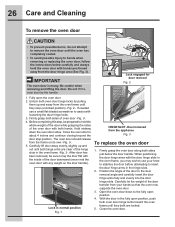
... and carefully insert the door hinge arms fully and evenly into the door hinge slots. If needed use your hands so that the oven now supports the oven door. 3. Do not lift the oven door by pulling them up and out until both oven door hinge locks toward the oven frame until they stop position. The oven door should release from the appliance Fig. 3 To replace the oven door 1. Door removed from the frame on the door handle...
... and carefully insert the door hinge arms fully and evenly into the door hinge slots. If needed use your hands so that the oven now supports the oven door. 3. Do not lift the oven door by pulling them up and out until both oven door hinge locks toward the oven frame until they stop position. The oven door should release from the appliance Fig. 3 To replace the oven door 1. Door removed from the frame on the door handle...

Complete Owner's Guide (English)
Page 27
...; Use pan size suggested and bake for the recommended time. • Be sure to preheat the oven for service call: 1-877-4ELECTROLUX (1-877-435-3287) recommended. Cakes not done in the center. • Oven too hot. • Incorrect pan size. • Pan not centered in the oven. • Use a medium-weight aluminum baking sheet. Foods not done when cooking time is no need to remove all sides when placed in oven. • Set oven temperature...
...; Use pan size suggested and bake for the recommended time. • Be sure to preheat the oven for service call: 1-877-4ELECTROLUX (1-877-435-3287) recommended. Cakes not done in the center. • Oven too hot. • Incorrect pan size. • Pan not centered in the oven. • Use a medium-weight aluminum baking sheet. Foods not done when cooking time is no need to remove all sides when placed in oven. • Set oven temperature...

Complete Owner's Guide (English)
Page 28
... left on the oven rack. Use heavier quality cookware so foods being prepared may save you both time and expense. This list includes common experiences that are not set . • Be sure electrical cord is securely connected into the electrical junction box. • Cord/plug is closed. • Make sure you call Problem Solution Oven control beeps and displays an F error code. • Electronic control has detected a fault condition. Contact cabinet maker to...
... left on the oven rack. Use heavier quality cookware so foods being prepared may save you both time and expense. This list includes common experiences that are not set . • Be sure electrical cord is securely connected into the electrical junction box. • Cord/plug is closed. • Make sure you call Problem Solution Oven control beeps and displays an F error code. • Electronic control has detected a fault condition. Contact cabinet maker to...

Complete Owner's Guide (English)
Page 31
... warranty period should service be readily determined. 2. Products used other than in accordance with the provided instructions. Service calls which are not a part of the unit. 4. Service calls to repair or replace appliance light bulbs, air filters, water filters, other consumables, or knobs, handles, or other appropriate payment record to be defective in materials or workmanship when such appliance is installed, used, and maintained in accordance with original serial numbers...
... warranty period should service be readily determined. 2. Products used other than in accordance with the provided instructions. Service calls which are not a part of the unit. 4. Service calls to repair or replace appliance light bulbs, air filters, water filters, other consumables, or knobs, handles, or other appropriate payment record to be defective in materials or workmanship when such appliance is installed, used, and maintained in accordance with original serial numbers...


