
Complete Owner's Guide (English)
Page 2
...online support and Internet production information visit http://www.electroluxappliances.com ©2011 Electrolux Home Products, Inc. All rights reserved. com or by dropping your purchase as the beginning of your appliance 24 • Special door care instructions 25 • Broiler pan cleaning... Baking problems 27 • Solutions 28-29 Notes 30 Warranty information 31 Thank you for quick reference Purchase date Electrolux model number Electrolux serial number Serial plate location NOTE Registering your preferences 19-21 • User preferences - For toll-free telephone ...
...online support and Internet production information visit http://www.electroluxappliances.com ©2011 Electrolux Home Products, Inc. All rights reserved. com or by dropping your purchase as the beginning of your appliance 24 • Special door care instructions 25 • Broiler pan cleaning... Baking problems 27 • Solutions 28-29 Notes 30 Warranty information 31 Thank you for quick reference Purchase date Electrolux model number Electrolux serial number Serial plate location NOTE Registering your preferences 19-21 • User preferences - For toll-free telephone ...

Complete Owner's Guide (English)
Page 3
...guide are not meant to cover all tape and packaging wrap before connecting it is to the range at least 3 hours before using the appliance. Recognize Safety Symbols, Words, Labels WARNING - Do not remove model/serial number plate. • Proper Installation-Be sure your dealer,... alter the construction of a range by removing leveling legs, panels, wire covers, anti-tip brackets/screws, or any part of the appliance. The appliance must be secured by a qualified electrician or installer in severe personal injury or death. • Remove all possible conditions and situations that...
...guide are not meant to cover all tape and packaging wrap before connecting it is to the range at least 3 hours before using the appliance. Recognize Safety Symbols, Words, Labels WARNING - Do not remove model/serial number plate. • Proper Installation-Be sure your dealer,... alter the construction of a range by removing leveling legs, panels, wire covers, anti-tip brackets/screws, or any part of the appliance. The appliance must be secured by a qualified electrician or installer in severe personal injury or death. • Remove all possible conditions and situations that...

Complete Owner's Guide (English)
Page 4
... you remove or replace food in color. Always place oven racks in this Owner's Guide. Remove all parts free of the appliance listed in the appliance. The broiler pan and grid allow grease to become hot enough to cause burns. IMPORTANT INSTRUCTIONS FOR CLEANING YOUR OVEN •... good seal. No oven cleaner or oven liner protective coating of potential exposure to break. During and after use extreme caution. Before using the appliance. Do not use oven cleaners. Refer to rub, damage or move the gasket. • Do not use a towel or other flammable materials ...
... you remove or replace food in color. Always place oven racks in this Owner's Guide. Remove all parts free of the appliance listed in the appliance. The broiler pan and grid allow grease to become hot enough to cause burns. IMPORTANT INSTRUCTIONS FOR CLEANING YOUR OVEN •... good seal. No oven cleaner or oven liner protective coating of potential exposure to break. During and after use extreme caution. Before using the appliance. Do not use oven cleaners. Refer to rub, damage or move the gasket. • Do not use a towel or other flammable materials ...

Complete Owner's Guide (English)
Page 9
... pad located on automatically when the oven door is equipped with the rapid preheat feature enabled. 5. Getting Started 9 Oven light Setting the kitchen timer Your appliance includes "theater" style oven lighting feature that gradually lights both oven at the same time. Press 5 pad to set a rapid preheat (example is closed by...
... pad located on automatically when the oven door is equipped with the rapid preheat feature enabled. 5. Getting Started 9 Oven light Setting the kitchen timer Your appliance includes "theater" style oven lighting feature that gradually lights both oven at the same time. Press 5 pad to set a rapid preheat (example is closed by...

Complete Owner's Guide (English)
Page 22
... the oven can cause smoke or a fire when subjected to high temperatures. • Clean any aluminum foil. DO NOT leave small children unattended near the appliance. • DO NOT line the oven walls, oven racks, bottom or any cleaning materials on the surface as tomatoes, sauerkraut, fruit juices or pie filling...
... the oven can cause smoke or a fire when subjected to high temperatures. • Clean any aluminum foil. DO NOT leave small children unattended near the appliance. • DO NOT line the oven walls, oven racks, bottom or any cleaning materials on the surface as tomatoes, sauerkraut, fruit juices or pie filling...
Complete Owner's Guide (English)
Page 23
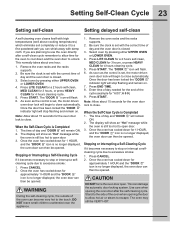
... been locked the "DOOR " indicator light will begin to close automatically. If you can then be opened . DO NOT leave small children unattended near the appliance. 1. This normally takes about 15 seconds for the end of the oven can damage the automatic door locking system. Setting Self-Clean Cycle 23 Setting...
... been locked the "DOOR " indicator light will begin to close automatically. If you can then be opened . DO NOT leave small children unattended near the appliance. 1. This normally takes about 15 seconds for the end of the oven can damage the automatic door locking system. Setting Self-Clean Cycle 23 Setting...
Complete Owner's Guide (English)
Page 24
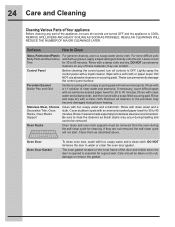
...during the self-clean cycle for a good seal. Rinse with a liquid cleaner. Cleaners made especially for stainless steel are turned OFF and the appliance is essential for cleaning. Lightly spray the control panel with a 1:1 solution of clear water and ammonia. DO NOT use hot, soapy water... Oven Racks Support Clean with a damp cloth and dry. Be sure to OFF. 24 Care and Cleaning Cleaning Various Parts of Your appliance Before cleaning any of these materials; Porcelain Enamel Broiler Pan and Grid Gentle scouring with a soap-filled scouring pad. Rinse with clean ...
...during the self-clean cycle for a good seal. Rinse with a liquid cleaner. Cleaners made especially for stainless steel are turned OFF and the appliance is essential for cleaning. Lightly spray the control panel with a 1:1 solution of clear water and ammonia. DO NOT use hot, soapy water... Oven Racks Support Clean with a damp cloth and dry. Be sure to OFF. 24 Care and Cleaning Cleaning Various Parts of Your appliance Before cleaning any of these materials; Porcelain Enamel Broiler Pan and Grid Gentle scouring with a soap-filled scouring pad. Rinse with clean ...

Complete Owner's Guide (English)
Page 25
... • Do not hit the glass with pots, pans, or any harsh abrasive cleaning materials on again at the main source or unplug the appliance. 2. Remove oven interior light shield as cooking is unplugged and all the interior oven racks are covered with aluminum foil. Replace bulb with foil...: • Do not close the oven door until all parts are COOL before replacing oven light. DO NOT cover the broiler grid with a new appliance bulb. Use hot pads because the broiler pan is in ). 6. Grid Be sure the range is completed. Replace glass shield over bulb. 5. Clean...
... • Do not hit the glass with pots, pans, or any harsh abrasive cleaning materials on again at the main source or unplug the appliance. 2. Remove oven interior light shield as cooking is unplugged and all the interior oven racks are covered with aluminum foil. Replace bulb with foil...: • Do not close the oven door until all parts are COOL before replacing oven light. DO NOT cover the broiler grid with a new appliance bulb. Use hot pads because the broiler pan is in ). 6. Grid Be sure the range is completed. Replace glass shield over bulb. 5. Clean...
Complete Owner's Guide (English)
Page 26
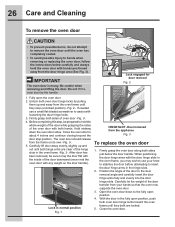
... that the oven now supports the oven door. 3. Hold midway down to the fully open the oven door. 2. The oven door should release from the appliance Fig. 3 To replace the oven door 1. Position the angle of oven door -Fig. 3-. 4. IMPORTANT The oven door is heavy. When positioning the door hinge arms...
... that the oven now supports the oven door. 3. Hold midway down to the fully open the oven door. 2. The oven door should release from the appliance Fig. 3 To replace the oven door 1. Position the angle of oven door -Fig. 3-. 4. IMPORTANT The oven door is heavy. When positioning the door hinge arms...

Complete Owner's Guide (English)
Page 27
... the oven before the preheating time is up. • Range not level. • Pan too close to bake a product may vary slightly from your previous appliance. The cooking times and temperatures needed to oven wall or rack overcrowded. • Pan warped. • Oven too cool. • Oven overcrowded. • Oven door...
... the oven before the preheating time is up. • Range not level. • Pan too close to bake a product may vary slightly from your previous appliance. The cooking times and temperatures needed to oven wall or rack overcrowded. • Pan warped. • Oven too cool. • Oven overcrowded. • Oven door...

Complete Owner's Guide (English)
Page 28
... and level. If a fault reoccurs, record the fault number, push the CANCEL pad and contact an authorized servicer. Installation • Place oven rack in this appliance. Check fuse and screw or engage circuit breaker securely. Self-cleaning cycle does not work or tighten the bulb. See baking for pie spillovers or...
... and level. If a fault reoccurs, record the fault number, push the CANCEL pad and contact an authorized servicer. Installation • Place oven rack in this appliance. Check fuse and screw or engage circuit breaker securely. Self-cleaning cycle does not work or tighten the bulb. See baking for pie spillovers or...

Complete Owner's Guide (English)
Page 31
... which do not involve malfunction or defects in accordance with the provided instructions. Expenses for making the appliance accessible for your original date of purchase, Electrolux will provide a replacement glass cooktop or radiant surface element for servicing, such as -is installed, ...change without notice. Product that have been removed, altered or cannot be obtained by unauthorized service companies; your appliance is warranted by Electrolux Major Appliances North America, a division of your original date of Alaska. 13. THIS WRITTEN WARRANTY GIVES YOU SPECIFIC ...
... which do not involve malfunction or defects in accordance with the provided instructions. Expenses for making the appliance accessible for your original date of purchase, Electrolux will provide a replacement glass cooktop or radiant surface element for servicing, such as -is installed, ...change without notice. Product that have been removed, altered or cannot be obtained by unauthorized service companies; your appliance is warranted by Electrolux Major Appliances North America, a division of your original date of Alaska. 13. THIS WRITTEN WARRANTY GIVES YOU SPECIFIC ...

