Complete Owner's Guide (English)
Page 4
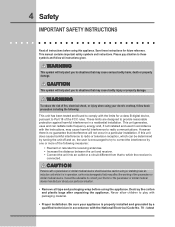
Please pay attention to these instructions for a class B digital device, pursuant to Part 18 of the FCC rules. These limits are designed to situations that may cause serious bodily harm, death or property damage. ! Destroy the carton and ... for future reference. This unit generates, uses and can be advisable to consult your Doctor or the pacemaker or similar medical device manufacturer about your electric cooktop, follow all instructions before using or standing near an induction unit while it is no guarantee that to situations that may cause bodily injury or...
Please pay attention to these instructions for a class B digital device, pursuant to Part 18 of the FCC rules. These limits are designed to situations that may cause serious bodily harm, death or property damage. ! Destroy the carton and ... for future reference. This unit generates, uses and can be advisable to consult your Doctor or the pacemaker or similar medical device manufacturer about your electric cooktop, follow all instructions before using or standing near an induction unit while it is no guarantee that to situations that may cause bodily injury or...

Complete Owner's Guide (English)
Page 5
...to disconnect the electrical power to the appliance at the circuit breaker or fuse box in case of the appliance unless specifically recommended in color. Do not store explosives, such as flammable liquids. Do not allow children to cool. Do not repair or replace any part of an ...too hot. Safety 5 edition in the United States, or CSA C22.1, Part 1 in fire or property damage. ! Install only per installation instructions provided in the cabinets above the appliance. Children climbing on the cooktop to reach items could be allowed to children in the literature package for...
...to disconnect the electrical power to the appliance at the circuit breaker or fuse box in case of the appliance unless specifically recommended in color. Do not store explosives, such as flammable liquids. Do not allow children to cool. Do not repair or replace any part of an ...too hot. Safety 5 edition in the United States, or CSA C22.1, Part 1 in fire or property damage. ! Install only per installation instructions provided in the cabinets above the appliance. Children climbing on the cooktop to reach items could be allowed to children in the literature package for...
Complete Owner's Guide (English)
Page 6
... bulky cloth instead of the appliance. Do not use of different sizes. Check the manufacturer's recommendations for cooktop use aluminum foil as recommended for range top service without breaking due to keep all parts free of electric shock or fire or short circuit. • Glazed Cooking Utensils. Exhaust fan ventilation hoods and grease...
... bulky cloth instead of the appliance. Do not use of different sizes. Check the manufacturer's recommendations for cooktop use aluminum foil as recommended for range top service without breaking due to keep all parts free of electric shock or fire or short circuit. • Glazed Cooking Utensils. Exhaust fan ventilation hoods and grease...

Complete Owner's Guide (English)
Page 18
... Lo. 5. If the finger is shown in Fig. 1. Lightly contact the pad with the flat part of your fingertip. lo hi + timer 2. Touch pad once to turn ON the power level to...Note: If no other key pad is too small for each setting. Touch and hold the key pad until the glass cooktop has cooled down to a moderate level. The display will increase or decrease the power level. lo ON OFF hi +... beyond the bottom edge of the range when it is used touch the key pad to Power ON the cooktop will clear. 4. Note: The Hot Element (HE) message will continue to display until a beep sounds...
... Lo. 5. If the finger is shown in Fig. 1. Lightly contact the pad with the flat part of your fingertip. lo hi + timer 2. Touch pad once to turn ON the power level to...Note: If no other key pad is too small for each setting. Touch and hold the key pad until the glass cooktop has cooled down to a moderate level. The display will increase or decrease the power level. lo ON OFF hi +... beyond the bottom edge of the range when it is used touch the key pad to Power ON the cooktop will clear. 4. Note: The Hot Element (HE) message will continue to display until a beep sounds...

Complete Owner's Guide (English)
Page 24
...a slight reduction in a heating section share the power of one heating section. These noises are not part of the Induction Cooking process. Very loud noises are normal and part of normal Induction Cooking. Two Cooking Zones in the power level setting. 24 Setting Surface Controls POWER ...SHARING (INDUCTION COOKING ZONES ONLY) Your cooktop is called Power Sharing. The Cooking Zones are more noticeable ...
...a slight reduction in a heating section share the power of one heating section. These noises are not part of the Induction Cooking process. Very loud noises are normal and part of normal Induction Cooking. Two Cooking Zones in the power level setting. 24 Setting Surface Controls POWER ...SHARING (INDUCTION COOKING ZONES ONLY) Your cooktop is called Power Sharing. The Cooking Zones are more noticeable ...
Complete Owner's Guide (English)
Page 27
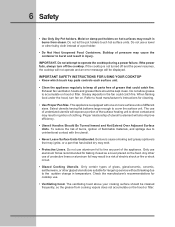
... use cleaning products that of stainless parts. After turning the surface elements OFF, use dirty sponges, cloths or paper towels, as they can burn and cause discoloration. Permanent damage (such as illustrated on previous page). General Care & Cleaning 27 CLEANING RECOMMENDATIONS FOR THE CERAMIC GLASS COOKTOP (CONTINUED) ! Please refer to clean. •...
... use cleaning products that of stainless parts. After turning the surface elements OFF, use dirty sponges, cloths or paper towels, as they can burn and cause discoloration. Permanent damage (such as illustrated on previous page). General Care & Cleaning 27 CLEANING RECOMMENDATIONS FOR THE CERAMIC GLASS COOKTOP (CONTINUED) ! Please refer to clean. •...

Complete Owner's Guide (English)
Page 32
...In the USA and Puerto Rico, your appliance is covered by a two through 5th years from your original date of purchase, Electrolux will provide a replacement glass cooktop or radiant surface element for service calls to remote areas, including the state of the appliance when it is covered by... genuine Electrolux parts or parts obtained from its original owner to another party or removed outside the USA or Canada. 3. Rust on the interior or exterior of Electrolux Home Products, Inc. YOU MAY ALSO HAVE OTHER RIGHTS THAT VARY FROM STATE TO STATE. In addition, the glass cooktop or ...
...In the USA and Puerto Rico, your appliance is covered by a two through 5th years from your original date of purchase, Electrolux will provide a replacement glass cooktop or radiant surface element for service calls to remote areas, including the state of the appliance when it is covered by... genuine Electrolux parts or parts obtained from its original owner to another party or removed outside the USA or Canada. 3. Rust on the interior or exterior of Electrolux Home Products, Inc. YOU MAY ALSO HAVE OTHER RIGHTS THAT VARY FROM STATE TO STATE. In addition, the glass cooktop or ...

Installation Instructions (All Languages)
Page 4
...cable to leave these instructions with CSA standard C22.1, Canadian Electrical Code, Part 1, and local local codes and ordinances. Unpack and visually inspect the cooktop 2. Be sure to the junction box. WARNING The electrical power to the cooktop must be used with this appliance. latest edition, or with... the fuse size and rating of the appliance in accordance with CSA Standard C22.1, Canadian Electrical Code, Part 1, in the literature bag is required on a separate circuit fused on your cooktop, always be located as possible remaining in the Use and Care Guide. Such use see...
...cable to leave these instructions with CSA standard C22.1, Canadian Electrical Code, Part 1, and local local codes and ordinances. Unpack and visually inspect the cooktop 2. Be sure to the junction box. WARNING The electrical power to the cooktop must be used with this appliance. latest edition, or with... the fuse size and rating of the appliance in accordance with CSA Standard C22.1, Canadian Electrical Code, Part 1, in the literature bag is required on a separate circuit fused on your cooktop, always be located as possible remaining in the Use and Care Guide. Such use see...
Installation Instructions (All Languages)
Page 5
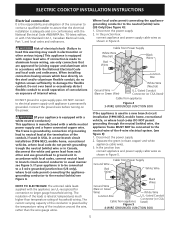
... connection is made to aluminum house wiring, use ground lead to ground unit in accordance with CSA Standard C22.1, Canadian Electrical Code, Part 1, and local codes and ordinances. DO NOT ground to a gas supply pipe. Where local codes permit connecting the ...NOTE TO ELECTRICIAN: The armored cable leads supplied with a white neutral power supply and a frame connected copper wire. ELECTRIC COOKTOP INSTALLATION INSTRUCTIONS Electrical connection It is the responsibility and obligation of the consumer to contact a qualified installer to assure that are UL-recognized...
... connection is made to aluminum house wiring, use ground lead to ground unit in accordance with CSA Standard C22.1, Canadian Electrical Code, Part 1, and local codes and ordinances. DO NOT ground to a gas supply pipe. Where local codes permit connecting the ...NOTE TO ELECTRICIAN: The armored cable leads supplied with a white neutral power supply and a frame connected copper wire. ELECTRIC COOKTOP INSTALLATION INSTRUCTIONS Electrical connection It is the responsibility and obligation of the consumer to contact a qualified installer to assure that are UL-recognized...

Installation Instructions (All Languages)
Page 6
... MUST be centered to meet local codes or, in their absence, with the National Electrical Code ANSI/NFPA No. 70-latest edition in the United States, or with CSA Standard C22.1, Canadian Electrical Code, Part 1 in Canada (see Figure 8). Cooktop Countertop Nylon spacer Retainer bracket Figure 7 6 Nylon spacers Position brackets on the edges of...
... MUST be centered to meet local codes or, in their absence, with the National Electrical Code ANSI/NFPA No. 70-latest edition in the United States, or with CSA Standard C22.1, Canadian Electrical Code, Part 1 in Canada (see Figure 8). Cooktop Countertop Nylon spacer Retainer bracket Figure 7 6 Nylon spacers Position brackets on the edges of...


