

Installation Instructions (All Languages)
Page 1
...; (71.8) CUTOUT DIMENSIONS AND CABINET WIDTH F G (Min.) H. Printed in oven. Do not remove spacers (if equipped) on the side walls and/or on convection models, verify dimension G to prevent excess heat buildup that may find little or no cabinet work being necessary. Hole for Cable * Door Open (see note 2) Spacer 2" (5 cm) Wide Wood Spacer if Needed (see notes 4 & 5) Min. Standard Height (**Others, see note 4) Electrical Junction Box Figure...
...; (71.8) CUTOUT DIMENSIONS AND CABINET WIDTH F G (Min.) H. Printed in oven. Do not remove spacers (if equipped) on the side walls and/or on convection models, verify dimension G to prevent excess heat buildup that may find little or no cabinet work being necessary. Hole for Cable * Door Open (see note 2) Spacer 2" (5 cm) Wide Wood Spacer if Needed (see notes 4 & 5) Min. Standard Height (**Others, see note 4) Electrical Junction Box Figure...

Installation Instructions (All Languages)
Page 2
... final location at least three (3) hours before installing the combination oven. 2. An extension cord should be moved if servicing is required on a separate circuit fused on the door of the line (red and black wires). A suitable strain relief must be supplied with the National Electrical Code ANSI/NFPA No.70- IMPORTANT SAFETY INSTRUCTIONS • Be sure your Owner's Guide for warming or heating the room. NOTE: Wire sizes and connections...
... final location at least three (3) hours before installing the combination oven. 2. An extension cord should be moved if servicing is required on a separate circuit fused on the door of the line (red and black wires). A suitable strain relief must be supplied with the National Electrical Code ANSI/NFPA No.70- IMPORTANT SAFETY INSTRUCTIONS • Be sure your Owner's Guide for warming or heating the room. NOTE: Wire sizes and connections...

Installation Instructions (All Languages)
Page 6
... Use and Care Guide for a convection baking or roasting, both elements cycle on the rack. The anti-tip mounting screws supplied with an Electronic Oven Control. Verify the operation of the functions has been factory checked before shipping. A. Checking Operation Your model is set for operation. 1. B. When the oven is equipped with the wall oven must be used as a template to your Use and Care Guide for Service Checklist" and the "Operating Instructions" in the oven should feel heat...
... Use and Care Guide for a convection baking or roasting, both elements cycle on the rack. The anti-tip mounting screws supplied with an Electronic Oven Control. Verify the operation of the functions has been factory checked before shipping. A. Checking Operation Your model is set for operation. 1. B. When the oven is equipped with the wall oven must be used as a template to your Use and Care Guide for Service Checklist" and the "Operating Instructions" in the oven should feel heat...

Complete Owner's Guide (English)
Page 2
... Started 16-17 • Power up, control display modes & timers...........16 • Control lock & oven lights 17 Settings for Best Results 18-19 Setting Microwave Controls 20-29 • Time cooking 20 • Quick sensor 21 • Sensor cook 23 • Auto cook 24 • Auto reheat 26 • Melt, soften 27 • Auto defrost 28 • Multi stage cooking 29 Setting Lower Oven Controls 30-52 • Rapid preheat 30 • Bake 31 • Using cook time 32 • Using cook time with end time...
... Started 16-17 • Power up, control display modes & timers...........16 • Control lock & oven lights 17 Settings for Best Results 18-19 Setting Microwave Controls 20-29 • Time cooking 20 • Quick sensor 21 • Sensor cook 23 • Auto cook 24 • Auto reheat 26 • Melt, soften 27 • Auto defrost 28 • Multi stage cooking 29 Setting Lower Oven Controls 30-52 • Rapid preheat 30 • Bake 31 • Using cook time 32 • Using cook time with end time...

Complete Owner's Guide (English)
Page 4
... materials inside the oven to explode and SHOULD NOT be boiling. It is not designed for examination, repair or adjustment. • DO NOT cover or block any appliance, close supervision is removed from paper or plastic bags before placing bag in the Microwave Oven at the fuse or circuit breaker panel. • Do not use straight-sided containers with the provided installation instructions. • Some products...
... materials inside the oven to explode and SHOULD NOT be boiling. It is not designed for examination, repair or adjustment. • DO NOT cover or block any appliance, close supervision is removed from paper or plastic bags before placing bag in the Microwave Oven at the fuse or circuit breaker panel. • Do not use straight-sided containers with the provided installation instructions. • Some products...

Complete Owner's Guide (English)
Page 5
... Warming or Heating the Room. • Do not use the oven or microwave oven for this appliance. Ask your appliance is properly installed and grounded by a qualified technician in Canada CSA Standard C22.1, Canadian Electrical Code, Part 1, and local code requirements. Know how to disconnect the power to the appliance at the circuit breaker or fuse box in case of the following safety instructions before using this appliance: • Remove...
... Warming or Heating the Room. • Do not use the oven or microwave oven for this appliance. Ask your appliance is properly installed and grounded by a qualified technician in Canada CSA Standard C22.1, Canadian Electrical Code, Part 1, and local code requirements. Know how to disconnect the power to the appliance at the circuit breaker or fuse box in case of the following safety instructions before using this appliance: • Remove...

Complete Owner's Guide (English)
Page 6
... not use extreme caution. Once the power resumes, reset the clock and oven function. • Remove the oven door from steam. Do not let potholders contact the hot heating elements in burns from any part of the appliance. • DO NOT TOUCH HEATING ELEMENTS OR INTERIOR SURFACES OF THE OVENS OR ANY AREAS NEAR THESE ZONE. Remove all utensils from the high heat of a hot oven. The broiler pan and its...
... not use extreme caution. Once the power resumes, reset the clock and oven function. • Remove the oven door from steam. Do not let potholders contact the hot heating elements in burns from any part of the appliance. • DO NOT TOUCH HEATING ELEMENTS OR INTERIOR SURFACES OF THE OVENS OR ANY AREAS NEAR THESE ZONE. Remove all utensils from the high heat of a hot oven. The broiler pan and its...

Complete Owner's Guide (English)
Page 7
... 3 hours before turning on the hood or filter. Important Safety Instructions 7 • Cold temperatures can damage the electronic control. Self cleaning ovens • Clean in the self-cleaning cycle only the parts listed in temperatures above 32°F (0°C) for cleaning. Do not allow grease to accumulate. • Kitchen cleaners and aerosols-Always follow the manufacturer's recommended directions for use oven cleaners-No commercial oven cleaner or oven liner protective coating...
... 3 hours before turning on the hood or filter. Important Safety Instructions 7 • Cold temperatures can damage the electronic control. Self cleaning ovens • Clean in the self-cleaning cycle only the parts listed in temperatures above 32°F (0°C) for cleaning. Do not allow grease to accumulate. • Kitchen cleaners and aerosols-Always follow the manufacturer's recommended directions for use oven cleaners-No commercial oven cleaner or oven liner protective coating...
Complete Owner's Guide (English)
Page 15
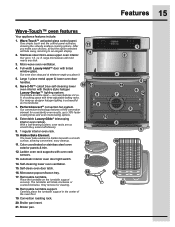
... touch and the control panel activates, showing the virtually endless cooking options. Our up to 30% faster cooking times and even more baking options. 8. cu. ft. Perfect-Convect3® convection fan system. With a ball-bearing system, oven racks are so smooth they extend effortlessly. 9. 1 regular interior oven rack. 10. Self-clean oven door latch. 16. Place the turntable on the turntable support securely. Removable turntable support. Stainless steel micro-wave upper oven interior. large microwaves will fade...
... touch and the control panel activates, showing the virtually endless cooking options. Our up to 30% faster cooking times and even more baking options. 8. cu. ft. Perfect-Convect3® convection fan system. With a ball-bearing system, oven racks are so smooth they extend effortlessly. 9. 1 regular interior oven rack. 10. Self-clean oven door latch. 16. Place the turntable on the turntable support securely. Removable turntable support. Stainless steel micro-wave upper oven interior. large microwaves will fade...

Complete Owner's Guide (English)
Page 21
... least one inch to calculate cooking time or power level. • Suppose you . You don't need to cover. Press 2 for temperature after heating. Press START Do not place microwave popcorn directly on the metal turntable as it heats. NOTES 1. The sensor adjusts the cooking times and power level for temperature after cooking. To continue cooking, press the CANCEL/off any covering to allow steam to secure. Each food has a cooking hint. Be careful when removing any...
... least one inch to calculate cooking time or power level. • Suppose you . You don't need to cover. Press 2 for temperature after heating. Press START Do not place microwave popcorn directly on the metal turntable as it heats. NOTES 1. The sensor adjusts the cooking times and power level for temperature after cooking. To continue cooking, press the CANCEL/off any covering to allow steam to secure. Each food has a cooking hint. Be careful when removing any...

Complete Owner's Guide (English)
Page 26
... MICRO OVEN NOTES 1. Reheat settings can be necessary to double the entered amount to select quantity and touch START. 3. Fresh Rolls/ Muffins 2. Large items should be considered as 2 or 3 regular size. Arrange on plate, cover with paper towel. For room temperature pastas, use manual operation. 2. Pasta without sauce double the quantity per setting. Cover with More or less time adjustment. 2. Press START Auto Reheat chart Food 1. Touch desired number...
... MICRO OVEN NOTES 1. Reheat settings can be necessary to double the entered amount to select quantity and touch START. 3. Fresh Rolls/ Muffins 2. Large items should be considered as 2 or 3 regular size. Arrange on plate, cover with paper towel. For room temperature pastas, use manual operation. 2. Pasta without sauce double the quantity per setting. Cover with More or less time adjustment. 2. Press START Auto Reheat chart Food 1. Touch desired number...
Complete Owner's Guide (English)
Page 34
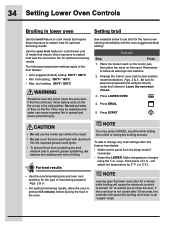
... not use a fire extinguisher. Leave the oven door closed after this feature has started: • Wake control panel from contacting the broil element and to close the oven door. Each press of meats that require direct exposure to set broil for optimum browning results. If the fire continues, throw baking soda on the fire or use the roasting rack when broiling. See example below to radiant heat for the lower oven starting immediately...
... not use a fire extinguisher. Leave the oven door closed after this feature has started: • Wake control panel from contacting the broil element and to close the oven door. Each press of meats that require direct exposure to set broil for optimum browning results. If the fire continues, throw baking soda on the fire or use the roasting rack when broiling. See example below to radiant heat for the lower oven starting immediately...

Complete Owner's Guide (English)
Page 36
... air circulation. Pan position for two rack baking. 36 Setting Lower Oven Controls About convection bake Setting convection bake Convection bake is time saved. Convection bake uses a fan to set temperature, PREHEATING will turn off and a beep will begin heating. If your recipe instructions have been written for some foods, but the overall result is part of space between the food items for even cooking with excellent results. Conv bake may slightly increase cook times for use with a single rack use convection bake, follow the Convection Convert option instructions...
... air circulation. Pan position for two rack baking. 36 Setting Lower Oven Controls About convection bake Setting convection bake Convection bake is time saved. Convection bake uses a fan to set temperature, PREHEATING will turn off and a beep will begin heating. If your recipe instructions have been written for some foods, but the overall result is part of space between the food items for even cooking with excellent results. Conv bake may slightly increase cook times for use with a single rack use convection bake, follow the Convection Convert option instructions...

Complete Owner's Guide (English)
Page 38
... auto-start immediately with the convection fan and element to make the changes. Press CONV ROAST Convection roast may press CANCEL any cook settings after this feature are crispy brown on the outside while staying moist on the inside. The following options: • Probe • Cook time or cook time with this feature has started: • Select the LOWER oven. keys. Meats cooked with end time 3. Press START Once START is pressed the oven will adjust...
... auto-start immediately with the convection fan and element to make the changes. Press CONV ROAST Convection roast may press CANCEL any cook settings after this feature are crispy brown on the outside while staying moist on the inside. The following options: • Probe • Cook time or cook time with this feature has started: • Select the LOWER oven. keys. Meats cooked with end time 3. Press START Once START is pressed the oven will adjust...
Complete Owner's Guide (English)
Page 59
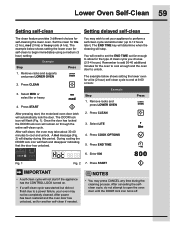
... to open the oven door until the DOOR lock icon turns off. Remove racks and supports and press LOWER OVEN 2. Select MED or select lite or heavy 4. Press CLEAN 3. Select LITE 4. Once the door has locked the DOOR lock icon will automatically lock the door. During cooling the DOOR lock icon will stop. The END TIME key will determine when the cleaning will flash and disappear indicating that the door has unlocked. Press COOK OPTIONS...
... to open the oven door until the DOOR lock icon turns off. Remove racks and supports and press LOWER OVEN 2. Select MED or select lite or heavy 4. Press CLEAN 3. Select LITE 4. Once the door has locked the DOOR lock icon will automatically lock the door. During cooling the DOOR lock icon will stop. The END TIME key will determine when the cleaning will flash and disappear indicating that the door has unlocked. Press COOK OPTIONS...
Complete Owner's Guide (English)
Page 64
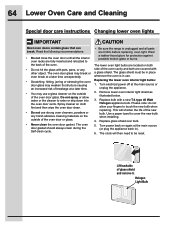
... clean during the Self-clean cycle. • Be sure the range is in use. Turn electrical power off at the main source (or plug the appliance back in place whenever the oven is unplugged and all the interior oven racks are covered with a new T-4 type 40 Watt Halogen appliance bulb. Replace bulb with a glass shield. Use a paper towel to be in ). 6. The oven door glass may break or even break at a later time...
... clean during the Self-clean cycle. • Be sure the range is in use. Turn electrical power off at the main source (or plug the appliance back in place whenever the oven is unplugged and all the interior oven racks are covered with a new T-4 type 40 Watt Halogen appliance bulb. Replace bulb with a glass shield. Use a paper towel to be in ). 6. The oven door glass may break or even break at a later time...

Complete Owner's Guide (English)
Page 66
... Started section. • Be sure electrical cord is securely connected into the electrical junction box. • Cord/plug is not complete. Follow instructions under "Using the Self-Clean Feature". Before you call Problem Faulty Installation Entire appliance does not operate Oven does not operate Oven light does not work Self-cleaning cycle does not work Solution • Place oven rack in order to operate the oven. The time of oven. Contact your dealer, installing agent or authorized servicer. • Service wiring is not installed...
... Started section. • Be sure electrical cord is securely connected into the electrical junction box. • Cord/plug is not complete. Follow instructions under "Using the Self-Clean Feature". Before you call Problem Faulty Installation Entire appliance does not operate Oven does not operate Oven light does not work Self-cleaning cycle does not work Solution • Place oven rack in order to operate the oven. The time of oven. Contact your dealer, installing agent or authorized servicer. • Service wiring is not installed...

Complete Owner's Guide (English)
Page 68
... to bake a product may vary slightly from the oven except the ones to 4") of air space on all sides when placed in recipe. • Use proper rack position and place pan so there is 5.1cm to 10.2cm (2" to the installation instructions for roasting meats or baking casseroles. the preheating time is uneven, refer to 4") of space on all sides of each pan in oven. • Set oven temperature...
... to bake a product may vary slightly from the oven except the ones to 4") of air space on all sides when placed in recipe. • Use proper rack position and place pan so there is 5.1cm to 10.2cm (2" to the installation instructions for roasting meats or baking casseroles. the preheating time is uneven, refer to 4") of space on all sides of each pan in oven. • Set oven temperature...

Complete Owner's Guide (English)
Page 71
... installed, used , and maintained in and free-standing range appliances) is covered by a one year from your original date of purchase, Electrolux will provide a replacement glass cooktop or radiant surface element for your origi- Products with the provided instructions. 7. Product that have been removed, altered or cannot be repaired in accordance with original serial numbers that has been transferred from its original owner to use of parts other than genuine Electrolux parts...
... installed, used , and maintained in and free-standing range appliances) is covered by a one year from your original date of purchase, Electrolux will provide a replacement glass cooktop or radiant surface element for your origi- Products with the provided instructions. 7. Product that have been removed, altered or cannot be repaired in accordance with original serial numbers that has been transferred from its original owner to use of parts other than genuine Electrolux parts...

Dimensions
Page 1
... Clock & Timer Yes Humidity Sensor Yes Power Levels 11 Touch Pad Controls 29 Auto Defrost Options 6 Auto Cook Options - Perfect Turkey®, Defrost, Dehydrate, Bread Proof, My Favorites, Multi-Stage Cooking, Temperature Probe, Rapid Preheat, Delay Bake, Convection Convert Luxury-Design® Lighting with Variable 2-Speed Fan Cooking Modes - Ft. Refer to Product Installation Guide for Part Numbers Included Optional Specifications Color - Luxury-Glide® Oven Racks With a ball bearing system, oven racks are so smooth they extend effortlessly. Bake, Broil, Convection Bake...
... Clock & Timer Yes Humidity Sensor Yes Power Levels 11 Touch Pad Controls 29 Auto Defrost Options 6 Auto Cook Options - Perfect Turkey®, Defrost, Dehydrate, Bread Proof, My Favorites, Multi-Stage Cooking, Temperature Probe, Rapid Preheat, Delay Bake, Convection Convert Luxury-Design® Lighting with Variable 2-Speed Fan Cooking Modes - Ft. Refer to Product Installation Guide for Part Numbers Included Optional Specifications Color - Luxury-Glide® Oven Racks With a ball bearing system, oven racks are so smooth they extend effortlessly. Bake, Broil, Convection Bake...


