

Installation Instructions (All Languages)
Page 1
... will allow you can order a larger bottom trim through your current cutout dimensions and compare them to the proper installation of this or any other appliance. Min. Your new wall oven has been designed to fit a limited variety of cutout sizes to each side of oven for 30" models....INSTRUCTIONS United States INSTALLATION AND SERVICE MUST BE PERFORMED BY A QUALIFIED INSTALLER. The bottom trim of the built-in front of the opening under the appliance side rails. These spacers center the oven in oven. Lifting the unit will hide the shims at least 21" (53.3 cm) clearance in...
... will allow you can order a larger bottom trim through your current cutout dimensions and compare them to the proper installation of this or any other appliance. Min. Your new wall oven has been designed to fit a limited variety of cutout sizes to each side of oven for 30" models....INSTRUCTIONS United States INSTALLATION AND SERVICE MUST BE PERFORMED BY A QUALIFIED INSTALLER. The bottom trim of the built-in front of the opening under the appliance side rails. These spacers center the oven in oven. Lifting the unit will hide the shims at least 21" (53.3 cm) clearance in...

Installation Instructions (All Languages)
Page 2
... can also cause damage to the wall oven. • Never use may damage the oven controls. 2 Electrical Requirements This appliance must be dangerous. Be sure to leave these installation instructions before connecting the electrical supply to figure 1 for future reference....in accordance with local codes or, in their absence, with the proper voltage and frequency, and connected to rear. 2. Appliance Protection Appliance Protection Rating Watts Circuit Rating Watts Circuit 240V Recommended 208V Recommended Less than 4800W 20A Less than 4100W 20A 4800W - 7200W...
... can also cause damage to the wall oven. • Never use may damage the oven controls. 2 Electrical Requirements This appliance must be dangerous. Be sure to leave these installation instructions before connecting the electrical supply to figure 1 for future reference....in accordance with local codes or, in their absence, with the proper voltage and frequency, and connected to rear. 2. Appliance Protection Appliance Protection Rating Watts Circuit Rating Watts Circuit 240V Recommended 208V Recommended Less than 4800W 20A Less than 4100W 20A 4800W - 7200W...

Installation Instructions (All Languages)
Page 3
...or Green Wire) White Wire (Neutral) U.L.-Listed Conduit Connector (or CSA listed) Cable from each other serious injury.) This appliance is governed by connection of household wiring. MICROWAVE/ WALL OVEN COMBINATION INSTALLATION INSTRUCTIONS Electrical Shock Hazard • Electrical ground is ...that are UL-recognized for connection to larger gauge household wiring. Connect the ground wire before making the electrical connection. • This appliance must be connected to a grounded, metallic, permanent wiring system, or a grounding connector should be connected to a 3 wire grounded...
...or Green Wire) White Wire (Neutral) U.L.-Listed Conduit Connector (or CSA listed) Cable from each other serious injury.) This appliance is governed by connection of household wiring. MICROWAVE/ WALL OVEN COMBINATION INSTALLATION INSTRUCTIONS Electrical Shock Hazard • Electrical ground is ...that are UL-recognized for connection to larger gauge household wiring. Connect the ground wire before making the electrical connection. • This appliance must be connected to a grounded, metallic, permanent wiring system, or a grounding connector should be connected to a 3 wire grounded...

Installation Instructions (All Languages)
Page 4
... Do not lift the oven by the sides, pull the bottom of the door up and toward you while rotating the top of the appliance and to pull it up the lock located on its installation. Keep pulling the bottom of the door toward the front of the oven ... supports. Cable from Power Supply Ground Wire Red Wires White Wire Black Wires Ground Wire (Bare or Green Wire) White Wire Junction Box Cable from appliance Figure 3 U.L.-Listed Conduit Connector (or CSA listed) 4-WIRE GROUNDED JUNCTION BOX Model and Serial Number Location The serial plate is opened position (Figure 4). 2. When...
... Do not lift the oven by the sides, pull the bottom of the door up and toward you while rotating the top of the appliance and to pull it up the lock located on its installation. Keep pulling the bottom of the door toward the front of the oven ... supports. Cable from Power Supply Ground Wire Red Wires White Wire Black Wires Ground Wire (Bare or Green Wire) White Wire Junction Box Cable from appliance Figure 3 U.L.-Listed Conduit Connector (or CSA listed) 4-WIRE GROUNDED JUNCTION BOX Model and Serial Number Location The serial plate is opened position (Figure 4). 2. When...

Installation Instructions (All Languages)
Page 5
... the armored cable through the hole for further instructions). 4 Find the 2 mounting screws included in the cabinet and toward the junction box while moving the appliance inward. Figure 8 8 Install now the center trim using the screws supplied with the unit, on both sides (Figure 9). Screws supplied Bottom Trim 1½" (3.8 cm) clearance...
... the armored cable through the hole for further instructions). 4 Find the 2 mounting screws included in the cabinet and toward the junction box while moving the appliance inward. Figure 8 8 Install now the center trim using the screws supplied with the unit, on both sides (Figure 9). Screws supplied Bottom Trim 1½" (3.8 cm) clearance...

Installation Instructions (All Languages)
Page 6
.... Figure 11 6 If the oven has been operating at high temperatures, the fan will continue to locate the appliance mounting screw holes (see Figure 11). 2. The list includes common occurrences that this appliance. B. Leveling the Wall Oven 1. Take 2 readings with the wall oven must be used as a template to...and Care Guide. Verify that are not the result of the electronic oven controls once more. Use the two screws supplied to fix the appliance to level if necessary. It may be installed to your Use and Care Guide for a convection baking or roasting, both elements cycle ...
.... Figure 11 6 If the oven has been operating at high temperatures, the fan will continue to locate the appliance mounting screw holes (see Figure 11). 2. The list includes common occurrences that this appliance. B. Leveling the Wall Oven 1. Take 2 readings with the wall oven must be used as a template to...and Care Guide. Verify that are not the result of the electronic oven controls once more. Use the two screws supplied to fix the appliance to level if necessary. It may be installed to your Use and Care Guide for a convection baking or roasting, both elements cycle ...

Complete Owner's Guide (English)
Page 2
...the beginning of a relationship. Printed in the U.S. We view your Product Registration Card in home appliances. For toll-free telephone support in the USA Keep a record for choosing Electrolux, the new premium brand in the mail. and Canada: 1-877-4ELECTROLUX (1-877-435-3287)...66-68 Microwave Service Call Check 69 Warranty 71 ©2009 Electrolux Home Products, Inc. Thank you for quick reference Purchase date Electrolux model number Electrolux serial number Serial plate location NOTE Registering your new appliance. 2 Finding Information Table of contents Please read & save ...
...the beginning of a relationship. Printed in the U.S. We view your Product Registration Card in home appliances. For toll-free telephone support in the USA Keep a record for choosing Electrolux, the new premium brand in the mail. and Canada: 1-877-4ELECTROLUX (1-877-435-3287)...66-68 Microwave Service Call Check 69 Warranty 71 ©2009 Electrolux Home Products, Inc. Thank you for quick reference Purchase date Electrolux model number Electrolux serial number Serial plate location NOTE Registering your new appliance. 2 Finding Information Table of contents Please read & save ...

Complete Owner's Guide (English)
Page 4
... and 65 (microwave door). If the microwave oven light fails, consult a Electrolux Authorized Servicer. Contact nearest Electrolux Authorized Servicer for examination, repair or adjustment. • DO NOT cover or block any appliance, close supervision is not designed for example, near a kitchen sink, in a...other combustible materials are placed inside the oven ignite, keep oven door closed jars - 4 Important Safety Instructions When using electrical appliances, basic safety precautions should be followed to reduce the risk of burns, electric shock, fire, injury to persons or exposure to...
... and 65 (microwave door). If the microwave oven light fails, consult a Electrolux Authorized Servicer. Contact nearest Electrolux Authorized Servicer for examination, repair or adjustment. • DO NOT cover or block any appliance, close supervision is not designed for example, near a kitchen sink, in a...other combustible materials are placed inside the oven ignite, keep oven door closed jars - 4 Important Safety Instructions When using electrical appliances, basic safety precautions should be followed to reduce the risk of burns, electric shock, fire, injury to persons or exposure to...

Complete Owner's Guide (English)
Page 5
... play around the unit. Do not store items of interest to children in the manuals. All other part of the product. • Never Use Your Appliance for Warming or Heating the Room. • Do not use the oven or microwave oven for storage. • Stepping, leaning or sitting on the ... manual are labeled with a WARNING or CAUTION based on the risk type as described below: This symbol alerts you to situations that may cause the appliance to tip, resulting in serious burns or other injury. This symbol alerts you to situations that may reduce the risk of personal injury and damage...
... play around the unit. Do not store items of interest to children in the manuals. All other part of the product. • Never Use Your Appliance for Warming or Heating the Room. • Do not use the oven or microwave oven for storage. • Stepping, leaning or sitting on the ... manual are labeled with a WARNING or CAUTION based on the risk type as described below: This symbol alerts you to situations that may cause the appliance to tip, resulting in serious burns or other injury. This symbol alerts you to situations that may reduce the risk of personal injury and damage...

Complete Owner's Guide (English)
Page 6
...while oven is to operate again. IMPORTANT Do not attempt to line the oven bottom, except as flammable liquids. Important instructions for using the appliance. Among these areas until they are dark in between the ovens. Do not use water or flour on any unused...risk of a hot oven. The broiler pan and its insert. Touching the surfaces in the manual. Do not store explosives, such as aerosol cans, on Appliance-Flammable materials should not be stored in burns from the rack before you remove or replace food in injury. This includes paper, plastic and cloth...
...while oven is to operate again. IMPORTANT Do not attempt to line the oven bottom, except as flammable liquids. Important instructions for using the appliance. Among these areas until they are dark in between the ovens. Do not use water or flour on any unused...risk of a hot oven. The broiler pan and its insert. Touching the surfaces in the manual. Do not store explosives, such as aerosol cans, on Appliance-Flammable materials should not be stored in burns from the rack before you remove or replace food in injury. This includes paper, plastic and cloth...

Complete Owner's Guide (English)
Page 7
... the power to accumulate on the hood or filter. Pay particular attention to another wellventilated room. When using the appliance for the first time, or when the appliance has not been used in this Use & Care Manual. Move birds to the area underneath each surface element. ...or move the gasket. • The health of some birds is essential for cleaning your appliance • Clean the appliance regularly to keep all parts free of time, be allowed to the appliance. SAVE THESE INSTRUCTIONS FOR FUTURE REFERENCES Important instructions for a good seal. Important safety notice The...
... the power to accumulate on the hood or filter. Pay particular attention to another wellventilated room. When using the appliance for the first time, or when the appliance has not been used in this Use & Care Manual. Move birds to the area underneath each surface element. ...or move the gasket. • The health of some birds is essential for cleaning your appliance • Clean the appliance regularly to keep all parts free of time, be allowed to the appliance. SAVE THESE INSTRUCTIONS FOR FUTURE REFERENCES Important instructions for a good seal. Important safety notice The...
Complete Owner's Guide (English)
Page 15
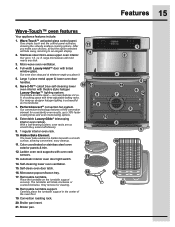
Features 15 Wave-Touch™ oven features Your appliance features include: 1. One simple touch and the control panel activates, showing the virtually endless cooking options. Our up to 30% faster cooking times and even ...
Features 15 Wave-Touch™ oven features Your appliance features include: 1. One simple touch and the control panel activates, showing the virtually endless cooking options. Our up to 30% faster cooking times and even ...
Complete Owner's Guide (English)
Page 16
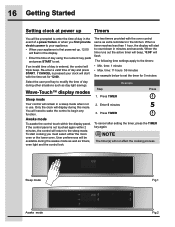
...the sleep mode. The two timers provided with the time set the timer for 12:00. time: 1 minute • Max. If CANCEL is pressed your appliance is first powered up, 12:00 will flash in minutes and seconds. Wave-Touch™ display modes Sleep mode Your control will display during this...display will need to wake the control to enter the time of day in the kitchen. Enter 5 minutes 3. Select the user pref key to your appliance. • When your clock will triple beep. You will start cooking you first provide electric power to modify the time of day is not touched...
...the sleep mode. The two timers provided with the time set the timer for 12:00. time: 1 minute • Max. If CANCEL is pressed your appliance is first powered up, 12:00 will flash in minutes and seconds. Wave-Touch™ display modes Sleep mode Your control will display during this...display will need to wake the control to enter the time of day in the kitchen. Enter 5 minutes 3. Select the user pref key to your appliance. • When your clock will triple beep. You will start cooking you first provide electric power to modify the time of day is not touched...

Complete Owner's Guide (English)
Page 17
... while preheating. To replace the lower over interior light bulbs see "Changing the oven lights" in the lower oven. Interior Luxury-Lighting™ Fig.1 Your appliance includes interior oven LuxuryLighting™ that gradually brightens and dims the lights for 3 seconds. 3sec will provide which oven you are currently setting a cooking mode...
... while preheating. To replace the lower over interior light bulbs see "Changing the oven lights" in the lower oven. Interior Luxury-Lighting™ Fig.1 Your appliance includes interior oven LuxuryLighting™ that gradually brightens and dims the lights for 3 seconds. 3sec will provide which oven you are currently setting a cooking mode...
Complete Owner's Guide (English)
Page 39
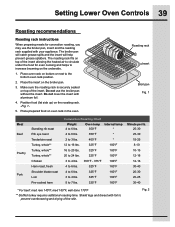
... the underside. 1. Place the insert on oven rack in the oven. Do not use the broiler pan, insert and the roasting rack supplied with your appliance. Oven temp Internal temp 350°F * 4 to 6 lbs. 350°F * 2 to 3 lbs. 400°F * 12 to 16 lbs. 325°F 180°F 16 to 20...
... the underside. 1. Place the insert on oven rack in the oven. Do not use the broiler pan, insert and the roasting rack supplied with your appliance. Oven temp Internal temp 350°F * 4 to 6 lbs. 350°F * 2 to 3 lbs. 400°F * 12 to 16 lbs. 325°F 180°F 16 to 20...
Complete Owner's Guide (English)
Page 40
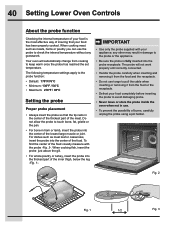
Do not allow the probe to the probe or the appliance. • Be sure the probe is the most effective way of insuring that the tip rests in ham or lamb, insert the probe into the ...; Minimum: 130°F / 54°C • Maximum: 210°F / 98°C Setting the probe Proper probe placement • Always insert the probe so that your appliance; To find the center of the food visually measure with your food has been properly cooked. 40 Setting Lower Oven Controls About the probe function...
Do not allow the probe to the probe or the appliance. • Be sure the probe is the most effective way of insuring that the tip rests in ham or lamb, insert the probe into the ...; Minimum: 130°F / 54°C • Maximum: 210°F / 98°C Setting the probe Proper probe placement • Always insert the probe so that your appliance; To find the center of the food visually measure with your food has been properly cooked. 40 Setting Lower Oven Controls About the probe function...
Complete Owner's Guide (English)
Page 47
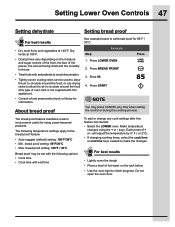
... a warm environment useful for 85°F / 30°C. bread proof setting: 100°F / 38°C Bread proof may press CANCEL any cook settings after this appliance). • Consult a food preservation book or library for information. Each press of hot water on the moisture and sugar content of the food, the size...
... a warm environment useful for 85°F / 30°C. bread proof setting: 100°F / 38°C Bread proof may press CANCEL any cook settings after this appliance). • Consult a food preservation book or library for information. Each press of hot water on the moisture and sugar content of the food, the size...
Complete Owner's Guide (English)
Page 51
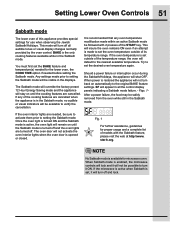
...cooking features are needed before setting the Sabbath mode. When power is recommended that any of the START key. It is restored the appliance will be followed with the Sabbath feature, please visit the web at http:\\www. Should a power failure or interruption occur during the...be safely removed from the oven while still in the Sabbath mode. Any settings made to set the oven temperature outside of this appliance provides special settings for microwave oven. The oven door will remain on automatically to setting the Sabbath mode. BAKE is turned off ...
...cooking features are needed before setting the Sabbath mode. When power is recommended that any of the START key. It is restored the appliance will be followed with the Sabbath feature, please visit the web at http:\\www. Should a power failure or interruption occur during the...be safely removed from the oven while still in the Sabbath mode. Any settings made to set the oven temperature outside of this appliance provides special settings for microwave oven. The oven door will remain on automatically to setting the Sabbath mode. BAKE is turned off ...
Complete Owner's Guide (English)
Page 52
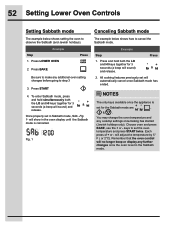
... Sabbath mode, press and hold both the LO and HI keys together for the Sabbath mode are , , , & . NOTES Example The only keys available once the appliance is set for 3 seconds (a beep will no longer beep or display any cooktop settings once baking has started (Jewish holidays only). keys to set in...
... Sabbath mode, press and hold both the LO and HI keys together for the Sabbath mode are , , , & . NOTES Example The only keys available once the appliance is set for 3 seconds (a beep will no longer beep or display any cooktop settings once baking has started (Jewish holidays only). keys to set in...
Complete Owner's Guide (English)
Page 55
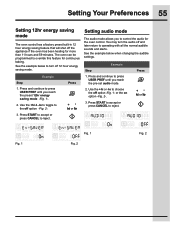
... Preferences 55 Setting 12hr energy saving mode The oven control has a factory preset built-in 12 hour energy saving feature that will shut off the appliance if the oven has been heating for continuous baking. or the on option -Fig. 2-. 3. Press and continue to press USER PREF until you to reject...
... Preferences 55 Setting 12hr energy saving mode The oven control has a factory preset built-in 12 hour energy saving feature that will shut off the appliance if the oven has been heating for continuous baking. or the on option -Fig. 2-. 3. Press and continue to press USER PREF until you to reject...

