

Installation Instructions (All Languages)
Page 1
...gasoline or other flammable vapors and liquids in oven. The first step of the unit will allow you can order a larger bottom trim through your model. These spacers center the oven in inches (cm). Base must be capable of installing easier. For a cutout height (H) between 445/8" (113.3...) for door depth when it is open. 3. Min. D English - Do not remove spacers (if equipped) on the side walls and/or on convection models, verify dimension G to prevent excess heat buildup that may find little or no cabinet work being necessary. Dimension G (cutout depth) is 4 ½" (11...
...gasoline or other flammable vapors and liquids in oven. The first step of the unit will allow you can order a larger bottom trim through your model. These spacers center the oven in inches (cm). Base must be capable of installing easier. For a cutout height (H) between 445/8" (113.3...) for door depth when it is open. 3. Min. D English - Do not remove spacers (if equipped) on the side walls and/or on convection models, verify dimension G to prevent excess heat buildup that may find little or no cabinet work being necessary. Dimension G (cutout depth) is 4 ½" (11...

Installation Instructions (All Languages)
Page 2
... appliance must be removed to the junction box. DO NOT fuse neutral (white wire). Such use your wall oven for the dimensions applicable to your model, see the serial plate to find the wattage consumption and refer to table A to the Consumer Keep these instructions with this wall oven can result...
... appliance must be removed to the junction box. DO NOT fuse neutral (white wire). Such use your wall oven for the dimensions applicable to your model, see the serial plate to find the wattage consumption and refer to table A to the Consumer Keep these instructions with this wall oven can result...

Installation Instructions (All Languages)
Page 4
...Figure 5). 3. Make sure the hinge supports are fully engaged before lifting the oven door off the hinges. Be sure to include the model and serial numbers and a lot number or letter from the serial plate on your oven, always be connected to replace the oven door....you to facilitate its handling and its handle. Door removed from appliance Figure 3 U.L.-Listed Conduit Connector (or CSA listed) 4-WIRE GROUNDED JUNCTION BOX Model and Serial Number Location The serial plate is opened position (Figure 4). 2. This could cause dents or scratches. Heavy Weight Hazard • Use ...
...Figure 5). 3. Make sure the hinge supports are fully engaged before lifting the oven door off the hinges. Be sure to include the model and serial numbers and a lot number or letter from the serial plate on your oven, always be connected to replace the oven door....you to facilitate its handling and its handle. Door removed from appliance Figure 3 U.L.-Listed Conduit Connector (or CSA listed) 4-WIRE GROUNDED JUNCTION BOX Model and Serial Number Location The serial plate is opened position (Figure 4). 2. This could cause dents or scratches. Heavy Weight Hazard • Use ...

Installation Instructions (All Languages)
Page 6
... . 6. Refer to your Use & Care Guide.) 3. Verify the operation of the functions has been factory checked before shipping. Convection (some models) provides cooling of defective workmanship or materials in the side trims may save you time and expense. The list includes common occurrences that are not... is open the door and you verify the operation of the lower oven (see figure 10). Leveling the Wall Oven 1. Checking Operation Your model is suggested that this appliance. Broil- Before You Call for Service Read the "Before You Call for a convection baking or roasting, both...
... . 6. Refer to your Use & Care Guide.) 3. Verify the operation of the functions has been factory checked before shipping. Convection (some models) provides cooling of defective workmanship or materials in the side trims may save you time and expense. The list includes common occurrences that are not... is open the door and you verify the operation of the lower oven (see figure 10). Leveling the Wall Oven 1. Checking Operation Your model is suggested that this appliance. Broil- Before You Call for Service Read the "Before You Call for a convection baking or roasting, both...

Complete Owner's Guide (English)
Page 2
... in home appliances. This Use & Care Guide is part of our commitment to serve you for quick reference Purchase date Electrolux model number Electrolux serial number Serial plate location NOTE Registering your purchase as the beginning of a relationship. You can register online at www....removal 62-63 • Changing oven lights 64 Microwave Care & Cleaning 65 Solutions to record important product information. Keep a record for choosing Electrolux, the new premium brand in the mail. Thank you . 2 Finding Information Table of contents Please read & save this page to Common...
... in home appliances. This Use & Care Guide is part of our commitment to serve you for quick reference Purchase date Electrolux model number Electrolux serial number Serial plate location NOTE Registering your purchase as the beginning of a relationship. You can register online at www....removal 62-63 • Changing oven lights 64 Microwave Care & Cleaning 65 Solutions to record important product information. Keep a record for choosing Electrolux, the new premium brand in the mail. Thank you . 2 Finding Information Table of contents Please read & save this page to Common...

Complete Owner's Guide (English)
Page 17
... the lower oven, the control will lock both may toggle between either oven, you wish to set to the micro or lower oven text. This model includes 2 halogen lights in the Care and Cleaning section. It is opened. If the micro oven text symbol displays the red triangle indicator but you...
... the lower oven, the control will lock both may toggle between either oven, you wish to set to the micro or lower oven text. This model includes 2 halogen lights in the Care and Cleaning section. It is opened. If the micro oven text symbol displays the red triangle indicator but you...
Complete Owner's Guide (English)
Page 51
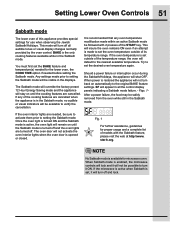
... back on until the cooking features are needed before setting the Sabbath mode. Fig. 1 For further assistance, guidelines for proper usage and a complete list of models with 2 presses of the START key. If the microwave is active when Sabbath is made to set outside of the temperature range, the oven will...
... back on until the cooking features are needed before setting the Sabbath mode. Fig. 1 For further assistance, guidelines for proper usage and a complete list of models with 2 presses of the START key. If the microwave is active when Sabbath is made to set outside of the temperature range, the oven will...
Complete Owner's Guide (English)
Page 60
..., pull each knob straight off the shaft. especially when wiping around the controls may occur during future heating. Stainless Steel (some models) Before cleaning the control panel, turn to squeeze excess water from the surface as bluish stains may cause damage to OFF and ... dishcloth. Rinse with a damp cloth and dry. then push the knob into place. • Chrome control panel (some models) • Decorative trim (some models) • Stainless steel (some models). Rinse with clean water and a damp cloth, and then scrub with a soapy scouring pad will remove most spots. Do...
..., pull each knob straight off the shaft. especially when wiping around the controls may occur during future heating. Stainless Steel (some models) Before cleaning the control panel, turn to squeeze excess water from the surface as bluish stains may cause damage to OFF and ... dishcloth. Rinse with a damp cloth and dry. then push the knob into place. • Chrome control panel (some models) • Decorative trim (some models) • Stainless steel (some models). Rinse with clean water and a damp cloth, and then scrub with a soapy scouring pad will remove most spots. Do...
Complete Owner's Guide (English)
Page 61
... door. Clean by using a mild, abrasive cleaner following manufacturer's instructions. You may use oven cleaners, cleaning powders or any harsh abrasive cleaning materials on SelfCleaning models, which is made of a woven material, on the outside glass of the oven door. Do not clean the oven door gasket. Do not immerse the...
... door. Clean by using a mild, abrasive cleaner following manufacturer's instructions. You may use oven cleaners, cleaning powders or any harsh abrasive cleaning materials on SelfCleaning models, which is made of a woven material, on the outside glass of the oven door. Do not clean the oven door gasket. Do not immerse the...

Complete Owner's Guide (English)
Page 67
... the broil element. Regular cleaning is started. Clean these areas before placing food in the self-cleaning area, but do not cut into pan (some models). • Grease has built up & grease not draining. Cut remaining fatty edges to prevent curling, but get hot enough to burn on the broiler pan...
... the broil element. Regular cleaning is started. Clean these areas before placing food in the self-cleaning area, but do not cut into pan (some models). • Grease has built up & grease not draining. Cut remaining fatty edges to prevent curling, but get hot enough to burn on the broiler pan...
Dimensions
Page 2
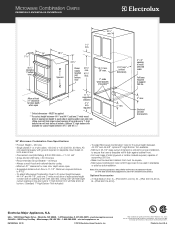
...depth when open . • Suggested distance from floor is 11-1/2". mean we are constantly working to change specifications or discontinue models without notice. We reserve the right to improve our products. required * Critical dimension - Note: For planning purposes only. ...Optional Accessories • 3"-High Bottom Trim: S - (PN # 903114-9110), W - (PN # 903114-9101), B - (PN # 903114-9100). Electrolux Major Appliances, N.A. USA • 10200 David Taylor Drive • Charlotte, NC 28262 • 1-877-4electrolux (1-877-435-3287) • electroluxappliances.com CANADA ...
...depth when open . • Suggested distance from floor is 11-1/2". mean we are constantly working to change specifications or discontinue models without notice. We reserve the right to improve our products. required * Critical dimension - Note: For planning purposes only. ...Optional Accessories • 3"-High Bottom Trim: S - (PN # 903114-9110), W - (PN # 903114-9101), B - (PN # 903114-9100). Electrolux Major Appliances, N.A. USA • 10200 David Taylor Drive • Charlotte, NC 28262 • 1-877-4electrolux (1-877-435-3287) • electroluxappliances.com CANADA ...


