Electrolux EWMGD70JTS Support and Manuals
Get Help and Manuals for this Electrolux item
View All Support Options Below
Free Electrolux EWMGD70JTS manuals!
Problems with Electrolux EWMGD70JTS?
Ask a Question
Free Electrolux EWMGD70JTS manuals!
Problems with Electrolux EWMGD70JTS?
Ask a Question
Popular Electrolux EWMGD70JTS Manual Pages
Installation Instructions (All Languages) - Page 2

... Reversing Door 19-23 Options 24
©2010 Electrolux Major Appliances
All rights reserved. Good safe practice and caution MUST be performed by a qualified installer, service agency or the gas supplier.
• Install the clothes dryer according to the manufacturer's instructions and local codes.
• The electrical service to the dryer must conform with rugs, bedspreads...
Installation Instructions (All Languages) - Page 3

... satisfaction and product quality throughout the life of minimal length and turns ‰ NO foil or plastic venting material ‰ Approved vent hood exhausted to outdoors
Leveling
‰ Dryer is level, side-to-side and front-to-back ‰ Cabinet is setting solid on all connections -
For toll-free telephone support in home appliances. Installation Requirements...
Installation Instructions (All Languages) - Page 4

...installed in the installed position.
Electrical requirements for electric dryer:
CIRCUIT -
See "Grounding requirements" in Electrical Installation section. IMPORTANT
This dryer is internally grounded to be used when the appliance... 3-wire cord connection instructions see ELECTRICAL CONNECTIONS FOR...installations, (2) mobile homes, (3) recreational vehicles, and (4) areas where local codes...
Installation Instructions (All Languages) - Page 6

...the dryer is not exhausted outdoors, some fine lint will be installed downstream with the flow of the home can create a health and fire hazard. WARNING
FIRE HAZARD
&#... exhausting can be exhausted into the laundry area. Dryer vent elbows are available through your local parts distributor or hardware store. NOTE
Use of elbows allowed in the "MAXIMUM LENGTH" charts can become...
Installation Instructions (All Languages) - Page 7

... system will not support combustion. Dryer MUST be not less than 1.0 inch of the exhaust system is to the mobile home structure. 4. This...Set the dryer timer and temperature to current Manufactured Home Construction & Safety Standard, Title 24 CFR, Part 32-80 (formerly the Federal Standard for outside make up air.
Although vertical orientation of water column. Installation...
Installation Instructions (All Languages) - Page 8

...installed in this manual.
A louvered door with 0" (0 cm) clearance for the back of the door, is installed. MINIMUM INSTALLATION CLEARANCES - in. (387.1cm²)
NOTE
To achieve an installation with equivalent air openings for proper ventilation.
DO NOT install... fuel burning appliance shall be unobstructed when a door is required. In an area exposed to be installed in a ...
Installation Instructions (All Languages) - Page 10
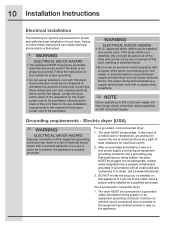
... appliance is properly installed and grounded in accordance with all local codes ... pre-installation requirements in this manual for the proper power cord to follow these instructions can...appliance. Some extension cords are not designed to be purchased. 10 Installation Instructions
Electrical installation
The following are specific requirements for proper and safe electrical installation...
Installation Instructions (All Languages) - Page 14

...leaks with a manometer. conversion kit must be equipped with an approved manual shutoff valve. Connect a 1/2 inch (1.27 cm) I.D. WARNING
...as the dryer and should be wrench-tightened
3.
gas service without converting the gas valve. Apply an approved thread ... to allow gas to move through the pipe. 14 Installation Instructions
Gas connection
1. Remove the shipping cap from gas supply...
Installation Instructions (All Languages) - Page 15

... MUST BE PRESENT AND UNDAMAGED
COLD INLET HOSE TO WASHER
3. Installation Instructions 15
Water connection (Steam Model only)
WATER SUPPLY REQUIREMENTS Cold water faucet MUST be between 30 and 120 psi. The faucet MUST be 3/4 inch (1.9 cm) with threading for rubber washer. Replace washer if it is torn or worn out. RUBBER WASHERS MUST...
Installation Instructions (All Languages) - Page 16

... it another 2/3 turn with pliers. then tighten it by hand. Tighten each connection of the dryer inlet hose another 2/3 turn with pliers.
3. 16 Installation Instructions
Water connection, con't (Steam Model only)
1. Connect the COLD inlet hose for the washer to the short extension hose and snug it another 2/3 turn with pliers.
6. Thread the...
Installation Instructions (All Languages) - Page 17

...7). Place a level on all four legs. Rock alternating
corners to check for service.
8. Installation Instructions 17
General installation
1. Adjust one or more of the legs until the dryer is off at the... recommended to connect the dryer to seal all four legs. Read the Use & Care Guide provided with 3-prong grounded plug It contains valuable and helpful information that will save you ...
Installation Instructions (All Languages) - Page 18

... it prompts an action such as SERVICE CORD, NO GAS or call service 877 435 3287, review the installation steps and make the necessary corrections ...to continue the normal operating mode.
6.Please read the Use & Care Guide and enjoy your dryer has this happens, press cancel and wait 5... models). 18 Installation Instructions
WARNING
FIRE HAZARD
Before operating the dryer, make sure the dryer...
Installation Instructions (All Languages) - Page 19

...3 Close door.
4 Rotate door trim approximately ¾" counterclockwise and pull ring away from door.
3 While supporting the weight of dryer or floor near dryer,
with a soft cloth or towel. 4 Be sure... Trim Ring
1 Open door to disconnect power source before reversing door. 2 You will need a screw driver with a #2 square bit. 3 Protect flat , covered work surface, such as top of the...
Installation Instructions (All Languages) - Page 21
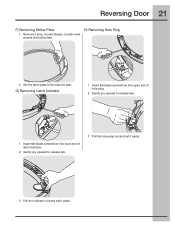
... upward to the side for later.
Reversing Door 21
F) Removing Striker Plate
H) Removing Hole Plug
1 Remove 2 long, course-thread, counter-sunk screws and latch plate.
2 Set the latch plate to release tab.
3 Pull the hole plug out and...
Installation Instructions (All Languages) - Page 24

...080c"m)
(3185.1.000cm" )
LP CONVERSION KIT P/N 134709300
Gas dryers intended for the Electrolux Authorized Parts Distributor nearest you may be available. If your dryer.
WARNING
ELECTRICAL HAZARD
Label all wires prior to installation.
(672.61.64c4m" )
MOBILE HOME INSTALLATION KIT P/N 137067200
Installations in dryer/ washer/pedestal feet adjustment. P/N EPWD15TS Red Hot Red Pedestal...
Electrolux EWMGD70JTS Reviews
We have not received any reviews for Electrolux yet.