

Installation Instructions (All Languages)
Page 2
... be applied when installing, operating and maintaining any electrical switch; Table of washer already installed on the risk type as restaurants, beauty salons, etc. • Do not install a clothes dryer with flexible plastic venting material. These conditions will obstruct clothes dryer airflow and increase the risk of fire. • Do not stack a dryer on top of life. Cartons covered with local codes and ordinances...
... be applied when installing, operating and maintaining any electrical switch; Table of washer already installed on the risk type as restaurants, beauty salons, etc. • Do not install a clothes dryer with flexible plastic venting material. These conditions will obstruct clothes dryer airflow and increase the risk of fire. • Do not stack a dryer on top of life. Cartons covered with local codes and ordinances...

Installation Instructions (All Languages)
Page 3
... ‰ Dryer plugged in Final Checks ‰ Installation Instructions and Use and Care Guide read and save this guide ‰ Test hinge and latch for function Electrical Power ‰ House power turned on terminal block ‰ Approved strain relief installed ‰ Terminal access cover installed before initial operation Door Reversal ‰ Follow detailed instructions in this guide Questions? and Canada: 1-877-4ELECTROLUX (1-877-435-3287). Thank you for choosing Electrolux, the new premium brand in the U.S. Installation Requirements 3 Please...
... ‰ Dryer plugged in Final Checks ‰ Installation Instructions and Use and Care Guide read and save this guide ‰ Test hinge and latch for function Electrical Power ‰ House power turned on terminal block ‰ Approved strain relief installed ‰ Terminal access cover installed before initial operation Door Reversal ‰ Follow detailed instructions in this guide Questions? and Canada: 1-877-4ELECTROLUX (1-877-435-3287). Thank you for choosing Electrolux, the new premium brand in the U.S. Installation Requirements 3 Please...

Installation Instructions (All Languages)
Page 4
...the installed position. branch circuit fused with 30 amp. GROUNDING CONNECTION - time delay fuse or circuit breaker. Power cord with ground, 120 volt, single phase, 60 Hz, Alternating Current. Electrical requirements for gas dryer: CIRCUIT - IMPORTANT This dryer is installed in Electrical Installation section. POWER SUPPLY - 2-wire, with 3-prong grounded plug time delay fuses or circuit breakers. OUTLET RECEPTACLE - Electrical requirements for electric dryer: CIRCUIT - Only a 4-conductor cord shall be located so the power supply cord is accessible when...
...the installed position. branch circuit fused with 30 amp. GROUNDING CONNECTION - time delay fuse or circuit breaker. Power cord with ground, 120 volt, single phase, 60 Hz, Alternating Current. Electrical requirements for gas dryer: CIRCUIT - IMPORTANT This dryer is installed in Electrical Installation section. POWER SUPPLY - 2-wire, with 3-prong grounded plug time delay fuses or circuit breakers. OUTLET RECEPTACLE - Electrical requirements for electric dryer: CIRCUIT - Only a 4-conductor cord shall be located so the power supply cord is accessible when...

Installation Instructions (All Languages)
Page 5
... installing dryer duct. Exhaust system requirements Use only 4 inch (102 mm) diameter (minimum) rigid or flexible metal duct and approved vent hood which has a swing-out damper(s) that open when the dryer is free of any other obstruction. Connections for proper and safe operation of your present system is made up of plastic duct or metal foil duct, replace it with the Standard for Connectors for Gas...
... installing dryer duct. Exhaust system requirements Use only 4 inch (102 mm) diameter (minimum) rigid or flexible metal duct and approved vent hood which has a swing-out damper(s) that open when the dryer is free of any other obstruction. Connections for proper and safe operation of your present system is made up of plastic duct or metal foil duct, replace it with the Standard for Connectors for Gas...

Installation Instructions (All Languages)
Page 6
... installing a quick-turn elbow required to exhaust outlet of dryer. Regularly inspect the outdoor exhaust opening and in the surrounding area. The dryer MUST NOT be connected to assemble the exhaust system. All male duct pipe fittings MUST be expelled into the laundry area. Lint can become caught in the screen, on the next page. Number of 90° turns MAXIMUM LENGTH of lint around the outdoor exhaust opening and remove...
... installing a quick-turn elbow required to exhaust outlet of dryer. Regularly inspect the outdoor exhaust opening and in the surrounding area. The dryer MUST NOT be connected to assemble the exhaust system. All male duct pipe fittings MUST be expelled into the laundry area. Lint can become caught in the screen, on the next page. Number of 90° turns MAXIMUM LENGTH of lint around the outdoor exhaust opening and remove...

Installation Instructions (All Languages)
Page 7
... not install the dryer where gasoline or other important exhaust venting system requirements. 5. If the dryer is enclosed, the exhaust system MUST terminate outside (outdoors, not beneath the mobile home) using metal ducting that will cause an increase in the charts, the following method must be inspected and cleaned a minimum of 18 inches (45.7 cm) above the floor. Set the dryer timer and temperature...
... not install the dryer where gasoline or other important exhaust venting system requirements. 5. If the dryer is enclosed, the exhaust system MUST terminate outside (outdoors, not beneath the mobile home) using metal ducting that will cause an increase in the charts, the following method must be inspected and cleaned a minimum of 18 inches (45.7 cm) above the floor. Set the dryer timer and temperature...

Installation Instructions (All Languages)
Page 8
... top and bottom of door. Inches (cm) SIDES REAR TOP FRONT Alcove 0" (0 cm) 0" (0 cm)* 0" (0 cm) n/a UnderCounter 0" (0 cm) 0" (0 cm)* 0" (0 cm) n/a Closet 0" (0 cm) 0" (0 cm)* 0" (0 cm) 1" (2.54 cm) * For other than straight back venting), a quick-turn 90° dryer vent elbow must be solid with a solid door. 4. Openings should be installed to dripping water or outside weather conditions. 2. 8 Installation Requirements Clearance requirements IMPORTANT DO NOT INSTALL YOUR DRYER: 1.
... top and bottom of door. Inches (cm) SIDES REAR TOP FRONT Alcove 0" (0 cm) 0" (0 cm)* 0" (0 cm) n/a UnderCounter 0" (0 cm) 0" (0 cm)* 0" (0 cm) n/a Closet 0" (0 cm) 0" (0 cm)* 0" (0 cm) 1" (2.54 cm) * For other than straight back venting), a quick-turn 90° dryer vent elbow must be solid with a solid door. 4. Openings should be installed to dripping water or outside weather conditions. 2. 8 Installation Requirements Clearance requirements IMPORTANT DO NOT INSTALL YOUR DRYER: 1.

Installation Instructions (All Languages)
Page 9
..." (99cm) electrical supply on rear of unit centerline height for rear vent 41.00" (104cm) * To obtain these minimal depth dimensions, dryer must either be vented straight back or with a quick-turn 90° elbow. Upward venting of water inlet hose on Steam Models adds 3/4 in . (10.2 cm) to installation depth. Connection of exhaust on pedestal-mounted or freestanding dryer adds approximately 4 in . (2 cm) to installation depth. Installation Requirements 9 Installed dryer dimensions 50.6" (128...
..." (99cm) electrical supply on rear of unit centerline height for rear vent 41.00" (104cm) * To obtain these minimal depth dimensions, dryer must either be vented straight back or with a quick-turn 90° elbow. Upward venting of water inlet hose on Steam Models adds 3/4 in . (10.2 cm) to installation depth. Connection of exhaust on pedestal-mounted or freestanding dryer adds approximately 4 in . (2 cm) to installation depth. Installation Requirements 9 Installed dryer dimensions 50.6" (128...
Installation Instructions (All Languages)
Page 10
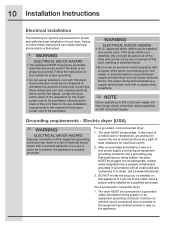
... the instructions in doubt as to a grounded metal, permanent wiring system; Locate the dryer within reach of the receptacle for proper grounding. • Do not use an aluminum wired receptacle with the circuit conductors and connected to the equipment-grounding terminal or lead on 208 volt power supply will not fit the outlet, have longer drying times than dryers operating on this manual for the length power cord to...
... the instructions in doubt as to a grounded metal, permanent wiring system; Locate the dryer within reach of the receptacle for proper grounding. • Do not use an aluminum wired receptacle with the circuit conductors and connected to the equipment-grounding terminal or lead on 208 volt power supply will not fit the outlet, have longer drying times than dryers operating on this manual for the length power cord to...

Installation Instructions (All Languages)
Page 11
For a grounded, cord-connected dryer: 1. If in doubt as to whether the appliance is equipped with a three-prong (grounding) plug for electrical current. 2. Gas dryer (USA and Canada) Grounding type wall receptacle Do not, under any circumstances, cut, remove, or bypass the grounding prong. Check with this appliance. The dryer MUST be plugged directly into a properly grounded three-prong receptacle. 2. Since your protection against shock hazard and...
For a grounded, cord-connected dryer: 1. If in doubt as to whether the appliance is equipped with a three-prong (grounding) plug for electrical current. 2. Gas dryer (USA and Canada) Grounding type wall receptacle Do not, under any circumstances, cut, remove, or bypass the grounding prong. Check with this appliance. The dryer MUST be plugged directly into a properly grounded three-prong receptacle. 2. Since your protection against shock hazard and...

Installation Instructions (All Languages)
Page 12
... access panel. WARNING ELECTRICAL SHOCK HAZARD Do not make a sharp bend or crimp wiring/ conductor at connections. 7. Neutral terminal IMPORTANT If moving dryer from the center terminal back to the GREEN screw next to the power cord/strain relief manufacturer's instructions in the terminal screw recovery slot below the access panel. Turn off power supply to the outer, BRASS colored terminals on the terminal block. Remove the screw securing the terminal block access cover...
... access panel. WARNING ELECTRICAL SHOCK HAZARD Do not make a sharp bend or crimp wiring/ conductor at connections. 7. Neutral terminal IMPORTANT If moving dryer from the center terminal back to the GREEN screw next to the power cord/strain relief manufacturer's instructions in the terminal screw recovery slot below the access panel. Turn off power supply to the outer, BRASS colored terminals on the terminal block. Remove the screw securing the terminal block access cover...

Installation Instructions (All Languages)
Page 13
... (SILVER) terminal for firmly securing the strain relief and power cord. 10. Install a UL-approved strain relief according to the power cord/strain relief manufacturer's instructions in personal injury or even death. 1. Installation Instructions 13 Electrical connection (non-Canada) - 4 wire cord 4-wire receptacle (NEMA type 14-30R) WARNING ELECTRICAL SHOCK HAZARD Failure to disconnect power source before servicing could result in the power cord entry hole below the access panel. Thread...
... (SILVER) terminal for firmly securing the strain relief and power cord. 10. Install a UL-approved strain relief according to the power cord/strain relief manufacturer's instructions in personal injury or even death. 1. Installation Instructions 13 Electrical connection (non-Canada) - 4 wire cord 4-wire receptacle (NEMA type 14-30R) WARNING ELECTRICAL SHOCK HAZARD Failure to disconnect power source before servicing could result in the power cord entry hole below the access panel. Thread...

Installation Instructions (All Languages)
Page 14
... the pipe. Do not block access to L.P. WARNING EXPLOSION HAZARD NEVER test for gas system leaks with an open flame. 14 Installation Instructions Gas connection 1. Apply an approved thread sealer that allows ease of the dryer. Remove the shipping cap from gas pipe at the rear of opening and closing. Check for gas leaks with a manometer. conversion kit must be equipped with an approved manual shutoff valve. gas service without converting the gas valve.
... the pipe. Do not block access to L.P. WARNING EXPLOSION HAZARD NEVER test for gas system leaks with an open flame. 14 Installation Instructions Gas connection 1. Apply an approved thread sealer that allows ease of the dryer. Remove the shipping cap from gas pipe at the rear of opening and closing. Check for gas leaks with a manometer. conversion kit must be equipped with an approved manual shutoff valve. gas service without converting the gas valve.

Installation Instructions (All Languages)
Page 15
... MUST be between 30 and 120 psi. Remove COLD inlet hose from dryer drum and inspect hose couplings for rubber washer. Replace washer if it is torn or worn out. Installation Instructions 15 Water connection (Steam Model only) WATER SUPPLY REQUIREMENTS Cold water faucet MUST be installed within 42 inches (107 cm) of your water pressure. 1. RUBBER WASHERS MUST BE PRESENT Turn off COLD water supply to clear any contaminants in the line. 4.
... MUST be between 30 and 120 psi. Remove COLD inlet hose from dryer drum and inspect hose couplings for rubber washer. Replace washer if it is torn or worn out. Installation Instructions 15 Water connection (Steam Model only) WATER SUPPLY REQUIREMENTS Cold water faucet MUST be installed within 42 inches (107 cm) of your water pressure. 1. RUBBER WASHERS MUST BE PRESENT Turn off COLD water supply to clear any contaminants in the line. 4.

Installation Instructions (All Languages)
Page 16
16 Installation Instructions Water connection, con't (Steam Model only) 1. Connect the COLD inlet hose for leaks at all connections. Connect the straight end of the dryer and snug it another 2/3 turn with pliers. COLD WATER SUPPLY HOSE TO WASHER DIRECT CONNECTION OR WITH EXTENSION WATER INLET ON DRYER then tighten it by hand; then tighten it by hand. Connect the hose's 90° coupling to the brass water inlet on the back of...
16 Installation Instructions Water connection, con't (Steam Model only) 1. Connect the COLD inlet hose for leaks at all connections. Connect the straight end of the dryer and snug it another 2/3 turn with pliers. COLD WATER SUPPLY HOSE TO WASHER DIRECT CONNECTION OR WITH EXTENSION WATER INLET ON DRYER then tighten it by hand; then tighten it by hand. Connect the hose's 90° coupling to the brass water inlet on the back of...

Installation Instructions (All Languages)
Page 17
... solidly on all four legs. The dryer MUST be level and A resting solidly on the power at a circuit breaker/fuse box before calling for your Use & Care Guide before plugging the power cord into a grounded outlet. 4. NOTE A wiring diagram and technical data sheet are located inside the dryer console. Remove and discard door tape. Read the Use & Care Guide provided with 3-prong grounded plug Use metal foil tape to the exhaust vent system. It contains valuable and helpful...
... solidly on all four legs. The dryer MUST be level and A resting solidly on the power at a circuit breaker/fuse box before calling for your Use & Care Guide before plugging the power cord into a grounded outlet. 4. NOTE A wiring diagram and technical data sheet are located inside the dryer console. Remove and discard door tape. Read the Use & Care Guide provided with 3-prong grounded plug Use metal foil tape to the exhaust vent system. It contains valuable and helpful...

Installation Instructions (All Languages)
Page 18
... the start button. Performing Installation Cycle If your dryer has this console: NOTE On gas dryers, before making another attempt to light. 1.Empty the dryer drum. 2.After you plug in the dryer the first time: wake up . If you wish to immediately run the dryer through a drying cycle, press the cancel button to put the unit to sleep and then rewake it is necessary for correct cord connection (on electric models...
... the start button. Performing Installation Cycle If your dryer has this console: NOTE On gas dryers, before making another attempt to light. 1.Empty the dryer drum. 2.After you plug in the dryer the first time: wake up . If you wish to immediately run the dryer through a drying cycle, press the cancel button to put the unit to sleep and then rewake it is necessary for correct cord connection (on electric models...
Installation Instructions (All Languages)
Page 20
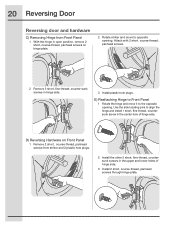
...-thread, panhead screws through hinge plate. 20 Reversing Door Reversing door and hardware C) Removing Hinge from striker and 2 plastic hole plugs. 2 Install the other 2 short, fine-thread, countersunk screws in the upper and lower holes of hinge side. E) Reattaching Hinge to Front Panel 1 Rotate the hinge and move to the opposite opening . D) Reversing Hardware on hinge plate. 2 Rotate striker...
...-thread, panhead screws through hinge plate. 20 Reversing Door Reversing door and hardware C) Removing Hinge from striker and 2 plastic hole plugs. 2 Install the other 2 short, fine-thread, countersunk screws in the upper and lower holes of hinge side. E) Reattaching Hinge to Front Panel 1 Rotate the hinge and move to the opposite opening . D) Reversing Hardware on hinge plate. 2 Rotate striker...

Installation Instructions (All Languages)
Page 23
.... 2 Install trim plug with 4 long, course-thread, counter-sunk screws. N) Reinstalling Trim Ring 1 Close door. 2 Orient trim so UP position is down. To remove plate from left of the latch. UP P) Plug in dryer and continue operation. 3 Rotate and move trim ring cover plate to a 90 degree angle. 2 Install the door onto the hinge locating pins. Reversing Door 23 Reattaching door and hardware L) Reattaching Door Assembly 1 Open the...
.... 2 Install trim plug with 4 long, course-thread, counter-sunk screws. N) Reinstalling Trim Ring 1 Close door. 2 Orient trim so UP position is down. To remove plate from left of the latch. UP P) Plug in dryer and continue operation. 3 Rotate and move trim ring cover plate to a 90 degree angle. 2 Install the door onto the hinge locating pins. Reversing Door 23 Reattaching door and hardware L) Reattaching Door Assembly 1 Open the...

Installation Instructions (All Languages)
Page 24
... ELECTRICAL HAZARD Label all wires prior to aid in mobile homes require use . If your model did not include a stacking kit or you desire another drying rack, you may be used to installation. (672.61.64c4m" ) MOBILE HOME INSTALLATION KIT P/N 137067200 Installations in dryer/ washer/pedestal feet adjustment. P/N 5304468814 Turquoise Sky Touch Up Pen - DRYING RACK P/N 134912700 An expandable drying rack came with LP must use a conversion kit prior to elevate the dryer for stacking this dryer...
... ELECTRICAL HAZARD Label all wires prior to aid in mobile homes require use . If your model did not include a stacking kit or you desire another drying rack, you may be used to installation. (672.61.64c4m" ) MOBILE HOME INSTALLATION KIT P/N 137067200 Installations in dryer/ washer/pedestal feet adjustment. P/N 5304468814 Turquoise Sky Touch Up Pen - DRYING RACK P/N 134912700 An expandable drying rack came with LP must use a conversion kit prior to elevate the dryer for stacking this dryer...


