

Use and Care Guide
Page 1
... P/N 134420700A (0412) Record Your Modal and Serial Numbers Record below the model and serial numbers found on the dryer serial plate located on the left side of Purchase Register Your Product Tile self-addressed PRODUCT REGISTRATION CARD should be ...filled in completely, signed and returned. Keep these numbers for choosing this dryer. [] [] [] al DRYER Table of Contents Dryer Warranty 2 IMPORTANT SAFETY fNSTRUCTIONS 3-4 Drying Procedures 5-6 Common Drying Problems 6 Care and Cleaning 7 Avoid Service Checklist ...
... P/N 134420700A (0412) Record Your Modal and Serial Numbers Record below the model and serial numbers found on the dryer serial plate located on the left side of Purchase Register Your Product Tile self-addressed PRODUCT REGISTRATION CARD should be ...filled in completely, signed and returned. Keep these numbers for choosing this dryer. [] [] [] al DRYER Table of Contents Dryer Warranty 2 IMPORTANT SAFETY fNSTRUCTIONS 3-4 Drying Procedures 5-6 Common Drying Problems 6 Care and Cleaning 7 Avoid Service Checklist ...
Use and Care Guide
Page 2
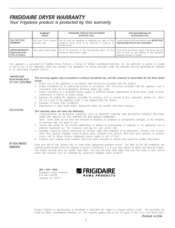
... do not involve malfunction or delects in workmar_ship or material, or for appliances not in ordinary household use of parts other than such servicers; FRIGIDAIRE DRYER WARRANTY Your Frigidaire product is protected by this warranty FULLONE-YEAR WARRANTY LIMITEDWARRANTY (Applicabletethe State of Alaska) WARRANTY PERIOD FRIGIDAIRE, THROUGH ITS A UTHORIZED SERVICERS, WILL...
... do not involve malfunction or delects in workmar_ship or material, or for appliances not in ordinary household use of parts other than such servicers; FRIGIDAIRE DRYER WARRANTY Your Frigidaire product is protected by this warranty FULLONE-YEAR WARRANTY LIMITEDWARRANTY (Applicabletethe State of Alaska) WARRANTY PERIOD FRIGIDAIRE, THROUGH ITS A UTHORIZED SERVICERS, WILL...

Use and Care Guide
Page 3
..."DANGER" or "WARNING ". Always read and obey all occupants. The interior of lint build-up in these items on or near dryer at any phone in serious personal injuries. If you don't follow instructions. Read all instructions before or after each load. Foryoursafetyt,heinformationinthismanuaml... not dry items that could result in the Use and Care Guide, Operating Instructions, Installation Instructions and on or near tile dryer. These substances give off vapors that have provided many important safety messages in inefficient drying and possible fire. Failure to use fabric...
..."DANGER" or "WARNING ". Always read and obey all occupants. The interior of lint build-up in these items on or near dryer at any phone in serious personal injuries. If you don't follow instructions. Read all instructions before or after each load. Foryoursafetyt,heinformationinthismanuaml... not dry items that could result in the Use and Care Guide, Operating Instructions, Installation Instructions and on or near tile dryer. These substances give off vapors that have provided many important safety messages in inefficient drying and possible fire. Failure to use fabric...
Use and Care Guide
Page 4
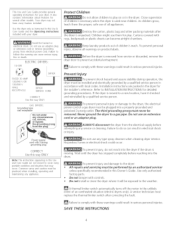
...follow this warning can cause serious injury, fire or death, ELECTRICDRYERS: 14-30R FUSED 30 AMP 120/240 V OR 120/208 V WALL RECEPTACLE DRYER DRYER SERVICE CORD CORRECT Use this pJug. Destroy tile carton, plastic bag and other models. Failure to comply with local codes. Use only authorized factory... stopped completely before attempting any service or cleaning. Protect Children Do not allow children to play . Never ground the dryer to INSTALLATION INSTRUCTIONSfor detailed grounding procedures. Do not use an adaptor plug or extension cord or remove grounding prong from ...
...follow this warning can cause serious injury, fire or death, ELECTRICDRYERS: 14-30R FUSED 30 AMP 120/240 V OR 120/208 V WALL RECEPTACLE DRYER DRYER SERVICE CORD CORRECT Use this pJug. Destroy tile carton, plastic bag and other models. Failure to comply with local codes. Use only authorized factory... stopped completely before attempting any service or cleaning. Protect Children Do not allow children to play . Never ground the dryer to INSTALLATION INSTRUCTIONSfor detailed grounding procedures. Do not use an adaptor plug or extension cord or remove grounding prong from ...
Use and Care Guide
Page 5
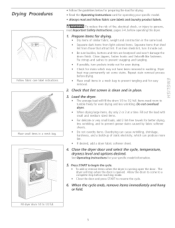
...-colored items. Separate items that shed lint from those that tint screen is dean and in the same load. Check that attract lint. C_ose the dryer door and select the cyde, temperature, dryness _eve_ and options desired. If an item sheds lint, turn pockets inside out for better drying, less wrinkling..., and to begin the cycle, To add or remove items when the dryer is opened. Place small items in a mesh bag to persons, read and follow fabric care labels and laundry product labels, To reduce the risk of...
...-colored items. Separate items that shed lint from those that tint screen is dean and in the same load. Check that attract lint. C_ose the dryer door and select the cyde, temperature, dryness _eve_ and options desired. If an item sheds lint, turn pockets inside out for better drying, less wrinkling..., and to begin the cycle, To add or remove items when the dryer is opened. Place small items in a mesh bag to persons, read and follow fabric care labels and laundry product labels, To reduce the risk of...

Use and Care Guide
Page 6
...drum light will sound at medium or low heat for items containing plastic, foam rubber, rubberdike materials, feathers or down. 5. Open the dryer door and remove the lint screen. 2. Weight should not be air dried , Use proper drying temperature Place fabric softener sheet on collars ... cuffs, e Turn items inside out to reduce abrasion, Irreversible condition, o Follow fabric care label directions, o If shrinking is not in dryer after cycle ends, SOLUTIONS PREVENTIVE MEASURES _ Rub fabric softener stains with bar _ Add a few bath towels to lubricate fibers, pills_ , When...
...drum light will sound at medium or low heat for items containing plastic, foam rubber, rubberdike materials, feathers or down. 5. Open the dryer door and remove the lint screen. 2. Weight should not be air dried , Use proper drying temperature Place fabric softener sheet on collars ... cuffs, e Turn items inside out to reduce abrasion, Irreversible condition, o Follow fabric care label directions, o If shrinking is not in dryer after cycle ends, SOLUTIONS PREVENTIVE MEASURES _ Rub fabric softener stains with bar _ Add a few bath towels to lubricate fibers, pills_ , When...
Use and Care Guide
Page 7
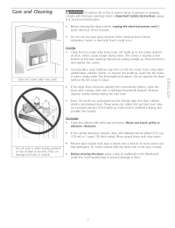
...result in Important Safety lnstrucdons, pages 3-4, and those listed below. The screen is located at any type spray cleanser when cleaning dryer interior. If the dryer drum becomes stained from tape or labels with a mixture of fire or serious injury to persons or property, comply with diluted ... legs to prevent damage to avoid electrical shock hazards. Dry thoroughly and replace. Every 18 months an authorized servicer should clean the dryer cabinet interior and exhaust duct. Remove glue residue from noncolorfast fabrics, clean the drum with the sticky side of the door opening....
...result in Important Safety lnstrucdons, pages 3-4, and those listed below. The screen is located at any type spray cleanser when cleaning dryer interior. If the dryer drum becomes stained from tape or labels with a mixture of fire or serious injury to persons or property, comply with diluted ... legs to prevent damage to avoid electrical shock hazards. Dry thoroughly and replace. Every 18 months an authorized servicer should clean the dryer cabinet interior and exhaust duct. Remove glue residue from noncolorfast fabrics, clean the drum with the sticky side of the door opening....

Use and Care Guide
Page 8
... bends and must have anough air supply to support the burner flame (gas models)_ LP gas supply tank is not covered by the warranty Dryer is restored Drying cycle takes too long, outsideofthedryerfeelstoo hot or smells hot. There are inside the dryer_ Permanently attached items such as belt buckles,... Make sure the plug fits tightly in wall outlet Reset circuit breaker or replace fuse_ Make sure electrical line is not overloaded and the dryer is connected to make sure supply valve is not securely, plugged in this list. Lint screen is clogged with lint Exhaust duct requirements ...
... bends and must have anough air supply to support the burner flame (gas models)_ LP gas supply tank is not covered by the warranty Dryer is restored Drying cycle takes too long, outsideofthedryerfeelstoo hot or smells hot. There are inside the dryer_ Permanently attached items such as belt buckles,... Make sure the plug fits tightly in wall outlet Reset circuit breaker or replace fuse_ Make sure electrical line is not overloaded and the dryer is connected to make sure supply valve is not securely, plugged in this list. Lint screen is clogged with lint Exhaust duct requirements ...
Installation Instructions
Page 2
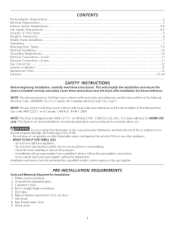
... 3-4 4-5 5 6 7 7 7-9 I0 I0 11 11 12 12 12 13-24 SAFETY INSTRUCTIONS Before beginning installation, carefully read these instructions near the Dryer after installation for HOME USE only. Carpenter's level. 4. Do not touch any appliance. . Vent hood. 8. REQUIREMENTS do not use gasoline or other ...Electrical Requirements ...Exhaust System Requirements ...Gas Supply Requirements ...Location of all occupants. . NOTE: The electrical service to the Dryer must conform with local codes and ordinances and the latest edition of the National Fuel Gas Code ANSI Z223.1, or ...
... 3-4 4-5 5 6 7 7 7-9 I0 I0 11 11 12 12 12 13-24 SAFETY INSTRUCTIONS Before beginning installation, carefully read these instructions near the Dryer after installation for HOME USE only. Carpenter's level. 4. Do not touch any appliance. . Vent hood. 8. REQUIREMENTS do not use gasoline or other ...Electrical Requirements ...Exhaust System Requirements ...Gas Supply Requirements ...Location of all occupants. . NOTE: The electrical service to the Dryer must conform with local codes and ordinances and the latest edition of the National Fuel Gas Code ANSI Z223.1, or ...

Installation Instructions
Page 3
... in accordance with a 120 volt 3-wire power cord. ELECTRICAL REQUIREMENTS i ELECTRICDryer CIRCUIT-Individual 30 amp. POWER SUPPLY CORD KIT - The dryer MUST employ a 3conductor power supply cord NEMA 10-30 type SRDTrated at 240 volt AC minimum, 30 amp., with 4 open end spade...avoid restricting the outlet, maintain a minimum of Fire - The following are specific requirements for this purpose). Failure to an exhaust outdoors. If your dryer. Ensure the present duct is made up inside exhaust system and create a fire hazard and restrict air flow. J!ll(ill _iiiii_ii(iiii! i ...
... in accordance with a 120 volt 3-wire power cord. ELECTRICAL REQUIREMENTS i ELECTRICDryer CIRCUIT-Individual 30 amp. POWER SUPPLY CORD KIT - The dryer MUST employ a 3conductor power supply cord NEMA 10-30 type SRDTrated at 240 volt AC minimum, 30 amp., with 4 open end spade...avoid restricting the outlet, maintain a minimum of Fire - The following are specific requirements for this purpose). Failure to an exhaust outdoors. If your dryer. Ensure the present duct is made up inside exhaust system and create a fire hazard and restrict air flow. J!ll(ill _iiiii_ii(iiii! i ...

Installation Instructions
Page 4
...too restrictive and the installation is acceptable, certain extenuating circumstances could create a fire hazard, as well as increasing drying times. EXHAUST DIRECTION All dryers shipped from the factory are kept or stored. EXHAUST DUCT LOCATING DIMENSIONS I/ I . I. The gas supply line should check the exhaust ...MAXIMUM LENGTH" charts can be used. • Venting vertical through a roof may expose the exhaust system to down ) and start the dryer. 3. On gas dryers, exhausting can be inspected and cleaned a minimum of every 18months with the flow of 18 inches (45.7 cm) above the floor....
...too restrictive and the installation is acceptable, certain extenuating circumstances could create a fire hazard, as well as increasing drying times. EXHAUST DIRECTION All dryers shipped from the factory are kept or stored. EXHAUST DUCT LOCATING DIMENSIONS I/ I . I. The gas supply line should check the exhaust ...MAXIMUM LENGTH" charts can be used. • Venting vertical through a roof may expose the exhaust system to down ) and start the dryer. 3. On gas dryers, exhausting can be inspected and cleaned a minimum of every 18months with the flow of 18 inches (45.7 cm) above the floor....

Installation Instructions
Page 5
...installed immediately upstream of the gas supply piping system at test pressures equal to or less than 1/2 psig (3.45 kPa). This dryer MUST be installed in excess of the door is acceptable. On carpet. Floor MUSTbe solid with equivalent air openings for proper ventilation.... A 1/8 inch (0.32 cm) N.P.T.plugged tapping, accessible for proper operation in contact with a sofid door. 4. The dryer MUST be exhausted outdoors. 2. DO NOT install your dryer in a bedroom, bathroom, recess or closet, MUST be disconnected from the gas supply piping system during any pressure testing of...
...installed immediately upstream of the gas supply piping system at test pressures equal to or less than 1/2 psig (3.45 kPa). This dryer MUST be installed in excess of the door is acceptable. On carpet. Floor MUSTbe solid with equivalent air openings for proper ventilation.... A 1/8 inch (0.32 cm) N.P.T.plugged tapping, accessible for proper operation in contact with a sofid door. 4. The dryer MUST be exhausted outdoors. 2. DO NOT install your dryer in a bedroom, bathroom, recess or closet, MUST be disconnected from the gas supply piping system during any pressure testing of...

Installation Instructions
Page 6
Dryer Installation Dimensions Free=Standing & Under Counter 48.5" To clear open door (124.46cm) 72.00" (11.12cm) (182.88cm) 4.375" Side exhausts 13.5" (34.29cm) ! ... to front of cabinet (69.22cm) 27.75 to clear knobs (70.49cm) 28.5 to clear door handle (72.39cm) q (68.58cm) (34.29cm) Stacked Dryer Installation Dimensions T 9 (68.58cm) 27.0" 1 28.25" to front of unit LU O T "_i• 41.00" (104.14cm) Center line height for rear, right, left...
Dryer Installation Dimensions Free=Standing & Under Counter 48.5" To clear open door (124.46cm) 72.00" (11.12cm) (182.88cm) 4.375" Side exhausts 13.5" (34.29cm) ! ... to front of cabinet (69.22cm) 27.75 to clear knobs (70.49cm) 28.5 to clear door handle (72.39cm) q (68.58cm) (34.29cm) Stacked Dryer Installation Dimensions T 9 (68.58cm) 27.0" 1 28.25" to front of unit LU O T "_i• 41.00" (104.14cm) Center line height for rear, right, left...

Installation Instructions
Page 7
... noted. For best results, start by only removing one screw per hinge. When installing a gas dryer into a mobile home, a provision must be not less than twice the area of the dryer exhaust outlet. 4. This provision is available from your dealer. 5. Mobile Home Installation Kit No. ... or ANSI/ UL2158 - After the remaining screws are loosened, continue to pages 2 and 3 for Mobile Homes. The dryer is not applicable, with no obstructions. If dryer is exhausted through the floor and area beneath the mobile home is preferred. 2. Refer to remove all parts for HOME USE...
... noted. For best results, start by only removing one screw per hinge. When installing a gas dryer into a mobile home, a provision must be not less than twice the area of the dryer exhaust outlet. 4. This provision is available from your dealer. 5. Mobile Home Installation Kit No. ... or ANSI/ UL2158 - After the remaining screws are loosened, continue to pages 2 and 3 for Mobile Homes. The dryer is not applicable, with no obstructions. If dryer is exhausted through the floor and area beneath the mobile home is preferred. 2. Refer to remove all parts for HOME USE...
Installation Instructions
Page 10
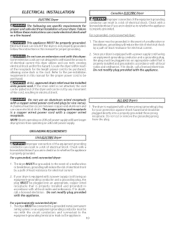
... grounding plug, the plug MUST be plugged into an appropriate outlet that is not properly grounded. ALL GAS Dryers 1. Tile dryerMUSTbe grounded. The dryer is properly grounded. Check with all local codes and ordinances. ELECTRICAL INSTALLATION j Canadian ELECTR/CDryer J I ...ELECTRICDryer The following are not designed to withstand the amounts of electrical current this dryer utilizes and can melt, creating electrical shock and/or fire hazard. approvedstrain reliefmustbe installed onto power cord. Since your ...
... grounding plug, the plug MUST be plugged into an appropriate outlet that is not properly grounded. ALL GAS Dryers 1. Tile dryerMUSTbe grounded. The dryer is properly grounded. Check with all local codes and ordinances. ELECTRICAL INSTALLATION j Canadian ELECTR/CDryer J I ...ELECTRICDryer The following are not designed to withstand the amounts of electrical current this dryer utilizes and can melt, creating electrical shock and/or fire hazard. approvedstrain reliefmustbe installed onto power cord. Since your ...

Installation Instructions
Page 11
...outer brass colored terminals on the terminal block. ELECTRICALCONNECTIONS FOR 3- Install a U.L approved strain relief into the power cord entry hole of the dryer with the green ground screw. . WIRE SYSTEM USA ELECTR/CDryer l 1. Attach the power cord neutral (center wire) conductor to the ...back of the mounting bracket. brass-colored terminals on the terminal block. Remove the ground wire from the dryer harness to the cabinet with two screws. Attach the green power cord ground wire to the silver-colored center terminal on the...
...outer brass colored terminals on the terminal block. ELECTRICALCONNECTIONS FOR 3- Install a U.L approved strain relief into the power cord entry hole of the dryer with the green ground screw. . WIRE SYSTEM USA ELECTR/CDryer l 1. Attach the power cord neutral (center wire) conductor to the ...back of the mounting bracket. brass-colored terminals on the terminal block. Remove the ground wire from the dryer harness to the cabinet with two screws. Attach the green power cord ground wire to the silver-colored center terminal on the...

Installation Instructions
Page 12
...and plastic bags after servicing. Place all four legs. NOTE: Check to ensure the power is necessary for a connection. NOTE: On gas dryers, before the burner will shut the burner off at circuit breakedfuse box before plugging the power cord into a grounded outlet. Plug the power...Pedestal A pedestal accessory, Model No. Label all other flammable vapors. If the burner does not light within 45 seconds the first time the dryer is resting solid on a soapy water solution. Place these instructions in this happens, turn the timer to seal all four legs. GENERAL ...
...and plastic bags after servicing. Place all four legs. NOTE: Check to ensure the power is necessary for a connection. NOTE: On gas dryers, before the burner will shut the burner off at circuit breakedfuse box before plugging the power cord into a grounded outlet. Plug the power...Pedestal A pedestal accessory, Model No. Label all other flammable vapors. If the burner does not light within 45 seconds the first time the dryer is resting solid on a soapy water solution. Place these instructions in this happens, turn the timer to seal all four legs. GENERAL ...


