
Owners Manual
Page 1
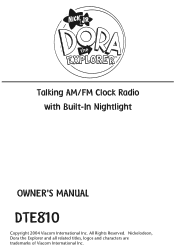
All Rights Reserved. Talking AM/FM Clock Radio with Built-In Nightlight OWNER'S MANUAL DTE810 Copyright 2004 Viacom International Inc. Nickelodeon, Dora the Explorer and all related titles, logos and characters are trademarks of Viacom International Inc.
All Rights Reserved. Talking AM/FM Clock Radio with Built-In Nightlight OWNER'S MANUAL DTE810 Copyright 2004 Viacom International Inc. Nickelodeon, Dora the Explorer and all related titles, logos and characters are trademarks of Viacom International Inc.
Owners Manual
Page 2
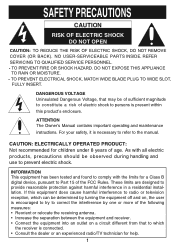
... radio or television reception, which can be observed during handling and use to provide reasonable protection against harmful interference in a residential installation. These limits are designed to prevent electric shock. TO PREVENT ELECTRICAL SHOCK, MATCH WIDE BLADE PLUG TO WIDE SLOT, FULLY INSERT. ATTENTION The Owner's Manual contains important operating and maintenance instructions. As with the limits for a Class B digital...
... radio or television reception, which can be observed during handling and use to provide reasonable protection against harmful interference in a residential installation. These limits are designed to prevent electric shock. TO PREVENT ELECTRICAL SHOCK, MATCH WIDE BLADE PLUG TO WIDE SLOT, FULLY INSERT. ATTENTION The Owner's Manual contains important operating and maintenance instructions. As with the limits for a Class B digital...
Owners Manual
Page 3
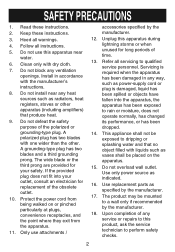
... the power cord from being walked on the apparatus. 15. Servicing is required when the apparatus has been damaged in accordance with dry cloth. 7. Do not overload wall outlet. The product may be exposed to rain or moisture, does not operate normally, has changed its performance, or has been dropped. 14. SAFETY PRECAUTIONS 1. Keep these instructions. 2. Do not use...
... the power cord from being walked on the apparatus. 15. Servicing is required when the apparatus has been damaged in accordance with dry cloth. 7. Do not overload wall outlet. The product may be exposed to rain or moisture, does not operate normally, has changed its performance, or has been dropped. 14. SAFETY PRECAUTIONS 1. Keep these instructions. 2. Do not use...
Owners Manual
Page 4
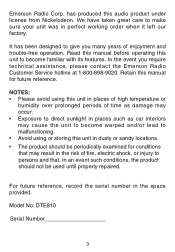
... future reference. Read this manual before operating this unit to become warped and/or lead to become familiar with its features. For future reference, record the serial number in perfect working order when it left our factory. We have taken great care to give you require technical assistance, please contact the Emerson Radio Customer Service hotline at 1-800...
... future reference. Read this manual before operating this unit to become warped and/or lead to become familiar with its features. For future reference, record the serial number in perfect working order when it left our factory. We have taken great care to give you require technical assistance, please contact the Emerson Radio Customer Service hotline at 1-800...
Owners Manual
Page 5
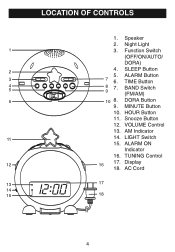
LOCATION OF CONTROLS 1. Function Switch (OFF/ON/AUTO/ DORA) 2 4. BAND Switch 9 (FM/AM) 6 10 8. DORA Button 9. Snooze Button 12. AC Cord 13 17 14 15 18 4 Speaker 2. SLEEP Button 5. HOUR Button 11. LIGHT Switch 15. AM Indicator 11 14. TUNING Control 12 16 17. Night Light 1 3. TIME Button 4 5 8 7. Display 18. VOLUME Control 13. ALARM ON Indicator 16. MINUTE Button 10. ALARM Button 3 7 6.
LOCATION OF CONTROLS 1. Function Switch (OFF/ON/AUTO/ DORA) 2 4. BAND Switch 9 (FM/AM) 6 10 8. DORA Button 9. Snooze Button 12. AC Cord 13 17 14 15 18 4 Speaker 2. SLEEP Button 5. HOUR Button 11. LIGHT Switch 15. AM Indicator 11 14. TUNING Control 12 16 17. Night Light 1 3. TIME Button 4 5 8 7. Display 18. VOLUME Control 13. ALARM ON Indicator 16. MINUTE Button 10. ALARM Button 3 7 6.
Owners Manual
Page 6
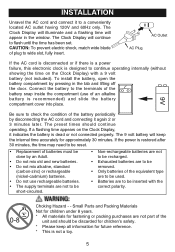
... operating. The Clock Display will illuminate and a flashing time will continue to wide slot, fully insert. Choking Hazard - - CAUTION: To prevent electric shock, match wide blade of plug to flash until the time has been set. Connect the battery to the terminals of the battery snap inside the compartment (use of an alkaline battery is restored after 30 minutes, the time may need to be reset. • Replacement...
... operating. The Clock Display will illuminate and a flashing time will continue to wide slot, fully insert. Choking Hazard - - CAUTION: To prevent electric shock, match wide blade of plug to flash until the time has been set. Connect the battery to the terminals of the battery snap inside the compartment (use of an alkaline battery is restored after 30 minutes, the time may need to be reset. • Replacement...
Owners Manual
Page 7
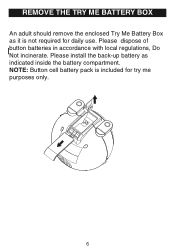
Please install the back-up battery as indPicleaatseedrienmsoidvee tthheeebnacltotseerdy TcroymMpeabratmtteeryntb.ox, as it is not required for try me purposes only. 6 REMOVE THE TRY ME BATTERY BOX An adult should remove the enclosed Try Me Battery Box as it is not NOirneTdqEiuc:iaretBeddutifntoosrinddeactielhylelubbsaaett.tetePrylrecyaospmeapcainrkstmtiasellnintt.hcelubdaeckd-ufporbatrtytermy eas purNpootes:eBsuottonnlyc.ell battery pack included for daily use. Please dispose of button batRteEriMesOVinEaTcHcEorTdRaYncMeEwBitAhTlToEcRalYreBgOuXlations, Do Not incinerate.
Please install the back-up battery as indPicleaatseedrienmsoidvee tthheeebnacltotseerdy TcroymMpeabratmtteeryntb.ox, as it is not required for try me purposes only. 6 REMOVE THE TRY ME BATTERY BOX An adult should remove the enclosed Try Me Battery Box as it is not NOirneTdqEiuc:iaretBeddutifntoosrinddeactielhylelubbsaaett.tetePrylrecyaospmeapcainrkstmtiasellnintt.hcelubdaeckd-ufporbatrtytermy eas purNpootes:eBsuottonnlyc.ell battery pack included for daily use. Please dispose of button batRteEriMesOVinEaTcHcEorTdRaYncMeEwBitAhTlToEcRalYreBgOuXlations, Do Not incinerate.

Owners Manual
Page 8
...; buttons to advance the time until the desired time is PM. 7 Adjust the VOLUME control 3 as desired. Antennas FM: Extend and rotate the AC Cord for better AM reception. Slide the BAND switch 1 to the ON position. Make sure the AM indicator is lit if the time is AM and not lit if the time is shown on the display. OPERATION TO PLAY THE RADIO 1 2 3 2 1 Slide the Function...
...; buttons to advance the time until the desired time is PM. 7 Adjust the VOLUME control 3 as desired. Antennas FM: Extend and rotate the AC Cord for better AM reception. Slide the BAND switch 1 to the ON position. Make sure the AM indicator is lit if the time is AM and not lit if the time is shown on the display. OPERATION TO PLAY THE RADIO 1 2 3 2 1 Slide the Function...
Owners Manual
Page 9
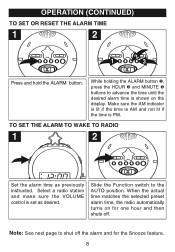
TO SET THE ALARM TO WAKE TO RADIO 1 2 Set the alarm time2as3previously instructed. Slide the Function switch to shut off . Select a radio station and make sure the VOLUME control is PM. Note: See next page to the AUTO position. Make sure the AM indicator is lit if the time is AM and not lit if the time is set as desired. OPERATION (CONTINUED) TO SET OR RESET THE ALARM TIME 1 2 1 2 3 Press and hold the ALARM button. 2 3 While...
TO SET THE ALARM TO WAKE TO RADIO 1 2 Set the alarm time2as3previously instructed. Slide the Function switch to shut off . Select a radio station and make sure the VOLUME control is PM. Note: See next page to the AUTO position. Make sure the AM indicator is lit if the time is AM and not lit if the time is set as desired. OPERATION (CONTINUED) TO SET OR RESET THE ALARM TIME 1 2 1 2 3 Press and hold the ALARM button. 2 3 While...
Owners Manual
Page 10
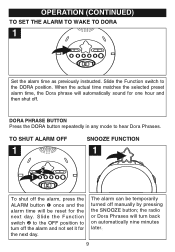
... preset alarm time, the Dora phrase will be temporarily turned off the alarm and not set it for the next day. The alarm can be reset for one hour and then shut off the alarm, press the ALARM button 1 once and the alarm time will automatically sound for the next day. OPERATION (CONTINUED) TO SET THE ALARM TO WAKE TO DORA 1 Set the alarm time as previously instructed. TO SHUT ALARM OFF 1 SNOOZE FUNCTION 1 2 1 1 To shut off . 2 3 DORA PHRASE BUTTON Press the DORA button repeatedly...
... preset alarm time, the Dora phrase will be temporarily turned off the alarm and not set it for the next day. The alarm can be reset for one hour and then shut off the alarm, press the ALARM button 1 once and the alarm time will automatically sound for the next day. OPERATION (CONTINUED) TO SET THE ALARM TO WAKE TO DORA 1 Set the alarm time as previously instructed. TO SHUT ALARM OFF 1 SNOOZE FUNCTION 1 2 1 1 To shut off . 2 3 DORA PHRASE BUTTON Press the DORA button repeatedly...
Owners Manual
Page 11
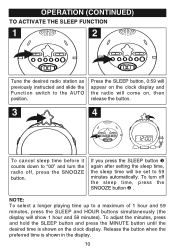
OPERATION (CONTINUED) TO ACTIVATE THE SLEEP FUNCTION 1 2 2 3 Tune the desired radio station as previously instructed and slide the Function switch to "00" and turn the radio off, press the SNOOZE button. 1 If you press the SLEEP button ‚ again after setting the sleep time, tmthhieenustelsesleepaeupttiommteai2mtwice3ial,lllyb.peTr seoesttsutront h5o9fef SNOOZE button ƒ . Press the SLEEP button, 0:59 will appear on the clock display and the radio will show 1 hour and 59 minutes). To adjust the minutes...
OPERATION (CONTINUED) TO ACTIVATE THE SLEEP FUNCTION 1 2 2 3 Tune the desired radio station as previously instructed and slide the Function switch to "00" and turn the radio off, press the SNOOZE button. 1 If you press the SLEEP button ‚ again after setting the sleep time, tmthhieenustelsesleepaeupttiommteai2mtwice3ial,lllyb.peTr seoesttsutront h5o9fef SNOOZE button ƒ . Press the SLEEP button, 0:59 will appear on the clock display and the radio will show 1 hour and 59 minutes). To adjust the minutes...
Owners Manual
Page 12
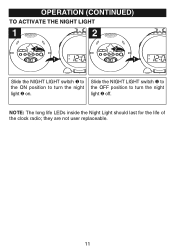
NOTE: The long life LEDs inside the Night Light should last for the life of the clock radio; Slide the NIGHT LIGHT switch 1 to the OFF position to turn the night light 2 off. they are not user replaceable. 11 OPERATION (CONTINUED) TO ACTIVATE THE NIGHT LIGHT 1 2 2 1 2 1 Slide the NIGHT LIGHT switch 1 to the ON position to turn the night light 2 on.
NOTE: The long life LEDs inside the Night Light should last for the life of the clock radio; Slide the NIGHT LIGHT switch 1 to the OFF position to turn the night light 2 off. they are not user replaceable. 11 OPERATION (CONTINUED) TO ACTIVATE THE NIGHT LIGHT 1 2 2 1 2 1 Slide the NIGHT LIGHT switch 1 to the ON position to turn the night light 2 on.
Owners Manual
Page 13
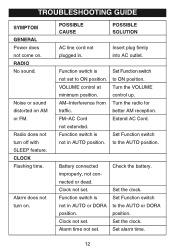
.... Turn the VOLUME control up. CLOCK Flashing time. Function switch is not set . Function switch is not in . Noise or sound distorted on . Extend AC Cord. Alarm time not set to ON position. Check the battery. Set alarm time. 12 Insert plug firmly into AC outlet. Battery connected improperly, not connected or dead. Set Function switch to the AUTO position. Set the clock. TROUBLESHOOTING GUIDE SYMPTOM GENERAL Power does not come on AM or FM. Alarm does not turn off with SLEEP feature...
.... Turn the VOLUME control up. CLOCK Flashing time. Function switch is not set . Function switch is not in . Noise or sound distorted on . Extend AC Cord. Alarm time not set to ON position. Check the battery. Set alarm time. 12 Insert plug firmly into AC outlet. Battery connected improperly, not connected or dead. Set Function switch to the AUTO position. Set the clock. TROUBLESHOOTING GUIDE SYMPTOM GENERAL Power does not come on AM or FM. Alarm does not turn off with SLEEP feature...
Owners Manual
Page 14
LIMITED WARRANTY Emerson Radio Corp. For repair or replacement, pack your check or money order payable to follow operating instructions, commercial use and conditions, for labor and parts at an authorized Depot Repair Facility, or replace the product at our discretion. AU898M 5101 Statesman Drive, Irving, TX 75063. 13 in a padded box, enclose your unit in the amount of $9.00 (not required...
LIMITED WARRANTY Emerson Radio Corp. For repair or replacement, pack your check or money order payable to follow operating instructions, commercial use and conditions, for labor and parts at an authorized Depot Repair Facility, or replace the product at our discretion. AU898M 5101 Statesman Drive, Irving, TX 75063. 13 in a padded box, enclose your unit in the amount of $9.00 (not required...

Owners Manual
Page 15
® EMERSON PART NO: 21-2067 608-05 Printed in China
® EMERSON PART NO: 21-2067 608-05 Printed in China


