
Owners Manual
Page 2
... wall outlet. The lightning flash with liquids such as power-supply cord or plug is used, use this apparatus during lightning storms or when unused for replacement of the obsolete outlet. 7.) Protect the power cord from the apparatus. 8.) Only use attachments / accessories specified by the manufacturer. 16.) Upon completion of important operating and maintenance (servicing) instructions in any ventilation openings. A polarized plug has two blades with...
... wall outlet. The lightning flash with liquids such as power-supply cord or plug is used, use this apparatus during lightning storms or when unused for replacement of the obsolete outlet. 7.) Protect the power cord from the apparatus. 8.) Only use attachments / accessories specified by the manufacturer. 16.) Upon completion of important operating and maintenance (servicing) instructions in any ventilation openings. A polarized plug has two blades with...
Owners Manual
Page 3
... system. Please call the Emerson Customer Service Hotline, toll free, at: 1-800-898-9020. If that you for the serial number when calling to 5:00 PM, Central Time, Monday through Friday. If after reading this manual. This system includes an AM/FM digital tuner with 20 preset station memories, a digital clock, a full-function remote control, and a pair of this Micro Audio System with the set-up or operation of matching speakers. Please review this manual...
... system. Please call the Emerson Customer Service Hotline, toll free, at: 1-800-898-9020. If that you for the serial number when calling to 5:00 PM, Central Time, Monday through Friday. If after reading this manual. This system includes an AM/FM digital tuner with 20 preset station memories, a digital clock, a full-function remote control, and a pair of this Micro Audio System with the set-up or operation of matching speakers. Please review this manual...
Owners Manual
Page 4
... areas. • Operate controls and switches as described in a particular installation. Operation is properly installed. • When moving the set, be determined by turning the equipment off and on a circuit different from that to which can radiate radio frequency energy and, if not installed and used in a residential installation. AVOID EXPOSURE TO BEAM This product contains a low power Laser Device. • Avoid installing this equipment does...
... areas. • Operate controls and switches as described in a particular installation. Operation is properly installed. • When moving the set, be determined by turning the equipment off and on a circuit different from that to which can radiate radio frequency energy and, if not installed and used in a residential installation. AVOID EXPOSURE TO BEAM This product contains a low power Laser Device. • Avoid installing this equipment does...
Owners Manual
Page 5
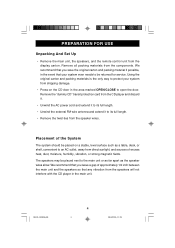
... as far apart as a table, desk, or shelf, convenient to open the door. PREPARATION FOR USE Unpacking And Set Up • Remove the main unit, the speakers, and the remote control unit from shipping damage. • Press on a stable, level surface such as the speaker wires allow. ES128_042806.p65 4 4 28/4/2006, 11:39 We recommend that your system from the display carton.
... as far apart as a table, desk, or shelf, convenient to open the door. PREPARATION FOR USE Unpacking And Set Up • Remove the main unit, the speakers, and the remote control unit from shipping damage. • Press on a stable, level surface such as the speaker wires allow. ES128_042806.p65 4 4 28/4/2006, 11:39 We recommend that your system from the display carton.
Owners Manual
Page 6
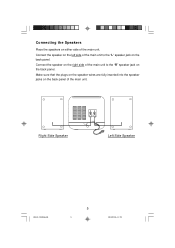
Make sure that the plugs on the speaker wires are fully inserted into the speaker jacks on the back panel. Connect the speaker on the left side of the main unit to the "R" speaker jack on either side of the main unit. Connect the speaker on the right side of the main unit to the "L"speaker jack on the back panel of the main unit. Connecting the Speakers Place the speakers on the back panel. Right Side Speaker Left Side Speaker ES128_042806.p65 5 5 28/4/2006, 11:39
Make sure that the plugs on the speaker wires are fully inserted into the speaker jacks on the back panel. Connect the speaker on the left side of the main unit to the "R" speaker jack on either side of the main unit. Connect the speaker on the right side of the main unit to the "L"speaker jack on the back panel of the main unit. Connecting the Speakers Place the speakers on the back panel. Right Side Speaker Left Side Speaker ES128_042806.p65 5 5 28/4/2006, 11:39
Owners Manual
Page 7
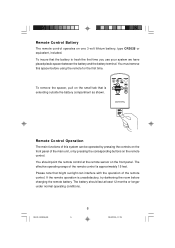
.../4/2006, 11:39 The battery should point the remote control at least 12 months or longer under normal operating conditions. Remote Control Battery The remote control operates on the front panel of the remote control is unsatisfactory, try darkening the room before using the remote for the first time. You must remove this system can interfere with the operation of the remote control. You should last at the remote sensor on the small...
.../4/2006, 11:39 The battery should point the remote control at least 12 months or longer under normal operating conditions. Remote Control Battery The remote control operates on the front panel of the remote control is unsatisfactory, try darkening the room before using the remote for the first time. You must remove this system can interfere with the operation of the remote control. You should last at the remote sensor on the small...
Owners Manual
Page 9
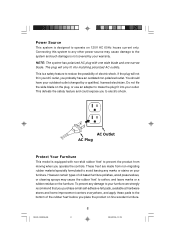
... system has polarized AC plug with non-skid rubber 'feet' to prevent the product from non-migrating rubber material specially formulated to avoid leaving any other power source may cause the rubber 'feet' to soften, and leave marks or a rubber residue on the plug, or use an adapter to make the plug...-adhesive felt pads, available at hardware stores and home improvement centers everywhere, and apply these pads to the bottom of the rubber 'feet' before you operate the controls. To prevent any damage to your furniture. Connecting this system to any marks or stains on fine wooden furniture...
... system has polarized AC plug with non-skid rubber 'feet' to prevent the product from non-migrating rubber material specially formulated to avoid leaving any other power source may cause the rubber 'feet' to soften, and leave marks or a rubber residue on the plug, or use an adapter to make the plug...-adhesive felt pads, available at hardware stores and home improvement centers everywhere, and apply these pads to the bottom of the rubber 'feet' before you operate the controls. To prevent any damage to your furniture. Connecting this system to any marks or stains on fine wooden furniture...
Owners Manual
Page 11
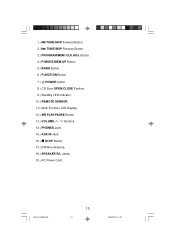
Button. 4.) P-MODE/MEM-UP Button. 5.) BAND Button. 6.) FUNCTION Button. 7.) POWER button. 8.) CD Door OPEN/CLOSE Position. 9.) Standby LED Indicator. 10.) REMOTE SENSOR. 11.) Multi-Function LCD Display. 12.) PLAY/PAUSE Button. 13.) VOLUME / Buttons. 14.) PHONES Jack. 15.) AUX IN Jack. 16.) STOP Button. 17.) FM Wire Antenna. 18.) SPEAKER R/L Jacks. 19.) AC Power Cord. ES128_042806.p65 10 10 28/4/2006, 11:39 1.) TUNE/SKIP Forward Button. 2.) TUNE/SKIP Reverse Button. 3.) PROGRAM/MEM./CLK.ADJ.
Button. 4.) P-MODE/MEM-UP Button. 5.) BAND Button. 6.) FUNCTION Button. 7.) POWER button. 8.) CD Door OPEN/CLOSE Position. 9.) Standby LED Indicator. 10.) REMOTE SENSOR. 11.) Multi-Function LCD Display. 12.) PLAY/PAUSE Button. 13.) VOLUME / Buttons. 14.) PHONES Jack. 15.) AUX IN Jack. 16.) STOP Button. 17.) FM Wire Antenna. 18.) SPEAKER R/L Jacks. 19.) AC Power Cord. ES128_042806.p65 10 10 28/4/2006, 11:39 1.) TUNE/SKIP Forward Button. 2.) TUNE/SKIP Reverse Button. 3.) PROGRAM/MEM./CLK.ADJ.
Owners Manual
Page 13
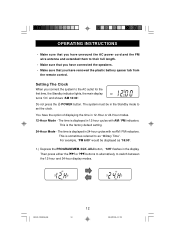
... the PROGRAM/MEM./CLK. ES128_042806.p65 12 12 28/4/2006, 11:39 OPERATING INSTRUCTIONS • Make sure that you have unwound the AC power cord and the FM wire antenna and extended them to their full length. • Make sure that you have connected the speakers. • Make sure that you connect the system to set the clock. This is displayed in the display. Do not press the POWER button.
... the PROGRAM/MEM./CLK. ES128_042806.p65 12 12 28/4/2006, 11:39 OPERATING INSTRUCTIONS • Make sure that you have unwound the AC power cord and the FM wire antenna and extended them to their full length. • Make sure that you have connected the speakers. • Make sure that you connect the system to set the clock. This is displayed in the display. Do not press the POWER button.
Owners Manual
Page 14
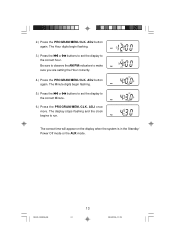
... correct time will appear on the display when the system is in the Standby/ Power Off mode or the AUX mode. ES128_042806.p65 13 13 28/4/2006, 11:39 ADJ once more. The Hour digits begin flashing. 5.) Press the or buttons to set the display to Be sure to observe the AM/PM indicators to make sure you are setting the Hour correctly. 4.) Press the PROGRAM...
... correct time will appear on the display when the system is in the Standby/ Power Off mode or the AUX mode. ES128_042806.p65 13 13 28/4/2006, 11:39 ADJ once more. The Hour digits begin flashing. 5.) Press the or buttons to set the display to Be sure to observe the AM/PM indicators to make sure you are setting the Hour correctly. 4.) Press the PROGRAM...
Owners Manual
Page 15
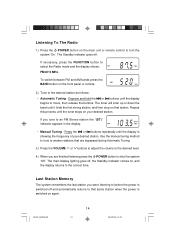
...:39 To switch between FM and AM bands press the BAND button on the front panel or remote. 2.) Tune to an FM Stereo station the "(ST)" indicator appears in the display. • Manual Tuning - If you tune to the desired station as follows: • Automatic Tuning - Use the manual tuning method to tune to weaker stations that are finished listening press the POWER button to select the Radio mode and the display shows...
...:39 To switch between FM and AM bands press the BAND button on the front panel or remote. 2.) Tune to an FM Stereo station the "(ST)" indicator appears in the display. • Manual Tuning - If you tune to the desired station as follows: • Automatic Tuning - Use the manual tuning method to tune to weaker stations that are finished listening press the POWER button to select the Radio mode and the display shows...
Owners Manual
Page 18
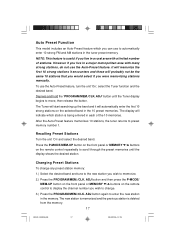
The Tuner will start searching up the band and it encounters and these will probably not be the same 10 stations that you would select if you were memorizing stations manually. ADJ button and then press the P-MODE/ MEM-UP button on the front panel or MEMORY / buttons on the remote control to display the channel number you wish to change any preset station memory: 1.) Select the desired band...
The Tuner will start searching up the band and it encounters and these will probably not be the same 10 stations that you would select if you were memorizing stations manually. ADJ button and then press the P-MODE/ MEM-UP button on the front panel or MEMORY / buttons on the remote control to display the channel number you wish to change any preset station memory: 1.) Select the desired band...
Owners Manual
Page 19
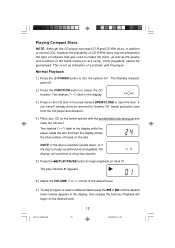
... was used to turn the system 'On'. Playback will continue to show two dashes. 5.) Press the PLAY/PAUSE button to select the CD function. The play indicator appears. 6.) Adjust the VOLUME or control to the desired level. 7.) To skip to open the door. Two dashes ("- -") flash in the display while the player reads the disc and then the display shows the total number of the blank media you...
... was used to turn the system 'On'. Playback will continue to show two dashes. 5.) Press the PLAY/PAUSE button to select the CD function. The play indicator appears. 6.) Adjust the VOLUME or control to the desired level. 7.) To skip to open the door. Two dashes ("- -") flash in the display while the player reads the disc and then the display shows the total number of the blank media you...
Owners Manual
Page 20
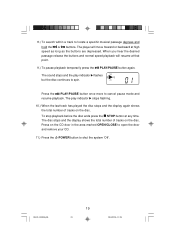
... on the disc. The sound stops and the play indicator stops flashing. 10.) When the last track has played the disc stops and the display again shows the total number of tracks on the CD door in the area marked OPEN/CLOSE to open the door and remove your CD. 11.) Press the POWER button to spin. Press the PLAY/PAUSE button once more to locate a specific musical passage...
... on the disc. The sound stops and the play indicator stops flashing. 10.) When the last track has played the disc stops and the display again shows the total number of tracks on the CD door in the area marked OPEN/CLOSE to open the door and remove your CD. 11.) Press the POWER button to spin. Press the PLAY/PAUSE button once more to locate a specific musical passage...
Owners Manual
Page 21
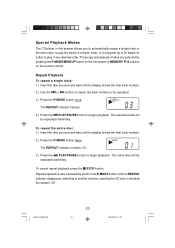
... program up to 20 tracks on the remote control. Repeat Playback To repeat a single track: 1.) Insert the disc as usual and wait until the REPEAT indicator disappears, switching to another function, opening the CD door or shutting the system 'Off'. To repeat the entire disc: 1.) Insert the disc as usual and wait until the display shows the total track number. 2.) Use the or buttons...
... program up to 20 tracks on the remote control. Repeat Playback To repeat a single track: 1.) Insert the disc as usual and wait until the REPEAT indicator disappears, switching to another function, opening the CD door or shutting the system 'Off'. To repeat the entire disc: 1.) Insert the disc as usual and wait until the display shows the total track number. 2.) Use the or buttons...
Owners Manual
Page 24
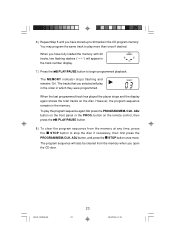
... remote control, then press the PLAY/PAUSE button. 8.) To clear the program sequence from the memory when you open the CD door. The program sequence will play the program sequence again first press the PROGRAM/MEM./CLK. 6.) Repeat Step 5 until you have fully loaded the memory with 20 tracks, two flashing dashes (" - - To play in the order in the track number display. 7.) Press the PLAY/PAUSE button...
... remote control, then press the PLAY/PAUSE button. 8.) To clear the program sequence from the memory when you open the CD door. The program sequence will play the program sequence again first press the PROGRAM/MEM./CLK. 6.) Repeat Step 5 until you have fully loaded the memory with 20 tracks, two flashing dashes (" - - To play in the order in the track number display. 7.) Press the PLAY/PAUSE button...
Owners Manual
Page 25
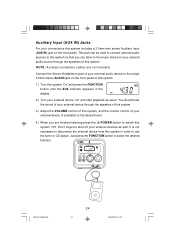
.... Auxiliary Input (AUX IN) Jacks For your convenience this system includes a 3.5mm mini stereo Auxiliary Input (AUX IN) jack on your external audio source through the speakers of this system. 3.) Adjust the VOLUME control of your external device 'On'and start playback as well. You should hear the sound of your external device through the speakers of this system. Don't forget to disconnect the external device from this system, and the volume control of this system in the display. 2.) Turn your...
.... Auxiliary Input (AUX IN) Jacks For your convenience this system includes a 3.5mm mini stereo Auxiliary Input (AUX IN) jack on your external audio source through the speakers of this system. 3.) Adjust the VOLUME control of your external device 'On'and start playback as well. You should hear the sound of your external device through the speakers of this system. Don't forget to disconnect the external device from this system, and the volume control of this system in the display. 2.) Turn your...
Owners Manual
Page 26
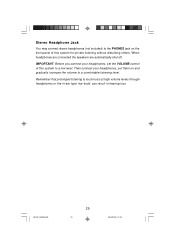
Stereo Headphone Jack You may connect stereo headphones (not included) to the PHONES jack on and gradually increase the volume to a comfortable listening level. When headphones are connected the speakers are automatically shut off. Remember that prolonged listening to a low level. Then connect your headphones, set the VOLUME control of this system to loud music at high volume levels through headphones or the in-ear type 'ear...
Stereo Headphone Jack You may connect stereo headphones (not included) to the PHONES jack on and gradually increase the volume to a comfortable listening level. When headphones are connected the speakers are automatically shut off. Remember that prolonged listening to a low level. Then connect your headphones, set the VOLUME control of this system to loud music at high volume levels through headphones or the in-ear type 'ear...

Owners Manual
Page 28
...panel becomes dirty or smudged with a mild soap and water solution. Do not leave it lying around where a young child or pet could play with, or swallow it with a soft dry dust cloth. SERVICE TO FIND THE LOCATION AND PHONE R NUMBER OF YOUR NEAREST SERVICE CENTER PERMITTED TO PERFORM WARRANTY... Lithium Battery...fingerprints it . CALL TOLL FREE: 1-800-695-0098 FOR ADDITIONAL SET-UP OR OPERATING ASSISTANCE PLEASE CALL: 1-800-898-9020 FOR CUSTOMER SERVICE, PLEASE WRITE TO: Emerson Radio Corp., Consumer Affairs Dept., 5101 Statesman Drive, Irving, TX 75063. Never use any water or other ...
...panel becomes dirty or smudged with a mild soap and water solution. Do not leave it lying around where a young child or pet could play with, or swallow it with a soft dry dust cloth. SERVICE TO FIND THE LOCATION AND PHONE R NUMBER OF YOUR NEAREST SERVICE CENTER PERMITTED TO PERFORM WARRANTY... Lithium Battery...fingerprints it . CALL TOLL FREE: 1-800-695-0098 FOR ADDITIONAL SET-UP OR OPERATING ASSISTANCE PLEASE CALL: 1-800-898-9020 FOR CUSTOMER SERVICE, PLEASE WRITE TO: Emerson Radio Corp., Consumer Affairs Dept., 5101 Statesman Drive, Irving, TX 75063. Never use any water or other ...
Owners Manual
Page 29
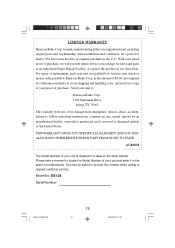
...Serial Number of purchase. This warranty does not cover damage from the date of the United States. warrants manufacturing defects in original material, including original parts and workmanship, under normal use , rental, repairs by California residents) to follow operating instructions, commercial use and conditions, for labor and parts at an authorized Depot Repair Facility, or replace the product...WARRANTY Emerson Radio Corp. THIS WARRANTY GIVES YOU SPECIFIC LEGAL RIGHTS, AND YOU MAY ALSO HAVE OTHER RIGHTS WHICH VARY FROM STATE TO STATE. Model No: ES128 Serial Number: ...
...Serial Number of purchase. This warranty does not cover damage from the date of the United States. warrants manufacturing defects in original material, including original parts and workmanship, under normal use , rental, repairs by California residents) to follow operating instructions, commercial use and conditions, for labor and parts at an authorized Depot Repair Facility, or replace the product...WARRANTY Emerson Radio Corp. THIS WARRANTY GIVES YOU SPECIFIC LEGAL RIGHTS, AND YOU MAY ALSO HAVE OTHER RIGHTS WHICH VARY FROM STATE TO STATE. Model No: ES128 Serial Number: ...

