
Owners Manual
Page 2
... of important operating and maintenance (servicing) instructions in the literature accompanying the appliance. Servicing is damaged, liquid has been spilled or objects have fallen into your safety. Use only power source as indicated. 16.) Use replacement parts as radiators, heat registers, stoves, or other . The lightning flash with dry cloth. 7.) Do not block any way, such as power-supply cord or plug is...
... of important operating and maintenance (servicing) instructions in the literature accompanying the appliance. Servicing is damaged, liquid has been spilled or objects have fallen into your safety. Use only power source as indicated. 16.) Use replacement parts as radiators, heat registers, stoves, or other . The lightning flash with dry cloth. 7.) Do not block any way, such as power-supply cord or plug is...
Owners Manual
Page 3
... system includes a digital tuner with 20 preset station memory, a CD player with 20 track programmable memory, a clock timer so that you For purchasing this Emerson Research Micro Audio System with the set to sleep or wake to diagnose and correct the problem for you understand all the functions we have included in this Emerson Research audio product. Please call the Emerson Research Customer Service Hot Line Toll Free at 800-898...
... system includes a digital tuner with 20 preset station memory, a CD player with 20 track programmable memory, a clock timer so that you For purchasing this Emerson Research Micro Audio System with the set to sleep or wake to diagnose and correct the problem for you understand all the functions we have included in this Emerson Research audio product. Please call the Emerson Research Customer Service Hot Line Toll Free at 800-898...
Owners Manual
Page 4
... sure to which can radiate radio frequency energy and, if not installed and used in accordance with the limits for help. If this might damage the finish. Use a clean dry cloth. • Operate controls and switches as this equipment does cause harmful interference to correct the interference by turning the equipment off and on, the user is encouraged to try to...
... sure to which can radiate radio frequency energy and, if not installed and used in accordance with the limits for help. If this might damage the finish. Use a clean dry cloth. • Operate controls and switches as this equipment does cause harmful interference to correct the interference by turning the equipment off and on, the user is encouraged to try to...
Owners Manual
Page 5
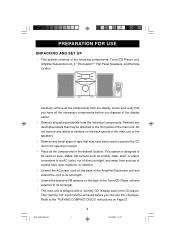
... from opening in transit. • Place all the components from the display carton and verify that may be used to prevent the CD door from the individual components. Refer to the "PLAYING COMPACT DISCS" instructions on the back of the following components: Tuner/CD Player unit, Amplifier/Subwoofer unit, 2 "Thinovation™ "Flat Panel Speakers, and Remote Control. Carefully remove all the components in the CD player. ES20_ib061303...
... from opening in transit. • Place all the components from the display carton and verify that may be used to prevent the CD door from the individual components. Refer to the "PLAYING COMPACT DISCS" instructions on the back of the following components: Tuner/CD Player unit, Amplifier/Subwoofer unit, 2 "Thinovation™ "Flat Panel Speakers, and Remote Control. Carefully remove all the components in the CD player. ES20_ib061303...
Owners Manual
Page 9
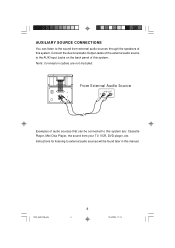
... External Audio Source Examples of audio sources that can listen to external audio sources will be connected to the AUX Input Jacks on the back panel of this system. ES20_ib061303.p65 8 8 13/6/2003, 12:13 Instructions for listening to the sound from your TV, VCR, DVD player, etc. AUXILIARY SOURCE CONNECTIONS You can be found later in this manual. Note: Connection cables are : Cassette Player, Mini Disc Player, the sound from external audio sources through the speakers...
... External Audio Source Examples of audio sources that can listen to external audio sources will be connected to the AUX Input Jacks on the back panel of this system. ES20_ib061303.p65 8 8 13/6/2003, 12:13 Instructions for listening to the sound from your TV, VCR, DVD player, etc. AUXILIARY SOURCE CONNECTIONS You can be found later in this manual. Note: Connection cables are : Cassette Player, Mini Disc Player, the sound from external audio sources through the speakers...
Owners Manual
Page 10
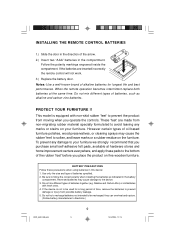
... the compartment. When the remote operation becomes intermittent replace both batteries at hardware stores and home improvement centers everywhere, and apply these precautions when using batteries in the compartment. Do not mix different types of batteries, such as indicated in the battery compartment. BATTERY PRECAUTIONS Follow these pads to the device. 3. INSTALLING THE REMOTE CONTROL BATTERIES 1.) Slide the door in the direction of the arrow...
... the compartment. When the remote operation becomes intermittent replace both batteries at hardware stores and home improvement centers everywhere, and apply these precautions when using batteries in the compartment. Do not mix different types of batteries, such as indicated in the battery compartment. BATTERY PRECAUTIONS Follow these pads to the device. 3. INSTALLING THE REMOTE CONTROL BATTERIES 1.) Slide the door in the direction of the arrow...
Owners Manual
Page 12
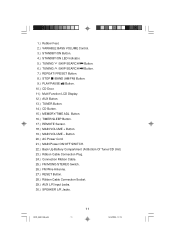
...-Function LCD Display. 12.) AUX Button. 13.) TUNER Button. 14.) CD Button. 15.) MEMORY/TIME ADJ. ES20_ib061303.p65 11 11 13/6/2003, 12:13 Button. 20.) AC Power Cord. 21.) MAIN Power ON/OFF SWITCH. 22.) Back Up Battery Compartment (At Bottom Of Tuner/CD Unit) 23.) Ribbon Cable Connection Plug. 24.) Connection Ribbon Cable. 25.) FM MONO/STEREO Switch. 26.) FM Wire Antenna. 27.) RESET Button. 28.) Ribbon Cable Connection Socket. 29.) AUX L/R Input Jacks. 30.) SPEAKER L/R Jacks. Button. 16.) TIMER/SLEEP Button. 17.) REMOTE Sensor. 18.) MAIN VOLUME + Button...
...-Function LCD Display. 12.) AUX Button. 13.) TUNER Button. 14.) CD Button. 15.) MEMORY/TIME ADJ. ES20_ib061303.p65 11 11 13/6/2003, 12:13 Button. 20.) AC Power Cord. 21.) MAIN Power ON/OFF SWITCH. 22.) Back Up Battery Compartment (At Bottom Of Tuner/CD Unit) 23.) Ribbon Cable Connection Plug. 24.) Connection Ribbon Cable. 25.) FM MONO/STEREO Switch. 26.) FM Wire Antenna. 27.) RESET Button. 28.) Ribbon Cable Connection Socket. 29.) AUX L/R Input Jacks. 30.) SPEAKER L/R Jacks. Button. 16.) TIMER/SLEEP Button. 17.) REMOTE Sensor. 18.) MAIN VOLUME + Button...

Owners Manual
Page 14
..., 12:13 OPERATING INSTRUCTIONS • Make sure the Tuner/CD Player unit is connected to the Amplifier/ Subwoofer unit with the built in ribbon cable. • Make sure that the 2 "Thinovation™ " Flat Panel speakers are connected to the Amplifier/Subwoofer unit. • Make sure that you have installed the batteries in the remote control, and the back up batteries in the Tuner/CD Player battery compartment. • Make sure the AC power cord from the...
..., 12:13 OPERATING INSTRUCTIONS • Make sure the Tuner/CD Player unit is connected to the Amplifier/ Subwoofer unit with the built in ribbon cable. • Make sure that the 2 "Thinovation™ " Flat Panel speakers are connected to the Amplifier/Subwoofer unit. • Make sure that you have installed the batteries in the remote control, and the back up batteries in the Tuner/CD Player battery compartment. • Make sure the AC power cord from the...
Owners Manual
Page 18
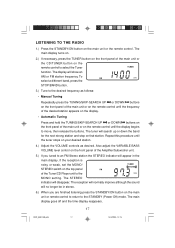
... Amplifier/Subwoofer unit. 5.) If you tuned to the STANDBY (Power Off) mode. The reception will normally improve although the sound will appear in stereo. 6.) When you are finished listening press the STANDBY/ON button on the front panel of the Tuner/CD Player unit to select the Tuner function. LISTENING TO THE RADIO 1.) Press the STANDBY/ON button on that station. Also adjust the VARIABLE BASS VOLUME level control...
... Amplifier/Subwoofer unit. 5.) If you tuned to the STANDBY (Power Off) mode. The reception will normally improve although the sound will appear in stereo. 6.) When you are finished listening press the STANDBY/ON button on the front panel of the Tuner/CD Player unit to select the Tuner function. LISTENING TO THE RADIO 1.) Press the STANDBY/ON button on that station. Also adjust the VARIABLE BASS VOLUME level control...

Owners Manual
Page 21
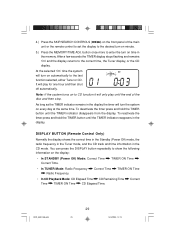
... REPEAT/PRESET button repeatedly to memorize. CHANGING PRESET STATIONS To change . ES20_ib061303.p65 20 20 13/6/2003, 12:13 Press the MEMORY/TIME ADJ. button and then press the REPEAT/PRESET button to display the memory number you wish to scroll through the preset memories until the display shows the desired station. button again to change any preset station memory select the desired band and tune to the new station you wish to enter the new station...
... REPEAT/PRESET button repeatedly to memorize. CHANGING PRESET STATIONS To change . ES20_ib061303.p65 20 20 13/6/2003, 12:13 Press the MEMORY/TIME ADJ. button and then press the REPEAT/PRESET button to display the memory number you wish to scroll through the preset memories until the display shows the desired station. button again to change any preset station memory select the desired band and tune to the new station you wish to enter the new station...
Owners Manual
Page 23
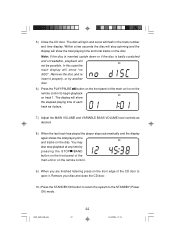
... player stops automatically and the display again shows the total playing time and tracks on the front panel of the CD door to open it plays. 7.) Adjust the MAIN VOLUME and VARIABLE BASS VOLUME level controls as it . The display will show "no dISC". In this case the main display will show the total playing time and total tracks on the remote control to the STANDBY (Power Off) mode. Within a few seconds the disc will stop playback...
... player stops automatically and the display again shows the total playing time and tracks on the front panel of the CD door to open it plays. 7.) Adjust the MAIN VOLUME and VARIABLE BASS VOLUME level controls as it . The display will show "no dISC". In this case the main display will show the total playing time and total tracks on the remote control to the STANDBY (Power Off) mode. Within a few seconds the disc will stop playback...
Owners Manual
Page 24
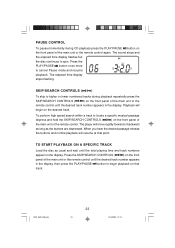
... total playing time and track numbers appear on that point. TO START PLAYBACK ON A SPECIFIC TRACK Load the disc as the buttons are depressed. To perform high speed search within a track to locate a specific musical passage depress and hold the SKIP/SEARCH CONTROLS ( / ) on the front panel of the main unit or the remote control until the desired track number appears in the display. The sound stops and the elapsed time display flashes...
... total playing time and track numbers appear on that point. TO START PLAYBACK ON A SPECIFIC TRACK Load the disc as the buttons are depressed. To perform high speed search within a track to locate a specific musical passage depress and hold the SKIP/SEARCH CONTROLS ( / ) on the front panel of the main unit or the remote control until the desired track number appears in the display. The sound stops and the elapsed time display flashes...
Owners Manual
Page 25
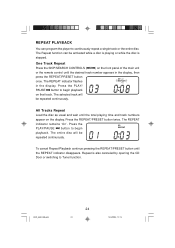
... the total playing time and track numbers appear on the front panel of the main unit or the remote control until the REPEAT indicator disappears. Press the PLAY/PAUSE button to Tuner function. REPEAT PLAYBACK You can be repeated continuously. The selected track will be activated while a disc is playing or while the disc is also canceled by opening the CD Door or switching to begin playback on that track. The REPEAT indicator flashes...
... the total playing time and track numbers appear on the front panel of the main unit or the remote control until the REPEAT indicator disappears. Press the PLAY/PAUSE button to Tuner function. REPEAT PLAYBACK You can be repeated continuously. The selected track will be activated while a disc is playing or while the disc is also canceled by opening the CD Door or switching to begin playback on that track. The REPEAT indicator flashes...
Owners Manual
Page 28
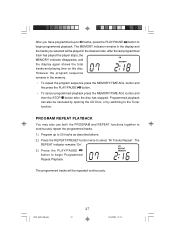
... remains in the desired order. button and the press the PLAY/PAUSE button. • To cancel programmed playback press the MEMORY/TIME ADJ. After the last programmed track has played the player stops, the MEMORY indicator disappears, and the display again shows the total tracks and playing time on the disc. Programmed playback can also be canceled by opening the CD Door, or by switching to begin Programmed Repeat Playback. ES20_ib061303.p65 27 27...
... remains in the desired order. button and the press the PLAY/PAUSE button. • To cancel programmed playback press the MEMORY/TIME ADJ. After the last programmed track has played the player stops, the MEMORY indicator disappears, and the display again shows the total tracks and playing time on the disc. Programmed playback can also be canceled by opening the CD Door, or by switching to begin Programmed Repeat Playback. ES20_ib061303.p65 27 27...
Owners Manual
Page 29
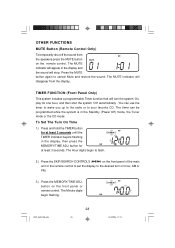
... speakers press the MUTE button on the remote control. To Set The Turn On Time 1.) Press and hold the TIMER button for at least 3 seconds. ES20_ib061303.p65 28 28 13/6/2003, 12:13 The Hour digits begin flashing. The MUTE indicator will turn on the front panel or remote control. You can be programmed while the system is in the Standby (Power Off) mode, the Tuner mode or the CD mode. button...
... speakers press the MUTE button on the remote control. To Set The Turn On Time 1.) Press and hold the TIMER button for at least 3 seconds. ES20_ib061303.p65 28 28 13/6/2003, 12:13 The Hour digits begin flashing. The MUTE indicator will turn on the front panel or remote control. You can be programmed while the system is in the Standby (Power Off) mode, the Tuner mode or the CD mode. button...
Owners Manual
Page 30
... the display. TIMER ON Time • In TUNER Mode: Radio Frequency Radio Frequency. To deactivate the timer press and hold the TIMER button until the end of the main unit or the remote control to set the display to the last function selected, either Tuner or CD. Correct Time TIMER ON Time • In CD Playback Mode: CD Elapsed Time CD Remaining Time Time TIMER ON Time CD Elapsed Time. Correct ES20_ib061303.p65 29 29 13/6/2003, 12:13 button once more to enter the turn on...
... the display. TIMER ON Time • In TUNER Mode: Radio Frequency Radio Frequency. To deactivate the timer press and hold the TIMER button until the end of the main unit or the remote control to set the display to the last function selected, either Tuner or CD. Correct Time TIMER ON Time • In CD Playback Mode: CD Elapsed Time CD Remaining Time Time TIMER ON Time CD Elapsed Time. Correct ES20_ib061303.p65 29 29 13/6/2003, 12:13 button once more to enter the turn on...
Owners Manual
Page 31
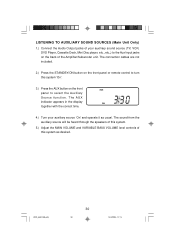
... AUX indicator appears in the display together with the correct time. 4.) Turn your auxiliary sound source (TV, VCR, DVD Player, Cassette Deck, Mini Disc player, etc., etc,,) to turn this system as usual. LISTENING TO AUXILIARY SOUND SOURCES (Main Unit Only) 1.) Connect the Audio Output jacks of your auxiliary source 'On'and operate it as desired. The connection cables are not included. 2.) Press the STANDBY/ON button on the front panel or remote control to the Aux Input jacks...
... AUX indicator appears in the display together with the correct time. 4.) Turn your auxiliary sound source (TV, VCR, DVD Player, Cassette Deck, Mini Disc player, etc., etc,,) to turn this system as usual. LISTENING TO AUXILIARY SOUND SOURCES (Main Unit Only) 1.) Connect the Audio Output jacks of your auxiliary source 'On'and operate it as desired. The connection cables are not included. 2.) Press the STANDBY/ON button on the front panel or remote control to the Aux Input jacks...
Owners Manual
Page 32
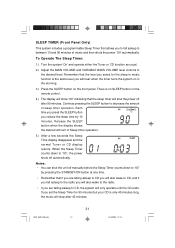
... music will shut the power off automatically. When the Sleep Timer counts down to "00", the power shuts off after 45 minutes. To Operate The Sleep Timer: 1.) Turn the system 'On'and operate either the Tuner or CD function as usual. 2.) Adjust the MAIN VOLUME and VARIABLE BASS VOLUME level controls to decrease the amount of Sleep timer operation. 5.) After a few seconds the Sleep Time display disappears and the normal Tuner...
... music will shut the power off automatically. When the Sleep Timer counts down to "00", the power shuts off after 45 minutes. To Operate The Sleep Timer: 1.) Turn the system 'On'and operate either the Tuner or CD function as usual. 2.) Adjust the MAIN VOLUME and VARIABLE BASS VOLUME level controls to decrease the amount of Sleep timer operation. 5.) After a few seconds the Sleep Time display disappears and the normal Tuner...
Owners Manual
Page 33
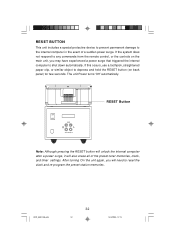
ON OFF AUX R L SPEAKERS RESET Button Note: Although pressing the RESET button will unlock the internal computer after a power surge, it will need to reset the clock and re-program the preset station memories. ES20_ib061303.p65 32 32 13/6/2003, 12:13 If the system does not respond to any commands from the remote control, or the controls on back panel) for few seconds. The unit Power turns 'Off...
ON OFF AUX R L SPEAKERS RESET Button Note: Although pressing the RESET button will unlock the internal computer after a power surge, it will need to reset the clock and re-program the preset station memories. ES20_ib061303.p65 32 32 13/6/2003, 12:13 If the system does not respond to any commands from the remote control, or the controls on back panel) for few seconds. The unit Power turns 'Off...
Owners Manual
Page 35
... to follow operating instructions, commercial use, rental, repairs by California residents) to : Emerson Radio Corp. 1901 Diplomat Drive. AU898M SERVICE TO FIND THE LOCATION AND PHONE NUMBER OF YOUR NEAREST SERVICE CENTER PERMITTED TO PERFORM WARRANTY... For repair or replacement, pack your unit to cover shipping and handling costs, and enclose a copy of the United States. Farmers Branch, TX 75234. CALL TOLL FREE: 1-800...
... to follow operating instructions, commercial use, rental, repairs by California residents) to : Emerson Radio Corp. 1901 Diplomat Drive. AU898M SERVICE TO FIND THE LOCATION AND PHONE NUMBER OF YOUR NEAREST SERVICE CENTER PERMITTED TO PERFORM WARRANTY... For repair or replacement, pack your unit to cover shipping and handling costs, and enclose a copy of the United States. Farmers Branch, TX 75234. CALL TOLL FREE: 1-800...