
Owners Manual
Page 1
PERSONAL CD PLAYER with 40 SECOND ELECTRONIC ANTI-SKIP PROTECTION OWNER'S MANUAL HD9971 Visit our web site at www.emersonradio.com HD9971_ib_drafts.p65 18 19/4/2002, 15:52
PERSONAL CD PLAYER with 40 SECOND ELECTRONIC ANTI-SKIP PROTECTION OWNER'S MANUAL HD9971 Visit our web site at www.emersonradio.com HD9971_ib_drafts.p65 18 19/4/2002, 15:52

Owners Manual
Page 2
... bottom cabinet. There's a Dynamic Bass Boost Control that you ......... For purchasing this instruction manual completely and carefully to make sure you choose. Thank you record the serial number of your favorite CD's in the space below for future reference. Please read this Emerson Personal CD Player. The CD player has a 22 track programmable memory so you can listen to repeat a single track, the entire disc, or a programmed sequence of tracks, indefinitely.
... bottom cabinet. There's a Dynamic Bass Boost Control that you ......... For purchasing this instruction manual completely and carefully to make sure you choose. Thank you record the serial number of your favorite CD's in the space below for future reference. Please read this Emerson Personal CD Player. The CD player has a 22 track programmable memory so you can listen to repeat a single track, the entire disc, or a programmed sequence of tracks, indefinitely.
Owners Manual
Page 3
... 1 LASER PRODUCT APPAREIL Á LASER DE CLASSE 1 PRODUCTO LASER DE CLASE 1 CAUTION INVISIBLE LASER RADIATION WHEN OPEN AND INTERLOCKS DEFEATED. AVOID EXPOSURE TO BEAM This product contains a low power Laser Device. CAUTION THIS LASER COMPACT DISC PLAYER FUNCTIONS BY HELP OF INVISIBLE LASER LIGHT AND IS EQUIPPED WITH SAFETY SWITCHES TO AVOID EXPOSURE WHEN DOOR IS OPEN AND SAFETY INTERLOCKS ARE DEFEATED. The Owner's Manual contains important operating and maintenance instructions...
... 1 LASER PRODUCT APPAREIL Á LASER DE CLASSE 1 PRODUCTO LASER DE CLASE 1 CAUTION INVISIBLE LASER RADIATION WHEN OPEN AND INTERLOCKS DEFEATED. AVOID EXPOSURE TO BEAM This product contains a low power Laser Device. CAUTION THIS LASER COMPACT DISC PLAYER FUNCTIONS BY HELP OF INVISIBLE LASER LIGHT AND IS EQUIPPED WITH SAFETY SWITCHES TO AVOID EXPOSURE WHEN DOOR IS OPEN AND SAFETY INTERLOCKS ARE DEFEATED. The Owner's Manual contains important operating and maintenance instructions...
Owners Manual
Page 4
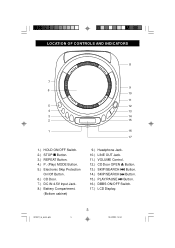
HD9971_ib_drafts.p65 3 3 19/4/2002, 15:52 LOCATION OF CONTROLS AND INDICATORS 8 7 9 6 10 11 5 12 4 13 3 14 2 15 1 16 17 1.) HOLD ON/OFF Switch. 2.) STOP Button. 3.) REPEAT Button. 4.) P. (Play) MODE Button. 5.) Electronic Skip Protection On/Off Button. 6.) CD Door. 7.) DC IN 4.5V Input Jack. 8.) Battery Compartment. (Bottom cabinet) 9.) Headphone Jack. 10.) LINE OUT Jack. 11.) VOLUME Control. 12.) CD Door OPEN Button. 13.) SKIP/SEARCH Button. 14.) SKIP/SEARCH Button. 15.) PLAY/PAUSE Button. 16.) DBBS ON/OFF Switch. 17.) LCD Display.
HD9971_ib_drafts.p65 3 3 19/4/2002, 15:52 LOCATION OF CONTROLS AND INDICATORS 8 7 9 6 10 11 5 12 4 13 3 14 2 15 1 16 17 1.) HOLD ON/OFF Switch. 2.) STOP Button. 3.) REPEAT Button. 4.) P. (Play) MODE Button. 5.) Electronic Skip Protection On/Off Button. 6.) CD Door. 7.) DC IN 4.5V Input Jack. 8.) Battery Compartment. (Bottom cabinet) 9.) Headphone Jack. 10.) LINE OUT Jack. 11.) VOLUME Control. 12.) CD Door OPEN Button. 13.) SKIP/SEARCH Button. 14.) SKIP/SEARCH Button. 15.) PLAY/PAUSE Button. 16.) DBBS ON/OFF Switch. 17.) LCD Display.

Owners Manual
Page 5
Appears when the Repeat playback mode is selected. 6.) Repeat A-B Indicators - Appears when Repeat between 2 designated points. 7.) Elapsed Time And Total Playing Time Indicator. 8.) Track Number Display - Flashes when batteries needed to be replaced. HD9971_ib_drafts.p65 4 4 19/4/2002, 15:52 Appears when programming tracks or playing programmed tracks. 3.) RPT Indicator - Appears when Intro playback mode is selected. 4.) RND (Random) Indicator - Lights when using batteries power. Appears when Random playback mode is activated. 2.) PGM (Program) Indicator - flashing icon ...
Appears when the Repeat playback mode is selected. 6.) Repeat A-B Indicators - Appears when Repeat between 2 designated points. 7.) Elapsed Time And Total Playing Time Indicator. 8.) Track Number Display - Flashes when batteries needed to be replaced. HD9971_ib_drafts.p65 4 4 19/4/2002, 15:52 Appears when programming tracks or playing programmed tracks. 3.) RPT Indicator - Appears when Intro playback mode is selected. 4.) RND (Random) Indicator - Lights when using batteries power. Appears when Random playback mode is activated. 2.) PGM (Program) Indicator - flashing icon ...
Owners Manual
Page 6
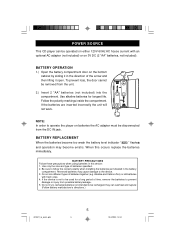
POWER SOURCE This CD player can overheat and rupture (Follow battery manufacturer's directions.) HD9971_ib_drafts.p65 5 5 19/4/2002, 15:52 BATTERY PRECAUTIONS Follow these precautions when using batteries in this occurs replace the batteries immediately. Follow the polarity markings inside the compartment. NOTE: In order to operate the player on batteries the AC adapter must be disconnected from the unit. 2.) Insert 2 "AA" batteries (not included) into the...
POWER SOURCE This CD player can overheat and rupture (Follow battery manufacturer's directions.) HD9971_ib_drafts.p65 5 5 19/4/2002, 15:52 BATTERY PRECAUTIONS Follow these precautions when using batteries in this occurs replace the batteries immediately. Follow the polarity markings inside the compartment. NOTE: In order to operate the player on batteries the AC adapter must be disconnected from the unit. 2.) Insert 2 "AA" batteries (not included) into the...
Owners Manual
Page 7
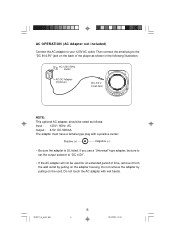
... use a "Universal"-type adapter, be sure to set the output selector to your 120V AC outlet. The adapter must have a female-type plug with wet hands. HD9971_ib_drafts.p65 6 6 19/4/2002, 15:52 Do not remove the adapter by pulling on the back of time, remove it from the wall outlet by pulling on the adapter housing. AC OPERATION (AC Adapter not included) Connect...
... use a "Universal"-type adapter, be sure to set the output selector to your 120V AC outlet. The adapter must have a female-type plug with wet hands. HD9971_ib_drafts.p65 6 6 19/4/2002, 15:52 Do not remove the adapter by pulling on the back of time, remove it from the wall outlet by pulling on the adapter housing. AC OPERATION (AC Adapter not included) Connect...
Owners Manual
Page 8
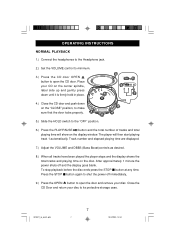
... PLAYBACK 1.) Connect the headphones to the Headphone jack. 2.) Set the VOLUME control to minimum. 3.) Press the CD door OPEN VOLUME button to open the door and remove your disc. Place your disc to the "OFF" position. 6.) Press the PLAY/PAUSE button and the total number of tracks and total playing time will then start playing track 1 automatically. Track number and elapsed playing time are displayed. 7.) Adjust the VOLUME and DBBS (Bass Boost)controls as desired. 8.) When all tracks have been played the player stops...
... PLAYBACK 1.) Connect the headphones to the Headphone jack. 2.) Set the VOLUME control to minimum. 3.) Press the CD door OPEN VOLUME button to open the door and remove your disc. Place your disc to the "OFF" position. 6.) Press the PLAY/PAUSE button and the total number of tracks and total playing time will then start playing track 1 automatically. Track number and elapsed playing time are displayed. 7.) Adjust the VOLUME and DBBS (Bass Boost)controls as desired. 8.) When all tracks have been played the player stops...
Owners Manual
Page 9
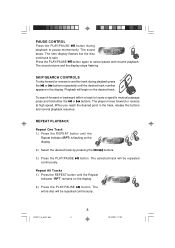
... resume playback. Press the PLAY/PAUSE button again to another track during playback to pause momentarily. To search forward or backward within a track to spin. The selected track will begin on the desired track. The time display flashes but the disc continues to locate a specific musical passage press and hold either the or buttons. button. PAUSE CONTROL Press the PLAY/PAUSE button during playback press the or buttons repeatedly until the Repeat Indicator...
... resume playback. Press the PLAY/PAUSE button again to another track during playback to pause momentarily. To search forward or backward within a track to spin. The selected track will begin on the desired track. The time display flashes but the disc continues to locate a specific musical passage press and hold either the or buttons. button. PAUSE CONTROL Press the PLAY/PAUSE button during playback press the or buttons repeatedly until the Repeat Indicator...
Owners Manual
Page 10
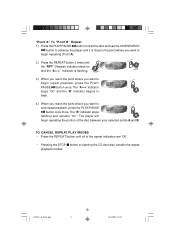
... begin repeating (Point A). 2.) Press the REPEAT button 3 times until all of the disc between your selected points A and B. The "A "indicator stays "On" and the "B" indicator begins to flash. 4.) When you reach the point where you want to begin repeating the portion of the repeat indicators are 'Off'. • Pressing the STOP button or opening the CD door also cancels the repeat playback modes. HD9971_ib_drafts...
... begin repeating (Point A). 2.) Press the REPEAT button 3 times until all of the disc between your selected points A and B. The "A "indicator stays "On" and the "B" indicator begins to flash. 4.) When you reach the point where you want to begin repeating the portion of the repeat indicators are 'Off'. • Pressing the STOP button or opening the CD door also cancels the repeat playback modes. HD9971_ib_drafts...
Owners Manual
Page 11
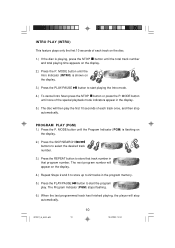
... track number. 3.) Press the REPEAT button to start the program play. MODE button until the Intro Indicator (INTRO) is flashing on the display. 3.) Press the PLAY/PAUSE button to store that track number in that program number. HD9971_ib_drafts.p65 10 10 19/4/2002, 15:52 The Program Indicator (PGM) stops flashing. 6.) When the last programmed track has finished playing, the player will stop automatically. PROGRAM PLAY (PGM) 1.) Press the P. MODE button until none of the special playback mode...
... track number. 3.) Press the REPEAT button to start the program play. MODE button until the Intro Indicator (INTRO) is flashing on the display. 3.) Press the PLAY/PAUSE button to store that track number in that program number. HD9971_ib_drafts.p65 10 10 19/4/2002, 15:52 The Program Indicator (PGM) stops flashing. 6.) When the last programmed track has finished playing, the player will stop automatically. PROGRAM PLAY (PGM) 1.) Press the P. MODE button until none of the special playback mode...
Owners Manual
Page 12
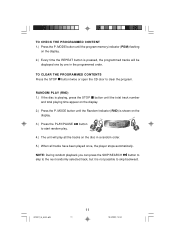
... programmed order. MODE button until the total track number and total playing time appear on the display. 2.) Every time the REPEAT button is playing, press the STOP button until the Random Indicator (RND) is not possible to start random play all tracks have been played once, the player stops automatically. MODE button until the program memory indicator (PGM) flashing on the display. 2.) Press the P. TO CLEAR THE PROGRAMMED CONTENTS Press the STOP button twice or open the CD...
... programmed order. MODE button until the total track number and total playing time appear on the display. 2.) Every time the REPEAT button is playing, press the STOP button until the Random Indicator (RND) is not possible to start random play all tracks have been played once, the player stops automatically. MODE button until the program memory indicator (PGM) flashing on the display. 2.) Press the P. TO CLEAR THE PROGRAMMED CONTENTS Press the STOP button twice or open the CD...
Owners Manual
Page 13
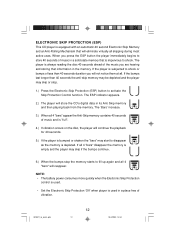
... playback for 40 seconds. 5.) If the player is bumped or shaken the "bars" may start to fill up again and all skipping during most active uses. The 'Bars'increase. 3.) When all . NOTE: • The battery power consumes more quickly when the Electronic Skip Protection control is used in the memory. ELECTRONIC SKIP PROTECTION (ESP) This CD player is used . • Set...
... playback for 40 seconds. 5.) If the player is bumped or shaken the "bars" may start to fill up again and all skipping during most active uses. The 'Bars'increase. 3.) When all . NOTE: • The battery power consumes more quickly when the Electronic Skip Protection control is used in the memory. ELECTRONIC SKIP PROTECTION (ESP) This CD player is used . • Set...
Owners Manual
Page 14
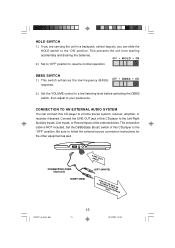
... the DBBS switch, then adjust to follow the external source connection instructions for the other equipment as well. Connect the LINE OUT jack of the external device. Set the DBBS(Bass Boost) switch of this CD player to the Left/Right Auxiliary Inputs, Line Inputs, or Record Inputs of this CD player to the "OFF" position. HOLD SWITCH 1.) If you are carrying the unit in a backpack, school bag etc, you can connect this CD player to a home stereo system...
... the DBBS switch, then adjust to follow the external source connection instructions for the other equipment as well. Connect the LINE OUT jack of the external device. Set the DBBS(Bass Boost) switch of this CD player to the Left/Right Auxiliary Inputs, Line Inputs, or Record Inputs of this CD player to the "OFF" position. HOLD SWITCH 1.) If you are carrying the unit in a backpack, school bag etc, you can connect this CD player to a home stereo system...
Owners Manual
Page 15
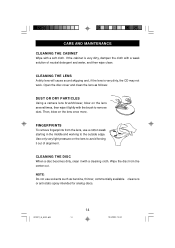
Open the disc cover and clean the lens as benzine, thinner, commercially available cleaners or anti-static spray intended for analog discs. HD9971_ib_drafts.p65 14 14 19/4/2002, 15:52 Then, blow on the lens several times, then wipe it lightly with a weak solution of alignment. Use only very light ...with the brush to the outside edge. FINGERPRINTS To remove fingerprints from the center out. NOTE: Do not use a cotton swab starting in the middle and working to remove dust. If the cabinet is very dirty, the CD may not work. CARE AND MAINTENANCE CLEANING THE CABINET Wipe with...
Open the disc cover and clean the lens as benzine, thinner, commercially available cleaners or anti-static spray intended for analog discs. HD9971_ib_drafts.p65 14 14 19/4/2002, 15:52 Then, blow on the lens several times, then wipe it lightly with a weak solution of alignment. Use only very light ...with the brush to the outside edge. FINGERPRINTS To remove fingerprints from the center out. NOTE: Do not use a cotton swab starting in the middle and working to remove dust. If the cabinet is very dirty, the CD may not work. CARE AND MAINTENANCE CLEANING THE CABINET Wipe with...

Owners Manual
Page 16
... TROUBLESHOOTING GUIDE If you experience a problem with soft cloth. Disc inserted incorrectly. Dirty or defective disc. Try another disc. Replace batteries. Clean or replace disc. SYMPTOM Unit will not play. SOLUTION Replace batteries. No sound from headphones. Headphone plug not inserted correctly. Defective disc. Reinsert disc correctly. Lens: see page 14. 'Care and Maintenance' Reinsert headphone plug correctly. Raise volume controls on main unit and/or headphone cable. SERVICE FOR ADDITIONAL SET-UP OR OPERATING...
... TROUBLESHOOTING GUIDE If you experience a problem with soft cloth. Disc inserted incorrectly. Dirty or defective disc. Try another disc. Replace batteries. Clean or replace disc. SYMPTOM Unit will not play. SOLUTION Replace batteries. No sound from headphones. Headphone plug not inserted correctly. Defective disc. Reinsert disc correctly. Lens: see page 14. 'Care and Maintenance' Reinsert headphone plug correctly. Raise volume controls on main unit and/or headphone cable. SERVICE FOR ADDITIONAL SET-UP OR OPERATING...
Owners Manual
Page 17
... adjustments which the serial number has been defaced, modified or removed. • Damage to equipment not properly connected to compact discs or cassettes. THIS WARRANTY IS NON-TRANSFERABLE AND APPLIES ONLY TO THE ORIGINAL PURCHASER AND DOES NOT EXTEND TO SUBSEQUENT OWNERS OF THE PRODUCT. How does state law apply to follow operating instructions. • Use of original purchase in our discretion. EMERSON RADIO...
... adjustments which the serial number has been defaced, modified or removed. • Damage to equipment not properly connected to compact discs or cassettes. THIS WARRANTY IS NON-TRANSFERABLE AND APPLIES ONLY TO THE ORIGINAL PURCHASER AND DOES NOT EXTEND TO SUBSEQUENT OWNERS OF THE PRODUCT. How does state law apply to follow operating instructions. • Use of original purchase in our discretion. EMERSON RADIO...