

Owners Manual
Page 2
... magnitude to persons WARNING: TO REDUCE THE RISK OF ELECTRIC SHOCK DO NOT REMOVE COVER (OR BACK), NO USERSERVICEABLE PARTS INSIDE REFER SERVICING TO QUALIFIED SERVICE PERSONNEL. Install in any heat sources such as power-supply cord or plug is intended to alert the user to the presence of electric shock to constitute a risk of important operating and maintenance (servicing) instructions in the...
... magnitude to persons WARNING: TO REDUCE THE RISK OF ELECTRIC SHOCK DO NOT REMOVE COVER (OR BACK), NO USERSERVICEABLE PARTS INSIDE REFER SERVICING TO QUALIFIED SERVICE PERSONNEL. Install in any heat sources such as power-supply cord or plug is intended to alert the user to the presence of electric shock to constitute a risk of important operating and maintenance (servicing) instructions in the...
Owners Manual
Page 3
... set up or operation of all the advanced features we have any problem with CD player, digital tuner, 3-way tower speakers, and powered subwoofer. If you have built into this system. Model No: RS1008 Serial No: RS1008_ib042303.p65 2 2 23/4/2003, 14:51 Please call the Emerson Customer Service Hotline, toll free, at 800-898-9020. Thank you for purchasing this Emerson audio product. For future reference, record the serial number in perfect working...
... set up or operation of all the advanced features we have any problem with CD player, digital tuner, 3-way tower speakers, and powered subwoofer. If you have built into this system. Model No: RS1008 Serial No: RS1008_ib042303.p65 2 2 23/4/2003, 14:51 Please call the Emerson Customer Service Hotline, toll free, at 800-898-9020. Thank you for purchasing this Emerson audio product. For future reference, record the serial number in perfect working...
Owners Manual
Page 4
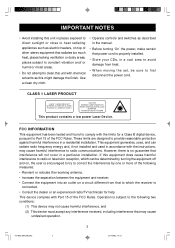
... or moist areas. • Do not attempt to clean this might damage the finish. However, there is properly installed. • Store your CDs, in a cool area to avoid damage from that may cause harmful interference to radio communications. Use a clean dry cloth. • Operate controls and switches as this unit with Part 15 of the FCC Rules. RS1008_ib042303.p65 3 3 23...
... or moist areas. • Do not attempt to clean this might damage the finish. However, there is properly installed. • Store your CDs, in a cool area to avoid damage from that may cause harmful interference to radio communications. Use a clean dry cloth. • Operate controls and switches as this unit with Part 15 of the FCC Rules. RS1008_ib042303.p65 3 3 23...
Owners Manual
Page 5
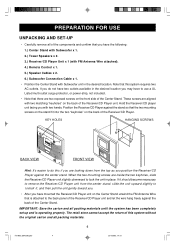
...the Center Stand unwind the FM Antenna Wire that you with Subwoofer unit in the desired location. Hold the Receiver/CD player unit facing you have to use a UL Listed multi-outlet surge protector, or power-strip, not included. • ...system has been completely set up and is attached to remove the Receiver/CD Player unit from the top as you may have the following: 1.) Center Stand with Subwoofer x 1. 2.) Tower Speakers x 2. 3.) Receiver/CD Player Unit x 1 (with FM Antenna Wire attached). 4.) Remote Control x 1. 5.) Speaker Cables x 2. 6.) Subwoofer Connection Cable x 1. •...
...the Center Stand unwind the FM Antenna Wire that you with Subwoofer unit in the desired location. Hold the Receiver/CD player unit facing you have to use a UL Listed multi-outlet surge protector, or power-strip, not included. • ...system has been completely set up and is attached to remove the Receiver/CD Player unit from the top as you may have the following: 1.) Center Stand with Subwoofer x 1. 2.) Tower Speakers x 2. 3.) Receiver/CD Player Unit x 1 (with FM Antenna Wire attached). 4.) Remote Control x 1. 5.) Speaker Cables x 2. 6.) Subwoofer Connection Cable x 1. •...

Owners Manual
Page 6
... Center Stand before you connect the speakers to make the connections correctly. Insert the bare wires from the right tower speaker to lock the wires in place. TOWER SPEAKERS Locate the color-coded speakers cables. Black Wire Red Wire Red Black BACK PANEL Connect the other end of the color-coded speaker cables to the black terminal of the tower speakers are connected incorrectly the sound may be mounted on...
... Center Stand before you connect the speakers to make the connections correctly. Insert the bare wires from the right tower speaker to lock the wires in place. TOWER SPEAKERS Locate the color-coded speakers cables. Black Wire Red Wire Red Black BACK PANEL Connect the other end of the color-coded speaker cables to the black terminal of the tower speakers are connected incorrectly the sound may be mounted on...
Owners Manual
Page 10
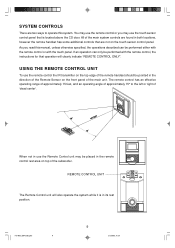
... main system controls are found in the direction of the Remote Sensor on top of the subwoofer. REMOTE CONTROL UNIT The Remote Control unit will clearly indicate "REMOTE CONTROL ONLY". You may be performed either with the remote control or with the remote control, the instructions for that operation will also operate the system while it is located above the CD door. When not in use the remote control the IR...
... main system controls are found in the direction of the Remote Sensor on top of the subwoofer. REMOTE CONTROL UNIT The Remote Control unit will clearly indicate "REMOTE CONTROL ONLY". You may be performed either with the remote control or with the remote control, the instructions for that operation will also operate the system while it is located above the CD door. When not in use the remote control the IR...
Owners Manual
Page 11
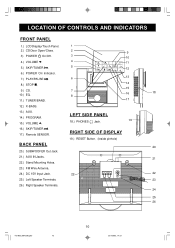
....) SUBWOOFER Out Jack. 21.) AUX IN Jacks. 21 22.) Stand Mounting Holes. 23.) FM Wire Antenna. 24.) DC 15V Input Jack. 22 22 25.) Left Speaker Terminals. 23 26.) Right Speaker Terminals. 24 25 26 RS1008_ib042303.p65 10 10 23/4/2003, 14:51 LOCATION OF CONTROLS AND INDICATORS FRONT PANEL 1.) LCD Display/Touch Panel. 1 2.) CD Door Open/Close. 2 3) POWER On/Off. 3 4.) VOLUME . 4 5.) SKIP/TUNER . 5 6.) POWER 'On'Indicator. 7.) PLAY/PAUSE . 6 8.) STOP . 9.) CD...
....) SUBWOOFER Out Jack. 21.) AUX IN Jacks. 21 22.) Stand Mounting Holes. 23.) FM Wire Antenna. 24.) DC 15V Input Jack. 22 22 25.) Left Speaker Terminals. 23 26.) Right Speaker Terminals. 24 25 26 RS1008_ib042303.p65 10 10 23/4/2003, 14:51 LOCATION OF CONTROLS AND INDICATORS FRONT PANEL 1.) LCD Display/Touch Panel. 1 2.) CD Door Open/Close. 2 3) POWER On/Off. 3 4.) VOLUME . 4 5.) SKIP/TUNER . 5 6.) POWER 'On'Indicator. 7.) PLAY/PAUSE . 6 8.) STOP . 9.) CD...
Owners Manual
Page 12
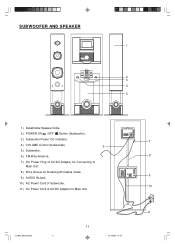
RS1008_ib042303.p65 11 11 11 23/4/2003, 14:59 SUBWOOFER AND SPEAKER 1 2 3 4 5 1.) Detachable Speaker Grille. 2.) POWER ON /OFF Button (Subwoofer). 3.) Subwoofer Power 'On'Indicator. 7 4.) VOLUME Control (Subwoofer). 6 5.) Subwoofer. 6.) FM Wire Antenna. 8 7.) DC Power Plug of AC/DC Adapter for Connecting to Main Unit. 8.) Wire Groove for Dressing All Cables inside. 9 9.) AUDIO IN Jack. 10.) AC Power Cord of Subwoofer. 10 11.) AC Power Cord of AC/DC Adapter for Main Unit.
RS1008_ib042303.p65 11 11 11 23/4/2003, 14:59 SUBWOOFER AND SPEAKER 1 2 3 4 5 1.) Detachable Speaker Grille. 2.) POWER ON /OFF Button (Subwoofer). 3.) Subwoofer Power 'On'Indicator. 7 4.) VOLUME Control (Subwoofer). 6 5.) Subwoofer. 6.) FM Wire Antenna. 8 7.) DC Power Plug of AC/DC Adapter for Connecting to Main Unit. 8.) Wire Groove for Dressing All Cables inside. 9 9.) AUDIO IN Jack. 10.) AC Power Cord of Subwoofer. 10 11.) AC Power Cord of AC/DC Adapter for Main Unit.
Owners Manual
Page 13
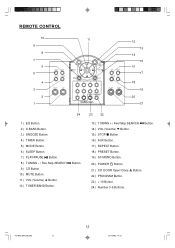
... AUX REPEAT ST/MONO PRESET POWER 12 13 14 15 16 17 18 19 20 21 24 1.) EQ Button. 2.) X-BASS Button. 3.) SNOOZE Button. 4.) TIMER Button. 5.) MODE Button. 6.) SLEEP Button. 7.) PLAY/PAUSE Button. 8.) TUNING - / Rev Skip-SEARCH 9.) CD Button. 10.) MUTE Button. 11.) VOL (Volume) Button. 12.) TUNER/BAND Button. Button. 23 22 13.) TUNING + / Fwd Skip-SEARCH 14.) VOL (Volume) Button. 15.) STOP Button. 16.) AUX Button. 17.) REPEAT Button. 18.) PRESET Button. 19.) ST/MONO Button. Button. 20.) POWER Button. 21.) CD DOOR Open/Close 22.) PROGRAM Button. 23.) + 10 Button. 24.) Number...
... AUX REPEAT ST/MONO PRESET POWER 12 13 14 15 16 17 18 19 20 21 24 1.) EQ Button. 2.) X-BASS Button. 3.) SNOOZE Button. 4.) TIMER Button. 5.) MODE Button. 6.) SLEEP Button. 7.) PLAY/PAUSE Button. 8.) TUNING - / Rev Skip-SEARCH 9.) CD Button. 10.) MUTE Button. 11.) VOL (Volume) Button. 12.) TUNER/BAND Button. Button. 23 22 13.) TUNING + / Fwd Skip-SEARCH 14.) VOL (Volume) Button. 15.) STOP Button. 16.) AUX Button. 17.) REPEAT Button. 18.) PRESET Button. 19.) ST/MONO Button. Button. 20.) POWER Button. 21.) CD DOOR Open/Close 22.) PROGRAM Button. 23.) + 10 Button. 24.) Number...

Owners Manual
Page 15
... the display until you have installed batteries in the Remote Control unit. • Make sure that adjusts the tone for popular types of the Receiver/CD Player unit. Subwoofer POWER ON /OFF Button (on Subwoofer only) Press this button to the appropriate terminals and jacks on the remote to switch the X-BASS circuit 'On'or 'Off". VOLUME / Buttons Press these buttons on the touch panel or on the back of music. The Subwoofer Power...
... the display until you have installed batteries in the Remote Control unit. • Make sure that adjusts the tone for popular types of the Receiver/CD Player unit. Subwoofer POWER ON /OFF Button (on Subwoofer only) Press this button to the appropriate terminals and jacks on the remote to switch the X-BASS circuit 'On'or 'Off". VOLUME / Buttons Press these buttons on the touch panel or on the back of music. The Subwoofer Power...
Owners Manual
Page 17
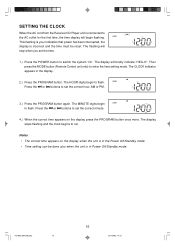
... to switch the system 'On'. The display will begin to the AC outlet for the first time, the time display will briefly indicate "HELLO". The CLOCK indicator appears in Power Off/Standby mode. The flashing will stop when you set the correct hour, AM or PM. 3.) Press the PROGRAM button again. The HOUR digits begin flashing. SETTING THE CLOCK When the AC cord from the Receiver/CD Player...
... to switch the system 'On'. The display will begin to the AC outlet for the first time, the time display will briefly indicate "HELLO". The CLOCK indicator appears in Power Off/Standby mode. The flashing will stop when you set the correct hour, AM or PM. 3.) Press the PROGRAM button again. The HOUR digits begin flashing. SETTING THE CLOCK When the AC cord from the Receiver/CD Player...

Owners Manual
Page 18
... desired station. 4.) Adjust the main VOLUME, EQ, X-BASS, and Subwoofer VOLUME controls as follows: • Manual Tuning Repeatedly press the or buttons until the tuner stops on that the lead wire FM Antenna, attached to the FM Antenna screw terminal on . Antenna Information FM Make sure that station. LISTENING TO RADIO Reminder: Unless otherwise specified you shut the power off and the display again shows the correct time. The touch panel display lighting turns on...
... desired station. 4.) Adjust the main VOLUME, EQ, X-BASS, and Subwoofer VOLUME controls as follows: • Manual Tuning Repeatedly press the or buttons until the tuner stops on that the lead wire FM Antenna, attached to the FM Antenna screw terminal on . Antenna Information FM Make sure that station. LISTENING TO RADIO Reminder: Unless otherwise specified you shut the power off and the display again shows the correct time. The touch panel display lighting turns on...
Owners Manual
Page 21
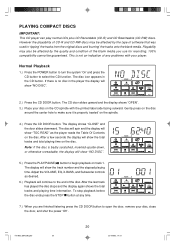
... playing time. However the playability of CD-R and CD-RW discs may also be guaranteed. The CD door slides upward and the display shows "OPEN". 3.) Place your player. The display shows "CLOSE" and the door slides downward. Adjust the VOLUME, EQ, X-BASS, and Subwoofer controls as the player reads the Table Of Contents on track 1. After a few seconds the display will continue to select the CD function. Normal Playback 1.) Press the POWER button to turn...
... playing time. However the playability of CD-R and CD-RW discs may also be guaranteed. The CD door slides upward and the display shows "OPEN". 3.) Place your player. The display shows "CLOSE" and the door slides downward. Adjust the VOLUME, EQ, X-BASS, and Subwoofer controls as the player reads the Table Of Contents on track 1. After a few seconds the display will continue to select the CD function. Normal Playback 1.) Press the POWER button to turn...
Owners Manual
Page 22
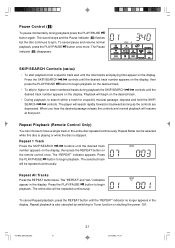
... disc continues to begin playback. When you hear the desired passage release the controls and normal playback will search rapidly forward or backward as long as the controls are depressed. The "REPEAT"and "ALL"indicators appear in the display. Repeat Mode can choose to search within a track for a specific musical passage, depress and hold the SKIP/ SEARCH / controls. Press the PLAY/PAUSE button to spin. Repeat playback is stopped...
... disc continues to begin playback. When you hear the desired passage release the controls and normal playback will search rapidly forward or backward as long as the controls are depressed. The "REPEAT"and "ALL"indicators appear in the display. Repeat Mode can choose to search within a track for a specific musical passage, depress and hold the SKIP/ SEARCH / controls. Press the PLAY/PAUSE button to spin. Repeat playback is stopped...
Owners Manual
Page 24
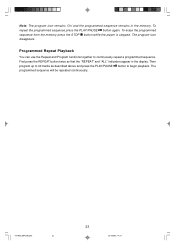
... the PLAY/PAUSE button to continuously repeat a programmed sequence. The programmed sequence will be repeated continuously. To repeat the programmed sequence press the PLAY/PAUSE button again. To erase the programmed sequence from the memory press the STOP button while the player is stopped. Note: The program icon remains 'On'and the programmed sequence remains in the display. Programmed Repeat Playback You can use the Repeat and Program functions together to begin playback. First press the REPEAT button...
... the PLAY/PAUSE button to continuously repeat a programmed sequence. The programmed sequence will be repeated continuously. To repeat the programmed sequence press the PLAY/PAUSE button again. To erase the programmed sequence from the memory press the STOP button while the player is stopped. Note: The program icon remains 'On'and the programmed sequence remains in the display. Programmed Repeat Playback You can use the Repeat and Program functions together to begin playback. First press the REPEAT button...
Owners Manual
Page 25
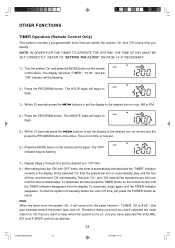
... "TIMER", "12:00", and the "ON" indicator will begin to flash. 5.) Within 10 seconds press the / buttons to set the display to the same function - The "OFF" indicator begins flashing. 7.) Repeat Steps 2 through 5 to hear when the system turns on the remote control twice. Therefore make sure that you have selected the radio station or CD that you have adjusted the VOLUME, EQ, and X-BASS controls as...
... "TIMER", "12:00", and the "ON" indicator will begin to flash. 5.) Within 10 seconds press the / buttons to set the display to the same function - The "OFF" indicator begins flashing. 7.) Repeat Steps 2 through 5 to hear when the system turns on the remote control twice. Therefore make sure that you have selected the radio station or CD that you have adjusted the VOLUME, EQ, and X-BASS controls as...
Owners Manual
Page 26
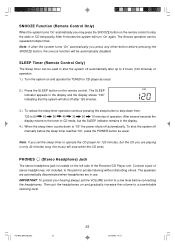
... power shuts off manually before pressing the SNOOZE button, the snooze function will stop the radio or CD temporarily. PHONES (Stereo Headphone) Jack The stereo headphone jack is only 40 minutes long, the music will be repeated multiple times. Connect a pair of operation. 1.) Turn the system on the remote control. After several seconds the display returns to the tuner or CD mode, but the CD you are in use. Then put the headphones on the remote control to stop...
... power shuts off manually before pressing the SNOOZE button, the snooze function will stop the radio or CD temporarily. PHONES (Stereo Headphone) Jack The stereo headphone jack is only 40 minutes long, the music will be repeated multiple times. Connect a pair of operation. 1.) Turn the system on the remote control. After several seconds the display returns to the tuner or CD mode, but the CD you are in use. Then put the headphones on the remote control to stop...
Owners Manual
Page 27
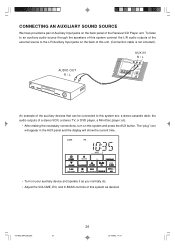
..., 14:51 etc. • After making the necessary connections, turn on your auxiliary device and operate it as you normally do. • Adjust the VOLUME, EQ, and X-BASS controls of this system and press the AUX button. To listen to an auxiliary audio source through the speakers of this system connect the L/R audio outputs of the external source to the L/R Auxiliary Input jacks on the back panel of a stereo VCR, a stereo TV, or DVD player, a Mini-Disc player;
..., 14:51 etc. • After making the necessary connections, turn on your auxiliary device and operate it as you normally do. • Adjust the VOLUME, EQ, and X-BASS controls of this system and press the AUX button. To listen to an auxiliary audio source through the speakers of this system connect the L/R audio outputs of the external source to the L/R Auxiliary Input jacks on the back panel of a stereo VCR, a stereo TV, or DVD player, a Mini-Disc player;

Owners Manual
Page 28
If this occurs, use a toothpick, straightened paper clip, or similar object to reset the clock and re-program the preset station memories. RS1008_ib042303.p65 27 27 23/4/2003, 14:51 After turning 'On'the unit again, you will also erase all of the preset tuner memories, clock, and timer settings. RESET BUTTON This unit includes a special protective device to prevent permanent damage to shut down...
If this occurs, use a toothpick, straightened paper clip, or similar object to reset the clock and re-program the preset station memories. RS1008_ib042303.p65 27 27 23/4/2003, 14:51 After turning 'On'the unit again, you will also erase all of the preset tuner memories, clock, and timer settings. RESET BUTTON This unit includes a special protective device to prevent permanent damage to shut down...
Owners Manual
Page 30
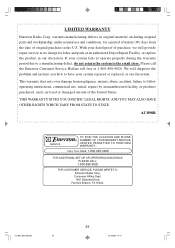
... system to follow operating instructions, commercial use and conditions, for labor and parts at 1-800-898-9020. Consumer Affairs Dept. 1901 Diplomat Drive, Farmers Branch, TX 75234. CALL TOLL FREE: 1-800-695-0098 FOR ADDITIONAL SET-UP OR OPERATING ASSISTANCE PLEASE CALL: 1-800-898-9020 FOR CUSTOMER SERVICE, PLEASE WRITE TO: Emerson Radio Corp. If your system repaired or replaced, at our discretion...
... system to follow operating instructions, commercial use and conditions, for labor and parts at 1-800-898-9020. Consumer Affairs Dept. 1901 Diplomat Drive, Farmers Branch, TX 75234. CALL TOLL FREE: 1-800-695-0098 FOR ADDITIONAL SET-UP OR OPERATING ASSISTANCE PLEASE CALL: 1-800-898-9020 FOR CUSTOMER SERVICE, PLEASE WRITE TO: Emerson Radio Corp. If your system repaired or replaced, at our discretion...