
Owners Manual
Page 1
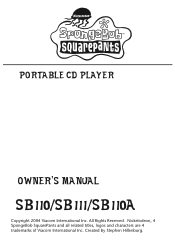
Nickelodeon, SpongeBob SquarePants and all related titles, logos and characters are trademarks of Viacom International Inc. Created by Stephen Hillenburg. All Rights Reserved. PORTABLE CD PLAYER OWNER'S MANUAL SB110/SB111/SB110A Copyright 2004 Viacom International Inc.
Nickelodeon, SpongeBob SquarePants and all related titles, logos and characters are trademarks of Viacom International Inc. Created by Stephen Hillenburg. All Rights Reserved. PORTABLE CD PLAYER OWNER'S MANUAL SB110/SB111/SB110A Copyright 2004 Viacom International Inc.
Owners Manual
Page 2
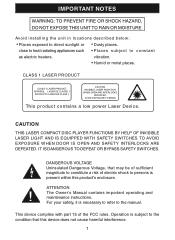
... Owner's Manual contains important operating and maintenance instructions. Operation is subject to the condition that may be of sufficient magnitude to constitute a risk of the FCC rules. IT IS DANGEROUS TO DEFEAT OR BYPASS SAFETY SWITCHES. CLASS 1 LASER PRODUCT CLASS 1 LASER PRODUCT APPAREIL LASER DE CLASSE 1 PRODUCTO LASER DE CLASE 1 CAUTION INVISIBLE LASER RADIATION WHEN OPEN AND INTERLOCKS DEFEATED. This device complies with part 15...
... Owner's Manual contains important operating and maintenance instructions. Operation is subject to the condition that may be of sufficient magnitude to constitute a risk of the FCC rules. IT IS DANGEROUS TO DEFEAT OR BYPASS SAFETY SWITCHES. CLASS 1 LASER PRODUCT CLASS 1 LASER PRODUCT APPAREIL LASER DE CLASSE 1 PRODUCTO LASER DE CLASE 1 CAUTION INVISIBLE LASER RADIATION WHEN OPEN AND INTERLOCKS DEFEATED. This device complies with part 15...
Owners Manual
Page 3
.... For future reference, record the serial number in places of high temperature or humidity over prolonged periods of enjoyment and trouble free operation. Read this manual before operating this unit in the space provided. Retain this audio product under license from Nickelodeon. Emerson Radio Corp. has produced this manual for future reference. Model No: SB110/SB111/SB110A Serial No 2 NOTES: • Please avoid using this unit to...
.... For future reference, record the serial number in places of high temperature or humidity over prolonged periods of enjoyment and trouble free operation. Read this manual before operating this unit in the space provided. Retain this audio product under license from Nickelodeon. Emerson Radio Corp. has produced this manual for future reference. Model No: SB110/SB111/SB110A Serial No 2 NOTES: • Please avoid using this unit to...
Owners Manual
Page 4
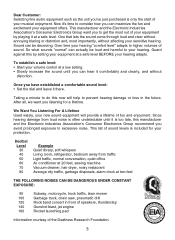
... for your musical enjoyment. Once you can hear it is too late, this now will provide a lifetime of your equipment by setting your equipment at a safe level. We Want You Listening For A Lifetime Used wisely, your hearing adapts. We Want...sound come through loud and clear without distortion. Now it there. To establish a safe level: • Start your hearing "comfort level" adapts to consider how you have established a comfortable sound level: • Set the dial and leave it 's time to higher volumes of the Deafness Research Foundation. Over time your volume control...
... for your musical enjoyment. Once you can hear it is too late, this now will provide a lifetime of your equipment by setting your equipment at a safe level. We Want You Listening For A Lifetime Used wisely, your hearing adapts. We Want...sound come through loud and clear without distortion. Now it there. To establish a safe level: • Start your hearing "comfort level" adapts to consider how you have established a comfortable sound level: • Set the dial and leave it 's time to higher volumes of the Deafness Research Foundation. Over time your volume control...
Owners Manual
Page 5
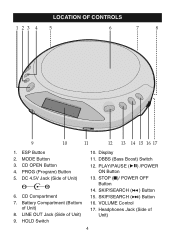
DBBS (Bass Boost) Switch 12. LOCATION OF CONTROLS 123 4 5 6 7 8 9 10 11 12 13 14 15 16 17 1. CD OPEN Button 4. Battery Compartment (Bottom of Unit) 4 PROG (Program) Button 5. STOP (I)/ POWER OFF Button 14. Headphones Jack (Side of Unit) 8. MODE Button 3. LINE OUT Jack (Side of Unit) - + 6. Display 11. SKIP/SEARCH ( ) Button 15. VOLUME Control 17. DC 4.5V Jack (Side of Unit) 9. HOLD Switch 10. SKIP/SEARCH ( ) Button 16. CD Compartment 7. PLAY/PAUSE ( ) /POWER ON Button 13. ESP Button 2.
DBBS (Bass Boost) Switch 12. LOCATION OF CONTROLS 123 4 5 6 7 8 9 10 11 12 13 14 15 16 17 1. CD OPEN Button 4. Battery Compartment (Bottom of Unit) 4 PROG (Program) Button 5. STOP (I)/ POWER OFF Button 14. Headphones Jack (Side of Unit) 8. MODE Button 3. LINE OUT Jack (Side of Unit) - + 6. Display 11. SKIP/SEARCH ( ) Button 15. VOLUME Control 17. DC 4.5V Jack (Side of Unit) 9. HOLD Switch 10. SKIP/SEARCH ( ) Button 16. CD Compartment 7. PLAY/PAUSE ( ) /POWER ON Button 13. ESP Button 2.
Owners Manual
Page 6
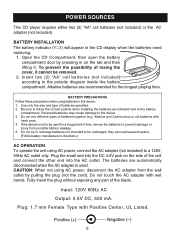
... any part of batteries together (e.g. Input: 120V 60Hz AC Output: 4.5V DC, 500 mA. Positive (+) 5 Negative ( ) Open the CD Compartment, then open the battery compartment door by pulling the plug (not the cord). Use only the size and type of losing the cover, it . they can overheat and rupture. (Follow battery manufacturer's directions.) AC OPERATION To operate the unit using batteries in the CD display when the batteries need replacing. 1. The batteries are...
... any part of batteries together (e.g. Input: 120V 60Hz AC Output: 4.5V DC, 500 mA. Positive (+) 5 Negative ( ) Open the CD Compartment, then open the battery compartment door by pulling the plug (not the cord). Use only the size and type of losing the cover, it . they can overheat and rupture. (Follow battery manufacturer's directions.) AC OPERATION To operate the unit using batteries in the CD display when the batteries need replacing. 1. The batteries are...
Owners Manual
Page 7
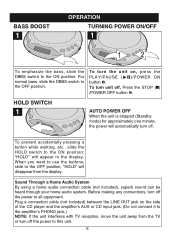
...., slide the HOLD switch to all equipment. Before making any connections, turn off , Press the STOP (I) /POWER OFF button ƒ. "HOLD" will automatically turn off the power to the ON position. Plug a connection cable (not included) between the LINE OUT jack on , press the PLAY/PAUSE ( )/POWER ON button ‚. HOLD SWITCH 1 AUTO POWER OFF When the unit is stopped (Standby mode) for approximately one minute, the power will appear in the display. BASS BOOST 1 OPERATION TURNING POWER ON/OFF 1 12...
...., slide the HOLD switch to all equipment. Before making any connections, turn off , Press the STOP (I) /POWER OFF button ƒ. "HOLD" will automatically turn off the power to the ON position. Plug a connection cable (not included) between the LINE OUT jack on , press the PLAY/PAUSE ( )/POWER ON button ‚. HOLD SWITCH 1 AUTO POWER OFF When the unit is stopped (Standby mode) for approximately one minute, the power will appear in the display. BASS BOOST 1 OPERATION TURNING POWER ON/OFF 1 12...

Owners Manual
Page 8
... once again to turn off or wait approximately 60 seconds and the unit will stop mode to resume playback. 3 4 4 3 1 2 Adjust the VOLUME control ‚ and DBBS switch ƒ as desired. the total number of tracks and playing time will blink. Press the STOP (I )/POWER OFF button to start playback. CD OPERATION TO PLAY A CD (THIS UNIT CAN PLAY STANDARD OR CDR/RW DISCS) 1 2 Open the CD compartment lid by pressing the CD OPEN button. When the disc is inserted...
... once again to turn off or wait approximately 60 seconds and the unit will stop mode to resume playback. 3 4 4 3 1 2 Adjust the VOLUME control ‚ and DBBS switch ƒ as desired. the total number of tracks and playing time will blink. Press the STOP (I )/POWER OFF button to start playback. CD OPERATION TO PLAY A CD (THIS UNIT CAN PLAY STANDARD OR CDR/RW DISCS) 1 2 Open the CD compartment lid by pressing the CD OPEN button. When the disc is inserted...
Owners Manual
Page 9
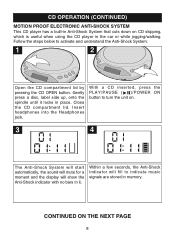
... will show the Anti-Shock indicator with no bars in it locks in the car or while jogging/walking. Insert headphones into the Headphones jack. With a CD inserted, press the PLAY/PAUSE ( )/POWER ON button to turn the unit on CD skipping, which is useful when using the CD player in place. Gently press a disc, label side up, onto the spindle until it .
... will show the Anti-Shock indicator with no bars in it locks in the car or while jogging/walking. Insert headphones into the Headphones jack. With a CD inserted, press the PLAY/PAUSE ( )/POWER ON button to turn the unit on CD skipping, which is useful when using the CD player in place. Gently press a disc, label side up, onto the spindle until it .
Owners Manual
Page 10
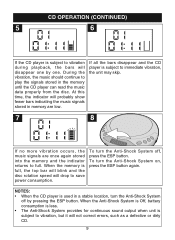
... one. CD OPERATION (CONTINUED) 5 6 If the CD player is full, the top bar will blink and the disc rotation speed will drop to save power consumption. When the memory is subject to play the signals stored in a stable location, turn the Anti-Shock System off , press the ESP button. During the vibration, the music should continue to vibration during playback, the...
... one. CD OPERATION (CONTINUED) 5 6 If the CD player is full, the top bar will blink and the disc rotation speed will drop to save power consumption. When the memory is subject to play the signals stored in a stable location, turn the Anti-Shock System off , press the ESP button. During the vibration, the music should continue to vibration during playback, the...
Owners Manual
Page 11
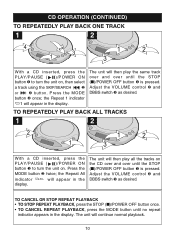
... display. Adjust the VOLUME control ƒ and DBBS switch „ as desired. The unit will continue normal playback. 10 TO CANCEL OR STOP REPEAT PLAYBACK • TO STOP REPEAT PLAYBACK, press the STOP (I )/POWER OFF button ‚ is pressed. The unit will then play the same track over and over until the STOP (I )/POWER OFF button once. • TO CANCEL REPEAT PLAYBACK, press the MODE button until the STOP (I)/POWER OFF button ‚ is pressed. Press the MODE button...
... display. Adjust the VOLUME control ƒ and DBBS switch „ as desired. The unit will continue normal playback. 10 TO CANCEL OR STOP REPEAT PLAYBACK • TO STOP REPEAT PLAYBACK, press the STOP (I )/POWER OFF button ‚ is pressed. The unit will then play the same track over and over until the STOP (I )/POWER OFF button once. • TO CANCEL REPEAT PLAYBACK, press the MODE button until the STOP (I)/POWER OFF button ‚ is pressed. Press the MODE button...
Owners Manual
Page 12
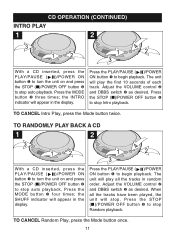
... button ‚ to begin playback. Adjust the VOLUME control ƒ and DBBS switch „ as desired. Adjust the VOLUME control ƒ and DBBS switch „ as desired. CD OPERATION (CONTINUED) INTRO PLAY 1 2 3 1 2 1 2 3 4 With a CD inserted, press the PLAY/PAUSE ( )/POWER ON button ‚ to turn the unit on and press the STOP (I)/POWER OFF button ƒ to stop auto playback. The unit will play the first 10 seconds of each track. TO CANCEL Random Play, press the Mode button...
... button ‚ to begin playback. Adjust the VOLUME control ƒ and DBBS switch „ as desired. Adjust the VOLUME control ƒ and DBBS switch „ as desired. CD OPERATION (CONTINUED) INTRO PLAY 1 2 3 1 2 1 2 3 4 With a CD inserted, press the PLAY/PAUSE ( )/POWER ON button ‚ to turn the unit on and press the STOP (I)/POWER OFF button ƒ to stop auto playback. The unit will play the first 10 seconds of each track. TO CANCEL Random Play, press the Mode button...
Owners Manual
Page 13
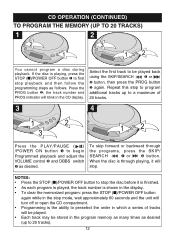
... unit will turn off or open the CD compartment. • Programming is the ability to preselect the order in which a series of 20 tracks. 3 4 1 2 3 12 Press the PLAY/PAUSE ( ) /POWER ON button ‚ to a maximum of tracks will blink in the program memory as many times as desired (up to begin Programmed playback and adjust the VOLUME control ƒ and DBBS switch „ as follows. the track number and...
... unit will turn off or open the CD compartment. • Programming is the ability to preselect the order in which a series of 20 tracks. 3 4 1 2 3 12 Press the PLAY/PAUSE ( ) /POWER ON button ‚ to a maximum of tracks will blink in the program memory as many times as desired (up to begin Programmed playback and adjust the VOLUME control ƒ and DBBS switch „ as follows. the track number and...
Owners Manual
Page 14
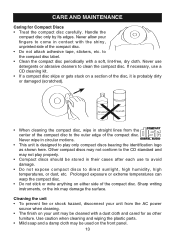
... the shiny, unprinted side of the compact disc. • Do not attach adhesive tape, stickers, etc. Other compact discs may not conform to the CD standard and may be cleaned with a soft, lint-free, dry cloth. Use caution when cleaning and wiping the plastic parts. • Mild soap and a damp cloth may not play only compact discs bearing the identification logo as other furniture...
... the shiny, unprinted side of the compact disc. • Do not attach adhesive tape, stickers, etc. Other compact discs may not conform to the CD standard and may be cleaned with a soft, lint-free, dry cloth. Use caution when cleaning and wiping the plastic parts. • Mild soap and a damp cloth may not play only compact discs bearing the identification logo as other furniture...
Owners Manual
Page 15
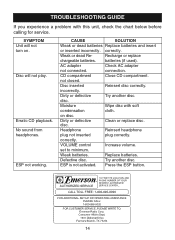
... calling for service. set to minimum. Press the ESP button. TO FIND THE LOCATION AND PHONE NUMBER OF YOUR ¨ NEAREST AUTHORIZED AUTHORIZED SERVICE SERVICE CENTER... CAUSE SOLUTION Weak or dead batteries Replace batteries and insert or inserted incorrectly. incorrectly. on . VOLUME control Increase volume. Defective disc. Disc will not turn on disc. CD compartment Close CD compartment. Headphone Reinsert headphone plug not inserted plug correctly. TROUBLESHOOTING GUIDE If you experience a problem with soft...
... calling for service. set to minimum. Press the ESP button. TO FIND THE LOCATION AND PHONE NUMBER OF YOUR ¨ NEAREST AUTHORIZED AUTHORIZED SERVICE SERVICE CENTER... CAUSE SOLUTION Weak or dead batteries Replace batteries and insert or inserted incorrectly. incorrectly. on . VOLUME control Increase volume. Defective disc. Disc will not turn on disc. CD compartment Close CD compartment. Headphone Reinsert headphone plug not inserted plug correctly. TROUBLESHOOTING GUIDE If you experience a problem with soft...

Owners Manual
Page 16
... SPECIFIC LEGAL RIGHTS, AND YOU MAY ALSO HAVE OTHER RIGHTS WHICH VARY FROM STATE TO STATE. AU898M 15 in a padded box, enclose your dated proof of purchase, we will provide repair service at an authorized Depot Repair Facility, or replace the product in the U.S. LIMITED WARRANTY Emerson Radio Corp. With your check or money order payable to follow operating instructions, commercial use...
... SPECIFIC LEGAL RIGHTS, AND YOU MAY ALSO HAVE OTHER RIGHTS WHICH VARY FROM STATE TO STATE. AU898M 15 in a padded box, enclose your dated proof of purchase, we will provide repair service at an authorized Depot Repair Facility, or replace the product in the U.S. LIMITED WARRANTY Emerson Radio Corp. With your check or money order payable to follow operating instructions, commercial use...

Owners Manual
Page 17
¤ EMERSON PART NO.: 21-2046 407-02 Printed in China
¤ EMERSON PART NO.: 21-2046 407-02 Printed in China