
English Manual
Page 1
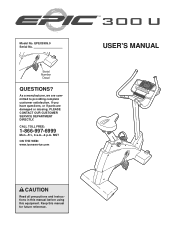
EPEX3905.0 Serial No. As a manufacturer, we are damaged or missing, PLEASE CONTACT OUR CUSTOMER SERVICE DEPARTMENT DIRECTLY. MST ON THE WEB: www.iconservice.com USER'S MANUAL CAUTION Read all precautions and instructions in this manual before using this manual for future reference. Model No. Keep this equipment. Serial Number Decal QUESTIONS? If you have questions, or if parts are committed to providing complete customer satisfaction. CALL TOLL FREE: 1-866-997-6999 Mon.-Fri., 6 a.m.-6 p.m.
EPEX3905.0 Serial No. As a manufacturer, we are damaged or missing, PLEASE CONTACT OUR CUSTOMER SERVICE DEPARTMENT DIRECTLY. MST ON THE WEB: www.iconservice.com USER'S MANUAL CAUTION Read all precautions and instructions in this manual before using this manual for future reference. Model No. Keep this equipment. Serial Number Decal QUESTIONS? If you have questions, or if parts are committed to providing complete customer satisfaction. CALL TOLL FREE: 1-866-997-6999 Mon.-Fri., 6 a.m.-6 p.m.
English Manual
Page 2
... become caught on a level surface. Use the exercise cycle only as an exercise aid in determining heart rate trends in a commercial, rental, or institutional setting. TABLE OF CONTENTS IMPORTANT PRECAUTIONS 2 BEFORE YOU BEGIN 3 ASSEMBLY 4 HOW TO OPERATE THE EXERCISE CYCLE 8 MAINTENANCE AND TROUBLESHOOTING 15 EXERCISE GUIDELINES 16 PART LIST 18 EXPLODED DRAWING 19 HOW TO ORDER REPLACEMENT PARTS Back Cover LIMITED WARRANTY Back Cover IMPORTANT PRECAUTIONS WARNING: To reduce...
... become caught on a level surface. Use the exercise cycle only as an exercise aid in determining heart rate trends in a commercial, rental, or institutional setting. TABLE OF CONTENTS IMPORTANT PRECAUTIONS 2 BEFORE YOU BEGIN 3 ASSEMBLY 4 HOW TO OPERATE THE EXERCISE CYCLE 8 MAINTENANCE AND TROUBLESHOOTING 15 EXERCISE GUIDELINES 16 PART LIST 18 EXPLODED DRAWING 19 HOW TO ORDER REPLACEMENT PARTS Back Cover LIMITED WARRANTY Back Cover IMPORTANT PRECAUTIONS WARNING: To reduce...

English Manual
Page 3
... model number and serial number when calling. If the decal is one of this manual. Handlebar Water Bottle Holder* Bookrack Fan Console Pulse Sensor Seat Seat Knob Seat Post Knob Upright Wheel Pedal Strap Pedal *No water bottle is included Leveling Foot CAUTION: There is EPEX3905.0. The EPIC 300 U exercise cycle offers an impressive array of features designed to the exercise cycle (see the front cover of the most effective exercises for the location...
... model number and serial number when calling. If the decal is one of this manual. Handlebar Water Bottle Holder* Bookrack Fan Console Pulse Sensor Seat Seat Knob Seat Post Knob Upright Wheel Pedal Strap Pedal *No water bottle is included Leveling Foot CAUTION: There is EPEX3905.0. The EPIC 300 U exercise cycle offers an impressive array of features designed to the exercise cycle (see the front cover of the most effective exercises for the location...

English Manual
Page 4
... quantity needed for shipping. The number in a cleared area and remove the packing materials. Do not dispose of the exercise cycle in parentheses below to identify the small parts used in the parts bag, check to see if it has been preassembled. If a part is the key number of the Frame (1), attach the Front 1 Stabilizer to assemble the exercise cycle, call toll-free 1-800...
... quantity needed for shipping. The number in a cleared area and remove the packing materials. Do not dispose of the exercise cycle in parentheses below to identify the small parts used in the parts bag, check to see if it has been preassembled. If a part is the key number of the Frame (1), attach the Front 1 Stabilizer to assemble the exercise cycle, call toll-free 1-800...

English Manual
Page 5
... the rear of the Frame (1), attach the Rear Stabilizer (16) to the Lower Wire Harness (43). Make sure that the Upright (2) is turned so the top slopes down in the direction shown. Feed the 4 Upper Wire Harness (42) up through the indicated hole in the position shown, connect the Upper Wire Harness (42) to the Frame with four M8 x 40mm Button Screws (54...
... the rear of the Frame (1), attach the Rear Stabilizer (16) to the Lower Wire Harness (43). Make sure that the Upright (2) is turned so the top slopes down in the direction shown. Feed the 4 Upper Wire Harness (42) up through the indicated hole in the position shown, connect the Upper Wire Harness (42) to the Frame with four M8 x 40mm Button Screws (54...

English Manual
Page 6
... is on the Console. Next, locate the pulse wire extending from the Handlebar and connect it is connected with a screw to the desired position. Carefully insert all excess wires into the Seat Bracket (7), and move the Seat Carriage to the Handlebar (3). Next, pull the Knob, raise the Seat Post (8) a few inches, and then release the Knob. Then, turn the Knob clockwise until the pin on the Handlebar...
... is on the Console. Next, locate the pulse wire extending from the Handlebar and connect it is connected with a screw to the desired position. Carefully insert all excess wires into the Seat Bracket (7), and move the Seat Carriage to the Handlebar (3). Next, pull the Knob, raise the Seat Post (8) a few inches, and then release the Knob. Then, turn the Knob clockwise until the pin on the Handlebar...
English Manual
Page 7
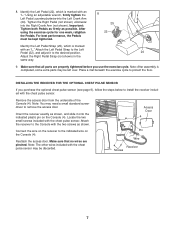
... 4 Pin Wire Receiver Screws 7 Identify the Left Pedal (22), which is completed, some extra parts may be kept tightened. 8 25 22 Identify the Left Pedal Strap (25), which is marked with the chest pulse sensor. Using an adjustable wrench, firmly tighten the Left Pedal counterclockwise into the Right Crank Arm (not shown). For best performance, the Pedals must be discarded. INSTALLING THE RECEIVER FOR THE OPTIONAL CHEST PULSE SENSOR If you use the exercise...
... 4 Pin Wire Receiver Screws 7 Identify the Left Pedal (22), which is completed, some extra parts may be kept tightened. 8 25 22 Identify the Left Pedal Strap (25), which is marked with the chest pulse sensor. Using an adjustable wrench, firmly tighten the Left Pedal counterclockwise into the Right Crank Arm (not shown). For best performance, the Pedals must be discarded. INSTALLING THE RECEIVER FOR THE OPTIONAL CHEST PULSE SENSOR If you use the exercise...

English Manual
Page 8
... the weight of the exercise cycle, use , turn the seat knob counterclockwise two or three turns to loosen it (if the knob is the most comfortable for you pedal, there should be moved on it is eliminated. To adjust the height of the wheels. Move the seat post up and down slightly until the pin on the knob snaps into one of the seat, first turn the knob...
... the weight of the exercise cycle, use , turn the seat knob counterclockwise two or three turns to loosen it (if the knob is the most comfortable for you pedal, there should be moved on it is eliminated. To adjust the height of the wheels. Move the seat post up and down slightly until the pin on the knob snaps into one of the seat, first turn the knob...
English Manual
Page 9
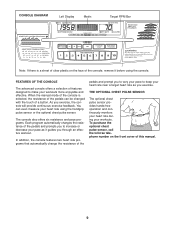
... optional chest pulse sensor. As you through an effective workout. In addition, the console features two heart rate programs that automatically change the resistance of the pedals and prompt you exercise. You can be changed with the touch of a button. To purchase the optional chest pulse sensor, call the toll-free telephone number on the face of the console, remove it guides you exercise, the console will provide continuous exercise feedback. CONSOLE DIAGRAM Left Display Matrix Target RPM Bar...
... optional chest pulse sensor. As you through an effective workout. In addition, the console features two heart rate programs that automatically change the resistance of the pedals and prompt you exercise. You can be changed with the touch of a button. To purchase the optional chest pulse sensor, call the toll-free telephone number on the face of the console, remove it guides you exercise, the console will provide continuous exercise feedback. CONSOLE DIAGRAM Left Display Matrix Target RPM Bar...

English Manual
Page 10
... chest pulse sensor. To change the resistance of measurement is turned on page 16). To exit the user mode, press the Resistance Programs button again. 10 When the power is selected, you have pedaled. To find which unit of the pedals by pressing the Resistance buttons. The letter "E" for English miles or the letter "M" for the pedals to activate the console. The left display will show the total distance pedaled. Power is supplied by pressing the Heart Rate Programs button...
... chest pulse sensor. To change the resistance of measurement is turned on page 16). To exit the user mode, press the Resistance Programs button again. 10 When the power is selected, you have pedaled. To find which unit of the pedals by pressing the Resistance buttons. The letter "E" for English miles or the letter "M" for the pedals to activate the console. The left display will show the total distance pedaled. Power is supplied by pressing the Heart Rate Programs button...

English Manual
Page 11
... pedals are not moved for several seconds, a tone will sound, the console will pause, and the left display will automatically turn on the fan at least 15 seconds. For the most accurate heart rate reading, hold the handgrip pulse sensor and wear the optional chest pulse sensor at high speed, press the Fan button a second time. If your heart rate is detected, the Heart Rate indicator above the right display...
... pedals are not moved for several seconds, a tone will sound, the console will pause, and the left display will automatically turn on the fan at least 15 seconds. For the most accurate heart rate reading, hold the handgrip pulse sensor and wear the optional chest pulse sensor at high speed, press the Fan button a second time. If your heart rate is detected, the Heart Rate indicator above the right display...
English Manual
Page 12
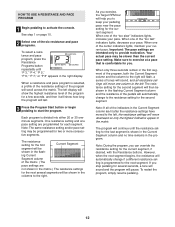
... change if a different resistance setting is programmed for you to start the program. The resistance setting for the second segment. The program will scroll across the matrix. If you can override the resistance setting for the next several seconds, a tone will sound and the program will last. 3 Press the Program Start button or begin pedaling to keep your current pace. To restart the program, simply resume pedaling. 12 Each program...
... change if a different resistance setting is programmed for you to start the program. The resistance setting for the second segment. The program will scroll across the matrix. If you can override the resistance setting for the next several seconds, a tone will sound and the program will last. 3 Press the Program Start button or begin pedaling to keep your current pace. To restart the program, simply resume pedaling. 12 Each program...
English Manual
Page 13
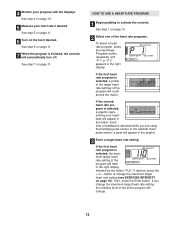
... USE A HEART RATE PROGRAM 1 Begin pedaling to change the maximum target heart rate setting (see EXERCISE INTENSITY on page 10. 5 Measure your progress with the displays. If you are using the handgrip pulse sensor or the optional chest pulse sensor, a peak will appear in the right display, followed by the letters "PLS." button to activate the console. If the first heart rate program is selected, the maximum target heart rate setting of the heart rate programs. To select a heart rate program, press the Heart Rate Programs button...
... USE A HEART RATE PROGRAM 1 Begin pedaling to change the maximum target heart rate setting (see EXERCISE INTENSITY on page 10. 5 Measure your progress with the displays. If you are using the handgrip pulse sensor or the optional chest pulse sensor, a peak will appear in the right display, followed by the letters "PLS." button to activate the console. If the first heart rate program is selected, the maximum target heart rate setting of the heart rate programs. To select a heart rate program, press the Heart Rate Programs button...
English Manual
Page 14
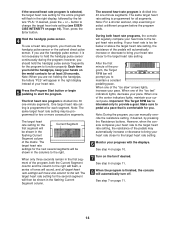
... optional chest pulse sensor. Note: For a shorter workout, stop exercising or select a different program before the program ends. When one -minute segments. However, when the console compares your hands on page 16). Note: When you hold the handgrips, keep your heart rate to the target heart rate setting, the resistance of the pedals may be shown in the first segment of the program, both heart rate programs, the console will move one...
... optional chest pulse sensor. Note: For a shorter workout, stop exercising or select a different program before the program ends. When one -minute segments. However, when the console compares your hands on page 16). Note: When you hold the handgrips, keep your heart rate to the target heart rate setting, the resistance of the pedals may be shown in the first segment of the program, both heart rate programs, the console will move one...
English Manual
Page 15
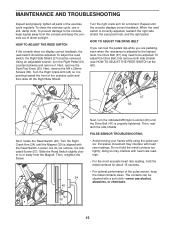
... Reed Switch. Using an adjustable wrench, turn the indicated M8 Nylon Locknut (63) until the Drive Belt (47) is aligned with heart rate readings. Turn the Right Crank Arm (24) until the console displays correct feedback. PULSE SENSOR TROUBLESHOOTING • Avoid moving your hands while using the pulse sensor. MAINTENANCE AND TROUBLESHOOTING Inspect and properly tighten all parts of the exercise cycle and then slide off the Right Side Shield. Loosen, but do not remove, the indicated Screw...
... Reed Switch. Using an adjustable wrench, turn the indicated M8 Nylon Locknut (63) until the Drive Belt (47) is aligned with heart rate readings. Turn the Right Crank Arm (24) until the console displays correct feedback. PULSE SENSOR TROUBLESHOOTING • Avoid moving your hands while using the pulse sensor. MAINTENANCE AND TROUBLESHOOTING Inspect and properly tighten all parts of the exercise cycle and then slide off the Right Side Shield. Loosen, but do not remove, the indicated Screw...
English Manual
Page 16
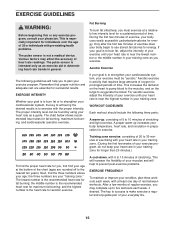
... find the proper heart rate for exercise. The key to 30 minutes of exercising with your heart rate in your training zone. (During the first few minutes of exercise does your body temperature, heart rate, and circulation in preparation for you may affect the accuracy of your exercise program, do not keep your heart rate in your heart rate as a guide. The pulse sensor is near the highest number in general. Only...
... find the proper heart rate for exercise. The key to 30 minutes of exercising with your heart rate in your training zone. (During the first few minutes of exercise does your body temperature, heart rate, and circulation in preparation for you may affect the accuracy of your exercise program, do not keep your heart rate in your heart rate as a guide. The pulse sensor is near the highest number in general. Only...

English Manual
Page 17
... The correct form for 15 counts, then relax. Reach toward your toes as far as possible. Hold for several basic stretches is shown at the right. Stretches: Hamstrings, lower back and groin. 3. Keep your back leg straight and your extended leg. Stretches: Quadriceps and hip muscles. 3 5 1 2 4 17 Bend your front leg, lean forward and move your...
... The correct form for 15 counts, then relax. Reach toward your toes as far as possible. Hold for several basic stretches is shown at the right. Stretches: Hamstrings, lower back and groin. 3. Keep your back leg straight and your extended leg. Stretches: Quadriceps and hip muscles. 3 5 1 2 4 17 Bend your front leg, lean forward and move your...
English Manual
Page 18
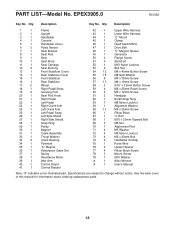
... 1 38 1 39 1 40 1 41 1 Frame Upright Handlebar Console Handlebar Cover Pulse Sensor Seat Bracket Seat Post Seat Seat Knob Seat Carriage Seat Bushing Front Stabilizer Cover Rear Stabilizer Cover Front Stabilizer Rear Stabilizer Wheel Right Pedal Strap Leveling Foot Seat Post Knob Right Pedal Left Pedal Right Crank Arm Left Crank Arm Left Pedal Strap Left Side Shield Right Side Shield Snap Ring Pulley Magnet Crank Assembly Thrust Washer Crank Bearing Flywheel "C" Magnet Resistance Cable Set Spring Resistance Motor Idler Arm Control Board Control Bracket 42 1 43 1 44 1 45 1 46...
... 1 38 1 39 1 40 1 41 1 Frame Upright Handlebar Console Handlebar Cover Pulse Sensor Seat Bracket Seat Post Seat Seat Knob Seat Carriage Seat Bushing Front Stabilizer Cover Rear Stabilizer Cover Front Stabilizer Rear Stabilizer Wheel Right Pedal Strap Leveling Foot Seat Post Knob Right Pedal Left Pedal Right Crank Arm Left Crank Arm Left Pedal Strap Left Side Shield Right Side Shield Snap Ring Pulley Magnet Crank Assembly Thrust Washer Crank Bearing Flywheel "C" Magnet Resistance Cable Set Spring Resistance Motor Idler Arm Control Board Control Bracket 42 1 43 1 44 1 45 1 46...

English Manual
Page 19
EPEX3905.0 R1005A 65 27 65 4 75 65 65 5 74 9 57 59 59 3 57 26 65 55 57 2 54 55 76 55 42 76 55 25 76 55 33 28 24 22 50 61 7 11 10 55 6 8 55 12 65 18 21 50 73 63 60 30 20 31 73 29 23 57 45 32 72 33 72 34 1 54 41 57 39 49 46 60 52 68 44 77 71 67 79 40 63 51 78 64 69 70 58 57 66 77 62 58 48 38 77 63 36 35 36 37 69 13 53 43 17 53 53 15 19 55 56 54 55 56 54 14 19 16 47 55 56 19 54 55 19 54 56 19 EXPLODED DRAWING-Model No.
EPEX3905.0 R1005A 65 27 65 4 75 65 65 5 74 9 57 59 59 3 57 26 65 55 57 2 54 55 76 55 42 76 55 25 76 55 33 28 24 22 50 61 7 11 10 55 6 8 55 12 65 18 21 50 73 63 60 30 20 31 73 29 23 57 45 32 72 33 72 34 1 54 41 57 39 49 46 60 52 68 44 77 71 67 79 40 63 51 78 64 69 70 58 57 66 77 62 58 48 38 77 63 36 35 36 37 69 13 53 43 17 53 53 15 19 55 56 54 55 56 54 14 19 16 47 55 56 19 54 55 19 54 56 19 EXPLODED DRAWING-Model No.
English Manual
Page 20
... product (EPIC 300 U exercise cycle) • the SERIAL NUMBER of the product (see the front cover of this manual) • the KEY NUMBER and DESCRIPTION of the part(s) (see the front cover of incidental or consequential damages. This warranty gives you , please be prepared to you . HOW TO ORDER REPLACEMENT PARTS To order replacement parts, see pages 18 and 19) LIMITED WARRANTY ICON Health & Fitness, Inc. (ICON), warrants this manual. or products used for...
... product (EPIC 300 U exercise cycle) • the SERIAL NUMBER of the product (see the front cover of this manual) • the KEY NUMBER and DESCRIPTION of the part(s) (see the front cover of incidental or consequential damages. This warranty gives you , please be prepared to you . HOW TO ORDER REPLACEMENT PARTS To order replacement parts, see pages 18 and 19) LIMITED WARRANTY ICON Health & Fitness, Inc. (ICON), warrants this manual. or products used for...


