
User Manual
Page 3
... walking belt may change speed, accelerate, or stop unexpectedly, which may affect the accuracy of the owner to the control system of high speeds. Keep the treadmill indoors, away from heated surfaces. 13. Do not put the treadmill in speed. 16. Do not operate the treadmill if the power cord or plug is damaged, or if the treadmill is not working properly.) 14. Always remove the key, unplug the power cord...
... walking belt may change speed, accelerate, or stop unexpectedly, which may affect the accuracy of the owner to the control system of high speeds. Keep the treadmill indoors, away from heated surfaces. 13. Do not put the treadmill in speed. 16. Do not operate the treadmill if the power cord or plug is damaged, or if the treadmill is not working properly.) 14. Always remove the key, unplug the power cord...
User Manual
Page 4
... persons with pre-existing health problems. Read all parts of the treadmill every three months. 24. When using them. 23. When using . Inspect and properly tighten all instructions before using iFIT.com CDs and videos, you can manually override the speed and incline settings at any exercise program, consult your physician. tenance and adjustment procedures de- scribed in this or any time by an authorized service representative. This is...
... persons with pre-existing health problems. Read all parts of the treadmill every three months. 24. When using them. 23. When using . Inspect and properly tighten all instructions before using iFIT.com CDs and videos, you can manually override the speed and incline settings at any exercise program, consult your physician. tenance and adjustment procedures de- scribed in this or any time by an authorized service representative. This is...
User Manual
Page 5
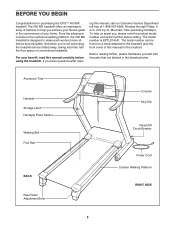
... workout more effective and enjoyable. Accessory Tray Handrail Storage Latch Handgrip Pulse Sensor Walking Belt Foot Rail BACK Rear Roller Adjustment Bolts Console Key/Clip Reset/Off Circuit Breaker Power Cord Cushion Walking Platform RIGHT SIDE 5 From the advanced console to the treadmill (see the front cover of conventional treadmills. If you 're not exercising, the treadmill can be folded away, taking less than half the floor space of this manual, call our Customer Service Department toll-free...
... workout more effective and enjoyable. Accessory Tray Handrail Storage Latch Handgrip Pulse Sensor Walking Belt Foot Rail BACK Rear Roller Adjustment Bolts Console Key/Clip Reset/Off Circuit Breaker Power Cord Cushion Walking Platform RIGHT SIDE 5 From the advanced console to the treadmill (see the front cover of conventional treadmills. If you 're not exercising, the treadmill can be folded away, taking less than half the floor space of this manual, call our Customer Service Department toll-free...
User Manual
Page 6
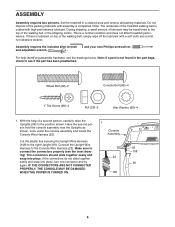
... remove all packing materials. Have the second person hold the console assembly near the Uprights as shown. Note: If a part is lubricant on top of the walking belt or the shipping carton. Connect the Upright Wire Harness to the right Upright (99). Look under the console assembly and locate the Console Wire Harness (22). 1 Console Assembly Cut the plastic ties securing the Upright Wire Harness (108) to the Console Wire Harness (22). Set the treadmill...
... remove all packing materials. Have the second person hold the console assembly near the Uprights as shown. Note: If a part is lubricant on top of the walking belt or the shipping carton. Connect the Upright Wire Harness to the right Upright (99). Look under the console assembly and locate the Console Wire Harness (22). 1 Console Assembly Cut the plastic ties securing the Upright Wire Harness (108) to the Console Wire Harness (22). Set the treadmill...
User Manual
Page 7
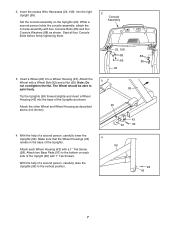
Insert the excess Wire Harnesses (22, 108) into a Wheel Housing (43). Start all four Console Bolts before firmly tightening them. 2 Console Assembly 22, 108 88 88 86 86 99 3. Attach two Base Pads (97) to the bottom on the Uprights (99). Attach the other Wheel and Wheel Housing as shown. Tip the Uprights (99) forward slightly and insert a Wheel Housing (43) into...
Insert the excess Wire Harnesses (22, 108) into a Wheel Housing (43). Start all four Console Bolts before firmly tightening them. 2 Console Assembly 22, 108 88 88 86 86 99 3. Attach two Base Pads (97) to the bottom on the Uprights (99). Attach the other Wheel and Wheel Housing as shown. Tip the Uprights (99) forward slightly and insert a Wheel Housing (43) into...
User Manual
Page 9
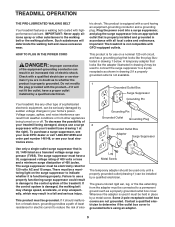
... the control system is damaged, the walking belt may change speed, accelerate, or stop unexpectedly, which may be connected to determine if the outlet box cover is equipped with highperformance lubricant. Some 2-pole receptacle outlet box covers are in doubt as shown in your local electronics store. IMPORTANT: Never apply silicone spray or other type of your treadmill (see your home's power. Plug the power cord...
... the control system is damaged, the walking belt may change speed, accelerate, or stop unexpectedly, which may be connected to determine if the outlet box cover is equipped with highperformance lubricant. Some 2-pole receptacle outlet box covers are in doubt as shown in your local electronics store. IMPORTANT: Never apply silicone spray or other type of your treadmill (see your home's power. Plug the power cord...
User Manual
Page 10
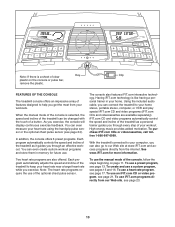
... optional chest pulse sensor (see pages 15 and 16. Two heart rate programs are available separately). In addition, the console offers 6 preset programs. Each program automatically controls the speed and incline of the treadmill as a personal trainer guides you exercise, the console will display continuous exercise feedback. With the treadmill connected to keep your home. Note: If there is a sheet of clear Key Clip plastic on page 11. See www.iFIT.com for future use a heart rate program...
... optional chest pulse sensor (see pages 15 and 16. Two heart rate programs are available separately). In addition, the console offers 6 preset programs. Each program automatically controls the speed and incline of the treadmill as a personal trainer guides you exercise, the console will display continuous exercise feedback. With the treadmill connected to keep your home. Note: If there is a sheet of clear Key Clip plastic on page 11. See www.iFIT.com for future use a heart rate program...
User Manual
Page 11
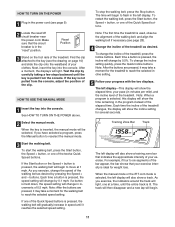
... Incline buttons. If the Start button or the Speed + button is pressed, the walking belt will change the incline of the treadmill as desired by carefully taking a few steps backward until the entire track is not pulled from the console. If the key is lit. See HOW TO TURN ON THE POWER above. if a button is selected, the left display. The time will begin . Find the clip attached to reselect the manual mode. buttons...
... Incline buttons. If the Start button or the Speed + button is pressed, the walking belt will change the incline of the treadmill as desired by carefully taking a few steps backward until the entire track is not pulled from the console. If the key is lit. See HOW TO TURN ON THE POWER above. if a button is selected, the left display. The time will begin . Find the clip attached to reselect the manual mode. buttons...
User Manual
Page 12
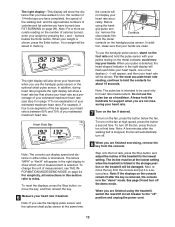
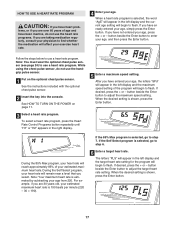
... addition, during heart rate programs the right display will show a heart rate bar that your hands are clean. Heart Rate Bar Note: The console can display speed and distance in the "demo" mode. Before using the treadmill, switch the reset/off circuit breaker to the storage position or the treadmill will be damaged. avoid moving your heart rate if desired. Note: If the displays on the number of the treadmill to miles. When you use the handgrip pulse sensor or the optional chest pulse sensor.
... addition, during heart rate programs the right display will show a heart rate bar that your hands are clean. Heart Rate Bar Note: The console can display speed and distance in the "demo" mode. Before using the treadmill, switch the reset/off circuit breaker to the storage position or the treadmill will be damaged. avoid moving your heart rate if desired. Note: If the displays on the number of the treadmill to miles. When you use the handgrip pulse sensor or the optional chest pulse sensor.
User Manual
Page 14
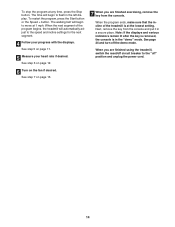
... incline of the program begins, the treadmill will begin to flash in the left display. To stop the program at the lowest setting. To restart the program, press the Start button or the Speed + button. Note: If the displays and various indicators remain lit after the key is removed, the console is at any time, press the Stop button. The time will automatically adjust to the "off" position and unplug the power cord...
... incline of the program begins, the treadmill will begin to flash in the left display. To stop the program at the lowest setting. To restart the program, press the Start button or the Speed + button. Note: If the displays and various indicators remain lit after the key is removed, the console is at any time, press the Stop button. The time will automatically adjust to the "off" position and unplug the power cord...
User Manual
Page 15
... the treadmill as de- Matrix 3 Press the Start button or the Speed + button and program the desired speed and incline settings. One speed setting and one -minute segments. umn of the matrix. (The incline settings are not shown in memory. See step 7 on page 16. See HOW TO TURN ON THE POWER on page 11. 2 Select one of segments that you are finished exercising, remove the key from the console. appear...
... the treadmill as de- Matrix 3 Press the Start button or the Speed + button and program the desired speed and incline settings. One speed setting and one -minute segments. umn of the matrix. (The incline settings are not shown in memory. See step 7 on page 16. See HOW TO TURN ON THE POWER on page 11. 2 Select one of segments that you are finished exercising, remove the key from the console. appear...
User Manual
Page 16
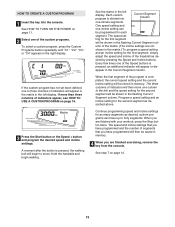
.... To change the speed or incline setting during the current segment, simply press the Speed or Incline buttons. HOW TO USE A CUSTOM PROGRAM 1 Insert the key into several segments will be shown in the flashing Current Segment column and the treadmill will automatically adjust to the second speed and incline settings that you programmed previously. ting are finished exercising, remove the key from the console. Then, press the Start button, and program speed and incline settings for the...
.... To change the speed or incline setting during the current segment, simply press the Speed or Incline buttons. HOW TO USE A CUSTOM PROGRAM 1 Insert the key into several segments will be shown in the flashing Current Segment column and the treadmill will automatically adjust to the second speed and incline settings that you programmed previously. ting are finished exercising, remove the key from the console. Then, press the Start button, and program speed and incline settings for the...
User Manual
Page 17
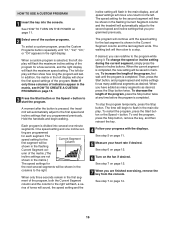
... use a heart rate program. See the instructions included with the optional chest pulse sensor. 2 Insert the key into the console. After you are over 60 years of your heart rate will affect your exercise heart rate. 4 Enter your age from 220. If desired, press the + or - When the desired setting is shown, press the Enter button. 17 To select a heart rate program, press the Heart Rate Control Programs button repeatedly until "H1" or "H2" appears in the left display...
... use a heart rate program. See the instructions included with the optional chest pulse sensor. 2 Insert the key into the console. After you are over 60 years of your heart rate will affect your exercise heart rate. 4 Enter your age from 220. If desired, press the + or - When the desired setting is shown, press the Enter button. 17 To select a heart rate program, press the Heart Rate Control Programs button repeatedly until "H1" or "H2" appears in the left display...
User Manual
Page 18
... speed and incline settings of the treadmill may automatically decrease. If your pulse is not detected during the program, you are finished exercising, remove the key from the console. Note: If the Self Select program is selected, the same target heart rate is too far below the current target heart rate, the incline of the treadmill may automatically change to bring your progress with the Speed or Incline buttons. Heart rate programs cannot be stopped...
... speed and incline settings of the treadmill may automatically decrease. If your pulse is not detected during the program, you are finished exercising, remove the key from the console. Note: If the Self Select program is selected, the same target heart rate is too far below the current target heart rate, the incline of the treadmill may automatically change to bring your progress with the Speed or Incline buttons. Heart rate programs cannot be stopped...
User Manual
Page 21
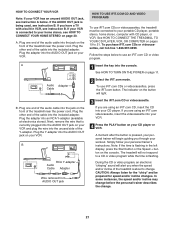
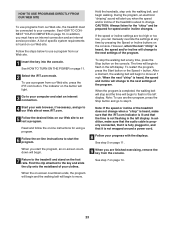
... personal trainer's instructions. If you when the speed and/or incline of the treadmill near the power cord. Follow the steps below . A VIDEO AUDIO IN ANT. A moment after the button is pressed, your VCR and plug the wire into the unused side of the treadmill near the power cord. Simply follow your VCR has an unused AUDIO OUT jack, see HOW TO CONNECT YOUR HOME STEREO on your VCR. Plug one...
... personal trainer's instructions. If you when the speed and/or incline of the treadmill near the power cord. Follow the steps below . A VIDEO AUDIO IN ANT. A moment after the button is pressed, your VCR and plug the wire into the unused side of the treadmill near the power cord. Simply follow your VCR has an unused AUDIO OUT jack, see HOW TO CONNECT YOUR HOME STEREO on your VCR. Plug one...
User Manual
Page 22
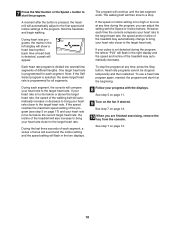
... left display. See step 7 on the fan if desired. However, when the next "chirp" is heard, the speed and incline will begin to the next settings of the CD or video program. CAUTION: Always remove iFIT.com CDs and videocassettes from the console. After a moment, the walking belt will stop the walking belt at 1 mph. Note: To use another flat surface instead of the treadmill does not change...
... left display. See step 7 on the fan if desired. However, when the next "chirp" is heard, the speed and incline will begin to the next settings of the CD or video program. CAUTION: Always remove iFIT.com CDs and videocassettes from the console. After a moment, the walking belt will stop the walking belt at 1 mph. Note: To use another flat surface instead of the treadmill does not change...
User Manual
Page 23
..., press the Stop button on -line instructions for speed and/or incline changes. Note: To use a program from our Web site, press the iFIT.com button. See step 7 on page 11. 2 Select the iFIT.com mode. Find the clip attached to flash in the left display. The time will begin to the key and slide the clip onto the waistband of specific system requirements is not wrapped around a power cord. 8 Follow...
..., press the Stop button on -line instructions for speed and/or incline changes. Note: To use a program from our Web site, press the iFIT.com button. See step 7 on page 11. 2 Select the iFIT.com mode. Find the clip attached to flash in the left display. The time will begin to the key and slide the clip onto the waistband of specific system requirements is not wrapped around a power cord. 8 Follow...
User Manual
Page 29
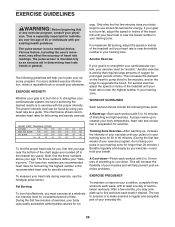
... the user's movement, may complete up , increase the intensity of exercise, your training zone for energy. Aerobic Exercise If your goal is to five workouts each week, with preexisting health problems. The pulse sensor is near the highest number in your age near the middle number in your exercise program. To find the three numbers above your body temperature, heart rate and circulation in general. The chart below...
... the user's movement, may complete up , increase the intensity of exercise, your training zone for energy. Aerobic Exercise If your goal is to five workouts each week, with preexisting health problems. The pulse sensor is near the highest number in your age near the middle number in your exercise program. To find the three numbers above your body temperature, heart rate and circulation in general. The chart below...
User Manual
Page 31
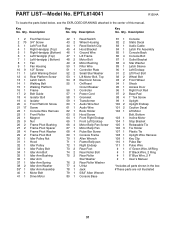
... 1 110 1 111 1 #1 #1 #1 #1 Console Static Decal Audio Cable Latch Pin Assembly Console Back Console Bolt Outlet Bracket Star Washer Latch Sleeve Left Endcap Lift Pivot Bolt Wheel Bolt Front Wheel Shock Access Door Right Foot Rail Base Pad 1" Tek Screw Upright Upright Endcap Caution Decal Lift Motor Bolt, Bottom Incline Motor Stop Bracket Releasable Tie Tie Holder Plastic Tie Upright Wire Harness Key Clip Pulse Bar Pulse Wire 4" Green Wire, M/Ring 8" Black Wire, 2 Ring 8" Blue Wire, 2 F User's Manual *Includes all parts shown in the...
... 1 110 1 111 1 #1 #1 #1 #1 Console Static Decal Audio Cable Latch Pin Assembly Console Back Console Bolt Outlet Bracket Star Washer Latch Sleeve Left Endcap Lift Pivot Bolt Wheel Bolt Front Wheel Shock Access Door Right Foot Rail Base Pad 1" Tek Screw Upright Upright Endcap Caution Decal Lift Motor Bolt, Bottom Incline Motor Stop Bracket Releasable Tie Tie Holder Plastic Tie Upright Wire Harness Key Clip Pulse Bar Pulse Wire 4" Green Wire, M/Ring 8" Black Wire, 2 Ring 8" Blue Wire, 2 F User's Manual *Includes all parts shown in the...
User Manual
Page 34
... (EPICTM 400 MX treadmill) • The SERIAL NUMBER of the product (see the front cover of this manual) • The KEY NUMBER and DESCRIPTION of the part(s) (see the PART LIST on how long an implied warranty lasts. until 6 p.m. Accordingly, the above limitation may not apply to replacing or repairing, at 1-866-997-6999, Monday through one of its scope and duration to the terms set forth...
... (EPICTM 400 MX treadmill) • The SERIAL NUMBER of the product (see the front cover of this manual) • The KEY NUMBER and DESCRIPTION of the part(s) (see the PART LIST on how long an implied warranty lasts. until 6 p.m. Accordingly, the above limitation may not apply to replacing or repairing, at 1-866-997-6999, Monday through one of its scope and duration to the terms set forth...


