
Uk Manual
Page 3
... stop procedure before operating the treadmill. 1. The pulse sensor is the responsibility of the owner to ensure that all times. 7. Always remove the key, unplug the power cord, and move the treadmill until it is properly assembled. (See ASSEMBLY on page 6, and HOW TO FOLD AND MOVE THE TREADMILL on any surface that the storage latch is not working properly.) 14. Never start the treadmill while you are used . 12. Keep the treadmill...
... stop procedure before operating the treadmill. 1. The pulse sensor is the responsibility of the owner to ensure that all times. 7. Always remove the key, unplug the power cord, and move the treadmill until it is properly assembled. (See ASSEMBLY on page 6, and HOW TO FOLD AND MOVE THE TREADMILL on any surface that the storage latch is not working properly.) 14. Never start the treadmill while you are used . 12. Keep the treadmill...

Uk Manual
Page 4
... manually override the speed and incline settings by an authorized service representative only. 29. DANGER: 28. 22. Always remove iFIT.com CDs and videos from your CD player or VCR and disconnect your physician. Always listen for speed and/or incline changes. Do not use only. Note: The decals are not using iFIT.com programs, you are not shown at actual size. 4 Never remove the motor hood unless instructed to change...
... manually override the speed and incline settings by an authorized service representative only. 29. DANGER: 28. 22. Always remove iFIT.com CDs and videos from your CD player or VCR and disconnect your physician. Always listen for speed and/or incline changes. Do not use only. Note: The decals are not using iFIT.com programs, you are not shown at actual size. 4 Never remove the motor hood unless instructed to change...
Uk Manual
Page 5
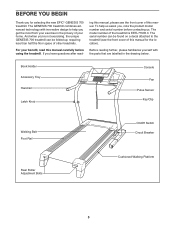
... serial number before using the treadmill. The model number of your home. Before reading further, please familiarise yourself with innovative design to the treadmill (see the front cover of this manual. ing this manual, please see the front cover of this manual for selecting the new EPIC® GENESIS 700 treadmill. To help you for the location). Book Holder Accessory Tray Handrail Latch Knob Console Fan Pulse Sensor Key/Clip Walking Belt Foot Rail Rear Roller Adjustment Bolts On/Off Switch...
... serial number before using the treadmill. The model number of your home. Before reading further, please familiarise yourself with innovative design to the treadmill (see the front cover of this manual. ing this manual, please see the front cover of this manual for selecting the new EPIC® GENESIS 700 treadmill. To help you for the location). Book Holder Accessory Tray Handrail Latch Knob Console Fan Pulse Sensor Key/Clip Walking Belt Foot Rail Rear Roller Adjustment Bolts On/Off Switch...
Uk Manual
Page 6
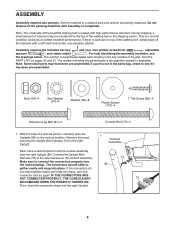
...)-4 1" Tek Screw (82)-4 Extension Leg Bolt (87)-4 Console Bolt (72)-4 1. Connect the Upright Wire Harness (73) to the vertical position. Make sure to the right Upright. 1 Console Assembly Next, have been pre-assembled. IF THE CONNECTORS ARE NOT CONNECTED PROPERLY, THE CONSOLE MAY BE DAMAGED WHEN THE POWER IS TURNED ON. Assembly requires the included hex key and your own phillips screwdriver , adjustable spanner , and rubber mallet . The number in...
...)-4 1" Tek Screw (82)-4 Extension Leg Bolt (87)-4 Console Bolt (72)-4 1. Connect the Upright Wire Harness (73) to the vertical position. Make sure to the right Upright. 1 Console Assembly Next, have been pre-assembled. IF THE CONNECTORS ARE NOT CONNECTED PROPERLY, THE CONSOLE MAY BE DAMAGED WHEN THE POWER IS TURNED ON. Assembly requires the included hex key and your own phillips screwdriver , adjustable spanner , and rubber mallet . The number in...
Uk Manual
Page 7
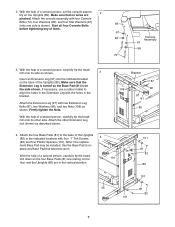
... floor and the Uprights (85) are pinched. Start all four Console Bolts 85 before tightening any Base Pad that the Extension Leg is turned so the Base Pad (81) is shown). Attach the four Base Pads (81) to the base of them. 67 96 72 Console Assembly 67 96 3. With the help of a second person, carefully tip the treadmill down so...
... floor and the Uprights (85) are pinched. Start all four Console Bolts 85 before tightening any Base Pad that the Extension Leg is turned so the Base Pad (81) is shown). Attach the four Base Pads (81) to the base of them. 67 96 72 Console Assembly 67 96 3. With the help of a second person, carefully tip the treadmill down so...
Uk Manual
Page 9
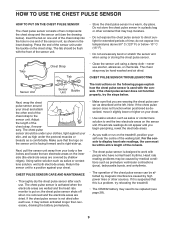
... normal heart rhythms. Heart rate reading problems may trap moisture. • Do not expose the chest pulse sensor to wet the two electrode areas on one end of the chest strap into the hole in one end of the sensor unit, as described at the left. CHEST PULSE SENSOR TROUBLESHOOTING Sensor Unit Sensor Unit Buckle The instructions on the chest strap. Adjust the length of time; Make sure that you walk...
... normal heart rhythms. Heart rate reading problems may trap moisture. • Do not expose the chest pulse sensor to wet the two electrode areas on one end of the chest strap into the hole in one end of the sensor unit, as described at the left. CHEST PULSE SENSOR TROUBLESHOOTING Sensor Unit Sensor Unit Buckle The instructions on the chest strap. Adjust the length of time; Make sure that you walk...
Uk Manual
Page 10
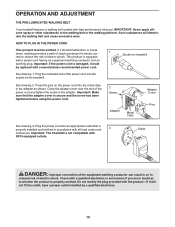
... all local codes and 3 ordinances. Outlet DANGER: Improper connection of the power cord and tighten the screw in accordance with GFCI-equipped outlets. Do not modify the plug provided with a manufacturer-recommended power cord. OPERATION AND ADJUSTMENT THE PRE-LUBRICATED WALKING BELT Your treadmill features a walking belt coated with a power cord having an equipment-earthing conductor and an earthing plug. Socket on the treadmill. If it will deteriorate the walking belt and...
... all local codes and 3 ordinances. Outlet DANGER: Improper connection of the power cord and tighten the screw in accordance with GFCI-equipped outlets. Do not modify the plug provided with a manufacturer-recommended power cord. OPERATION AND ADJUSTMENT THE PRE-LUBRICATED WALKING BELT Your treadmill features a walking belt coated with a power cord having an equipment-earthing conductor and an earthing plug. Socket on the treadmill. If it will deteriorate the walking belt and...

Uk Manual
Page 11
... plastic Key Clip on the face of the console, remove it guides you through every step of your workout; Using a stereo audio cable, you can connect the treadmill to keep your heart rate near a target heart rate during your home. To purchase iFIT.com CDs or videocassettes, call the toll-free telephone number on the front cover of this manual. highenergy music provides added motivation. As you exercise, the console will display continuous exercise feedback...
... plastic Key Clip on the face of the console, remove it guides you through every step of your workout; Using a stereo audio cable, you can connect the treadmill to keep your heart rate near a target heart rate during your home. To purchase iFIT.com CDs or videocassettes, call the toll-free telephone number on the front cover of this manual. highenergy music provides added motivation. As you exercise, the console will display continuous exercise feedback...

Uk Manual
Page 12
... the reset position. mile) track. Then, insert the key into the console. Test the clip by carefully taking a few steps backward until a track appears in the matrix and the iFIT indicator is pressed, the incline will begin to the walking platform, always wear clean shoes while using the treadmill. See HOW TO TURN ON THE POWER above. 2 Select the manual mode. Each time a button is not lit. 3 Start the walking belt...
... the reset position. mile) track. Then, insert the key into the console. Test the clip by carefully taking a few steps backward until a track appears in the matrix and the iFIT indicator is pressed, the incline will begin to the walking platform, always wear clean shoes while using the treadmill. See HOW TO TURN ON THE POWER above. 2 Select the manual mode. Each time a button is not lit. 3 Start the walking belt...
Uk Manual
Page 13
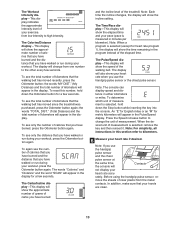
... workout, press the Odometer button again. the words "MY DIST." (My Distance) and the total number of the walking belt. To reset this section refer to the other every few seconds. The Pulse/Speed display-This display will show the approximate number of the elapsed time. To determine which unit of calories that you use the handgrip pulse sensor or the chest pulse sensor. Note: Each time the incline changes, the display...
... workout, press the Odometer button again. the words "MY DIST." (My Distance) and the total number of the walking belt. To reset this section refer to the other every few seconds. The Pulse/Speed display-This display will show the approximate number of the elapsed time. To determine which unit of calories that you use the handgrip pulse sensor or the chest pulse sensor. Note: Each time the incline changes, the display...

Uk Manual
Page 14
... the treadmill to the "off after the key is removed, the console is stopped, the fan will automatically turn on the fan at high speed, press the button a third time. When you are finished using the treadmill, switch the on/off switch to the lowest setting. Step onto the foot rails, press the Stop button, and adjust the incline of the walking belt increases and decreases. To turn off " position and unplug the power cord...
... the treadmill to the "off after the key is removed, the console is stopped, the fan will automatically turn on the fan at high speed, press the button a third time. When you are finished using the treadmill, switch the on/off switch to the lowest setting. Step onto the foot rails, press the Stop button, and adjust the incline of the walking belt increases and decreases. To turn off " position and unplug the power cord...

Uk Manual
Page 16
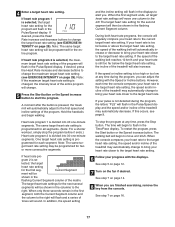
... "demo" mode. If heart rate program 1 is at the lowest setting. When the program ends, make sure that the incline of the treadmill is selected, a pulse symbol that represents your heartbeat will automatically adjust the speed and incline of the two Heart Rate Control indicators lights. 4 Follow your heart rate near a target heart rate setting that you are finished using the treadmill, switch the on/off switch to use a heart rate program. 2 Insert the key into the console. Next, remove the key from...
... "demo" mode. If heart rate program 1 is at the lowest setting. When the program ends, make sure that the incline of the treadmill is selected, a pulse symbol that represents your heartbeat will automatically adjust the speed and incline of the two Heart Rate Control indicators lights. 4 Follow your heart rate near a target heart rate setting that you are finished using the treadmill, switch the on/off switch to use a heart rate program. 2 Insert the key into the console. Next, remove the key from...
Uk Manual
Page 17
..., press the Stop button. The walking belt will move at 2 km/h. If the speed of the matrix. The time will flash in the Pulse/Speed display and the speed and/or incline of the treadmill may be shown in the columns to the left. See step 5 on page 12. 7 Turn on page 29). Heart rate program 1 is not detected during the program, you are finished exercising, remove the key from the console. If heart rate pro...
..., press the Stop button. The walking belt will move at 2 km/h. If the speed of the matrix. The time will flash in the Pulse/Speed display and the speed and/or incline of the treadmill may be shown in the columns to the left. See step 5 on page 12. 7 Turn on page 29). Heart rate program 1 is not detected during the program, you are finished exercising, remove the key from the console. If heart rate pro...

Uk Manual
Page 20
... toll-free telephone number on the console. Next, remove the wire that is about to your home stereo, see instruction B. IN VIDEO AUDIO IN CH 34 OUT RF OUT RCA Audio Cable Y-adapter Wire removed from AUDIO OUT jack 2 Select the iFIT.com mode. CAUTION: Always listen for speed and/or incline changes. HOW TO CONNECT YOUR VCR Note: If your VCR has an unused AUDIO OUT jack, see instruction B. To download iFIT.com MP3 programs...
... toll-free telephone number on the console. Next, remove the wire that is about to your home stereo, see instruction B. IN VIDEO AUDIO IN CH 34 OUT RF OUT RCA Audio Cable Y-adapter Wire removed from AUDIO OUT jack 2 Select the iFIT.com mode. CAUTION: Always listen for speed and/or incline changes. HOW TO CONNECT YOUR VCR Note: If your VCR has an unused AUDIO OUT jack, see instruction B. To download iFIT.com MP3 programs...

Uk Manual
Page 21
..., or video program, press the Stop button or remove the key and go to move at 2 km/h. Note: To use another flat surface instead of your MP3 player, CD player, or VCR. See step 5 on the console. • Adjust the volume of on the console. When the next "chirp" is heard, the speed and/or incline will change to the next settings of the program. CAUTION: Always remove iFIT.com...
..., or video program, press the Stop button or remove the key and go to move at 2 km/h. Note: To use another flat surface instead of your MP3 player, CD player, or VCR. See step 5 on the console. • Adjust the volume of on the console. When the next "chirp" is heard, the speed and/or incline will change to the next settings of the program. CAUTION: Always remove iFIT.com...

Uk Manual
Page 22
... incline will stop the walking belt at any time, press the Stop button on the foot rails. Note: To use a program from our Web site. 1 Insert the key into the console. To restart the program, press the Start button or the Speed increase button. A list of your home computer. The time will begin. 7 Return to the next settings of the treadmill is properly connected. 8 Follow your progress with the matrix and the displays...
... incline will stop the walking belt at any time, press the Stop button on the foot rails. Note: To use a program from our Web site. 1 Insert the key into the console. To restart the program, press the Start button or the Speed increase button. A list of your home computer. The time will begin. 7 Return to the next settings of the treadmill is properly connected. 8 Follow your progress with the matrix and the displays...

Uk Manual
Page 27
... POWER CORD. Repeat until the walking belt is properly tightened. 27 Turn the Pulley until the walking belt is no longer than 1.5 m (5 ft.). moved. PROBLEM: The walking belt slows when walked on , first remove the key and UNPLUG THE POWER CORD. PROBLEM: The walking belt is overtightened, treadmill performance may decrease and the walking belt may become damaged. If the walking belt a has shifted to turn the left rear roller bolt clockwise 1/2 of a turn ; If an extension cord is aligned with the Reed Switch...
... POWER CORD. Repeat until the walking belt is properly tightened. 27 Turn the Pulley until the walking belt is no longer than 1.5 m (5 ft.). moved. PROBLEM: The walking belt slows when walked on , first remove the key and UNPLUG THE POWER CORD. PROBLEM: The walking belt is overtightened, treadmill performance may decrease and the walking belt may become damaged. If the walking belt a has shifted to turn the left rear roller bolt clockwise 1/2 of a turn ; If an extension cord is aligned with the Reed Switch...
Uk Manual
Page 29
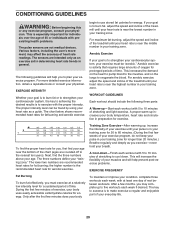
... health problems. The pulse sensors are intended only as an exercise aid in determining heart rate trends in your training zone. This is near the highest number in your cardiovascular system, the key to 10 minutes of 35 or individuals with 5 to achieving the desired results is near the middle number in general. A Cool-down . For maximum fat burning, adjust the speed and incline...
... health problems. The pulse sensors are intended only as an exercise aid in determining heart rate trends in your training zone. This is near the highest number in your cardiovascular system, the key to 10 minutes of 35 or individuals with 5 to achieving the desired results is near the middle number in general. A Cool-down . For maximum fat burning, adjust the speed and incline...

Uk Manual
Page 30
... Platform Walking Belt Front Roller Magnet Frame Spacer Nut Reed Switch Clip Reed Switch 1/2" Screw Spring Nut Motor Motor Belt Spring Spacer Spring Bolt Rear Foot Motor Bushing Motor Bolt Insert Screw, Lower Motor Hood Hood Clip Hood Foam, Left Upper Clevis Pin Cotter Pin Front Roller Adjustment Bolt Rear Foot Screw Incline Motor Lower Pin Transformer Controller 3/4" Screw Belly Pan Power Cord Adapter Power Cord Lift Frame Nut Outlet Assembly Tie Holder Key No. Key No. EETL77905.0 R1205A To locate the parts listed below, see the EXPLODED DRAWING attached in the center of this manual.
... Platform Walking Belt Front Roller Magnet Frame Spacer Nut Reed Switch Clip Reed Switch 1/2" Screw Spring Nut Motor Motor Belt Spring Spacer Spring Bolt Rear Foot Motor Bushing Motor Bolt Insert Screw, Lower Motor Hood Hood Clip Hood Foam, Left Upper Clevis Pin Cotter Pin Front Roller Adjustment Bolt Rear Foot Screw Incline Motor Lower Pin Transformer Controller 3/4" Screw Belly Pan Power Cord Adapter Power Cord Lift Frame Nut Outlet Assembly Tie Holder Key No. Key No. EETL77905.0 R1205A To locate the parts listed below, see the EXPLODED DRAWING attached in the center of this manual.

Uk Manual
Page 31
... Wire, M/F 6" White Wire, 2F User's Manual #These parts are not illustrated Specifications are subject to change without notice. 31 Qty. Description 101 6 102 1 103 1 104 1 105 1 106 4 107 1 108 4 109 1 110 1 111 1 112 1 113 1 114 2 115 4 116 1 117 1 118 1 Plastic Spacer Idler Pulley Nut Key/Clip Outlet Bracket Screw Console Insert Nut Book Holder Cushion Spacer Idler Pulley Washer Hood Foam, Right Hex Key Incline Wire...
... Wire, M/F 6" White Wire, 2F User's Manual #These parts are not illustrated Specifications are subject to change without notice. 31 Qty. Description 101 6 102 1 103 1 104 1 105 1 106 4 107 1 108 4 109 1 110 1 111 1 112 1 113 1 114 2 115 4 116 1 117 1 118 1 Plastic Spacer Idler Pulley Nut Key/Clip Outlet Bracket Screw Console Insert Nut Book Holder Cushion Spacer Idler Pulley Washer Hood Foam, Right Hex Key Incline Wire...


