

User Manual
Page 6
... VGA Computer Cable 14 Connecting the USB Cable for the Easy Interactive Pen 14 Using the Easy Interactive Pen Calibrating 16 Checking the Connection Status 16 Performing Calibration 16 Using the Pen as a Mouse 18 Solving Problems Problems and Solutions 20 Easy Interactive Pen Problems 20 Calibration Problems 20 Where to Get Help 21...
... VGA Computer Cable 14 Connecting the USB Cable for the Easy Interactive Pen 14 Using the Easy Interactive Pen Calibrating 16 Checking the Connection Status 16 Performing Calibration 16 Using the Pen as a Mouse 18 Solving Problems Problems and Solutions 20 Easy Interactive Pen Problems 20 Calibration Problems 20 Where to Get Help 21...

User Manual
Page 18
... on the board. • To double-click, tap twice. • To right-click, tap while pressing the button on the projected image. If you installed interactive whiteboard software, you to use the pens to write or draw on the pen. • To click and drag, tap and drag with the pen.... If the indicator light is green, the batteries have enough power. Using the Pen as a Mouse 18 The Easy Interactive Driver allows you can also use the pen as a mouse: • For best performance, hold the pen at an angle (like a normal pen), rather...
... on the board. • To double-click, tap twice. • To right-click, tap while pressing the button on the projected image. If you installed interactive whiteboard software, you to use the pens to write or draw on the pen. • To click and drag, tap and drag with the pen.... If the indicator light is green, the batteries have enough power. Using the Pen as a Mouse 18 The Easy Interactive Driver allows you can also use the pen as a mouse: • For best performance, hold the pen at an angle (like a normal pen), rather...
Quick Setup Guide
Page 3
... the Projector Position 11 Installing the Interactive Module 13 Installing the Wall Plate 13 Mounting the Interactive Module 14 Using the Interactive Module 15 Solving Problems 17 Interactive Pen Problems 17 Battery Problems 17 Where to Get Help 18 Internet Support 18 Speak to a Support Representative 18 Software Technical Support 18 Purchase Supplies and Accessories 18 Limited Warranty 19 Copyright Notice 20...
... the Projector Position 11 Installing the Interactive Module 13 Installing the Wall Plate 13 Mounting the Interactive Module 14 Using the Interactive Module 15 Solving Problems 17 Interactive Pen Problems 17 Battery Problems 17 Where to Get Help 18 Internet Support 18 Speak to a Support Representative 18 Software Technical Support 18 Purchase Supplies and Accessories 18 Limited Warranty 19 Copyright Notice 20...

Quick Setup Guide
Page 9
... plate (b) - - 25.1 24.9 24.6 24.3 24.1 23.8 23.5 23.3 23.0 22.7 22.5 22.2 22.0 21.7 21.4 21.2 20.9 20.6 20.4 20.1 19.8 19.6 19.3 19.0 18.8 18.5 18.2 18.0 17.7 17.4 17.2 16.9 16.7 16.4 16.1 15.9 15.6 - - - - - - 4:3 XGA Image width (W) Image height (H) - - - - - - - - - - 50.4 37.8 51.2 38.4 ...- - - - - - - - - - - - Distance from top of image to wall plate (b) - - - - - 22.1 21.8 21.5 21.2 20.9 20.6 20.3 20.0 19.7 19.4 19.1 18.8 18.5 18.2 17.9 17.6 17.3 17.0 16.7 16.4 16.1 15.8 15.5 15.2 14.9 14.6 14.3 14.0 13.7 13.4 13.1 12.8 12.5 12.2 11.9 11.6 11.3 11.0 10...
... plate (b) - - 25.1 24.9 24.6 24.3 24.1 23.8 23.5 23.3 23.0 22.7 22.5 22.2 22.0 21.7 21.4 21.2 20.9 20.6 20.4 20.1 19.8 19.6 19.3 19.0 18.8 18.5 18.2 18.0 17.7 17.4 17.2 16.9 16.7 16.4 16.1 15.9 15.6 - - - - - - 4:3 XGA Image width (W) Image height (H) - - - - - - - - - - 50.4 37.8 51.2 38.4 ...- - - - - - - - - - - - Distance from top of image to wall plate (b) - - - - - 22.1 21.8 21.5 21.2 20.9 20.6 20.3 20.0 19.7 19.4 19.1 18.8 18.5 18.2 17.9 17.6 17.3 17.0 16.7 16.4 16.1 15.8 15.5 15.2 14.9 14.6 14.3 14.0 13.7 13.4 13.1 12.8 12.5 12.2 11.9 11.6 11.3 11.0 10...
Quick Setup Guide
Page 14
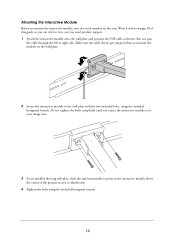
Make sure the cable doesn't get trapped when you mount the module on page 18 of the projection area or whiteboard. 4 Tighten the bolts using the included hexagonal wrench. Do not tighten the bolts completely until you center the interactive module over your image area. 3 If you can pass the cable through the left or...
Make sure the cable doesn't get trapped when you mount the module on page 18 of the projection area or whiteboard. 4 Tighten the bolts using the included hexagonal wrench. Do not tighten the bolts completely until you center the interactive module over your image area. 3 If you can pass the cable through the left or...
Quick Setup Guide
Page 18
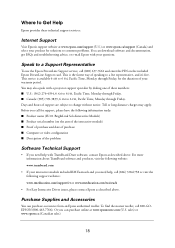
...866) 728-6758 or visit the following website: www.teamboard.com • If your questions. sales) or www.epson.ca (Canadian sales). 18 You may apply. Days and hours of support are subject to 6 PM, Pacific Time, Monday through Friday, for... with your interactive module included RM Easiteach and you call for support, please have the following information ready: ■ Product name (IU-01 BrightLink Solo Interactive Module) ■ Product serial number (on the included Epson PrivateLine Support card. Speak to a Support Representative To use the Epson PrivateLine Support service...
...866) 728-6758 or visit the following website: www.teamboard.com • If your questions. sales) or www.epson.ca (Canadian sales). 18 You may apply. Days and hours of support are subject to 6 PM, Pacific Time, Monday through Friday, for... with your interactive module included RM Easiteach and you call for support, please have the following information ready: ■ Product name (IU-01 BrightLink Solo Interactive Module) ■ Product serial number (on the included Epson PrivateLine Support card. Speak to a Support Representative To use the Epson PrivateLine Support service...