
User Guide
Page 1
... other than those marks. Microsoft, Windows, and Windows NT are registered trademarks of their respective owners. User's Guide Neither Seiko Epson Corporation nor its affiliates shall be trademarks of Seiko Epson Corporation. ® 24-pin Dot Matrix Printer All rights reserved. No part of this publication may be liable to the purchaser of Microsoft Corporation...
... other than those marks. Microsoft, Windows, and Windows NT are registered trademarks of their respective owners. User's Guide Neither Seiko Epson Corporation nor its affiliates shall be trademarks of Seiko Epson Corporation. ® 24-pin Dot Matrix Printer All rights reserved. No part of this publication may be liable to the purchaser of Microsoft Corporation...
User Guide
Page 3
... the protective materials 1 Assembling the Printer 2 Connecting the Printer to Your Computer 6 Connecting the printer 6 Plugging in the Printer 7 Chapter 2 Safety Instructions Warnings, Cautions, and Notes 9 Hot Parts Caution Symbol 9 Important Safety Instructions 9 Chapter 3 Paper Handling Loading Passbooks 17 Loading Single Sheets 19 Adjusting the top-of-form position 20 Adjusting the printing start position...
... the protective materials 1 Assembling the Printer 2 Connecting the Printer to Your Computer 6 Connecting the printer 6 Plugging in the Printer 7 Chapter 2 Safety Instructions Warnings, Cautions, and Notes 9 Hot Parts Caution Symbol 9 Important Safety Instructions 9 Chapter 3 Paper Handling Loading Passbooks 17 Loading Single Sheets 19 Adjusting the top-of-form position 20 Adjusting the printing start position...
User Guide
Page 4
Genuine Epson ribbon cartridge 25 Replacing the ribbon cartridge 25 Chapter 5 Control Panel Buttons and Lights 33 Functions auxiliary 36 Compress Printing Mode 38 Chapter 6 Changing your Printer's Settings About Your Printer's Default Settings 39 Understanding default settings 39 Changing default settings 53 Printing a Self-Test 55 Printing Hex Dump 56 Aligning Vertical Lines...
Genuine Epson ribbon cartridge 25 Replacing the ribbon cartridge 25 Chapter 5 Control Panel Buttons and Lights 33 Functions auxiliary 36 Compress Printing Mode 38 Chapter 6 Changing your Printer's Settings About Your Printer's Default Settings 39 Understanding default settings 39 Changing default settings 53 Printing a Self-Test 55 Printing Hex Dump 56 Aligning Vertical Lines...
User Guide
Page 5
Appendix A Product Information Printer and Ribbon Cartridge Parts 80 Printer parts 80 Ribbon cartridge parts 81 Printer Specifications 82 Mechanical 82 Electronic 84 Electrical 89 Environmental 90 Paper 90 Magnetic stripe reader/writer (horizontally installed only) .90 Standards and Approvals 102 v
Appendix A Product Information Printer and Ribbon Cartridge Parts 80 Printer parts 80 Ribbon cartridge parts 81 Printer Specifications 82 Mechanical 82 Electronic 84 Electrical 89 Environmental 90 Paper 90 Magnetic stripe reader/writer (horizontally installed only) .90 Standards and Approvals 102 v
User Guide
Page 7
... accordance with the instructions, may cause harmful interference to radio or television reception. This equipment generates, uses, and can find information on operating the impact dot matrix printer PLQ-20/PLQ-20M. Introduction Where to Find More Information This User's Guide provides you with instructions on the basic operation in this equipment does cause interference to...
... accordance with the instructions, may cause harmful interference to radio or television reception. This equipment generates, uses, and can find information on operating the impact dot matrix printer PLQ-20/PLQ-20M. Introduction Where to Find More Information This User's Guide provides you with instructions on the basic operation in this equipment does cause interference to...
User Guide
Page 9
Records maintained continue to reflect the equipment being produced can be expected to be compliant with the standards. Trade Name: EPSON Type of the FCC rules as required by 47CFR §2.909 Operation is identical to the representative unit tested and found to the following two ... harmful interference, and (2) this device must accept any interference received, including interference that the product identified herein, complies with 47CFR Part 2 and 15 of Product: Dot Impact Printer Model: P381A Introduction ix
Records maintained continue to reflect the equipment being produced can be expected to be compliant with the standards. Trade Name: EPSON Type of the FCC rules as required by 47CFR §2.909 Operation is identical to the representative unit tested and found to the following two ... harmful interference, and (2) this device must accept any interference received, including interference that the product identified herein, complies with 47CFR Part 2 and 15 of Product: Dot Impact Printer Model: P381A Introduction ix

User Guide
Page 11
Setting up the Printer 1 1 Unpacking the Printer 1 These items are included in the box with your printer. 1 1 printer 1 power code 1 1 ribbon cartridge User's Guide 1 1 Remove the protective materials 1 Follow the directions written on the cardboard box to remove the protective materials. 1 Save all packing and protective materials in case you need to ship the printer in the future. Chapter 1 Setting up the Printer 1
Setting up the Printer 1 1 Unpacking the Printer 1 These items are included in the box with your printer. 1 1 printer 1 power code 1 1 ribbon cartridge User's Guide 1 1 Remove the protective materials 1 Follow the directions written on the cardboard box to remove the protective materials. 1 Save all packing and protective materials in case you need to ship the printer in the future. Chapter 1 Setting up the Printer 1
User Guide
Page 12
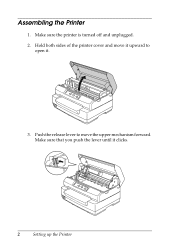
Hold both sides of the printer cover and move it upward to move the upper mechanism forward. Make sure that you push the lever until it . 3. Push the release lever to open it clicks. 2 Setting up the Printer Make sure the printer is turned off and unplugged. 2. Assembling the Printer 1.
Hold both sides of the printer cover and move it upward to move the upper mechanism forward. Make sure that you push the lever until it . 3. Push the release lever to open it clicks. 2 Setting up the Printer Make sure the printer is turned off and unplugged. 2. Assembling the Printer 1.
User Guide
Page 13
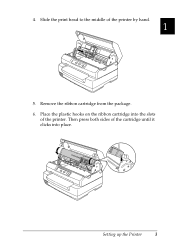
Slide the print head to the middle of the printer. Place the plastic hooks on the ribbon cartridge into place. 1 1 1 1 1 1 Setting up the Printer 3 Then press both sides of the cartridge until it clicks into the slots of the printer by hand. 1 1 1 1 1 5. 4. Remove the ribbon cartridge from the package. 1 6.
Slide the print head to the middle of the printer. Place the plastic hooks on the ribbon cartridge into place. 1 1 1 1 1 1 Setting up the Printer 3 Then press both sides of the cartridge until it clicks into the slots of the printer by hand. 1 1 1 1 1 5. 4. Remove the ribbon cartridge from the package. 1 6.
User Guide
Page 14
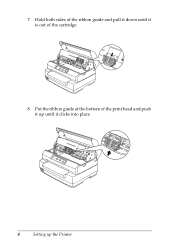
Hold both sides of the ribbon guide and pull it down until it is out of the print head and push it up until it clicks into place. 4 Setting up the Printer Put the ribbon guide at the bottom of the cartridge. 8. 7.
Hold both sides of the ribbon guide and pull it down until it is out of the print head and push it up until it clicks into place. 4 Setting up the Printer Put the ribbon guide at the bottom of the cartridge. 8. 7.
User Guide
Page 15
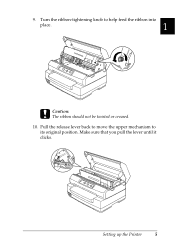
Turn the ribbon-tightening knob to its original position. Pull the release lever back to move the upper mechanism to help feed the ribbon into place. 1 1 1 1 1 c Caution: The ribbon should not be twisted or creased. 1 1 10. Make sure that you pull the lever until it clicks. 1 1 1 1 1 Setting up the Printer 5 9.
Turn the ribbon-tightening knob to its original position. Pull the release lever back to move the upper mechanism to help feed the ribbon into place. 1 1 1 1 1 c Caution: The ribbon should not be twisted or creased. 1 1 10. Make sure that you pull the lever until it clicks. 1 1 1 1 1 Setting up the Printer 5 9.
User Guide
Page 16
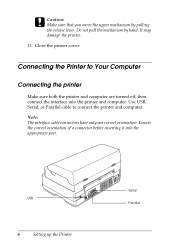
... computer. Ensure the correct orientation of a connector before inserting it into the printer and computer. USB 6 Setting up the Printer Serial Parallel Close the printer cover. Use USB, Serial, or Parallel cable to Your Computer Connecting the printer Make sure both the printer and computer are turned off, then connect the interface into the appropriate...
... computer. Ensure the correct orientation of a connector before inserting it into the printer and computer. USB 6 Setting up the Printer Serial Parallel Close the printer cover. Use USB, Serial, or Parallel cable to Your Computer Connecting the printer Make sure both the printer and computer are turned off, then connect the interface into the appropriate...
User Guide
Page 17
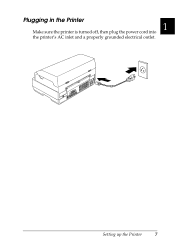
Plugging in the Printer 1 Make sure the printer is turned off, then plug the power cord into the printer's AC inlet and a properly grounded electrical outlet. 1 1 1 1 1 1 1 1 1 1 1 Setting up the Printer 7
Plugging in the Printer 1 Make sure the printer is turned off, then plug the power cord into the printer's AC inlet and a properly grounded electrical outlet. 1 1 1 1 1 1 1 1 1 1 1 Setting up the Printer 7

User Guide
Page 18
8 Setting up the Printer
8 Setting up the Printer
User Guide
Page 19
... before touching them. 2 Important Safety Instructions 2 Read all warnings and instructions marked on the 2 printer itself. 2 Safety Instructions 9 Never touch those parts just after the printer has been used. Notes contain important information and useful tips on the print head and other parts .... c 2 Cautions must be hot. In addition, follow all of your printer. 2 Hot Parts Caution Symbol 2 2 K This symbol is placed on the operation of these safety instructions before using the printer. Chapter 2 Safety Instructions 2 2 Warnings, Cautions, and Notes 2 w ...
... before touching them. 2 Important Safety Instructions 2 Read all warnings and instructions marked on the 2 printer itself. 2 Safety Instructions 9 Never touch those parts just after the printer has been used. Notes contain important information and useful tips on the print head and other parts .... c 2 Cautions must be hot. In addition, follow all of your printer. 2 Hot Parts Caution Symbol 2 2 K This symbol is placed on the operation of these safety instructions before using the printer. Chapter 2 Safety Instructions 2 2 Warnings, Cautions, and Notes 2 w ...
User Guide
Page 20
... a small, enclosed area, as photocopiers or air control systems that regularly switch on and off. ❏ Do not use an extension cord with the printer, make sure the total ampere of all equipment to avoid abrasions, cuts, fraying, crimping, kinking, and other damage. ❏ If you are not ...sure of the power supply specifications in the printer's cabinet, and do not insert objects through the slots. ❏ Use only the type of all devices plugged into the electrical outlet does not ...
... a small, enclosed area, as photocopiers or air control systems that regularly switch on and off. ❏ Do not use an extension cord with the printer, make sure the total ampere of all equipment to avoid abrasions, cuts, fraying, crimping, kinking, and other damage. ❏ If you are not ...sure of the power supply specifications in the printer's cabinet, and do not insert objects through the slots. ❏ Use only the type of all devices plugged into the electrical outlet does not ...

User Guide
Page 21
.... 2 ❏ Leave adequate room around the printer for easy operation and maintenance. ❏ Avoid places subject to a computer or other equipment may result in fire or electric shock. 2 ❏ This product's power cord is for PLQ-20M. Safety Instructions 11 Also avoid outlets on the...of electromagnetic interference, such as large motors or other appliances that can support at least 15 kg (33.1 lb) for PLQ-20 or 17 kg (37.5 lb) for use a printer stand, follow these guidelines: 2 Use a stand that can cause voltage fluctuations. ❏ Use a grounded power outlet...
.... 2 ❏ Leave adequate room around the printer for easy operation and maintenance. ❏ Avoid places subject to a computer or other equipment may result in fire or electric shock. 2 ❏ This product's power cord is for PLQ-20M. Safety Instructions 11 Also avoid outlets on the...of electromagnetic interference, such as large motors or other appliances that can support at least 15 kg (33.1 lb) for PLQ-20 or 17 kg (37.5 lb) for use a printer stand, follow these guidelines: 2 Use a stand that can cause voltage fluctuations. ❏ Use a grounded power outlet...
User Guide
Page 22
... cable so they do not attempt to service the printer yourself. ❏ Unplug the printer and refer servicing to a leg of damp cloth only. ❏ Do not spill liquid onto the printer. ❏ Except as specifically explained in this printer, the building installation must be kept level. If ...the power cord or plug is damaged. iii. When maintaining the printer ❏ Unplug the printer before cleaning it, and always clean it with paper feeding. ii. The printer should always be protected by the operating instructions. ❏ If you plan to use a ...
... cable so they do not attempt to service the printer yourself. ❏ Unplug the printer and refer servicing to a leg of damp cloth only. ❏ Do not spill liquid onto the printer. ❏ Except as specifically explained in this printer, the building installation must be kept level. If ...the power cord or plug is damaged. iii. When maintaining the printer ❏ Unplug the printer before cleaning it, and always clean it with paper feeding. ii. The printer should always be protected by the operating instructions. ❏ If you plan to use a ...
User Guide
Page 23
Refer to the Programming Guide for the passbook's binding in places subject to front. When operating the printer 2 ❏ Avoid using or storing the printer in the default settings mode. 2 ❏ Do not load passbooks that are creased or have more than 60% 2 reflectance. 2 ❏ When you load it away ...
Refer to the Programming Guide for the passbook's binding in places subject to front. When operating the printer 2 ❏ Avoid using or storing the printer in the default settings mode. 2 ❏ Do not load passbooks that are creased or have more than 60% 2 reflectance. 2 ❏ When you load it away ...
User Guide
Page 24
...checked when the print head is printing the self-test. ❏ Adjust only those controls that has the wrong voltage for your printer. ❏ Never replace the print head yourself; Improper adjustment of the printer must be hot; Always press the Offline button to pause printing. you have just used the... printer, the print head may damage the printer. Note for a few minutes before turning it is replaced. ❏ You need to move the print head by a qualified technician. ❏ Whenever you ...
...checked when the print head is printing the self-test. ❏ Adjust only those controls that has the wrong voltage for your printer. ❏ Never replace the print head yourself; Improper adjustment of the printer must be hot; Always press the Offline button to pause printing. you have just used the... printer, the print head may damage the printer. Note for a few minutes before turning it is replaced. ❏ You need to move the print head by a qualified technician. ❏ Whenever you ...


