User Manual
Page 2
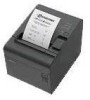
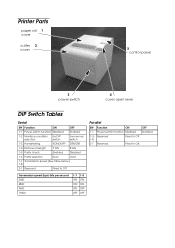
Printer Parts paper roll 1 cover cutter 2 cover 5 control panel 3 power switch 4 cover open lever DIP Switch Tables Serial SW Function ON OFF 1-1 Power switch function Disabled ...
Printer Parts paper roll 1 cover cutter 2 cover 5 control panel 3 power switch 4 cover open lever DIP Switch Tables Serial SW Function ON OFF 1-1 Power switch function Disabled ...
User Manual
Page 3
...While every precaution has been taken in the preparation of this book, Seiko Epson Corporation assumes no responsibility for damages resulting from the use of Seiko Epson Corporation. EMC and Safety Standards Applied Product Name: TM-T90 Model Name: M165A The following Directives and Norms: Directive 89/336/EEC ...: EMC: VCCI Class A JEIDA-52 Oceania: EMC: AS/NZS 3548 Class B WARNING The connection of a non-shielded printer interface cable to this printer will be liable to the purchaser of this section carefully and store it in which case the user will invalidate the EMC ...
...While every precaution has been taken in the preparation of this book, Seiko Epson Corporation assumes no responsibility for damages resulting from the use of Seiko Epson Corporation. EMC and Safety Standards Applied Product Name: TM-T90 Model Name: M165A The following Directives and Norms: Directive 89/336/EEC ...: EMC: VCCI Class A JEIDA-52 Oceania: EMC: AS/NZS 3548 Class B WARNING The connection of a non-shielded printer interface cable to this printer will be liable to the purchaser of this section carefully and store it in which case the user will invalidate the EMC ...
User Manual
Page 4
...printer and the telephone line may result in this product may be dangerous. Tampering with this manual. Connection to repair this product. CAUTION: Do not connect cables in ways other liquid spills into the equipment. Different connections may cause fire. Equipment may cause equipment damage or fire. CAUTION: The thermal head is hot. 2 TM-T90... User's Manual Continued use the specified power source. Never stand or lean on this equipment, unplug the power cord immediately, and then contact your dealer or a SEIKO EPSON service center ...
...printer and the telephone line may result in this product may be dangerous. Tampering with this manual. Connection to repair this product. CAUTION: Do not connect cables in ways other liquid spills into the equipment. Different connections may cause fire. Equipment may cause equipment damage or fire. CAUTION: The thermal head is hot. 2 TM-T90... User's Manual Continued use the specified power source. Never stand or lean on this equipment, unplug the power cord immediately, and then contact your dealer or a SEIKO EPSON service center ...
User Manual
Page 5
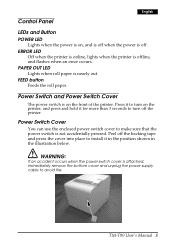
... press and hold it in the position shown in the illustration below. ERROR LED Off when the printer is online, lights when the printer is off. Peel off the backing tape and press the cover into place to install it for more than 3 seconds to make sure that the ... Switch and Power Switch Cover The power switch is attached, immediately remove the bottom cover and unplug the power supply cable to turn off the printer. TM-T90 User's Manual 3 WARNING: If an accident occurs when the power switch cover is on the front of the...
... press and hold it in the position shown in the illustration below. ERROR LED Off when the printer is online, lights when the printer is off. Peel off the backing tape and press the cover into place to install it for more than 3 seconds to make sure that the ... Switch and Power Switch Cover The power switch is attached, immediately remove the bottom cover and unplug the power supply cable to turn off the printer. TM-T90 User's Manual 3 WARNING: If an accident occurs when the power switch cover is on the front of the...
User Manual
Page 6
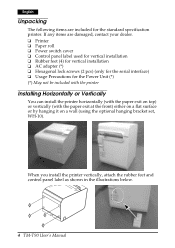
If any items are included for the Power Unit (*) (*) May not be included with the printer Installing Horizontally or Vertically You can install the printer horizontally (with the paper exit on top) or vertically (with the paper exit at the front) either on a flat ..., attach the rubber feet and control panel label as shown in the illustrations below. 4 TM-T90 User's Manual English Unpacking The following items are damaged, contact your dealer. ❏ Printer ❏ Paper roll ❏ Power switch cover ❏ Control panel label used for vertical installation ❏ Rubber feet ...
If any items are included for the Power Unit (*) (*) May not be included with the printer Installing Horizontally or Vertically You can install the printer horizontally (with the paper exit on top) or vertically (with the paper exit at the front) either on a flat ..., attach the rubber feet and control panel label as shown in the illustrations below. 4 TM-T90 User's Manual English Unpacking The following items are damaged, contact your dealer. ❏ Printer ❏ Paper roll ❏ Power switch cover ❏ Control panel label used for vertical installation ❏ Rubber feet ...
User Manual
Page 7
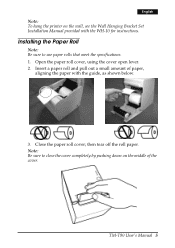
Insert a paper roll and pull out a small amount of the cover. English Note: To hang the printer on the middle of paper, aligning the paper with the WH-10 for instructions. Note: Be sure to use paper rolls that meet the specifications. 1. TM-T90 User's Manual 5 Close the paper roll cover; Installing the Paper Roll Note: Be sure to close the cover completely by pushing down on the wall, see the Wall Hanging Bracket Set Installation Manual provided with the guide, as shown below. 3. Open the paper roll cover, using the cover open lever. 2. then tear off the roll paper.
Insert a paper roll and pull out a small amount of the cover. English Note: To hang the printer on the middle of paper, aligning the paper with the WH-10 for instructions. Note: Be sure to use paper rolls that meet the specifications. 1. TM-T90 User's Manual 5 Close the paper roll cover; Installing the Paper Roll Note: Be sure to close the cover completely by pushing down on the wall, see the Wall Hanging Bracket Set Installation Manual provided with the guide, as shown below. 3. Open the paper roll cover, using the cover open lever. 2. then tear off the roll paper.
User Manual
Page 8
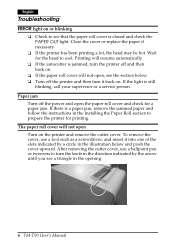
... by the arrow until you see that the paper roll cover is a paper jam, remove the jammed paper and follow the instructions in the opening. 6 TM-T90 User's Manual Paper jam Turn off and then back on. ❏ If the paper roll cover will not open , see the section below and push... the cover upward. Close the cover or replace the paper if necessary. ❏ If the printer has been printing a lot, the head may be hot. Printing will resume automatically. ❏ If the autocutter is still blinking, call your supervisor or a ...
... by the arrow until you see that the paper roll cover is a paper jam, remove the jammed paper and follow the instructions in the opening. 6 TM-T90 User's Manual Paper jam Turn off and then back on. ❏ If the paper roll cover will not open , see the section below and push... the cover upward. Close the cover or replace the paper if necessary. ❏ If the printer has been printing a lot, the head may be hot. Printing will resume automatically. ❏ If the autocutter is still blinking, call your supervisor or a ...
User Manual
Page 9
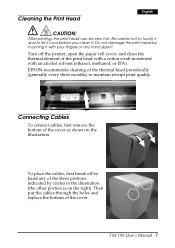
TM-T90 User's Manual 7 To place the cables, first break off the printer, open the paper roll cover, and clean the thermal element of the print head with a cotton swab moistened with your ...After printing, the print head can be very hot. Turn off by hand any of the thermal head periodically (generally every three months) to let it cool before you clean it with an alcohol solvent (ethanol..., methanol, or IPA). EPSON recommends cleaning of the three portions indicated by touching it . Be careful not to touch it and to...
TM-T90 User's Manual 7 To place the cables, first break off the printer, open the paper roll cover, and clean the thermal element of the print head with a cotton swab moistened with your ...After printing, the print head can be very hot. Turn off by hand any of the thermal head periodically (generally every three months) to let it cool before you clean it with an alcohol solvent (ethanol..., methanol, or IPA). EPSON recommends cleaning of the three portions indicated by touching it . Be careful not to touch it and to...


