
Installation Guide
Page 1
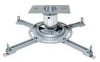
North Ave. • Melrose Park, IL 60160 • (800) 865-2112 or (708) 865-8870 • Fax: (708) 865-2941 • www.peerlessmounts.com It must be installed by Peerless Industries, Inc. 3215 W. Installation and Assembly: Universal Projector Ceiling Mount Model: ELPMBPJF This product is UL Listed. Maximum UL Load Capacity: 50 lb (22.7 kg) Manufactured by a qualified professional R installer.
North Ave. • Melrose Park, IL 60160 • (800) 865-2112 or (708) 865-8870 • Fax: (708) 865-2941 • www.peerlessmounts.com It must be installed by Peerless Industries, Inc. 3215 W. Installation and Assembly: Universal Projector Ceiling Mount Model: ELPMBPJF This product is UL Listed. Maximum UL Load Capacity: 50 lb (22.7 kg) Manufactured by a qualified professional R installer.

Installation Guide
Page 2
... these instructions. • When installing or adjusting the ceiling mount, do not overtighten. Tools Needed for Assembly • stud finder ("edge to edge" stud finder is intended for wood joist Table of Contents Parts List ...3 Installation to Extension Column ...4 Installation to Wood Joist Ceilings ...5 Installation to Concrete Ceilings ...6 Flush Mount Application ...7 Attaching Adapter Plate to Projector ...7-8 Attaching Adapter Plate to...
... these instructions. • When installing or adjusting the ceiling mount, do not overtighten. Tools Needed for Assembly • stud finder ("edge to edge" stud finder is intended for wood joist Table of Contents Parts List ...3 Installation to Extension Column ...4 Installation to Wood Joist Ceilings ...5 Installation to Concrete Ceilings ...6 Flush Mount Application ...7 Attaching Adapter Plate to Projector ...7-8 Attaching Adapter Plate to...

Installation Guide
Page 4
...(J) through extension column connector into slot in projector mount (A) using security allen wrench (B). See detail 1. Insert and tighten one of the top holes in projector mount (A) to prevent any excess movement. Screw projector mount (A) into slot on extension column using security...column connector (I ). C G K* UL Listed ELPMBP01, ELPMBP02, ELPMBP03 or UL Listed CMJ and ACC Series Ceiling Mounts (Sold Separately). Skip to separate the products. Installation to Extension Column 1 Screw extension column (sold separately) to extension column. Align the notch with a M5 ...
...(J) through extension column connector into slot in projector mount (A) using security allen wrench (B). See detail 1. Insert and tighten one of the top holes in projector mount (A) to prevent any excess movement. Screw projector mount (A) into slot on extension column using security...column connector (I ). C G K* UL Listed ELPMBP01, ELPMBP02, ELPMBP03 or UL Listed CMJ and ACC Series Ceiling Mounts (Sold Separately). Skip to separate the products. Installation to Extension Column 1 Screw extension column (sold separately) to extension column. Align the notch with a M5 ...
Installation Guide
Page 5
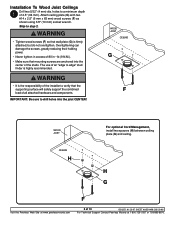
... the Peerless Web Site at 1-800-729-0307 or 708-865-8870. WOOD JOIST CEILING G F WOOD JOIST For optional Cord Management, install two spacers (H) between ceiling plate (G) and ceiling. Installation To Wood Joist Ceilings 1 Drill two 5/32" (4 mm) dia. holes to drill holes into the center of an "edge to step 2. IMPORTANT: Be... wall plate (G) is the responsibility of 10 ISSUED: 01-23-07 SHEET #:055-9498-2 05-29-08 For Technical Support Contact Peerless Mounts at www.peerlessmounts.com 5 of the installer to verify that mounting screws are anchored into the joist CENTER!
... the Peerless Web Site at 1-800-729-0307 or 708-865-8870. WOOD JOIST CEILING G F WOOD JOIST For optional Cord Management, install two spacers (H) between ceiling plate (G) and ceiling. Installation To Wood Joist Ceilings 1 Drill two 5/32" (4 mm) dia. holes to drill holes into the center of an "edge to step 2. IMPORTANT: Be... wall plate (G) is the responsibility of 10 ISSUED: 01-23-07 SHEET #:055-9498-2 05-29-08 For Technical Support Contact Peerless Mounts at www.peerlessmounts.com 5 of the installer to verify that mounting screws are anchored into the joist CENTER!

Installation Guide
Page 6
... concrete anchors and #14 x 2.5" wood screws (F) as shown below. IMPORTANT: It is the responsibility of the installer to verify that the ceiling will safely support the combined load of plaster, drywall, or other finishing material. Overtightening can damage the screws, greatly...support the combined load of 80 in Illustration A and 1, 2 and 3. If mounting to concrete ceiling covered with plaster / drywall is firmly attached, but do not overtighten. Installation to Concrete Ceilings WARNING • Concrete must be 2000 psi density minimum. metal bracket INCORRECT concrete ...
... concrete anchors and #14 x 2.5" wood screws (F) as shown below. IMPORTANT: It is the responsibility of the installer to verify that the ceiling will safely support the combined load of plaster, drywall, or other finishing material. Overtightening can damage the screws, greatly...support the combined load of 80 in Illustration A and 1, 2 and 3. If mounting to concrete ceiling covered with plaster / drywall is firmly attached, but do not overtighten. Installation to Concrete Ceilings WARNING • Concrete must be 2000 psi density minimum. metal bracket INCORRECT concrete ...

Installation Guide
Page 7
... of channels are installing may be used for each mounting hole, position feet of channels over mounting holes as shown. Do not overtighten screw; overtightening screw will damage threads making it difficult to ensure that the projector is the responsibility of the projector mount (A). WOOD JOIST C K NOTCH CEILING G A G A Attaching Adapter Plate to Projector 2 NOTE: The projector you are used...
... of channels are installing may be used for each mounting hole, position feet of channels over mounting holes as shown. Do not overtighten screw; overtightening screw will damage threads making it difficult to ensure that the projector is the responsibility of the projector mount (A). WOOD JOIST C K NOTCH CEILING G A G A Attaching Adapter Plate to Projector 2 NOTE: The projector you are used...