
Technical Reference
Page 5
...TM-H60000III. Appendix A Character Code Tables: Contains the character code tables. Appendix B Power Supply Specifications: Contains the specifications. CAUTION: Cautions must be observed to avoid minor injury to yourself or damage to your printer. Chapter 4 Maintenance & Troubleshooting...for general Image Scanner: programming with Image Scanner, TM-H6000III PhotoID Model. Appendix D Comparison Table: Comparison table for TM-H6000II with Image Scanner, TM-H6000II Photo-ID Model, TMH6000III with the TM-H6000III. See the specific warnings and cautions at appropriate ...
...TM-H60000III. Appendix A Character Code Tables: Contains the character code tables. Appendix B Power Supply Specifications: Contains the specifications. CAUTION: Cautions must be observed to avoid minor injury to yourself or damage to your printer. Chapter 4 Maintenance & Troubleshooting...for general Image Scanner: programming with Image Scanner, TM-H6000III PhotoID Model. Appendix D Comparison Table: Comparison table for TM-H6000II with Image Scanner, TM-H6000II Photo-ID Model, TMH6000III with the TM-H6000III. See the specific warnings and cautions at appropriate ...
Technical Reference
Page 13
or Incorrect Data With Serial Interface 4-8 4.2.7 Hexadecimal Dump 4-8 Rev. E xiii TM-H6000III Technical Reference Guide Chapter 3 Setup 3.1 Part Name and Basic Operation 3-1 3.1.1 Part Names 3-1 3.1.2 Connectors 3-2...Two-Color Printing 3-24 3.5 Self Tests 3-24 3.5.1 Running the Self Test on Roll Paper 3-24 3.5.2 Running the Self Test with Slip Paper 3-25 3.5.3 Running the Self Test with the Validation paper (Option 3-25 3.5.4 Running the Self Test with the Endorsement Function (Option 3-25 Chapter 4 Maintenance & Troubleshooting 4.1 Maintenance 4-1 4.1.1 Cleaning the Thermal...
or Incorrect Data With Serial Interface 4-8 4.2.7 Hexadecimal Dump 4-8 Rev. E xiii TM-H6000III Technical Reference Guide Chapter 3 Setup 3.1 Part Name and Basic Operation 3-1 3.1.1 Part Names 3-1 3.1.2 Connectors 3-2...Two-Color Printing 3-24 3.5 Self Tests 3-24 3.5.1 Running the Self Test on Roll Paper 3-24 3.5.2 Running the Self Test with Slip Paper 3-25 3.5.3 Running the Self Test with the Validation paper (Option 3-25 3.5.4 Running the Self Test with the Endorsement Function (Option 3-25 Chapter 4 Maintenance & Troubleshooting 4.1 Maintenance 4-1 4.1.1 Cleaning the Thermal...
Technical Reference
Page 89
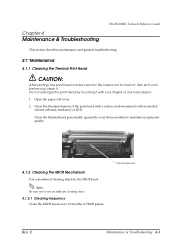
... Maintenance & Troubleshooting 4-1 Chapter 4 Maintenance & Troubleshooting TM-H6000III Technical Reference Guide This section describes maintenance and general troubleshooting. 4.1 Maintenance 4.1.1 Cleaning the Thermal Print Head CAUTION: After printing, the print head can be very hot. Be careful not to touch it . Clean the thermal element of the...not damage the print head by touching it with an alcohol solvent (ethanol, methanol, or IPA) Clean the thermal head periodically (generally every three months) to use an adhesive cleaning sheet. 4.1.2.1 Cleaning frequency Clean the MICR head...
... Maintenance & Troubleshooting 4-1 Chapter 4 Maintenance & Troubleshooting TM-H6000III Technical Reference Guide This section describes maintenance and general troubleshooting. 4.1 Maintenance 4.1.1 Cleaning the Thermal Print Head CAUTION: After printing, the print head can be very hot. Be careful not to touch it . Clean the thermal element of the...not damage the print head by touching it with an alcohol solvent (ethanol, methanol, or IPA) Clean the thermal head periodically (generally every three months) to use an adhesive cleaning sheet. 4.1.2.1 Cleaning frequency Clean the MICR head...
Technical Reference
Page 90
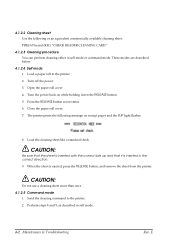
... or an equivalent commercially available cleaning sheet: PRESAT brand (KIC) "CHECK READER CLEANING CARD." 4.1.2.3 Cleaning procedure You can perform cleaning either in self mode. 4-2 Maintenance & Troubleshooting Rev. CAUTION: Do not use a cleaning sheet more than once. 4.1.2.5 Command mode 1. E Turn off the power. 3. These modes are described below. 4.1.2.4 Self mode 1. Press the...
... or an equivalent commercially available cleaning sheet: PRESAT brand (KIC) "CHECK READER CLEANING CARD." 4.1.2.3 Cleaning procedure You can perform cleaning either in self mode. 4-2 Maintenance & Troubleshooting Rev. CAUTION: Do not use a cleaning sheet more than once. 4.1.2.5 Command mode 1. E Turn off the power. 3. These modes are described below. 4.1.2.4 Self mode 1. Press the...
Technical Reference
Page 91
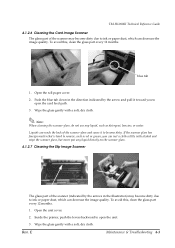
... 4.1.2.7 Cleaning the Slip Image Scanner The glass part of the scanner (indicated by the arrow and pull it to open the unit. 3. TM-H6000III Technical Reference Guide 4.1.2.6 Cleaning the Card Image Scanner The glass part of the scanner may become dirty. Inside the printer, push the levers ...of the scanner glass and cause it toward you can decrease the image quality. Wipe the glass gently with a soft, dry cloth. E Maintenance & Troubleshooting 4-3 Open the unit cover. 2. Open the roll paper cover. 2. To avoid this , clean the glass part every 12 months. If the scanner...
... 4.1.2.7 Cleaning the Slip Image Scanner The glass part of the scanner (indicated by the arrow and pull it to open the unit. 3. TM-H6000III Technical Reference Guide 4.1.2.6 Cleaning the Card Image Scanner The glass part of the scanner may become dirty. Inside the printer, push the levers ...of the scanner glass and cause it toward you can decrease the image quality. Wipe the glass gently with a soft, dry cloth. E Maintenance & Troubleshooting 4-3 Open the unit cover. 2. Open the roll paper cover. 2. To avoid this , clean the glass part every 12 months. If the scanner...
Technical Reference
Page 92
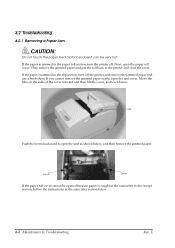
Next, open the unit cover. Then remove the jammed paper and put the roll back in the autocutter section below. 4-4 Maintenance & Troubleshooting Rev. Tab Push the levers backward to open the unit as shown below , and then remove the jammed paper. E Move the tabs on the ...sides of the cover forward and then lift the cover, as shown below . 4.2 Troubleshooting 4.2.1 Removing a Paper Jam CAUTION: Do not touch the paper feed motor because it can be opened because paper is jammed in the paper roll section...
Next, open the unit cover. Then remove the jammed paper and put the roll back in the autocutter section below. 4-4 Maintenance & Troubleshooting Rev. Tab Push the levers backward to open the unit as shown below , and then remove the jammed paper. E Move the tabs on the ...sides of the cover forward and then lift the cover, as shown below . 4.2 Troubleshooting 4.2.1 Removing a Paper Jam CAUTION: Do not touch the paper feed motor because it can be opened because paper is jammed in the paper roll section...
Technical Reference
Page 93
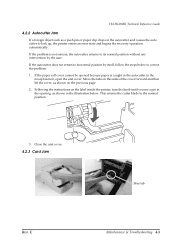
... on the previous page. 2. This returns the cutter blade to lock up, the printer enters an error state and begins the recovery operation automatically. E Maintenance & Troubleshooting 4-5 TM-H6000III Technical Reference Guide 4.2.2 Autocutter Jam If a foreign object such as a push pin or paper clip drops in the autocutter and causes the auto cutter to...
... on the previous page. 2. This returns the cutter blade to lock up, the printer enters an error state and begins the recovery operation automatically. E Maintenance & Troubleshooting 4-5 TM-H6000III Technical Reference Guide 4.2.2 Autocutter Jam If a foreign object such as a push pin or paper clip drops in the autocutter and causes the auto cutter to...
Technical Reference
Page 94
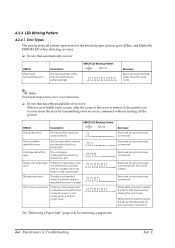
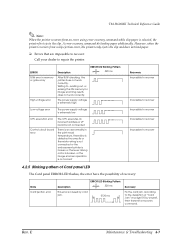
...can recover from the error by error recovery command See "Removing a Paper Jam" (page 4-4) for removing a paper jam. 4-6 Maintenance & Troubleshooting Rev. E 4.2.4 LED Blinking Pattern 4.2.4.1 Error Types The printer stops all printer operations for the selected paper section, goes offline, and blinks the... when detecting an error. ❏ Errors that automatically recover ERROR Print head temperature error Description The temperature of the thermal print head is extremely high ERROR LED Blinking Pattern 320 ms Recovery Recovers automatically when the print head cools Note: Print...
...can recover from the error by error recovery command See "Removing a Paper Jam" (page 4-4) for removing a paper jam. 4-6 Maintenance & Troubleshooting Rev. E 4.2.4 LED Blinking Pattern 4.2.4.1 Error Types The printer stops all printer operations for the selected paper section, goes offline, and blinks the... when detecting an error. ❏ Errors that automatically recover ERROR Print head temperature error Description The temperature of the thermal print head is extremely high ERROR LED Blinking Pattern 320 ms Recovery Recovers automatically when the print head cools Note: Print...
Technical Reference
Page 95
...High voltage error Description ERROR LED Blinking Pattern 320 ms After R/W checking, the printer does not work correctly. E Maintenance & Troubleshooting 4-7 Rev. The power supply voltage is extremely high Low voltage error The power supply voltage is extremely low CPU execution error ... I/F board is not connected There is selected, the printer first ejects the slip. A error recovery command do loading paper additionally. TM-H6000III Technical Reference Guide Note: When the printer recovers from a slip ejection error, the printer only ejects the slip and does not load...
...High voltage error Description ERROR LED Blinking Pattern 320 ms After R/W checking, the printer does not work correctly. E Maintenance & Troubleshooting 4-7 Rev. The power supply voltage is extremely high Low voltage error The power supply voltage is extremely low CPU execution error ... I/F board is not connected There is selected, the printer first ejects the slip. A error recovery command do loading paper additionally. TM-H6000III Technical Reference Guide Note: When the printer recovers from a slip ejection error, the printer only ejects the slip and does not load...
Technical Reference
Page 96
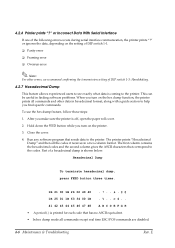
Run any software program that has no ASCII equivalent. • In hex dump mode all commands except real time ESC/POS commands are disabled. 4-8 Maintenance & Troubleshooting Rev. c 4 . . 41 42 43 44 45 46 47 48 A B C D E F G H • A period (.) is coming to the printer. This can be...depending on the setting of DIP switch 1-1. ❏ Parity error ❏ Framing error ❏ Overrun error Note: For other data in a two-column format. Close the cover. 4. The first column contains the hexadecimal codes and the second column gives the ASCII characters that correspond to help ...
Run any software program that has no ASCII equivalent. • In hex dump mode all commands except real time ESC/POS commands are disabled. 4-8 Maintenance & Troubleshooting Rev. c 4 . . 41 42 43 44 45 46 47 48 A B C D E F G H • A period (.) is coming to the printer. This can be...depending on the setting of DIP switch 1-1. ❏ Parity error ❏ Framing error ❏ Overrun error Note: For other data in a two-column format. Close the cover. 4. The first column contains the hexadecimal codes and the second column gives the ASCII characters that correspond to help ...
Technical Reference
Page 97
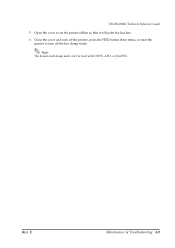
Close the cover and turn off the printer, press the FEED button three times, or reset the printer to set the printer offline so that it will print the last line. 6. Rev. Open the cover to turn off the hex dump mode. Note: The hexadecimal dump mode can't be used with OPOS, APD, or JavaPOS. TM-H6000III Technical Reference Guide 5. E Maintenance & Troubleshooting 4-9
Close the cover and turn off the printer, press the FEED button three times, or reset the printer to set the printer offline so that it will print the last line. 6. Rev. Open the cover to turn off the hex dump mode. Note: The hexadecimal dump mode can't be used with OPOS, APD, or JavaPOS. TM-H6000III Technical Reference Guide 5. E Maintenance & Troubleshooting 4-9