
Technical Brief (Impact Printers)
Page 1
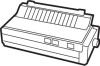
...LLL The name of an EPSON's impact printer tells you if it has a narrow or wide carriage: LLL L Nine-pin printers all begin with FX, LX, or DFX Twenty-four pin printers all begin with tireless printheads and superior quality ribbons. An impact printer has several advantages over any...multiple paper paths that the printer are either 9- Impact printers are capable of their reliability with LQ FX-980-Nine-pin narrow carriage Wide carriage printers have 4 number in their names Narrow carriage printers have 3 numbers in purchase price and low cost of printer: Low cost - Contents ...
...LLL The name of an EPSON's impact printer tells you if it has a narrow or wide carriage: LLL L Nine-pin printers all begin with FX, LX, or DFX Twenty-four pin printers all begin with tireless printheads and superior quality ribbons. An impact printer has several advantages over any...multiple paper paths that the printer are either 9- Impact printers are capable of their reliability with LQ FX-980-Nine-pin narrow carriage Wide carriage printers have 4 number in their names Narrow carriage printers have 3 numbers in purchase price and low cost of printer: Low cost - Contents ...
Technical Brief (Impact Printers)
Page 6
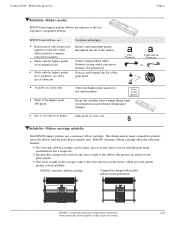
... extreme temperature changes L L Easy to every sale 5 Reliability-Ribbon cartridge reliability Most EPSON impact printers use a stationary ribbon cartridge. Technical Brief-Multimedia projectors Page 6 Reliability-Ribbon quality EPSON brand impact printer ribbons are ... Customer advantages Manufactured with ink precisely applied to the less expensive compatible ribbons. EPSON's stationary ribbon cartridge offers the following benefits: L L The stationary ribbon cartridge can achieve faster print speeds. L L L Available...
... extreme temperature changes L L Easy to every sale 5 Reliability-Ribbon cartridge reliability Most EPSON impact printers use a stationary ribbon cartridge. Technical Brief-Multimedia projectors Page 6 Reliability-Ribbon quality EPSON brand impact printer ribbons are ... Customer advantages Manufactured with ink precisely applied to the less expensive compatible ribbons. EPSON's stationary ribbon cartridge offers the following benefits: L L The stationary ribbon cartridge can achieve faster print speeds. L L L Available...
Product Information Guide
Page 1
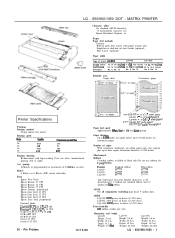
... head life 200 million strokes per wire Dimensions and weight LQ-850 Height: 5.6 in black only Do not use ribbons for single sheets; No. 10 No 6. Continuous paper Printer Specifications Printing Printing method 24-pin impact dot matrix Printing speed 10 draft 220 10 LCI 73 12...0 Kbytes (DIP switch selectable) Fonts Epson New Draft Epson Roman 10 CPI Epson Roman 12 CPI Epson Roman 15 CPI Epson Roman proportional Epson Sans Serif 10 CPI Epson Sans Serif 12 CPI Epson Sans Serif 15 CPI Epson Sans Serif proportional Optional fonts CcNmer IO CPI. Pin Printers 12/12/88 I - Depth:...
... head life 200 million strokes per wire Dimensions and weight LQ-850 Height: 5.6 in black only Do not use ribbons for single sheets; No. 10 No 6. Continuous paper Printer Specifications Printing Printing method 24-pin impact dot matrix Printing speed 10 draft 220 10 LCI 73 12...0 Kbytes (DIP switch selectable) Fonts Epson New Draft Epson Roman 10 CPI Epson Roman 12 CPI Epson Roman 15 CPI Epson Roman proportional Epson Sans Serif 10 CPI Epson Sans Serif 12 CPI Epson Sans Serif 15 CPI Epson Sans Serif proportional Optional fonts CcNmer IO CPI. Pin Printers 12/12/88 I - Depth:...

User Manual
Page 4
... the parts 1-2 Removing the protective materials 1-3 Choosing a Place for the Printer 1-5 Assembling the Printer 1-6 Installing the platen knob 1-6 Installing the ribbon l-7 Attaching the paper guide l-10 Testing the Printer 1-12 Loading a sheet of paper 1-12 Running the self test 1-15 Connecting the Printer to Your Computer 1-18 The parallel interface 1-19 The serial interface 1-20...
... the parts 1-2 Removing the protective materials 1-3 Choosing a Place for the Printer 1-5 Assembling the Printer 1-6 Installing the platen knob 1-6 Installing the ribbon l-7 Attaching the paper guide l-10 Testing the Printer 1-12 Loading a sheet of paper 1-12 Running the self test 1-15 Connecting the Printer to Your Computer 1-18 The parallel interface 1-19 The serial interface 1-20...

User Manual
Page 6
Chapter 4 Software and Graphics Software 4-2 Choosing from a menu 4-2 A quick test 4-3 Computer-printer communication 4-3 Word processors 4-4 Spreadsheets 4-6 Graphics programs 4-7 Graphics 4-8 The print head 4-9 Graphic command 4-12 Column reservation numbers 4-13...-defined characters 4-27 Copying ROM characters to RAM 4-27 Letter Quality characters 4-28 Chapter 5 Maintenance Replacing the Ribbon 5-2 Transporting the Printer 5-4 Cleaning the Printer 5-6 Chapter 6 Troubleshooting Troubleshooting 6-2 Problems and solutions 6-2 Data dump mode 6-5 Contents
Chapter 4 Software and Graphics Software 4-2 Choosing from a menu 4-2 A quick test 4-3 Computer-printer communication 4-3 Word processors 4-4 Spreadsheets 4-6 Graphics programs 4-7 Graphics 4-8 The print head 4-9 Graphic command 4-12 Column reservation numbers 4-13...-defined characters 4-27 Copying ROM characters to RAM 4-27 Letter Quality characters 4-28 Chapter 5 Maintenance Replacing the Ribbon 5-2 Transporting the Printer 5-4 Cleaning the Printer 5-6 Chapter 6 Troubleshooting Troubleshooting 6-2 Problems and solutions 6-2 Data dump mode 6-5 Contents

User Manual
Page 14
Unpacking the Printer 1-2 Checking the parts l-2 Removing the protective materials 1-3 Choosing a Place for the Printer l-5 Assembling the Printer l-6 Installing the platen knob l-6 Installing the ribbon l-7 Attaching the paper guide l-10 Testing the Printer 1-12 Loading a sheet of paper 1-12 Running the self test 1-15 Connecting the Printer to Your Computer 1-18 The parallel interface 1-19 The serial interface l-20
Unpacking the Printer 1-2 Checking the parts l-2 Removing the protective materials 1-3 Choosing a Place for the Printer l-5 Assembling the Printer l-6 Installing the platen knob l-6 Installing the ribbon l-7 Attaching the paper guide l-10 Testing the Printer 1-12 Loading a sheet of paper 1-12 Running the self test 1-15 Connecting the Printer to Your Computer 1-18 The parallel interface 1-19 The serial interface l-20

User Manual
Page 20
Remove the printer cover. 3. This step removes excess slack in the direction of the printer. 4. Turn the ribbon-tightening knob in the ribbon and makes it easier to an electrical outlet. 2. Make sure that the printer is not connected to install. 1-7 Slide the print head to the middle of the arrow to tighten the ribbon. Assembling the Printer Installing the ribbon To install the ribbon cartridge, follow these steps: 1.
Remove the printer cover. 3. This step removes excess slack in the direction of the printer. 4. Turn the ribbon-tightening knob in the ribbon and makes it easier to an electrical outlet. 2. Make sure that the printer is not connected to install. 1-7 Slide the print head to the middle of the arrow to tighten the ribbon. Assembling the Printer Installing the ribbon To install the ribbon cartridge, follow these steps: 1.

User Manual
Page 21
Hold the ribbon cartridge by its black, fin-like handles with the exposed ribbon away from you. (The LQ-850 ribbon cartridge has only one handle.) Push the cartridge firmly into position, making sure that the black plastic hooks fit into place. 1-8 Assembling the Printer 5. Use a pointed object, such as the tip of the arrow to guide the ribbon between the print head and the ribbon guide. At the same time turn the ribbon-tightening knob in the direction of a pencil, to help feed the ribbon into the slots inside the printer. 6.
Hold the ribbon cartridge by its black, fin-like handles with the exposed ribbon away from you. (The LQ-850 ribbon cartridge has only one handle.) Push the cartridge firmly into position, making sure that the black plastic hooks fit into place. 1-8 Assembling the Printer 5. Use a pointed object, such as the tip of the arrow to guide the ribbon between the print head and the ribbon guide. At the same time turn the ribbon-tightening knob in the direction of a pencil, to help feed the ribbon into the slots inside the printer. 6.

User Manual
Page 24
... test function to see that the power switch is working correctly even though it into an electrical outlet. 1-12 Make sure that the printer is turned off. If so, connect the power cord to ensure that the ribbon has been installed correctly. You should perform this test to make sure the... printer was not damaged during shipping and to the printer before plugging it is fully assembled, you need to load a sheet of paper 1. Next, plug the ...
... test function to see that the power switch is working correctly even though it into an electrical outlet. 1-12 Make sure that the printer is turned off. If so, connect the power cord to ensure that the ribbon has been installed correctly. You should perform this test to make sure the... printer was not damaged during shipping and to the printer before plugging it is fully assembled, you need to load a sheet of paper 1. Next, plug the ...

User Manual
Page 85
...both horizontally and vertically in more than one column, but the intelligence of the printer handles the timing of pin firings so that of unbroken lines. In order ...it against the paper to see individual dots. Each time a pin fires, it strikes the inked ribbon and presses it is that the effect is difficult to produce a small dot. As the head moves...letters, numbers, or symbols. Instead, the letters and symbols seem to know a little about how the LQ's print head works. Graphics I ncome Breakdown Marketing and Advertising \ Profit Salaries and Production Development The print ...
...both horizontally and vertically in more than one column, but the intelligence of the printer handles the timing of pin firings so that of unbroken lines. In order ...it against the paper to see individual dots. Each time a pin fires, it strikes the inked ribbon and presses it is that the effect is difficult to produce a small dot. As the head moves...letters, numbers, or symbols. Instead, the letters and symbols seem to know a little about how the LQ's print head works. Graphics I ncome Breakdown Marketing and Advertising \ Profit Salaries and Production Development The print ...

User Manual
Page 107
Replacing the Ribbon 5-2 Transporting the Printer 5-4 Cleaning the Printer 5-6
Replacing the Ribbon 5-2 Transporting the Printer 5-4 Cleaning the Printer 5-6

User Manual
Page 108
Use the following Epson replacement ribbons: Printer LQ-850 LQ-950 LQ-1050 Standard ribbon #7753 #7767 #7754 Film ribbon #7768 #7769 #7770 To replace the ribbon, turn off the power to replace the ribbon. 1. Slide the print head to replace the ribbon. Let it cool before attempting to the printer and remove the printer cover. Replacing the Ribbon When your printing becomes too faint you...
Use the following Epson replacement ribbons: Printer LQ-850 LQ-950 LQ-1050 Standard ribbon #7753 #7767 #7754 Film ribbon #7768 #7769 #7770 To replace the ribbon, turn off the power to replace the ribbon. 1. Slide the print head to replace the ribbon. Let it cool before attempting to the printer and remove the printer cover. Replacing the Ribbon When your printing becomes too faint you...

User Manual
Page 109
... knob in the direction of a pencil, to help guide the ribbon into place. 6. Use a pointed object, such as shown below. (The LQ-850 ribbon cartridge has only one handle.) 5. Reattach the printer cover. 5-3 Check to remove excess slack. 4. Unwrap the new ribbon, and turn the ribbon-tightening knob in the direction of the arrow to see that...
... knob in the direction of a pencil, to help guide the ribbon into place. 6. Use a pointed object, such as shown below. (The LQ-850 ribbon cartridge has only one handle.) 5. Reattach the printer cover. 5-3 Check to remove excess slack. 4. Unwrap the new ribbon, and turn the ribbon-tightening knob in the direction of the arrow to see that...

User Manual
Page 112
...not use alcohol or thinners to prevent any water from the power, remove any of the printer with lubricants: unsuitable oils can damage components as well as the ribbon cartridge. Contact your printer operating at its best, you think lubrication is dirty or dusty, clean it thoroughly several times... a year. Do not spray the inside of the parts inside the printer. Cleaning the Printer To keep your Epson dealer if you should ...
...not use alcohol or thinners to prevent any water from the power, remove any of the printer with lubricants: unsuitable oils can damage components as well as the ribbon cartridge. Contact your printer operating at its best, you think lubrication is dirty or dusty, clean it thoroughly several times... a year. Do not spray the inside of the parts inside the printer. Cleaning the Printer To keep your Epson dealer if you should ...

User Manual
Page 114
...the electrical outlet is all right, and the problem probably lies in Chapter 1. This is especially likely if parts of the printer should be in and that the ribbon is on and the POWER light is connected to replace the head yourself because other parts of printed characters are missing. ...discusses problems you may be checked at the same time. 6-2 Contact your Epson dealer. If the self test works properly, the printer is also turned on , press the ON LINE button. The print head may be worn out. The ribbon may be worn out. At the back of the chapter, is not...
...the electrical outlet is all right, and the problem probably lies in Chapter 1. This is especially likely if parts of the printer should be in and that the ribbon is on and the POWER light is connected to replace the head yourself because other parts of printed characters are missing. ...discusses problems you may be checked at the same time. 6-2 Contact your Epson dealer. If the self test works properly, the printer is also turned on , press the ON LINE button. The print head may be worn out. The ribbon may be worn out. At the back of the chapter, is not...

User Manual
Page 115
... may be wrong. l The ribbon may be jammed. Push it back to a qualified service person. See the paper specifications in Chapter 1. The cut sheet feeder mode may be selected by the DIP switch. you use the LOAD/EJECT button. l The paper may be jammed. If the printer beeps again and does not..., and the ON LINE light does not flicker, turn the printer off line when you do not have tried to cool. See the section on the self test in Chapter 2. Check the paper supply. Be sure that the printer is flickering, the LQ has stopped to allow the print head to load the...
... may be wrong. l The ribbon may be jammed. Push it back to a qualified service person. See the paper specifications in Chapter 1. The cut sheet feeder mode may be selected by the DIP switch. you use the LOAD/EJECT button. l The paper may be jammed. If the printer beeps again and does not..., and the ON LINE light does not flicker, turn the printer off line when you do not have tried to cool. See the section on the self test in Chapter 2. Check the paper supply. Be sure that the printer is flickering, the LQ has stopped to allow the print head to load the...

User Manual
Page 160
... With continuous, multi-part, no-carbon paper only; Depth: 14.2 in . Printer Specifications Paper feed speed Approximately 60 ms/line at 1/6 inch line spacing Paper thickness Up to 0.004 inches for 9-pin printers. Printer LQ-850 LQ-950 LQ-1050 Standard ribbon #7753 #7767 #7754 Film ribbon #7768 #7769 #7770 Life expectancy (in Letter Quality characters, at 25% duty...
... With continuous, multi-part, no-carbon paper only; Depth: 14.2 in . Printer Specifications Paper feed speed Approximately 60 ms/line at 1/6 inch line spacing Paper thickness Up to 0.004 inches for 9-pin printers. Printer LQ-850 LQ-950 LQ-1050 Standard ribbon #7753 #7767 #7754 Film ribbon #7768 #7769 #7770 Life expectancy (in Letter Quality characters, at 25% duty...

User Manual
Page 214
Index R READY light, 3-2 Reloading single sheet paper during printing, 2-5 Removing protective materials, 1-3-4 Ribbon cartridge installing, 1-7-9 replacing, 5-2-3 specifications, 8-4 RS-232C-compatible serial interface, 1-18, l-20 S Selecting typestyles ..., 7-2-15 loading, 2-2-5 reloading during printing, 2-5 using, 2-2-5, 2-12-15 Skip over perforation, 3-10-11 Software, 4-2-7 IN-4 choosing printer from a software menu, 4-2 computer-printer communications, 4-3-4 graphics programs, 4-7 naming and using commands, 4-4 spreadsheets, 4-6-7 word processors, 4-4-6 Special paper, printing on, 2-16-19 ...
Index R READY light, 3-2 Reloading single sheet paper during printing, 2-5 Removing protective materials, 1-3-4 Ribbon cartridge installing, 1-7-9 replacing, 5-2-3 specifications, 8-4 RS-232C-compatible serial interface, 1-18, l-20 S Selecting typestyles ..., 7-2-15 loading, 2-2-5 reloading during printing, 2-5 using, 2-2-5, 2-12-15 Skip over perforation, 3-10-11 Software, 4-2-7 IN-4 choosing printer from a software menu, 4-2 computer-printer communications, 4-3-4 graphics programs, 4-7 naming and using commands, 4-4 spreadsheets, 4-6-7 word processors, 4-4-6 Special paper, printing on, 2-16-19 ...

Product Support Bulletin(s)
Page 4
...are corrected by new operators who are usually caused by turning the printer off, taking out the paper and turning the printer back on the ROMA board may cause errors 10 or 20. ... An undefined op-code was detected. Incorrect jumper settings on . Physical obstruction such as a jammed ribbon 11 Skewed paper detect error. Since the initial reading upon loading a single sheet paper, the paper... knob instead of failure are documented in printhead failures. PSB No: P-0076 Page: 4 of 4 LQ-2550 cont. 03 A 'Verify After Write" check to ensure proper paper handling and prevent paper jams...
...are corrected by new operators who are usually caused by turning the printer off, taking out the paper and turning the printer back on the ROMA board may cause errors 10 or 20. ... An undefined op-code was detected. Incorrect jumper settings on . Physical obstruction such as a jammed ribbon 11 Skewed paper detect error. Since the initial reading upon loading a single sheet paper, the paper... knob instead of failure are documented in printhead failures. PSB No: P-0076 Page: 4 of 4 LQ-2550 cont. 03 A 'Verify After Write" check to ensure proper paper handling and prevent paper jams...

Product Support Bulletin(s)
Page 8
... ROM located on the main board of the LQ-850/950/1050? Why? EPSON AMERICA SERVICE, 23610 TELO AVENUE, TORRANCE, CALIF. 90505 PSB NO.: P-0035 PRODUCT SUPPORT BULLETIN DATE: 11/29/88 PAGE: 1 of 3 SUBJECT: LQ-850/950/1050 PRINTER QUESTIONS Q: How do I get the short tear... 3 seconds before the feature is selectable by dip switch 1-8. Then there are 61 or 62. A: Printer LQ-850 LQ-950 LQ-1050 Standard Ribbon #7753 #7767 #7754 Film Ribbon #7768 #7769 #7770 Q: Does the LQ-850/950/1050 support color? A: The number of data to the "ON" position. This is activated....
... ROM located on the main board of the LQ-850/950/1050? Why? EPSON AMERICA SERVICE, 23610 TELO AVENUE, TORRANCE, CALIF. 90505 PSB NO.: P-0035 PRODUCT SUPPORT BULLETIN DATE: 11/29/88 PAGE: 1 of 3 SUBJECT: LQ-850/950/1050 PRINTER QUESTIONS Q: How do I get the short tear... 3 seconds before the feature is selectable by dip switch 1-8. Then there are 61 or 62. A: Printer LQ-850 LQ-950 LQ-1050 Standard Ribbon #7753 #7767 #7754 Film Ribbon #7768 #7769 #7770 Q: Does the LQ-850/950/1050 support color? A: The number of data to the "ON" position. This is activated....


