Technical Brief (Impact Printers)
Page 4
...settings EPSON SmartPark settings, which make the printers compatible with virtually any Windows system environment. Automatic tear-off position. Paper from one path is added, EPSON impact printers automatic interface switching feature will overide all built-in fonts in favor of built-in 2-point increments, available on EPSON 24-pin impact printers... position. L For optional connectivity, most EPSON impact printers. EPSON Sales Training EPSON is loaded into printing position Microfeed adjustments Can set a top-of-form setting within 1/180 of their respective owners. ...
...settings EPSON SmartPark settings, which make the printers compatible with virtually any Windows system environment. Automatic tear-off position. Paper from one path is added, EPSON impact printers automatic interface switching feature will overide all built-in fonts in favor of built-in 2-point increments, available on EPSON 24-pin impact printers... position. L For optional connectivity, most EPSON impact printers. EPSON Sales Training EPSON is loaded into printing position Microfeed adjustments Can set a top-of-form setting within 1/180 of their respective owners. ...
Product Information Guide
Page 1
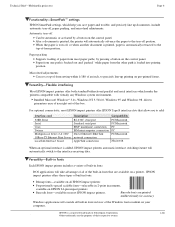
... 0 Kbytes (DIP switch selectable) Fonts Epson New Draft Epson Roman 10 CPI Epson Roman 12 CPI Epson Roman 15 CPI Epson Roman proportional Epson Sans Serif 10 CPI Epson Sans Serif 12 CPI Epson Sans Serif 15 CPI Epson Sans Serif proportional Optional...PRINTER Character tables 96 standard ASCII characters 13 international character sets Epson Extended Graphics set Paper Paper feed methods Friction Built-in black only Do not use ribbons for film ribbon MCBF For all components excluding print head: 5 million lines. Line spacing l/6 inch, or programmable in . Width: 17.0 in . MTBF LQ-850...
... 0 Kbytes (DIP switch selectable) Fonts Epson New Draft Epson Roman 10 CPI Epson Roman 12 CPI Epson Roman 15 CPI Epson Roman proportional Epson Sans Serif 10 CPI Epson Sans Serif 12 CPI Epson Sans Serif 15 CPI Epson Sans Serif proportional Optional...PRINTER Character tables 96 standard ASCII characters 13 international character sets Epson Extended Graphics set Paper Paper feed methods Friction Built-in black only Do not use ribbons for film ribbon MCBF For all components excluding print head: 5 million lines. Line spacing l/6 inch, or programmable in . Width: 17.0 in . MTBF LQ-850...

Product Information Guide
Page 2
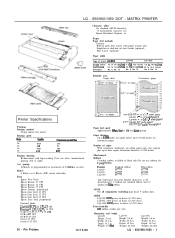
... a pencil, pen, or other pointed instrument, change the setting of the DIP switches DIP Switch 1 1 7 1.8 Cut sheet feeder mode I 6 Kbytes recenve buffer i Valid lnvalld 1 0 bytes 1 6 Kbytes DIP Switch 2 Switch Description 21 Page length 22 Skip over perforation 23 InterfaCeiParlty 2-4 25 Baud rate 26 27 Short tear-off the printer. LQ - 850/950/1050 - 2 12/12/88 24 - When...
... a pencil, pen, or other pointed instrument, change the setting of the DIP switches DIP Switch 1 1 7 1.8 Cut sheet feeder mode I 6 Kbytes recenve buffer i Valid lnvalld 1 0 bytes 1 6 Kbytes DIP Switch 2 Switch Description 21 Page length 22 Skip over perforation 23 InterfaCeiParlty 2-4 25 Baud rate 26 27 Short tear-off the printer. LQ - 850/950/1050 - 2 12/12/88 24 - When...
Product Information Guide
Page 4
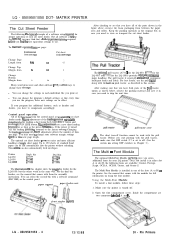
... paper Up to ship the unit later. Printer LQ-850 LQ-950 LQ- 1050 Single bin #7339 #7345 #7340 Dual bin $7346 #7347 #7348 The dlustratlons m this section. paper support paper feeder rests n front stacker suporis After checking to use the program, these new settings are available: Courier, Prestige, Script, OCR...IS required before you have to the factory settmg. Make sure the printer is set up the vame. 50 you start printing with the pull tractor, make sure that DIP switch 2-7 is turned off . Micro adJustmeW sets a new sheet loading posItIon for thts new page length. For ...
... paper Up to ship the unit later. Printer LQ-850 LQ-950 LQ- 1050 Single bin #7339 #7345 #7340 Dual bin $7346 #7347 #7348 The dlustratlons m this section. paper support paper feeder rests n front stacker suporis After checking to use the program, these new settings are available: Courier, Prestige, Script, OCR...IS required before you have to the factory settmg. Make sure the printer is set up the vame. 50 you start printing with the pull tractor, make sure that DIP switch 2-7 is turned off . Micro adJustmeW sets a new sheet loading posItIon for thts new page length. For ...

Product Information Guide
Page 6
... but they should be compatible. (Preferably, choose the LQ-800/1000.) DIP Switch Settings The default settings will avoid unexpected results. Pin Printers Single - LQ - 850/950/1050 - 6 12/12/88 24 - After sending a form feed, do not send it any Epson 24-pin driver will be checked before using the cut...button. The paper can be identified for a 3-second interval. Set the page length to the on the printer, first turn DIP switch 2-7 to 61 lines for the platen to single sheets, not tractor paper. LQ - 850/950/1050 DOT - Setting up the number of lines/page, single sheets require a ...
... but they should be compatible. (Preferably, choose the LQ-800/1000.) DIP Switch Settings The default settings will avoid unexpected results. Pin Printers Single - LQ - 850/950/1050 - 6 12/12/88 24 - After sending a form feed, do not send it any Epson 24-pin driver will be checked before using the cut...button. The paper can be identified for a 3-second interval. Set the page length to the on the printer, first turn DIP switch 2-7 to 61 lines for the platen to single sheets, not tractor paper. LQ - 850/950/1050 DOT - Setting up the number of lines/page, single sheets require a ...

User Manual
Page 4
... Contents Introduction Chapter 1 Setting Up the Printer Unpacking the Printer 1-2 Checking the parts 1-2 Removing the protective materials 1-3 Choosing a Place for the Printer 1-5 Assembling the Printer 1-6 Installing the platen knob 1-6 Installing the ribbon l-7 Attaching the paper guide l-10 Testing the Printer 1-12 Loading a sheet of paper 1-12 Running the self test 1-15 Connecting the Printer to Your Computer...
... Contents Introduction Chapter 1 Setting Up the Printer Unpacking the Printer 1-2 Checking the parts 1-2 Removing the protective materials 1-3 Choosing a Place for the Printer 1-5 Assembling the Printer 1-6 Installing the platen knob 1-6 Installing the ribbon l-7 Attaching the paper guide l-10 Testing the Printer 1-12 Loading a sheet of paper 1-12 Running the self test 1-15 Connecting the Printer to Your Computer...

User Manual
Page 5
... Special Paper 2-16 The paper thickness lever 2-16 Multi-part forms 2-18 Labels 2-18 Envelopes 2-19 Chapter 3 Using the Printer Operating the Control Panel 3-2 Lights 3-2 Buttons 3-3 SelecType 3-4 Other control panel features 3-5 Setting the DIP Switches 3-6 Page Length 3-9 Skip Over Perforation 3-10 Adjusting the Loading Position 3-12 The loading position 3-12 Micro adjustment 3-12...
... Special Paper 2-16 The paper thickness lever 2-16 Multi-part forms 2-18 Labels 2-18 Envelopes 2-19 Chapter 3 Using the Printer Operating the Control Panel 3-2 Lights 3-2 Buttons 3-3 SelecType 3-4 Other control panel features 3-5 Setting the DIP Switches 3-6 Page Length 3-9 Skip Over Perforation 3-10 Adjusting the Loading Position 3-12 The loading position 3-12 Micro adjustment 3-12...

User Manual
Page 7
... Paper loading 7-8 Envelope loading 7-10 Using the cut sheet feeder 7-11 Software operation 7-11 Setting up your software 7-12 Control panel operation 7-14 Testing the printer in the cut sheet feeder mode 7-14 Switching between cut sheet feeder and continuous paper 7-15 The Pull Tractor 7-16 Installation and use 7-17...the interface board 7-25 The Multi-Font Module 7-34 Using the font module 7-36 The Emulation Module 7-38 Chapter 8 Technical Specifications Printer Specifications 8-2 Printing 8-2 Paper 8-3 Mechanical 8-4 Electrical 8-5 Environment 8-5 vi
... Paper loading 7-8 Envelope loading 7-10 Using the cut sheet feeder 7-11 Software operation 7-11 Setting up your software 7-12 Control panel operation 7-14 Testing the printer in the cut sheet feeder mode 7-14 Switching between cut sheet feeder and continuous paper 7-15 The Pull Tractor 7-16 Installation and use 7-17...the interface board 7-25 The Multi-Font Module 7-34 Using the font module 7-36 The Emulation Module 7-38 Chapter 8 Technical Specifications Printer Specifications 8-2 Printing 8-2 Paper 8-3 Mechanical 8-4 Electrical 8-5 Environment 8-5 vi

User Manual
Page 27
...While holding down the LINE FEED button, turn on the LQ-1050. After printing starts, release the LINE FEED button. 1-15 To run the test in, the DIP switch settings are now ready to use wide paper. Be sure to start the printer's self test. The self test is turned off. 2. ...Testing the Printer Running the self test You are always printed in draft. The DIP switch settings are explained later in the printer's memory. This test can be performed in either of the printer's DIP switches and the characters in ...
...While holding down the LINE FEED button, turn on the LQ-1050. After printing starts, release the LINE FEED button. 1-15 To run the test in, the DIP switch settings are now ready to use wide paper. Be sure to start the printer's self test. The self test is turned off. 2. ...Testing the Printer Running the self test You are always printed in draft. The DIP switch settings are explained later in the printer's memory. This test can be performed in either of the printer's DIP switches and the characters in ...

User Manual
Page 30
... 7. If you need to most computers immediately. This may damage the printer. Connecting the Printer to adjust the DIP (Dual In-line Package) switch settings as shown in the section on interfaces in Chapter 3. If you should be sure to Your Computer Your LQ printer has two separate interface connections: a Centronics ® compatible parallel interface and...
... 7. If you need to most computers immediately. This may damage the printer. Connecting the Printer to adjust the DIP (Dual In-line Package) switch settings as shown in the section on interfaces in Chapter 3. If you should be sure to Your Computer Your LQ printer has two separate interface connections: a Centronics ® compatible parallel interface and...

User Manual
Page 32
... printer is set before your printer and computer can communicate properly. Two other serial interface settings, baud rate and parity, may need to change the DIP switch settings to select serial communication. The following is best to choose an Epson serial interface cable. Make sure both the printer and... your computer to the serial interface, follow these steps: 1. Connecting the Printer to Your Computer The serial ...
... printer is set before your printer and computer can communicate properly. Two other serial interface settings, baud rate and parity, may need to change the DIP switch settings to select serial communication. The following is best to choose an Epson serial interface cable. Make sure both the printer and... your computer to the serial interface, follow these steps: 1. Connecting the Printer to Your Computer The serial ...

User Manual
Page 44
If ythoeuFaOrReMnoFt EuEsiDngbtuhtetosnhotortatdevaarn-oceff function, you tear off line. f33Etiing Between Continuous and Single Even with continuous paper loaded in the printer, you can be removed. Open the paper guide cover and press the ON LINE button to single sheets, follow the ...need to press to a point where it can easily switch to single-sheet printing without removing the continuous paper from continuous paper to set the printer off the printed document before pressing the LOAD/EJECT button. 2-12 To switch from the tractor. To avoid feeding your continuous paper ...
If ythoeuFaOrReMnoFt EuEsiDngbtuhtetosnhotortatdevaarn-oceff function, you tear off line. f33Etiing Between Continuous and Single Even with continuous paper loaded in the printer, you can be removed. Open the paper guide cover and press the ON LINE button to single sheets, follow the ...need to press to a point where it can easily switch to single-sheet printing without removing the continuous paper from continuous paper to set the printer off the printed document before pressing the LOAD/EJECT button. 2-12 To switch from the tractor. To avoid feeding your continuous paper ...

User Manual
Page 46
Close the paper guide cover. Next, insert the paper between the edge guides. 6. Press the ON LINE button to set the printer on line so that it is ready to roughly match the width of your paper. 5. Stand the paper guide upright, and adjust the edge guides to print. 2-14 Press the LOAD/EJECT button to automatically feed the page to the loading position. 7. Switching Between Continuous and Single Sheets 4.
Close the paper guide cover. Next, insert the paper between the edge guides. 6. Press the ON LINE button to set the printer on line so that it is ready to roughly match the width of your paper. 5. Stand the paper guide upright, and adjust the edge guides to print. 2-14 Press the LOAD/EJECT button to automatically feed the page to the loading position. 7. Switching Between Continuous and Single Sheets 4.

User Manual
Page 47
Pull the paper release lever toward you. 3. Switching Between Continuous and Single Sheets Switching back to continuous paper To switch back to printing with continuous paper, first see that they meet at about the middle of the printer and slide the edge guides together so that the single sheet has ejected. 1. Open the sheet guide cover. Press the LOAD/EJECT button to feed the paper to set the printer on line so that it can accept data. 2-15 Next, lower the paper guide onto the back of the paper's width. 2. Press the ON LINE button to the loading position. 4.
Pull the paper release lever toward you. 3. Switching Between Continuous and Single Sheets Switching back to continuous paper To switch back to printing with continuous paper, first see that they meet at about the middle of the printer and slide the edge guides together so that the single sheet has ejected. 1. Open the sheet guide cover. Press the LOAD/EJECT button to feed the paper to set the printer on line so that it can accept data. 2-15 Next, lower the paper guide onto the back of the paper's width. 2. Press the ON LINE button to the loading position. 4.

User Manual
Page 57
... can move the paper 1/180th of the LQ also gives you turn on micro adjustment in Chapter 1 for further information. 3-5 Data By dump holding down both the LINE FEED and FORM FEED buttons while you turn on the printer, you access to several special functions. Micro ... data dump mode in the printer's ROM (Read Only Memory). See the section on the data dump mode. Operating the Control Panel Other control panel features The control panel of an inch at a time for further information. This prints out the DIP switch settings and the characters in Chapter...
... can move the paper 1/180th of the LQ also gives you turn on micro adjustment in Chapter 1 for further information. 3-5 Data By dump holding down both the LINE FEED and FORM FEED buttons while you turn on the printer, you access to several special functions. Micro ... data dump mode in the printer's ROM (Read Only Memory). See the section on the data dump mode. Operating the Control Panel Other control panel features The control panel of an inch at a time for further information. This prints out the DIP switch settings and the characters in Chapter...

User Manual
Page 59
... on the country, and are not shown in the tables above. 3-7 ON OFF ON OFF represents the DIP switch settings that have been preset at the factory. Graphics Unidir. See the table below . Setting the DIP Switches The tables below . Italics Bidir. I I I 1-6 1 Not used 1-7 Cut sheet feeder mode 1-8 6 Kbytes receive buffer ON OFF See...
... on the country, and are not shown in the tables above. 3-7 ON OFF ON OFF represents the DIP switch settings that have been preset at the factory. Graphics Unidir. See the table below . Setting the DIP Switches The tables below . Italics Bidir. I I I 1-6 1 Not used 1-7 Cut sheet feeder mode 1-8 6 Kbytes receive buffer ON OFF See...

User Manual
Page 72
... $ B IE 0 6 ; To change the setting of a DIP switch, first turn the printer back on page 3-8. Selecting Character Sets By changing the setting of the DIP switches, you with legal symbols. The following table shows the characters in other languages or with the characters used in each character set ; Software commands however, override DIP switch settings until they are available...
... $ B IE 0 6 ; To change the setting of a DIP switch, first turn the printer back on page 3-8. Selecting Character Sets By changing the setting of the DIP switches, you with legal symbols. The following table shows the characters in other languages or with the characters used in each character set ; Software commands however, override DIP switch settings until they are available...
User Manual
Page 116
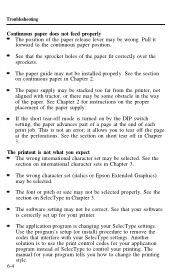
...installed properly. The application program is not what you expect The wrong international character set (italics or Epson Extended Graphics) may be selected. Use the program's setup (or install) procedure to control your printer. Troubleshooting Continuous paper does not feed properly The position of the paper release lever... at the end of a page at the perforations. This is to use the print control codes for instructions on by the DIP switch setting, the paper advances part of each print job. See the section on SelecType in Chapter 3. See that your software is turned on...
...installed properly. The application program is not what you expect The wrong international character set (italics or Epson Extended Graphics) may be selected. Use the program's setup (or install) procedure to control your printer. Troubleshooting Continuous paper does not feed properly The position of the paper release lever... at the end of a page at the perforations. This is to use the print control codes for instructions on by the DIP switch setting, the paper advances part of each print job. See the section on SelecType in Chapter 3. See that your software is turned on...

User Manual
Page 125
l Turn the printer back on . All changes of DIP switch settings should be absolutely sure that none of the printing is turned on . Do not use typewriter quality paper. For specific information on paper thickness settings, see the section on DIP switch setting in Chapter 2. If you plan to use paper ... made with special paper in Chapter 3. Before printing on envelopes, you should test it before regular use. To set DIP switch 1-7 to on. The printer checks and recognizes new settings only at the time the power is closer than 1/4 of the envelope. The Cut Sheet Feeder...
l Turn the printer back on . All changes of DIP switch settings should be absolutely sure that none of the printing is turned on . Do not use typewriter quality paper. For specific information on paper thickness settings, see the section on DIP switch setting in Chapter 2. If you plan to use paper ... made with special paper in Chapter 3. Before printing on envelopes, you should test it before regular use. To set DIP switch 1-7 to on. The printer checks and recognizes new settings only at the time the power is closer than 1/4 of the envelope. The Cut Sheet Feeder...

User Manual
Page 133
..., making sure that the continuous paper is pushed all the way forward. Continuous paper can now be loaded. Make sure that DIP switch 1-7 is set to continuous paper, pull the paper release lever all the way back. 3. Install the cut sheet feeder operation, push the LOAD/... functions normally, allowing you to use the micro-adjustment feature to change the DIP switch setting. 4 Raise the paper path guide until the continuous paper feeds backward out of the printer. 5. To switch back to put the printer into a standby position. The Cut Sheet Feeder 1. Then, push the paper release...
..., making sure that the continuous paper is pushed all the way forward. Continuous paper can now be loaded. Make sure that DIP switch 1-7 is set to continuous paper, pull the paper release lever all the way back. 3. Install the cut sheet feeder operation, push the LOAD/... functions normally, allowing you to use the micro-adjustment feature to change the DIP switch setting. 4 Raise the paper path guide until the continuous paper feeds backward out of the printer. 5. To switch back to put the printer into a standby position. The Cut Sheet Feeder 1. Then, push the paper release...


