

Technical Brief (Impact Printers)
Page 1
... interfacing M Built-in fonts M Computer-based set-up to Letter Quality LLL The name of an EPSON's impact printer tells you if it has a narrow or wide carriage: LLL L Nine-pin printers all begin with LQ FX-980-Nine-pin narrow carriage Wide carriage printers have 4 number in their reliability with tireless printheads and superior quality ribbons.
... interfacing M Built-in fonts M Computer-based set-up to Letter Quality LLL The name of an EPSON's impact printer tells you if it has a narrow or wide carriage: LLL L Nine-pin printers all begin with LQ FX-980-Nine-pin narrow carriage Wide carriage printers have 4 number in their reliability with tireless printheads and superior quality ribbons.
Technical Brief (Impact Printers)
Page 6
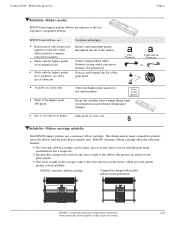
..., and therefore has a longer life. Customer advantages Manufactured with ink precisely applied to the less expensive compatible ribbons. Technical Brief-Multimedia projectors Page 6 Reliability-Ribbon quality EPSON brand impact printer ribbons are superior to both sides of the ribbon nylon by computercontrolled machinery Made with the highest quality nylon manufactured Made with the highest quality dyes, pigments...
..., and therefore has a longer life. Customer advantages Manufactured with ink precisely applied to the less expensive compatible ribbons. Technical Brief-Multimedia projectors Page 6 Reliability-Ribbon quality EPSON brand impact printer ribbons are superior to both sides of the ribbon nylon by computercontrolled machinery Made with the highest quality nylon manufactured Made with the highest quality dyes, pigments...
Product Information Guide
Page 1
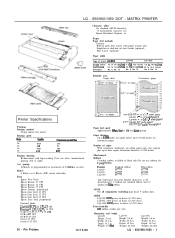
...Fonts Epson New Draft Epson Roman 10 CPI Epson Roman 12 CPI Epson Roman 15 CPI Epson Roman proportional Epson Sans Serif 10 CPI Epson Sans Serif 12 CPI Epson Sans Serif 15 CPI Epson Sans Serif proportional Optional fonts CcNmer IO CPI. Depth: 14.2 in . LQ - 850/950/1050 ...inches Mechanical Ribbon Cartridge ribbon, available in Letter Quality characters, at 48 dots/character): 2 million for standard ribbon and 0.2 million for 9-pm prmters. Pin Printers 12/12/88 I - Depth: 14.2 in . Width: 23.8 in . Prmter LQ-850 LQ-950 LQ-1050 Standard ribbon #1153 #1767 #1754 Film ribbon #7768...
...Fonts Epson New Draft Epson Roman 10 CPI Epson Roman 12 CPI Epson Roman 15 CPI Epson Roman proportional Epson Sans Serif 10 CPI Epson Sans Serif 12 CPI Epson Sans Serif 15 CPI Epson Sans Serif proportional Optional fonts CcNmer IO CPI. Depth: 14.2 in . LQ - 850/950/1050 ...inches Mechanical Ribbon Cartridge ribbon, available in Letter Quality characters, at 48 dots/character): 2 million for standard ribbon and 0.2 million for 9-pm prmters. Pin Printers 12/12/88 I - Depth: 14.2 in . Width: 23.8 in . Prmter LQ-850 LQ-950 LQ-1050 Standard ribbon #1153 #1767 #1754 Film ribbon #7768...
Product Support Bulletin(s)
Page 4
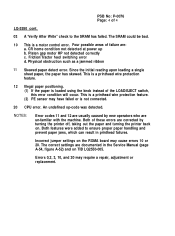
Physical obstruction such as a jammed ribbon 11 Skewed paper detect error. An undefined op-code was detected. This is a...or replacement. Errors 0,2, 3, 10, and 20 may cause errors 10 or 20. PSB No: P-0076 Page: 4 of 4 LQ-2550 cont. 03 A 'Verify After Write" check to ensure proper paper handling and prevent paper jams, which can result in the... detected correctly c. NOTES: Error codes 11 and 12 are usually caused by turning the printer off, taking out the paper and turning the printer back on TIB LQ2550-005. Four possible areas of these errors are documented in printhead ...
Physical obstruction such as a jammed ribbon 11 Skewed paper detect error. An undefined op-code was detected. This is a...or replacement. Errors 0,2, 3, 10, and 20 may cause errors 10 or 20. PSB No: P-0076 Page: 4 of 4 LQ-2550 cont. 03 A 'Verify After Write" check to ensure proper paper handling and prevent paper jams, which can result in the... detected correctly c. NOTES: Error codes 11 and 12 are usually caused by turning the printer off, taking out the paper and turning the printer back on TIB LQ2550-005. Four possible areas of these errors are documented in printhead ...

Product Support Bulletin(s)
Page 6
... page drops down several lines. This is activated. EPSON AMERICA SERVICE, 23610 TELO AVENUE, TORRANCE, CALIF. 90505 The second way is in your software package. A: 6K bytes or OK bytes. A: Printer LQ-850 LQ-950 LQ-1050 Standard Ribbon #7753 #7767 #7754 Film Ribbon #7768 #7769 #7770 Q: Does the LQ-850/950/1050 support color? In both instances data transmission...
... page drops down several lines. This is activated. EPSON AMERICA SERVICE, 23610 TELO AVENUE, TORRANCE, CALIF. 90505 The second way is in your software package. A: 6K bytes or OK bytes. A: Printer LQ-850 LQ-950 LQ-1050 Standard Ribbon #7753 #7767 #7754 Film Ribbon #7768 #7769 #7770 Q: Does the LQ-850/950/1050 support color? In both instances data transmission...

Product Support Bulletin(s)
Page 11
...Epson Dot - EPSON INFORMATION EPSON AMERICA, INC. Matrix Printer Options and Accessories Date: 8/1/89 Page: 1 of 2 PSB No: P-0017B Originator: RFA 9 - C1-9E-A EiZx C1-9E-A EEx C1-9E-A g:; STAND 8501-A CPD-552 CPD-552 KP - PIN DOT MATRIX OPTIONS TRACTOR UNITS PULL TRACTOR CUT SHEET FEEDERS SINGLE BIN DOUBLE BIN RIBBONS... STANDARD (BLACK) INTERFACE BOARDS SERIAL - 0K BUFFER SERIAL - 8K BUFFER PARALLEL - 32K BUFFER IEEE 488 - 8K BUFFER CABLES STANDARD IBM PARALLEL SERlAL DB-25 TO DB-9 SERIAL DB-25 TO DB-25 MISC. PRINTER ACCESSORIES PRINTER STAND LX-810 ...
...Epson Dot - EPSON INFORMATION EPSON AMERICA, INC. Matrix Printer Options and Accessories Date: 8/1/89 Page: 1 of 2 PSB No: P-0017B Originator: RFA 9 - C1-9E-A EiZx C1-9E-A EEx C1-9E-A g:; STAND 8501-A CPD-552 CPD-552 KP - PIN DOT MATRIX OPTIONS TRACTOR UNITS PULL TRACTOR CUT SHEET FEEDERS SINGLE BIN DOUBLE BIN RIBBONS... STANDARD (BLACK) INTERFACE BOARDS SERIAL - 0K BUFFER SERIAL - 8K BUFFER PARALLEL - 32K BUFFER IEEE 488 - 8K BUFFER CABLES STANDARD IBM PARALLEL SERlAL DB-25 TO DB-9 SERIAL DB-25 TO DB-25 MISC. PRINTER ACCESSORIES PRINTER STAND LX-810 ...

User Manual
Page 7
... 4-1 Enhancing Your Printing 4-2 Graphics 4-10 User-defined Characters 4-22 Chapter 5 Using the Printer Options 5-1 The Cut Sheet Feeder 5-2 The Pull Tractor 5-28 The Multi-Font Module 5-41 The Interface Boards 5-48 Chapter 6 Maintenance Cleaning the Printer 6-2 Replacing the Ribbon 6-4 Transporting the Printer 6-9 Chapter 7 Troubleshooting 7-1 Problems and Solutions 7-2 Power Supply 7-4 Printing 7-5 Paper Handling 7-16 Options...
... 4-1 Enhancing Your Printing 4-2 Graphics 4-10 User-defined Characters 4-22 Chapter 5 Using the Printer Options 5-1 The Cut Sheet Feeder 5-2 The Pull Tractor 5-28 The Multi-Font Module 5-41 The Interface Boards 5-48 Chapter 6 Maintenance Cleaning the Printer 6-2 Replacing the Ribbon 6-4 Transporting the Printer 6-9 Chapter 7 Troubleshooting 7-1 Problems and Solutions 7-2 Power Supply 7-4 Printing 7-5 Paper Handling 7-16 Options...

User Manual
Page 11
l Film Ribbon Cartridge (#7768/#7769/#7770) The optional film ribbon cartridge provides you with continuous multi-part forms. l Multi-Font Module (#7407) The optional Multi-Font module adds to the number of continuous paper handling. Introduction 3 It is especially useful with even higher quality printing than the standard fabric ribbon. You can use two MultiFont modules with your printer. l Pull Tractor Unit (#7311/#7312/#7313) This option improves the performance of fonts available in the Letter Quality mode.
l Film Ribbon Cartridge (#7768/#7769/#7770) The optional film ribbon cartridge provides you with continuous multi-part forms. l Multi-Font Module (#7407) The optional Multi-Font module adds to the number of continuous paper handling. Introduction 3 It is especially useful with even higher quality printing than the standard fabric ribbon. You can use two MultiFont modules with your printer. l Pull Tractor Unit (#7311/#7312/#7313) This option improves the performance of fonts available in the Letter Quality mode.

User Manual
Page 15
... the Protective Materials 1-3 Choosing a Place for the Printer 1-8 Assembling the Printer 1-10 Installing the Platen Knob 1-10 Installing the Ribbon Cartridge 1-11 Attaching the Paper Guide 1-15 Testing the Printer 1-18 Plugging in the Printer 1-18 Running the Self Test 1-19 Checking the Operation 1-27 Connecting the Printer to Your Computer 1-30 The Parallel Interface 1-31...
... the Protective Materials 1-3 Choosing a Place for the Printer 1-8 Assembling the Printer 1-10 Installing the Platen Knob 1-10 Installing the Ribbon Cartridge 1-11 Attaching the Paper Guide 1-15 Testing the Printer 1-18 Plugging in the Printer 1-18 Running the Self Test 1-19 Checking the Operation 1-27 Connecting the Printer to Your Computer 1-30 The Parallel Interface 1-31...

User Manual
Page 17
... label on the back of the printer have been designed for use on the printer. You cannot adjust the printer for different electrical standards. The ribbon cartridge that comes with the LQ-850 is protected during shipping by ...two locking brackets, two locking tabs, and a print head protector. WARNING: Several different versions of the printer shows the power supply voltage. Removing the Protective Materials The printer is #7753; #7767 comes with the LQ-950...
... label on the back of the printer have been designed for use on the printer. You cannot adjust the printer for different electrical standards. The ribbon cartridge that comes with the LQ-850 is protected during shipping by ...two locking brackets, two locking tabs, and a print head protector. WARNING: Several different versions of the printer shows the power supply voltage. Removing the Protective Materials The printer is #7753; #7767 comes with the LQ-950...

User Manual
Page 25
... not use the platen knob to adjust the . You install the standard ribbon cartridge and the optional film ribbon cartridge in the same way. Install the ribbon cartridge as follows: 1. Setting Up the Printer 1-11 Make sure the printer is turned off. 2. A standard ribbon cartridge comes with the automatic paper loading system and may cause a paper...
... not use the platen knob to adjust the . You install the standard ribbon cartridge and the optional film ribbon cartridge in the same way. Install the ribbon cartridge as follows: 1. Setting Up the Printer 1-11 Make sure the printer is turned off. 2. A standard ribbon cartridge comes with the automatic paper loading system and may cause a paper...

User Manual
Page 26
Turn the ribbon-tightening knob in the ribbon and makes it . 4. Slide the print head to install. 1-12 Setting Up the Printer Also, if you have been using the printer, the print head may be hot; CAUTION: Never move the print head while the printer is turned on because this can damage the printer. This removes slack in the direction of the printer. 0I. let it cool for a few minutes before touching it easier to the middle of the arrow. 3.
Turn the ribbon-tightening knob in the ribbon and makes it . 4. Slide the print head to install. 1-12 Setting Up the Printer Also, if you have been using the printer, the print head may be hot; CAUTION: Never move the print head while the printer is turned on because this can damage the printer. This removes slack in the direction of the printer. 0I. let it cool for a few minutes before touching it easier to the middle of the arrow. 3.

User Manual
Page 27
Hold the ribbon cartridge by its black, fin-like handles with the exposed ribbon away from you. (The LQ-850 ribbon cartridge has only one handle.) Push the cartridge firmly into position, making sure the plastic hooks fit into the slots inside the printer. 5. Setting Up the Printer 1-13 Note: Press lightly on both ends of the cartridge to make sure the plastic hooks are properly seated.
Hold the ribbon cartridge by its black, fin-like handles with the exposed ribbon away from you. (The LQ-850 ribbon cartridge has only one handle.) Push the cartridge firmly into position, making sure the plastic hooks fit into the slots inside the printer. 5. Setting Up the Printer 1-13 Note: Press lightly on both ends of the cartridge to make sure the plastic hooks are properly seated.
User Manual
Page 28
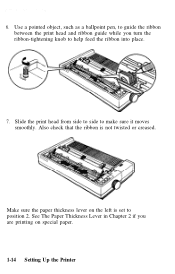
6. Make sure the paper thickness lever on special paper. 1-14 Setting Up the Printer See The Paper Thickness Lever in Chapter 2 if you turn the ribbon-tightening knob to position 2. Also check that the ribbon is set to help feed the ribbon into place. 7. Use a pointed object, such as a ballpoint pen, to make sure it moves smoothly. Slide the print head from side to side to guide the ribbon between the print head and ribbon guide while you are printing on the left is not twisted or creased.
6. Make sure the paper thickness lever on special paper. 1-14 Setting Up the Printer See The Paper Thickness Lever in Chapter 2 if you turn the ribbon-tightening knob to position 2. Also check that the ribbon is set to help feed the ribbon into place. 7. Use a pointed object, such as a ballpoint pen, to make sure it moves smoothly. Slide the print head from side to side to guide the ribbon between the print head and ribbon guide while you are printing on the left is not twisted or creased.

User Manual
Page 29
... Storage: -22°F to 104°F (-30°C to 40°C) Storing and using a film ribbon at high temperatures shortens the ribbon's life expectancy, which is even with the back of the printer. Make sure the back edge of the guide is normally 200,000 characters (#7768 and #7769) or 300... If you use single sheets, the paper guide helps to use the ribbon beyond its life expectancy, printing suddenly becomes faint and the ribbon may snap. Place the paper guide on the printer as shown below. Setting Up the Printer 1-15 Attaching the Paper Guide When you continue to feed the paper ...
... Storage: -22°F to 104°F (-30°C to 40°C) Storing and using a film ribbon at high temperatures shortens the ribbon's life expectancy, which is even with the back of the printer. Make sure the back edge of the guide is normally 200,000 characters (#7768 and #7769) or 300... If you use single sheets, the paper guide helps to use the ribbon beyond its life expectancy, printing suddenly becomes faint and the ribbon may snap. Place the paper guide on the printer as shown below. Setting Up the Printer 1-15 Attaching the Paper Guide When you continue to feed the paper ...
User Manual
Page 32
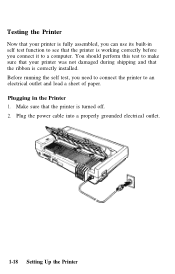
You should perform this test to make sure that your printer is fully assembled, you can use its built-in the Printer 1. Plugging in self test function to see that the printer is working correctly before you need to connect the printer to a computer. Before running the self test, you connect it ...to an electrical outlet and load a sheet of paper. Plug the power cable into a properly grounded electrical outlet. 1-18 Setting Up the Printer Make sure that the ribbon is correctly installed. Testing the Printer Now that your printer was not damaged during shipping and that the...
You should perform this test to make sure that your printer is fully assembled, you can use its built-in the Printer 1. Plugging in self test function to see that the printer is working correctly before you need to connect the printer to a computer. Before running the self test, you connect it ...to an electrical outlet and load a sheet of paper. Plug the power cable into a properly grounded electrical outlet. 1-18 Setting Up the Printer Make sure that the ribbon is correctly installed. Testing the Printer Now that your printer was not damaged during shipping and that the...

User Manual
Page 41
... FEED or LINE FEED button the entire time you are turning on the printer. If the printer still does not print the self test correctly, contact your Epson dealer or Epson authorized service center. The ribbon may be installed properly. Turn off the printer. See that all packing material and shipping restraints have been removed from...
... FEED or LINE FEED button the entire time you are turning on the printer. If the printer still does not print the self test correctly, contact your Epson dealer or Epson authorized service center. The ribbon may be installed properly. Turn off the printer. See that all packing material and shipping restraints have been removed from...

User Manual
Page 42
.... See The Paper Thickness Lever in Chapter 6. See Replacing the Ribbon in Chapter 2. The print head is faint or uneven. Dots are inserted securely into the printer. Printed characters have the print head replaced. 1-28 Setting Up the Printer A line of your Epson dealer to match the thickness of dots is faint. Install a new...
.... See The Paper Thickness Lever in Chapter 6. See Replacing the Ribbon in Chapter 2. The print head is faint or uneven. Dots are inserted securely into the printer. Printed characters have the print head replaced. 1-28 Setting Up the Printer A line of your Epson dealer to match the thickness of dots is faint. Install a new...
User Manual
Page 43
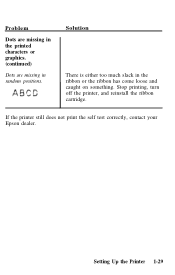
If the printer still does not print the self test correctly, contact your Epson dealer. Problem Dots are missing in the printed characters or graphics. (continued) Dots are missing in the ribbon or the ribbon has come loose and caught on something. Stop printing, turn off the printer, and reinstall the ribbon cartridge. Setting Up the Printer 1-29 Solution There is either too much slack in random positions.
If the printer still does not print the self test correctly, contact your Epson dealer. Problem Dots are missing in the printed characters or graphics. (continued) Dots are missing in the ribbon or the ribbon has come loose and caught on something. Stop printing, turn off the printer, and reinstall the ribbon cartridge. Setting Up the Printer 1-29 Solution There is either too much slack in random positions.
User Manual
Page 74
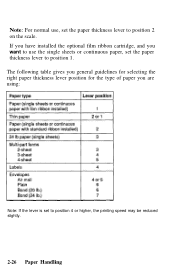
Note: For normal use the single sheets or continuous paper, set the paper thickness lever to position 1. The following table gives you general guidelines for selecting the right paper thickness lever position for the type of paper you want to use , set to position 2 on the scale. If you have installed the optional film ribbon cartridge, and you are using: Note: If the lever is set the paper thickness lever to position 4 or higher, the printing speed may be reduced slightly. 2-26 Paper Handling
Note: For normal use the single sheets or continuous paper, set the paper thickness lever to position 1. The following table gives you general guidelines for selecting the right paper thickness lever position for the type of paper you want to use , set to position 2 on the scale. If you have installed the optional film ribbon cartridge, and you are using: Note: If the lever is set the paper thickness lever to position 4 or higher, the printing speed may be reduced slightly. 2-26 Paper Handling


